首页
课程
问答
CTF
社区
招聘
峰会
发现
排行榜
知识库
工具下载
看雪20年
看雪商城
证书查询
登录
注册
首页
社区
课程
招聘
发现
问答
CTF
排行榜
知识库
工具下载
峰会
看雪商城
证书查询
社区
茶余饭后
发新帖
1
1
[原创] 这个图片可以作为 C 源码编译
发表于: 2026-3-15 16:55
1530
[原创] 这个图片可以作为 C 源码编译
_MicroBlock
2026-3-15 16:55
1530
今天闲的没事,突然在想,有没有可能做一个文件,既可以作为图片看,又可以用 C++ 编译器编译? ## 图片格式 C++ 编译器在遇到不认识的字符时会直接报错,所以我们需要一个纯文本的图片格式,至少 Header 部分一定要是纯文本的,因为后面的用户数据我们可以通过各种方法来绕过(比如加上 `/* */`,使用 `#if 0` 等),但 Header 除了使用预处理器以外,我们几乎没法控制。 在查找了一番以后,我发现一个图片格式,它完美符合我的要求:PAM——Portable Arbitrary Map 根据它的 <a href="elink@224K9s2c8@1M7s2y4Q4x3@1q4Q4x3V1k6Q4x3V1k6F1k6i4c8H3j5X3#2Q4x3X3g2K6L8%4g2J5j5$3g2X3L8%4u0Y4k6g2)9J5k6h3&6W2N6q4)9J5c8X3c8G2j5#2)9J5c8Y4m8S2L8g2)9J5k6h3S2@1L8h3H3`.">spec</a>,一个 PAM 格式的图片,它的 Header 可以是这样的: ``` P7 WIDTH 100 HEIGHT 100 DEPTH 4 MAXVAL 255 TUPLTYPE RGB_ALPHA ENDHDR [二进制图片数据,RRGGBBAA] ``` 同时,Header 部分还可以使用 # 开头进行注释。嗯?这不正好就是 C++ 的预处理器的开头吗? ## 构造图片 于是在此基础上,我们就有两种构造可以编译的图片的思路了。首先,我们可以把源码全部塞进 Header 里面,图片还是图片;其次,我们可以把源码作为二进制图片数据的一部分,把 Header 部分用 `#if 0` 忽略掉,让他可以过编译。 随便找张测试图片吧:  ### Approch 1 首先来实现把源码全部塞进 Header 里面的思路:我们大概需要构造一个这样的 PAM Header: ``` P7 #include "iostream" #define _src_line1 int main() { std::cout << "hello world!"; } _src_line1 #if 0 WIDTH 100 HEIGHT 100 DEPTH 3 MAXVAL 255 TUPLTYPE RGB ENDHDR ``` 用 Node.JS 实现如下: ```ts import * as fs from 'fs'; import * as path from 'path'; import { PNG } from 'pngjs'; function createPolyglot1(imagePath: string, cppCode: string, outputPath: string) { const imageData = fs.readFileSync(imagePath); const png = PNG.sync.read(imageData); const width = png.width; const height = png.height; const hasAlpha = png.data.length === width * height * 4; const depth = hasAlpha ? 4 : 3; const bytesPerPixel = depth; const imageBytes = Buffer.alloc(width * height * bytesPerPixel); for (let i = 0; i < width * height; i++) { for (let j = 0; j < bytesPerPixel; j++) { imageBytes[i * bytesPerPixel + j] = png.data[i * 4 + j]; } } const lines = cppCode.split('\n'); const preprocessor: string[] = []; const code: string[] = []; for (const line of lines) { if (line.trim().startsWith('#')) { preprocessor.push(line); } else { code.push(line); } } // 理论上需要分行处理 preprocessor 宏和源码交错的情况,懒得写了 const header = `P7 ${preprocessor.join('\n')} #define _src ${code.join(' ')} _src #if 0 WIDTH ${width} HEIGHT ${height} DEPTH ${depth} MAXVAL 255 TUPLTYPE ${hasAlpha ? 'RGB_ALPHA' : 'RGB'} ENDHDR `; const footer = Buffer.from('\n#endif\n'); const output = Buffer.concat([ Buffer.from(header), imageBytes, footer ]); fs.writeFileSync(outputPath, output); console.log(`Generated: ${outputPath}`); } const imagePath = process.argv[2] || 'input.png'; const cppPath = process.argv[3] || 'input.cpp'; const outputPath = process.argv[4] || 'output1.pam'; const cppCode = fs.readFileSync(cppPath, 'utf-8'); createPolyglot1(imagePath, cppCode, outputPath); ``` 测试一下: 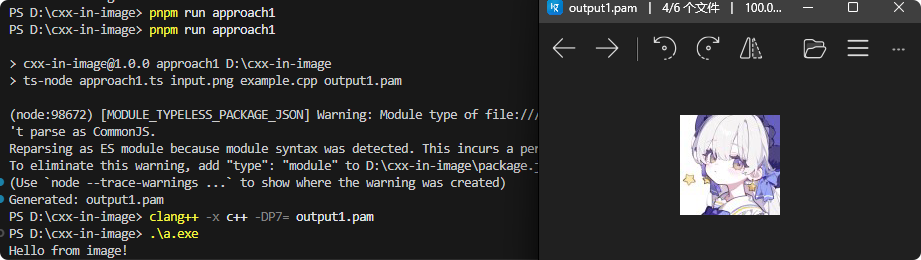 可以看到,我们成功获得了一张既可以编译,又可以查看的图片! ### Approch 2 我们也可以把源码塞进图片数据;感觉这种方式的可玩性更高一些,应该可以通过某种算法实现把源码均匀的隐写在所有 bytes 里面,不过为了实现简单,我直接做成覆盖最后几个 bytes 了: ```ts import * as fs from 'fs'; import { PNG } from 'pngjs'; function createPolyglot2(imagePath: string, cppCode: string, outputPath: string) { const imageData = fs.readFileSync(imagePath); const png = PNG.sync.read(imageData); const width = png.width; const height = png.height; const hasAlpha = png.data.length === width * height * 4; const depth = hasAlpha ? 4 : 3; const bytesPerPixel = depth; const totalBytes = width * height * bytesPerPixel; const header = `P7 #if 0 WIDTH ${width} HEIGHT ${height} DEPTH ${depth} MAXVAL 255 TUPLTYPE ${hasAlpha ? 'RGB_ALPHA' : 'RGB'} ENDHDR `; const imageBytes = Buffer.alloc(totalBytes); for (let i = 0; i < width * height; i++) { for (let j = 0; j < bytesPerPixel; j++) { imageBytes[i * bytesPerPixel + j] = png.data[i * 4 + j]; } } const codeSection = `\n#endif\n${cppCode}\n/*`; const codeSectionBytes = Buffer.from(codeSection); const closingComment = Buffer.from('*/'); const codeLen = codeSectionBytes.length + closingComment.length; if (codeLen > totalBytes) { throw new Error('C++ code too long for image size'); } const bodyBytes = Buffer.alloc(totalBytes); imageBytes.copy(bodyBytes, 0); codeSectionBytes.copy(bodyBytes, totalBytes - codeLen); closingComment.copy(bodyBytes, totalBytes - closingComment.length); const output = Buffer.concat([Buffer.from(header), bodyBytes]); fs.writeFileSync(outputPath, output); console.log(`Generated: ${outputPath}`); } const imagePath = process.argv[2] || 'input.png'; const cppPath = process.argv[3] || 'input.cpp'; const outputPath = process.argv[4] || 'output2.pam'; const cppCode = fs.readFileSync(cppPath, 'utf-8'); createPolyglot2(imagePath, cppCode, outputPath); ``` 效果也是一样的。不过可以看到图片的最后一节有一块黑点,那就是代码的数据: 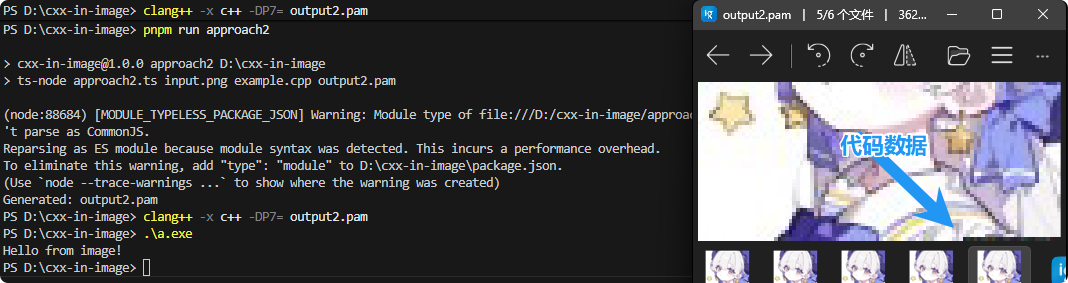 ## Summary 可以看出,“一个既可以编译又可以打开看的图片”确实是可行的,虽然我也不知道为什么我要研究这个。 或许日后可以整点 CTF 题,把图片做成可以编译的来隐写,就看谁能想到了(笑
冰与火的战歌:Windows内核攻防实战高级班!从零到实战,融合AI与Windows内核攻防全技术栈,打造具备自动化能力的内核开发高手。
#杂谈
收藏
・
1
点赞
・
1
打赏
分享
分享到微信
分享到QQ
分享到微博
赞赏记录
参与人
雪币
留言
时间
我的小拇指啊
感谢你的积极参与,期待更多精彩内容!
2026-3-17 15:52
查看更多
赞赏
×
1 雪花
5 雪花
10 雪花
20 雪花
50 雪花
80 雪花
100 雪花
150 雪花
200 雪花
支付方式:
微信支付
赞赏留言:
快捷留言
感谢分享~
精品文章~
原创内容~
精彩转帖~
助人为乐~
感谢分享~
最新回复
(
0
)
游客
登录
|
注册
方可回帖
回帖
表情
雪币赚取及消费
高级回复
返回
_MicroBlock
2
发帖
1
回帖
10
RANK
关注
私信
他的文章
[原创] 这个图片可以作为 C 源码编译
1530
[原创] Frida 脚本无 Root 一键持久化方案:将 Frida 脚本打包至 Xposed 模块、直接注入APP、生成 .so, .dll
18213
关于我们
联系我们
企业服务
看雪公众号
专注于PC、移动、智能设备安全研究及逆向工程的开发者社区
看原图
赞赏
×
雪币:
+
留言:
快捷留言
为你点赞!
返回
顶部