首页
课程
问答
CTF
社区
招聘
峰会
发现
排行榜
知识库
工具下载
看雪20年
看雪商城
证书查询
登录
注册
首页
社区
课程
招聘
发现
问答
CTF
排行榜
知识库
工具下载
峰会
看雪商城
证书查询
社区
Pwn
发新帖
20
13
[原创] Qemu 源码分析(PCI篇)
发表于: 2026-2-7 23:32
24934
[原创] Qemu 源码分析(PCI篇)
Elenia
7
2026-2-7 23:32
24934
> 几个月前写的文章了,翻飞书翻到了。可能结构会有点乱,主要是了解一下 PCI,有错误的话请各位大佬指正一下 ## PCI设备地址空间基础概念 > PCI 设备通过 BAR(Base Address Register,基地址寄存器) 来定义自己的地址空间。一个标准的 PCI 设备最多可以有 6 个 BAR(BAR0-BAR5),每个 BAR 可以映射到两种不同类型的地址空间: BAR(BASE Address Registers)用来确定设备所需要使用的内存和 I/O 空间的大小,也可以用来存放设备寄存器的地址。 设备可以申请两类的地址空间: - Memory Space (MMIO - Memory-Mapped I/O) - I/O Space (PMIO - Port-Mapped I/O) 想象 PCI 总线就像是计算机内部的"高速公路系统": - PCI 总线 = 高速公路主干道 - PCI 设备(网卡、显卡、声卡等)= 沿路的各个建筑物 - PCI Host Bridge = 高速公路的入口/收费站,连接 CPU 和 PCI 总线 - BAR(基地址寄存器) = 每个建筑物的地址门牌号 ### MMIO > 内存和 I/O 设备共享同一个地址空间 ```Shell CPU发出内存访问指令 (mov, load, store等) ↓ 地址总线上的地址被芯片组/北桥解码 ↓ 判断:这个地址是RAM还是设备? ├─ RAM地址范围 → 路由到内存控制器 → DRAM └─ 设备地址范围 → 路由到PCI总线 → 设备寄存器 ``` - CPU使用普通的内存访问指令(如 mov [addr], value) - 没有专门的I/O指令 - 设备寄存器被映射到物理地址空间的某个区域 - 访问这些地址时,芯片组会将请求路由到设备而不是内存 ### PMIO > 端口映射 I/O 通常使用一种特殊的 CPU 指令,专门执行 I/O 操作 I/O 设备有一个与内存不同的地址空间,为了实现地址空间的隔离,要么在 CPU 物理接口上增加一个 I/O 引脚,要么增加一条专用的 I/O 总线。 ```Shell CPU发出专门的I/O指令 (in/out) ↓ 使用独立的I/O地址空间(0-65535) ↓ 芯片组检测到I/O周期信号 ↓ 路由到对应的I/O端口设备 ``` - 使用专门的I/O指令:IN, OUT, INS, OUTS - 独立的64K I/O地址空间(与内存地址空间分离) - x86架构特有(ARM、RISC-V等架构只有MMIO) - 需要CPU特权级别支持 ### BAR (Base Address Register) ```Shell PCI配置空间(每个设备256字节): Offset 0x10-0x27: BAR0-BAR5 (6个基地址寄存器) 每个BAR可以配置为: ├─ MMIO空间:指向内存地址,如 0xFEBC0000 └─ PMIO空间:指向I/O端口,如 0xC050 ``` ## PCI的初始化 ```C ┌─────────────────────────────────────────────────────────────────┐ │ QEMU 启动 - main() │ └──────────────────────────┬──────────────────────────────────────┘ │ ▼ ┌─────────────────────────────────────────────────────────────────┐ │ 机器初始化 - pc_init1() │ │ (hw/i386/pc_piix.c) │ └──────────────────────────┬──────────────────────────────────────┘ │ ▼ ┌─────────────────────────────────────────────────────────────────┐ │ 1. 初始化内存区域 │ │ - system_memory (系统内存) │ │ - system_io (I/O 地址空间) │ │ - pci_memory (PCI 地址空间) │ │ │ │ memory_region_init(pci_memory, NULL, "pci", UINT64_MAX) │ └──────────────────────────┬──────────────────────────────────────┘ │ ▼ ┌─────────────────────────────────────────────────────────────────┐ │ 2. 创建 PCI Host Bridge │ │ phb = qdev_new(TYPE_I440FX_PCI_HOST_BRIDGE) │ │ │ │ 设置属性链接: │ │ - RAM_MEM → ram_memory │ │ - PCI_MEM → pci_memory │ │ - SYSTEM_MEM → system_memory │ │ - IO_MEM → system_io │ └──────────────────────────┬──────────────────────────────────────┘ │ ▼ ┌─────────────────────────────────────────────────────────────────┐ │ 3. Realize PCI Host Bridge │ │ sysbus_realize_and_unref(SYS_BUS_DEVICE(phb)) │ │ │ │ 调用: i440fx_pcihost_realize() │ │ (hw/pci-host/i440fx.c) │ └──────────────────────────┬──────────────────────────────────────┘ │ ▼ ┌─────────────────────────────────────────────────────────────────┐ │ 4. 映射 PCI 配置空间端口 │ │ - 0xCF8: PCI 配置地址端口 (conf_mem) │ │ - 0xCFC: PCI 配置数据端口 (data_mem) │ │ │ │ memory_region_add_subregion(io_memory, 0xcf8, conf_mem) │ │ memory_region_add_subregion(io_memory, 0xcfc, data_mem) │ └──────────────────────────┬──────────────────────────────────────┘ │ ▼ ┌─────────────────────────────────────────────────────────────────┐ │ 5. 创建 PCI 根总线 │ │ b = pci_root_bus_new(dev, NULL, pci_address_space, │ │ io_memory, 0, TYPE_PCI_BUS) │ │ │ │ 调用: pci_root_bus_internal_init() │ │ (hw/pci/pci.c) │ └──────────────────────────┬──────────────────────────────────────┘ │ ▼ ┌─────────────────────────────────────────────────────────────────┐ │ 6. 初始化 PCIBus 结构 │ │ - bus->address_space_mem = mem │ │ - bus->address_space_io = io │ │ - bus->flags |= PCI_BUS_IS_ROOT │ │ - bus->devices[256] = {NULL} // 设备数组 │ │ │ │ pci_host_bus_register(parent) │ └──────────────────────────┬──────────────────────────────────────┘ │ ▼ ┌─────────────────────────────────────────────────────────────────┐ │ 7. 创建 i440FX PCI 设备(设备号 0) │ │ d = pci_create_simple(b, 0, TYPE_I440FX) │ │ │ │ - Vendor ID: 0x8086 (Intel) │ │ - Device ID: 0x1237 (82441) │ │ - Class: PCI_CLASS_BRIDGE_HOST │ └──────────────────────────┬──────────────────────────────────────┘ │ ▼ ┌─────────────────────────────────────────────────────────────────┐ │ 8. 设置内存映射 │ │ - PCI Hole (3.5G ~ 4G) │ │ - SMRAM 区域 │ │ - PAM (可编程属性映射) │ │ │ │ pc_pci_as_mapping_init(system_memory, pci_address_space) │ └──────────────────────────┬──────────────────────────────────────┘ │ ▼ ┌─────────────────────────────────────────────────────────────────┐ │ 9. 设置中断路由 │ │ pci_bus_map_irqs(pcibus, pc_pci_slot_get_pirq) │ │ │ │ 将 PCI INTx (A/B/C/D) 映射到 PIRQ │ └──────────────────────────┬──────────────────────────────────────┘ │ ▼ ┌─────────────────────────────────────────────────────────────────┐ │ 10. 创建南桥 PCI 设备 (PIIX3/PIIX4) │ │ pci_dev = pci_new_multifunction(-1, TYPE_PIIX3) │ │ │ │ 包含: │ │ - ISA Bridge │ │ - IDE Controller │ │ - USB Controller (可选) │ │ - ACPI/Power Management │ └──────────────────────────┬──────────────────────────────────────┘ │ ▼ ┌─────────────────────────────────────────────────────────────────┐ │ 11. PCI 设备实现 (pci_realize_and_unref) │ │ 调用: pci_qdev_realize() → PCIDeviceClass->realize() │ │ │ │ - 分配配置空间 (256/4096 字节) │ │ - 初始化 BAR │ │ - 设置中断 │ │ - 添加到 bus->devices[devfn] │ └──────────────────────────┬──────────────────────────────────────┘ │ ▼ ┌─────────────────────────────────────────────────────────────────┐ │ 12. 创建其他 PCI 设备 │ │ - VGA 显卡 │ │ - 网卡 (e1000, rtl8139, virtio-net) │ │ - 存储控制器 (virtio-blk, nvme) │ │ - 声卡等 │ │ │ │ 通过命令行参数 (-device) 或机器默认配置创建 │ └──────────────────────────┬──────────────────────────────────────┘ │ ▼ ┌─────────────────────────────────────────────────────────────────┐ │ 13. PCI 初始化完成 │ │ - PCI 总线就绪 │ │ - 客户机可以通过 0xCF8/0xCFC 枚举设备 │ │ - 设备 MMIO/PMIO 映射到地址空间 │ │ - 中断路由配置完成 │ └─────────────────────────────────────────────────────────────────┘ ``` ## PCI 设备注册 > 这里用 edu PCI设备来做解释 ```Shell QEMU启动 ↓ 1. 类型系统初始化 (DEFINE_TYPES) ↓ 2. 设备类注册 (edu_class_init) ↓ 3. 用户创建设备 (-device edu) ↓ 4. 对象实例化 (edu_instance_init) ↓ 5. 设备实现 (pci_edu_realize) ↓ 6. 设备可用(Guest可以访问) ``` ### edu设备 > EDU = Educational Device(教育用设备)这是QEMU官方提供的一个虚拟PCI设备,专门用于教学目的,帮助学生和开发者学习如何编写设备驱动程序。 ```C ┌─────────────────────────────────────┐ │ QEMU虚拟机 │ │ ┌──────────────────────────────┐ │ │ │ Guest Linux (虚拟机OS) │ │ │ │ ┌────────────────────────┐ │ │ │ │ │ 学生编写的EDU驱动 │ │ │ ← 学习目标 │ │ └────────┬───────────────┘ │ │ │ │ │ (MMIO/DMA/IRQ) │ │ │ │ ┌────────▼───────────────┐ │ │ │ │ │ EDU虚拟PCI设备 │ │ │ ← edu.c模拟的设备 │ │ └────────────────────────┘ │ │ │ └──────────────────────────────┘ │ └─────────────────────────────────────┘ ``` #### edu的教学模块 ```C EDU设备包含4个教学模块: ┌─────────────────────────────────────┐ │ 1. 基础MMIO读写 │ │ - 设备识别寄存器 (0x00) │ │ - 活性检查寄存器 (0x04) │ │ └→ 学习:基本的寄存器访问 │ ├─────────────────────────────────────┤ │ 2. 异步计算 + 中断 │ │ - 阶乘计算 (0x08) │ │ - 状态寄存器 (0x20) │ │ - 中断状态 (0x24) │ │ └→ 学习:异步操作、中断处理 │ ├─────────────────────────────────────┤ │ 3. 中断控制 │ │ - 触发中断 (0x60) │ │ - 清除中断 (0x64) │ │ └→ 学习:中断管理、INTx/MSI │ ├─────────────────────────────────────┤ │ 4. DMA传输 │ │ - DMA源地址 (0x80) │ │ - DMA目标地址 (0x88) │ │ - DMA计数 (0x90) │ │ - DMA命令 (0x98) │ │ └→ 学习:DMA编程、内存管理 │ └─────────────────────────────────────┘ ``` ### 定义设备类型 ```C static const TypeInfo edu_types[] = { { .name = TYPE_PCI_EDU_DEVICE, .parent = TYPE_PCI_DEVICE, .instance_size = sizeof(EduState), .instance_init = edu_instance_init, .class_init = edu_class_init, .interfaces = (const InterfaceInfo[]) { { INTERFACE_CONVENTIONAL_PCI_DEVICE }, { }, }, } }; DEFINE_TYPES(edu_types) ``` - 解释 ```C // 定义类型名称 #define TYPE_PCI_EDU_DEVICE "edu" // TypeInfo结构体告诉QEMU: .name = "edu" // 设备类型名(命令行用 -device edu) .parent = TYPE_PCI_DEVICE // 继承自PCIDevice .instance_size = sizeof(EduState) // 每个实例的内存大小 .instance_init = edu_instance_init // 实例初始化函数 .class_init = edu_class_init // 类初始化函数 .interfaces = CONVENTIONAL_PCI_DEVICE // 实现传统PCI设备接口 ``` ### 类初始化 ```C static void edu_class_init(ObjectClass *class, const void *data) { DeviceClass *dc = DEVICE_CLASS(class); PCIDeviceClass *k = PCI_DEVICE_CLASS(class); k->realize = pci_edu_realize; k->exit = pci_edu_uninit; k->vendor_id = PCI_VENDOR_ID_QEMU; k->device_id = 0x11e8; k->revision = 0x10; k->class_id = PCI_CLASS_OTHERS; set_bit(DEVICE_CATEGORY_MISC, dc->categories); } ``` - 解释 ```C k->realize = pci_edu_realize; // 设备实现函数(相当于init) k->exit = pci_edu_uninit; // 设备退出函数(相当于cleanup) // PCI配置空间的值(用lspci可以看到) k->vendor_id = PCI_VENDOR_ID_QEMU; // 厂商ID: 0x1234 k->device_id = 0x11e8; // 设备ID: 0x11e8 k->revision = 0x10; // 版本号 k->class_id = PCI_CLASS_OTHERS; // PCI设备类别 ``` ### 设备初始化 ```C static void edu_instance_init(Object *obj) { EduState *edu = EDU(obj); edu->dma_mask = (1UL << 28) - 1; object_property_add_uint64_ptr(obj, "dma_mask", &edu->dma_mask, OBJ_PROP_FLAG_READWRITE); } ``` ### 设备实现 (核心) ```C++ static void pci_edu_realize(PCIDevice *pdev, Error **errp) { EduState *edu = EDU(pdev); uint8_t *pci_conf = pdev->config; pci_config_set_interrupt_pin(pci_conf, 1); if (msi_init(pdev, 0, 1, true, false, errp)) { return; } timer_init_ms(&edu->dma_timer, QEMU_CLOCK_VIRTUAL, edu_dma_timer, edu); qemu_mutex_init(&edu->thr_mutex); qemu_cond_init(&edu->thr_cond); qemu_thread_create(&edu->thread, "edu", edu_fact_thread, edu, QEMU_THREAD_JOINABLE); memory_region_init_io(&edu->mmio, OBJECT(edu), &edu_mmio_ops, edu, "edu-mmio", 1 * MiB); pci_register_bar(pdev, 0, PCI_BASE_ADDRESS_SPACE_MEMORY, &edu->mmio); } ``` - 解释 ```C++ // 1. 配置PCI中断引脚(INTA#) pci_config_set_interrupt_pin(pci_conf, 1); // 2. 初始化MSI(Message Signaled Interrupts)支持 // 参数:设备,偏移量,中断数量,支持64位地址,支持per-vector屏蔽 msi_init(pdev, 0, 1, true, false, errp); // 3. 初始化DMA定时器(模拟DMA传输延迟) timer_init_ms(&edu->dma_timer, QEMU_CLOCK_VIRTUAL, edu_dma_timer, edu); // 4. 创建后台线程(计算阶乘) qemu_thread_create(&edu->thread, "edu", edu_fact_thread, edu, ...); // 5. 创建MMIO内存区域(这是核心!) memory_region_init_io( &edu->mmio, // MemoryRegion对象 OBJECT(edu), // 所有者 &edu_mmio_ops, // 读写操作回调 edu, // opaque指针 "edu-mmio", // 名称 1 * MiB // 大小:1MB ); // 6. 注册为PCI BAR0(重要!) pci_register_bar( pdev, // PCI设备 0, // BAR编号:0 PCI_BASE_ADDRESS_SPACE_MEMORY, // MMIO类型(不是PMIO) &edu->mmio // 内存区域 ); ``` - 参数 - Opaque 指向设备状态结构的不透明指针 - Addr 相对于内存区域其实地址的偏移量 - Size 本次读取的数据宽度 ```C uint64_t (*read)(void *opaque, hwaddr addr, unsigned size); ``` - 返回值 - 含义: 从指定MMIO地址读取到的数据值 (意味着每次读取最多返回8字节大小的数据,因为本质qemu在这里是模拟汇编的读取操作,单汇编指令数据在x86_64下的变化大小最大8字节) - 作用: - 返回给虚拟机CPU,作为内存读取指令的结果 - 模拟设备寄存器的读取行为 - 可以触发设备状态变化(如清除中断标志) #### 读写操作回调 ```C static const MemoryRegionOps edu_mmio_ops = { .read = edu_mmio_read, .write = edu_mmio_write, .endianness = DEVICE_NATIVE_ENDIAN, .valid = { .min_access_size = 4, .max_access_size = 8, }, .impl = { .min_access_size = 4, .max_access_size = 8, }, }; ``` - 调用链条 ```C Guest: mov [0xFEBF1000], 1337 ↓ (VM Exit) KVM捕获访问 ↓ 传递给QEMU ↓ QEMU内存系统查找对应的MemoryRegion ↓ 找到edu->mmio ↓ 调用 edu_mmio_write(edu, 0x00, 1337, 4) ↓ 设备逻辑处理 ``` ## MMIO Read 调用链 ### 完整的调用链 ```C++ ┌─────────────────────────────────────────────────────────────────────┐ │ Guest OS (虚拟机) │ │ │ │ 用户驱动或应用程序 │ │ │ │ │ ▼ │ │ uint32_t val = *(uint32_t*)(mmio_mem + 0x08); │ │ │ │ │ ▼ │ │ CPU执行: MOV EAX, [0xFEBF1008] ← EDU设备BAR0 + 0x08 │ │ │ │ └───────────────────┼───────────────────────────────────────────────────┘ │ ▼ (VM Exit - EPT Violation 或 MMIO访问) ┌─────────────────────────────────────────────────────────────────────┐ │ Linux Kernel (Host) │ │ │ │ KVM模块 │ │ │ │ │ ▼ │ │ 检测到Guest访问设备地址 (0xFEBF1008) │ │ │ │ │ ▼ │ │ 填充 kvm_run 结构体: │ │ run->exit_reason = KVM_EXIT_MMIO │ │ run->mmio.phys_addr = 0xFEBF1008 │ │ run->mmio.len = 4 │ │ run->mmio.is_write = 0 │ │ │ │ │ ▼ │ │ return to userspace (ioctl返回) │ │ │ └───────────────────┼───────────────────────────────────────────────────┘ │ ▼ ┌─────────────────────────────────────────────────────────────────────┐ │ QEMU进程 (用户态) │ │ │ │ [1] kvm_cpu_exec() │ │ ↓ │ │ [2] run_ret = kvm_vcpu_ioctl(cpu, KVM_RUN, 0) │ │ ↓ (ioctl阻塞,直到VM Exit) │ │ [3] switch(run->exit_reason) │ │ ↓ │ │ [4] case KVM_EXIT_MMIO: │ │ ↓ │ │ [5] address_space_rw(&address_space_memory, │ │ run->mmio.phys_addr, │ │ attrs, │ │ run->mmio.data, │ │ run->mmio.len, │ │ run->mmio.is_write) │ │ ↓ │ │ [6] address_space_read_full() │ │ ↓ │ │ [7] fv = address_space_to_flatview(as) │ │ ↓ │ │ [8] flatview_read(fv, addr, attrs, buf, len) │ │ ↓ │ │ [9] mr = flatview_translate(fv, addr, ...) │ │ ↓ │ │ [10] flatview_read_continue() │ │ ↓ │ │ [11] flatview_read_continue_step() │ │ ↓ │ │ [12] memory_region_dispatch_read(mr, mr_addr, &val, ...) │ │ ↓ │ │ [13] memory_region_dispatch_read1() │ │ ↓ │ │ [14] access_with_adjusted_size() │ │ ↓ │ │ [15] memory_region_read_accessor() │ │ ↓ │ │ [16] tmp = mr->ops->read(mr->opaque, addr, size) │ │ ↓ │ │ [17] edu_mmio_read(edu, 0x08, 4) ← 最终调用! │ │ ↓ │ │ [18] switch(addr) { case 0x08: return edu->fact; } │ │ ↓ │ │ [19] 返回值逐层返回到 run->mmio.data │ │ ↓ │ │ [20] VM Enter,Guest继续执行 │ │ │ └─────────────────────────────────────────────────────────────────────┘ ``` ### 时序图 ```C Guest vCPU KVM (Kernel) QEMU (Userspace) EDU Device │ │ │ │ │ MOV [0xFEBF1008] │ │ │ ├───────────────────>│ │ │ │ │ EPT Violation │ │ │ │ (设备地址) │ │ │ │ │ │ │ │ 填充kvm_run │ │ │ │ exit_reason=MMIO │ │ │ │ │ │ │ │ ioctl返回 │ │ │ ├─────────────────────>│ │ │ │ │ │ │ │ │ address_space_rw │ │ │ │ flatview_translate │ │ │ │ 查找MemoryRegion │ │ │ │ │ │ │ │ dispatch_read │ │ │ ├────────────────────>│ │ │ │ │ edu_mmio_read │ │ │ │ switch(0x08) │ │ │ │ return fact │ │ │<────────────────────┤ │ │ │ │ │ │ 数据写入run->mmio │ │ │ │ KVM_RUN ioctl │ │ │ │<─────────────────────┤ │ │ │ │ │ │ │ VM Enter │ │ │ │ 注入读取结果到EAX │ │ │<───────────────────┤ │ │ │ 继续执行 │ │ │ │ │ │ │ ``` ### 阶段1: KVM捕获MMIO访问 ```C++ // 位置: accel/kvm/kvm-all.c:3154 int kvm_cpu_exec(CPUState *cpu) { struct kvm_run *run = cpu->kvm_run; // 共享内存页 do { // 进入Guest执行 run_ret = kvm_vcpu_ioctl(cpu, KVM_RUN, 0); // [Step 2] // Guest发生VM Exit后返回 switch (run->exit_reason) { case KVM_EXIT_MMIO: // [Step 4] // 处理MMIO访问 address_space_rw(&address_space_memory, // [Step 5] run->mmio.phys_addr, // 0xFEBF1008 attrs, run->mmio.data, // 数据缓冲区 run->mmio.len, // 4字节 run->mmio.is_write); // 0 (读操作) break; } } while (ret == 0); } ``` #### kvm_run 结构体 ```C /* for KVM_RUN, returned by mmap(vcpu_fd, offset=0) */ struct kvm_run { /* in */ __u8 request_interrupt_window; __u8 HINT_UNSAFE_IN_KVM(immediate_exit); __u8 padding1[6]; /* out */ __u32 exit_reason; __u8 ready_for_interrupt_injection; __u8 if_flag; __u16 flags; /* in (pre_kvm_run), out (post_kvm_run) */ __u64 cr8; __u64 apic_base; // ... // union 结构,这里简化一下,我们选择我们要用的表达。 struct { __u64 phys_addr; // Guest物理地址: 0xFEBF1008 __u8 data[8]; // 数据缓冲区 __u32 len; // 访问长度: 4 __u8 is_write; // 0=读, 1=写 } mmio; } ``` ### 阶段2: 地址空间转换 ```Python // 位置: system/physmem.c:3456 MemTxResult address_space_rw(AddressSpace *as, hwaddr addr, ...) { if (is_write) { return address_space_write(as, addr, attrs, buf, len); } else { return address_space_read_full(as, addr, attrs, buf, len); // [Step 6] } } MemTxResult address_space_read_full(AddressSpace *as, hwaddr addr, MemTxAttrs attrs, void *buf, hwaddr len) { MemTxResult result = MEMTX_OK; FlatView *fv; if (len > 0) { RCU_READ_LOCK_GUARD(); // [Step 7] 获取FlatView fv = address_space_to_flatview(as); // [Step 8] result = flatview_read(fv, addr, attrs, buf, len); } return result; } ``` FlatView的作用: - AddressSpace的扁平化视图 - 将层次化的MemoryRegion结构展开为线性地址映射 - 加速地址查找 ### 阶段3: 查找MemoryRegion ```Java // 位置: system/physmem.c:3409 static MemTxResult flatview_read(FlatView *fv, hwaddr addr, ...) { hwaddr l = len; hwaddr mr_addr; MemoryRegion *mr; l = len; // [Step 9] 地址转换:找到对应的MemoryRegion mr = flatview_translate(fv, addr, &mr_addr, &l, false, attrs); /* * 输入: addr = 0xFEBF1008 (Guest物理地址) * 输出: mr = &edu->mmio (EDU设备的MemoryRegion) * mr_addr = 0x08 (相对于MemoryRegion的偏移) */ if (!flatview_access_allowed(mr, attrs, mr_addr, l)) { return MEMTX_ACCESS_ERROR; } return flatview_read_continue(fv, addr, attrs, buf, len, // [Step 10] mr_addr, l, mr); } ``` - flatview_translate(): 地址转换,找到对应的MemoryRegion - 输入:addr = 0xFEBF1008 (Guest物理地址) - 输出:mr_addr = 0x08 (相对MemoryRegion的偏移) #### flatview_translate的查找过程 ```C /* Called from RCU critical section */ MemoryRegion *flatview_translate(FlatView *fv, hwaddr addr, hwaddr *xlat, hwaddr *plen, bool is_write, MemTxAttrs attrs) { MemoryRegion *mr; MemoryRegionSection section; AddressSpace *as = NULL; /* This can be MMIO, so setup MMIO bit. */ section = flatview_do_translate(fv, addr, xlat, plen, NULL, is_write, true, &as, attrs); mr = section.mr; if (xen_enabled() && memory_access_is_direct(mr, is_write, attrs)) { hwaddr page = ((addr & TARGET_PAGE_MASK) + TARGET_PAGE_SIZE) - addr; *plen = MIN(page, *plen); } return mr; } ``` #### 地址翻译过程 (核心) ```Java /** * flatview_do_translate - translate an address in FlatView * * @fv: the flat view that we want to translate on * @addr: the address to be translated in above address space * @xlat: the translated address offset within memory region. It * cannot be @NULL. * @plen_out: valid read/write length of the translated address. It * can be @NULL when we don't care about it. * @page_mask_out: page mask for the translated address. This * should only be meaningful for IOMMU translated * addresses, since there may be huge pages that this bit * would tell. It can be @NULL if we don't care about it. * @is_write: whether the translation operation is for write * @is_mmio: whether this can be MMIO, set true if it can * @target_as: the address space targeted by the IOMMU * @attrs: memory transaction attributes * * This function is called from RCU critical section */ static MemoryRegionSection flatview_do_translate(FlatView *fv, hwaddr addr, hwaddr *xlat, hwaddr *plen_out, hwaddr *page_mask_out, bool is_write, bool is_mmio, AddressSpace **target_as, MemTxAttrs attrs) { MemoryRegionSection *section; IOMMUMemoryRegion *iommu_mr; hwaddr plen = (hwaddr)(-1); if (!plen_out) { plen_out = &plen; } section = address_space_translate_internal( flatview_to_dispatch(fv), addr, xlat, plen_out, is_mmio); iommu_mr = memory_region_get_iommu(section->mr); if (unlikely(iommu_mr)) { return address_space_translate_iommu(iommu_mr, xlat, plen_out, page_mask_out, is_write, is_mmio, target_as, attrs); } if (page_mask_out) { /* Not behind an IOMMU, use default page size. */ *page_mask_out = ~TARGET_PAGE_MASK; } return *section; } ``` #### FlatView 内存模型 ```C 【层次化视图】MemoryRegion树形结构 system_memory (容器) ├── ram_below_4g (RAM, 0x00000000-0x7FFFFFFF, 2GB) ├── pci_memory (容器, 0x80000000-0xFFFFFFFF) │ ├── vga_mmio (VGA设备, 0xA0000000, 16MB) │ ├── edu_mmio (EDU设备, 0xFEBF1000, 1MB) ← 我们的设备 │ └── e1000_mmio (网卡, 0xFEBD0000, 128KB) └── ram_above_4g (RAM, 0x100000000+) 【扁平化视图】FlatView - 线性地址映射 FlatRange数组 (按地址排序): [0] 0x00000000-0x7FFFFFFF → ram_below_4g [1] 0x80000000-0x9FFFFFFF → (未分配) [2] 0xA0000000-0xA0FFFFFF → vga_mmio [3] 0xA1000000-0xFEBCFFFF → (未分配) [4] 0xFEBD0000-0xFEBEFFFF → e1000_mmio [5] 0xFEBF0000-0xFEBF0FFF → (gap) [6] 0xFEBF1000-0xFEBF1FFF → edu_mmio ← 查找目标 [7] 0xFEBF2000-0xFFFFFFFF → (未分配) [8] 0x100000000-... → ram_above_4g ``` ### 阶段4: 执行MMIO读操作 ```Go /* Called within RCU critical section. */ MemTxResult flatview_read_continue(FlatView *fv, hwaddr addr, MemTxAttrs attrs, void *ptr, hwaddr len, hwaddr mr_addr, hwaddr l, MemoryRegion *mr) { MemTxResult result = MEMTX_OK; uint8_t *buf = ptr; fuzz_dma_read_cb(addr, len, mr); for (;;) { result |= flatview_read_continue_step(attrs, buf, len, mr_addr, &l, mr); len -= l; buf += l; addr += l; if (!len) { break; } l = len; mr = flatview_translate(fv, addr, &mr_addr, &l, false, attrs); } return result; } static MemTxResult flatview_read_continue_step(MemTxAttrs attrs, uint8_t *buf, hwaddr len, hwaddr mr_addr, hwaddr *l, MemoryRegion *mr) { if (!flatview_access_allowed(mr, attrs, mr_addr, *l)) { return MEMTX_ACCESS_ERROR; } if (!memory_access_is_direct(mr, false, attrs)) { /* I/O case */ // // [Step 11] 这是I/O设备 (不是RAM) uint64_t val; MemTxResult result; bool release_lock = prepare_mmio_access(mr); *l = memory_access_size(mr, *l, mr_addr); result = memory_region_dispatch_read(mr, mr_addr, &val, size_memop(*l), attrs); /* * Assure Coverity (and ourselves) that we are not going to OVERRUN * the buffer by following stn_he_p(). */ #ifdef QEMU_STATIC_ANALYSIS assert((*l == 1 && len >= 1) || (*l == 2 && len >= 2) || (*l == 4 && len >= 4) || (*l == 8 && len >= 8)); #endif stn_he_p(buf, *l, val); if (release_lock) { bql_unlock(); } return result; } else { /* RAM case */ uint8_t *ram_ptr = qemu_ram_ptr_length(mr->ram_block, mr_addr, l, false, false); memcpy(buf, ram_ptr, *l); return MEMTX_OK; } } ``` ### 阶段5: 调用设备的读函数 ```C++ MemTxResult memory_region_dispatch_read(MemoryRegion *mr, hwaddr addr, uint64_t *pval, MemOp op, MemTxAttrs attrs) { unsigned size = memop_size(op); MemTxResult r; if (mr->alias) { return memory_region_dispatch_read(mr->alias, mr->alias_offset + addr, pval, op, attrs); } if (!memory_region_access_valid(mr, addr, size, false, attrs)) { *pval = unassigned_mem_read(mr, addr, size); return MEMTX_DECODE_ERROR; } r = memory_region_dispatch_read1(mr, addr, pval, size, attrs); adjust_endianness(mr, pval, op); return r; } static MemTxResult memory_region_dispatch_read1(MemoryRegion *mr, hwaddr addr, uint64_t *pval, unsigned size, MemTxAttrs attrs) { *pval = 0; if (mr->ops->read) { // [Step 14] 调用access_with_adjusted_size return access_with_adjusted_size(addr, pval, size, mr->ops->impl.min_access_size, mr->ops->impl.max_access_size, memory_region_read_accessor, mr, attrs); } else { return access_with_adjusted_size(addr, pval, size, mr->ops->impl.min_access_size, mr->ops->impl.max_access_size, memory_region_read_with_attrs_accessor, mr, attrs); } } ``` #### access_with_adjusted_size ```C++ static MemTxResult access_with_adjusted_size(hwaddr addr, uint64_t *value, unsigned size, unsigned access_size_min, unsigned access_size_max, MemTxResult (*access_fn) (MemoryRegion *mr, hwaddr addr, uint64_t *value, unsigned size, signed shift, uint64_t mask, MemTxAttrs attrs), MemoryRegion *mr, MemTxAttrs attrs) { uint64_t access_mask; unsigned access_size; unsigned i; MemTxResult r = MEMTX_OK; bool reentrancy_guard_applied = false; if (!access_size_min) { access_size_min = 1; } if (!access_size_max) { access_size_max = 4; } /* Do not allow more than one simultaneous access to a device's IO Regions */ if (mr->dev && !mr->disable_reentrancy_guard && !mr->ram_device && !mr->ram && !mr->rom_device && !mr->readonly) { if (mr->dev->mem_reentrancy_guard.engaged_in_io) { warn_report_once("Blocked re-entrant IO on MemoryRegion: " "%s at addr: 0x%" HWADDR_PRIX, memory_region_name(mr), addr); return MEMTX_ACCESS_ERROR; } mr->dev->mem_reentrancy_guard.engaged_in_io = true; reentrancy_guard_applied = true; } /* FIXME: support unaligned access? */ // 处理访问大小调整 // 可能需要多次访问 access_size = MAX(MIN(size, access_size_max), access_size_min); access_mask = MAKE_64BIT_MASK(0, access_size * 8); if (devend_big_endian(mr->ops->endianness)) { for (i = 0; i < size; i += access_size) { // [Step 15] 调用访问器函数 r |= access_fn(mr, addr + i, value, access_size, (size - access_size - i) * 8, access_mask, attrs); } } else { for (i = 0; i < size; i += access_size) { r |= access_fn(mr, addr + i, value, access_size, i * 8, access_mask, attrs); } } if (mr->dev && reentrancy_guard_applied) { mr->dev->mem_reentrancy_guard.engaged_in_io = false; } return r; } ``` 我们知道传入的参数为 ```C access_with_adjusted_size(addr, &data, size, mr->ops->impl.min_access_size, mr->ops->impl.max_access_size, memory_region_write_accessor, mr, attrs); ``` 所以access_fn间接调用memory_region_write_accessor ### 阶段6: 最终调用设备回调 #### memory_region_write_accessor ```C++ static MemTxResult memory_region_write_accessor(MemoryRegion *mr, hwaddr addr, uint64_t *value, unsigned size, signed shift, uint64_t mask, MemTxAttrs attrs) { uint64_t tmp = memory_region_shift_write_access(value, shift, mask); if (mr->subpage) { trace_memory_region_subpage_write(get_cpu_index(), mr, addr, tmp, size); } else if (trace_event_get_state_backends(TRACE_MEMORY_REGION_OPS_WRITE)) { hwaddr abs_addr = memory_region_to_absolute_addr(mr, addr); trace_memory_region_ops_write(get_cpu_index(), mr, abs_addr, tmp, size, memory_region_name(mr)); } // [Step 16] 调用设备注册的read函数! mr->ops->write(mr->opaque, addr, tmp, size); return MEMTX_OK; } ``` ### 阶段8: 返回Guest > 跳过阶段七(就是正常执行注册的函数) ```YAML 返回路径 (逆序): edu_mmio_read返回值 ↓ memory_region_read_accessor: *value = tmp ↓ access_with_adjusted_size: 合并多次访问结果 ↓ memory_region_dispatch_read1: *pval = value ↓ memory_region_dispatch_read: 调整字节序 ↓ flatview_read_continue_step: stn_he_p(buf, val) ↓ flatview_read_continue: 拷贝到buf ↓ flatview_read: return result ↓ address_space_read_full: return result ↓ address_space_rw: 数据写入run->mmio.data ↓ kvm_cpu_exec: VM Enter,恢复Guest执行 ↓ Guest: EAX寄存器被KVM填充为读取的值 ``` ## QEMU 查看 PCI 设备 ### Lspci ```YAML ~ $ lspci 00:01.0 Class 0601: 8086:7000 // 位置: BUS:0,Device:0,Function:0 // Host bridge : Class 0600 // Intel 厂商ID: 8086 // i440FX 芯片组: 1237 00:00.0 Class 0600: 8086:1237 00:01.3 Class 0680: 8086:7113 // 位置 Bus:0,Device:3,Function:0 // 设备类别:0200 以太网控制器 // intel 厂商id: 8086 // 设备id:100e (e1000 网卡) 00:03.0 Class 0200: 8086:100e 00:01.1 Class 0101: 8086:7010 00:02.0 Class 0300: 1234:1111 ``` | 地址 | 设备名称 | 厂商:设备ID | 类别 | 功能 | | ------- | ------------------ | ----------- | ---- | --------------------------- | | 00:00.0 | i440FX Host Bridge | 8086:1237 | 600 | PCI主机桥,连接CPU和PCI总线 | | 00:01.0 | PIIX3 ISA Bridge | 8086:7000 | 601 | 南桥ISA桥,管理传统设备 | | 00:01.1 | PIIX3 IDE | 8086:7010 | 101 | IDE硬盘控制器 | | 00:01.3 | PIIX3 PM | 8086:7113 | 680 | ACPI电源管理 | | 00:02.0 | QEMU VGA | 1234:1111 | 300 | VGA显卡 | | 00:03.0 | Intel E1000 | 8086:100e | 200 | 千兆网卡 | #### 格式对应 > 在后面会仔细解释其含义和实现 ```C BB:DD.F Class CCSS: VVVV:DDDD ``` - BB:DD.F = Bus:Device.Function(总线:设备:功能) - Class CCSS = 设备类别代码 - VVVV:DDDD = Vendor ID:Device ID(厂商ID:设备ID) #### PCI地址结构 ```C BB:DD.F │ │ └─ Function (功能号): 0-7 (3 bits) │ └──── Device (设备号): 0-31 (5 bits) └─────── Bus (总线号): 0-255 (8 bits) ``` ##### DeviceFn - 一般 Device 与 Function 一起成为 deviceFn - ```C devfn (8 bits) ┌─────────────────────┬──────────────┐ │ Device (5 bits) │ Function (3) │ │ Bits 7-3 │ Bits 2-0 │ └─────────────────────┴──────────────┘ 31 ... 0 7...0 ``` - 正向和反向运算 - ```C // 从 Device 和 Function 计算 devfn devfn = (device << 3) | function devfn = PCI_DEVFN(slot, func) // 从 devfn 反向计算 Device 和 Function device = (devfn >> 3) & 0x1f // 取高 5 位 function = devfn & 0x07 // 取低 3 位 ``` ##### PCIBus 中数组索引 > deviceFn 为 PCIBus 设备数组的索引 - 所以 device number 之间的index相差8位,然后qemu 会自动初始化每个device的0位 ```C PCIDevice *devices[PCI_SLOT_MAX * PCI_FUNC_MAX]; devices[0] → 00:00.0 (devfn=0) devices[1] → 00:00.1 (devfn=1) devices[2] → 00:00.2 (devfn=2) ... devices[7] → 00:00.7 (devfn=7) devices[8] → 00:01.0 (devfn=8) devices[9] → 00:01.1 (devfn=9) ... devices[11] → 00:01.3 (devfn=11) ... devices[24] → 00:03.0 (devfn=24) ... devices[255] → 00:31.7 (devfn=255) ``` - 多功能设备 ```C 00:01.0 → PIIX3 ISA Bridge (Function 0 - 主功能) 00:01.1 → PIIX3 IDE (Function 1) 00:01.3 → PIIX3 ACPI/PM (Function 3) ``` #### Class Code - PCI Class Code 是一个 24位 的分层编码系统: ```C ┌──────────────┬──────────────┬──────────────┐ │ Base Class │ Sub-Class │ Prog IF │ │ (8 bits) │ (8 bits) │ (8 bits) │ └──────────────┴──────────────┴──────────────┘ 0xCC 0xSS 0xPP ``` - Base Class (基类):设备的主要类型(如存储、网络、显示等) - Sub-Class (子类):更具体的设备类型 - Programming Interface (编程接口):具体的实现标准 - 显示格式:通常显示为 CCSS(前4位十六进制数) 直接查询源代码代码即可 ```C++ /* * PCI Class, Vendor and Device IDs * * Please keep sorted. * * Abbreviated version of linux/pci_ids.h * * QEMU-specific definitions belong in pci.h */ #ifndef HW_PCI_IDS_H #define HW_PCI_IDS_H /* Device classes and subclasses */ #define PCI_CLASS_NOT_DEFINED 0x0000 #define PCI_CLASS_NOT_DEFINED_VGA 0x0001 // 0x01 - 大容量存储控制器 (Storage) #define PCI_BASE_CLASS_STORAGE 0x01 #define PCI_CLASS_STORAGE_SCSI 0x0100 #define PCI_CLASS_STORAGE_IDE 0x0101 #define PCI_CLASS_STORAGE_FLOPPY 0x0102 #define PCI_CLASS_STORAGE_IPI 0x0103 #define PCI_CLASS_STORAGE_RAID 0x0104 #define PCI_CLASS_STORAGE_ATA 0x0105 #define PCI_CLASS_STORAGE_SATA 0x0106 #define PCI_CLASS_STORAGE_SAS 0x0107 #define PCI_CLASS_STORAGE_EXPRESS 0x0108 #define PCI_CLASS_STORAGE_UFS 0x0109 #define PCI_CLASS_STORAGE_OTHER 0x0180 // 0x02 - 网络控制器 (Network) #define PCI_BASE_CLASS_NETWORK 0x02 #define PCI_CLASS_NETWORK_ETHERNET 0x0200 #define PCI_CLASS_NETWORK_TOKEN_RING 0x0201 #define PCI_CLASS_NETWORK_FDDI 0x0202 #define PCI_CLASS_NETWORK_ATM 0x0203 #define PCI_CLASS_NETWORK_ISDN 0x0204 #define PCI_CLASS_NETWORK_WORLDFIP 0x0205 #define PCI_CLASS_NETWORK_PICMG214 0x0206 #define PCI_CLASS_NETWORK_OTHER 0x0280 // 0x03 - 显示控制器 (Display) #define PCI_BASE_CLASS_DISPLAY 0x03 #define PCI_CLASS_DISPLAY_VGA 0x0300 #define PCI_CLASS_DISPLAY_XGA 0x0301 #define PCI_CLASS_DISPLAY_3D 0x0302 #define PCI_CLASS_DISPLAY_OTHER 0x0380 // 0x04 - 多媒体设备 (Multimedia) #define PCI_BASE_CLASS_MULTIMEDIA 0x04 #define PCI_CLASS_MULTIMEDIA_VIDEO 0x0400 #define PCI_CLASS_MULTIMEDIA_AUDIO 0x0401 #define PCI_CLASS_MULTIMEDIA_PHONE 0x0402 #define PCI_CLASS_MULTIMEDIA_OTHER 0x0480 // 0x05 - 内存控制器 (Memory) #define PCI_BASE_CLASS_MEMORY 0x05 #define PCI_CLASS_MEMORY_RAM 0x0500 #define PCI_CLASS_MEMORY_FLASH 0x0501 #define PCI_CLASS_MEMORY_CXL 0x0502 #define PCI_CLASS_MEMORY_OTHER 0x0580 // 0x06 - 桥接设备 (Bridge) ⭐ 重要 #define PCI_BASE_CLASS_BRIDGE 0x06 #define PCI_CLASS_BRIDGE_HOST 0x0600 #define PCI_CLASS_BRIDGE_ISA 0x0601 #define PCI_CLASS_BRIDGE_EISA 0x0602 #define PCI_CLASS_BRIDGE_MC 0x0603 #define PCI_CLASS_BRIDGE_PCI 0x0604 #define PCI_CLASS_BRIDGE_PCI_INF_SUB 0x01 #define PCI_CLASS_BRIDGE_PCMCIA 0x0605 #define PCI_CLASS_BRIDGE_NUBUS 0x0606 #define PCI_CLASS_BRIDGE_CARDBUS 0x0607 #define PCI_CLASS_BRIDGE_RACEWAY 0x0608 #define PCI_CLASS_BRIDGE_PCI_SEMITP 0x0609 #define PCI_CLASS_BRIDGE_IB_PCI 0x060a #define PCI_CLASS_BRIDGE_OTHER 0x0680 // 0x07 - 通信设备 (Communication) #define PCI_BASE_CLASS_COMMUNICATION 0x07 #define PCI_CLASS_COMMUNICATION_SERIAL 0x0700 #define PCI_CLASS_COMMUNICATION_PARALLEL 0x0701 #define PCI_CLASS_COMMUNICATION_MULTISERIAL 0x0702 #define PCI_CLASS_COMMUNICATION_MODEM 0x0703 #define PCI_CLASS_COMMUNICATION_GPIB 0x0704 #define PCI_CLASS_COMMUNICATION_SC 0x0705 #define PCI_CLASS_COMMUNICATION_OTHER 0x0780 // 0x08 - 系统外设 (System) #define PCI_BASE_CLASS_SYSTEM 0x08 #define PCI_CLASS_SYSTEM_PIC 0x0800 #define PCI_CLASS_SYSTEM_PIC_IOAPIC 0x080010 #define PCI_CLASS_SYSTEM_PIC_IOXAPIC 0x080020 #define PCI_CLASS_SYSTEM_DMA 0x0801 #define PCI_CLASS_SYSTEM_TIMER 0x0802 #define PCI_CLASS_SYSTEM_RTC 0x0803 #define PCI_CLASS_SYSTEM_PCI_HOTPLUG 0x0804 #define PCI_CLASS_SYSTEM_SDHCI 0x0805 #define PCI_CLASS_SYSTEM_OTHER 0x0880 // 0x09 - 输入设备 (Input) #define PCI_BASE_CLASS_INPUT 0x09 #define PCI_CLASS_INPUT_KEYBOARD 0x0900 #define PCI_CLASS_INPUT_PEN 0x0901 #define PCI_CLASS_INPUT_MOUSE 0x0902 #define PCI_CLASS_INPUT_SCANNER 0x0903 #define PCI_CLASS_INPUT_GAMEPORT 0x0904 #define PCI_CLASS_INPUT_OTHER 0x0980 #define PCI_BASE_CLASS_DOCKING 0x0a #define PCI_CLASS_DOCKING_GENERIC 0x0a00 #define PCI_CLASS_DOCKING_OTHER 0x0a80 #define PCI_BASE_CLASS_PROCESSOR 0x0b #define PCI_CLASS_PROCESSOR_PENTIUM 0x0b02 #define PCI_CLASS_PROCESSOR_POWERPC 0x0b20 #define PCI_CLASS_PROCESSOR_MIPS 0x0b30 #define PCI_CLASS_PROCESSOR_CO 0x0b40 // 串行总线控制器 (Serial Bus) ⭐ 重要 #define PCI_BASE_CLASS_SERIAL 0x0c #define PCI_CLASS_SERIAL_FIREWIRE 0x0c00 #define PCI_CLASS_SERIAL_ACCESS 0x0c01 #define PCI_CLASS_SERIAL_SSA 0x0c02 #define PCI_CLASS_SERIAL_USB 0x0c03 #define PCI_CLASS_SERIAL_USB_UHCI 0x0c0300 #define PCI_CLASS_SERIAL_USB_OHCI 0x0c0310 #define PCI_CLASS_SERIAL_USB_EHCI 0x0c0320 #define PCI_CLASS_SERIAL_USB_XHCI 0x0c0330 #define PCI_CLASS_SERIAL_USB_UNKNOWN 0x0c0380 #define PCI_CLASS_SERIAL_USB_DEVICE 0x0c03fe #define PCI_CLASS_SERIAL_FIBER 0x0c04 #define PCI_CLASS_SERIAL_SMBUS 0x0c05 #define PCI_CLASS_SERIAL_IB 0x0c06 #define PCI_CLASS_SERIAL_IPMI 0x0c07 #define PCI_CLASS_SERIAL_SERCOS 0x0c08 #define PCI_CLASS_SERIAL_CANBUS 0x0c09 // 0x0D - 无线控制器 (Wireless) #define PCI_BASE_CLASS_WIRELESS 0x0d #define PCI_CLASS_WIRELESS_IRDA 0x0d00 #define PCI_CLASS_WIRELESS_CIR 0x0d01 #define PCI_CLASS_WIRELESS_RF_CONTROLLER 0x0d10 #define PCI_CLASS_WIRELESS_BLUETOOTH 0x0d11 #define PCI_CLASS_WIRELESS_BROADBAND 0x0d12 #define PCI_CLASS_WIRELESS_OTHER 0x0d80 #define PCI_BASE_CLASS_SATELLITE 0x0f #define PCI_CLASS_SATELLITE_TV 0x0f00 #define PCI_CLASS_SATELLITE_AUDIO 0x0f01 #define PCI_CLASS_SATELLITE_VOICE 0x0f03 #define PCI_CLASS_SATELLITE_DATA 0x0f04 #define PCI_BASE_CLASS_CRYPT 0x10 #define PCI_CLASS_CRYPT_NETWORK 0x1000 #define PCI_CLASS_CRYPT_ENTERTAINMENT 0x1001 #define PCI_CLASS_CRYPT_OTHER 0x1080 #define PCI_BASE_CLASS_SIGNAL_PROCESSING 0x11 #define PCI_CLASS_SP_DPIO 0x1100 #define PCI_CLASS_SP_PERF 0x1101 #define PCI_CLASS_SP_SYNCH 0x1110 #define PCI_CLASS_SP_MANAGEMENT 0x1120 #define PCI_CLASS_SP_OTHER 0x1180 #define PCI_CLASS_OTHERS 0xff /* Vendors and devices. Sort key: vendor first, device next. */ /* Ref: PCIe r6.0 Table 6-32 */ #define PCI_VENDOR_ID_PCI_SIG 0x0001 #define PCI_VENDOR_ID_LSI_LOGIC 0x1000 #define PCI_DEVICE_ID_LSI_53C810 0x0001 #define PCI_DEVICE_ID_LSI_53C895A 0x0012 #define PCI_DEVICE_ID_LSI_SAS1068 0x0054 #define PCI_DEVICE_ID_LSI_SAS1078 0x0060 #define PCI_DEVICE_ID_LSI_SAS0079 0x0079 #define PCI_VENDOR_ID_DEC 0x1011 #define PCI_DEVICE_ID_DEC_21143 0x0019 #define PCI_VENDOR_ID_CIRRUS 0x1013 #define PCI_VENDOR_ID_IBM 0x1014 #define PCI_VENDOR_ID_AMD 0x1022 #define PCI_DEVICE_ID_AMD_LANCE 0x2000 #define PCI_DEVICE_ID_AMD_SCSI 0x2020 #define PCI_VENDOR_ID_HP 0x103c #define PCI_VENDOR_ID_TI 0x104c #define PCI_VENDOR_ID_MOTOROLA 0x1057 #define PCI_DEVICE_ID_MOTOROLA_MPC106 0x0002 #define PCI_DEVICE_ID_MOTOROLA_RAVEN 0x4801 #define PCI_VENDOR_ID_APPLE 0x106b #define PCI_DEVICE_ID_APPLE_UNI_N_AGP 0x0020 #define PCI_DEVICE_ID_APPLE_U3_AGP 0x004b #define PCI_DEVICE_ID_APPLE_UNI_N_GMAC 0x0021 #define PCI_DEVICE_ID_APPLE_VIRTIO_BLK 0x1a00 #define PCI_VENDOR_ID_SUN 0x108e #define PCI_DEVICE_ID_SUN_EBUS 0x1000 #define PCI_DEVICE_ID_SUN_HME 0x1001 #define PCI_DEVICE_ID_SUN_SIMBA 0x5000 #define PCI_DEVICE_ID_SUN_SABRE 0xa000 #define PCI_VENDOR_ID_ORACLE 0x108e #define PCI_DEVICE_ID_REMOTE_IOHUB 0xb000 #define PCI_VENDOR_ID_CMD 0x1095 #define PCI_DEVICE_ID_CMD_646 0x0646 #define PCI_VENDOR_ID_REALTEK 0x10ec #define PCI_DEVICE_ID_REALTEK_8139 0x8139 #define PCI_VENDOR_ID_XILINX 0x10ee #define PCI_VENDOR_ID_VIA 0x1106 #define PCI_DEVICE_ID_VIA_82C686B_ISA 0x0686 #define PCI_DEVICE_ID_VIA_IDE 0x0571 #define PCI_DEVICE_ID_VIA_UHCI 0x3038 #define PCI_DEVICE_ID_VIA_82C686B_PM 0x3057 #define PCI_DEVICE_ID_VIA_AC97 0x3058 #define PCI_DEVICE_ID_VIA_MC97 0x3068 #define PCI_DEVICE_ID_VIA_8231_ISA 0x8231 #define PCI_DEVICE_ID_VIA_8231_PM 0x8235 #define PCI_VENDOR_ID_MARVELL 0x11ab #define PCI_DEVICE_ID_MARVELL_MV6436X 0x6460 #define PCI_VENDOR_ID_SILICON_MOTION 0x126f #define PCI_DEVICE_ID_SM501 0x0501 #define PCI_VENDOR_ID_ENSONIQ 0x1274 #define PCI_DEVICE_ID_ENSONIQ_ES1370 0x5000 #define PCI_VENDOR_ID_CHELSIO 0x1425 #define PCI_VENDOR_ID_FREESCALE 0x1957 #define PCI_DEVICE_ID_MPC8533E 0x0030 #define PCI_VENDOR_ID_BAIDU 0x1d22 #define PCI_DEVICE_ID_KUNLUN_VF 0x3685 #define PCI_VENDOR_ID_INTEL 0x8086 #define PCI_DEVICE_ID_INTEL_82378 0x0484 #define PCI_DEVICE_ID_INTEL_82441 0x1237 #define PCI_DEVICE_ID_INTEL_82801AA_5 0x2415 #define PCI_DEVICE_ID_INTEL_82801BA_11 0x244e #define PCI_DEVICE_ID_INTEL_82801D 0x24CD #define PCI_DEVICE_ID_INTEL_ESB_9 0x25ab #define PCI_DEVICE_ID_INTEL_NVME 0x5845 #define PCI_DEVICE_ID_INTEL_82371SB_0 0x7000 #define PCI_DEVICE_ID_INTEL_82371SB_1 0x7010 #define PCI_DEVICE_ID_INTEL_82371SB_2 0x7020 #define PCI_DEVICE_ID_INTEL_82371AB_0 0x7110 #define PCI_DEVICE_ID_INTEL_82371AB 0x7111 #define PCI_DEVICE_ID_INTEL_82371AB_2 0x7112 #define PCI_DEVICE_ID_INTEL_82371AB_3 0x7113 #define PCI_DEVICE_ID_INTEL_ICH9_0 0x2910 #define PCI_DEVICE_ID_INTEL_ICH9_1 0x2917 #define PCI_DEVICE_ID_INTEL_ICH9_2 0x2912 #define PCI_DEVICE_ID_INTEL_ICH9_3 0x2913 #define PCI_DEVICE_ID_INTEL_ICH9_4 0x2914 #define PCI_DEVICE_ID_INTEL_ICH9_5 0x2919 #define PCI_DEVICE_ID_INTEL_ICH9_6 0x2930 #define PCI_DEVICE_ID_INTEL_ICH9_7 0x2916 #define PCI_DEVICE_ID_INTEL_ICH9_8 0x2918 #define PCI_DEVICE_ID_INTEL_82801I_UHCI1 0x2934 #define PCI_DEVICE_ID_INTEL_82801I_UHCI2 0x2935 #define PCI_DEVICE_ID_INTEL_82801I_UHCI3 0x2936 #define PCI_DEVICE_ID_INTEL_82801I_UHCI4 0x2937 #define PCI_DEVICE_ID_INTEL_82801I_UHCI5 0x2938 #define PCI_DEVICE_ID_INTEL_82801I_UHCI6 0x2939 #define PCI_DEVICE_ID_INTEL_82801I_EHCI1 0x293a #define PCI_DEVICE_ID_INTEL_82801I_EHCI2 0x293c #define PCI_DEVICE_ID_INTEL_82599_SFP_VF 0x10ed #define PCI_DEVICE_ID_INTEL_P35_MCH 0x29c0 #define PCI_VENDOR_ID_XEN 0x5853 #define PCI_DEVICE_ID_XEN_PLATFORM 0x0001 #define PCI_VENDOR_ID_NEC 0x1033 #define PCI_DEVICE_ID_NEC_UPD720200 0x0194 #define PCI_VENDOR_ID_TEWS 0x1498 #define PCI_DEVICE_ID_TEWS_TPCI200 0x30C8 #define PCI_VENDOR_ID_VMWARE 0x15ad #define PCI_DEVICE_ID_VMWARE_PVRDMA 0x0820 #define PCI_VENDOR_ID_SYNOPSYS 0x16C3 #define PCI_VENDOR_ID_NVIDIA 0x10de #define PCI_VENDOR_ID_ASPEED 0x1A03 #endif ``` - 常用的快速查询表 - | Base Class | 类别名称 | 常见子类 | | ---------- | ---------- | --------------------------------------- | | 0x00 | 未定义 | 老设备 | | 0x01 | 存储控制器 | IDE(0x0101), SATA(0x0106), NVMe(0x0108) | | 0x02 | 网络控制器 | Ethernet(0x0200) | | 0x03 | 显示控制器 | VGA(0x0300), 3D(0x0302) | | 0x04 | 多媒体 | Audio(0x0401) | | 0x06 | 桥接设备 | Host(0x0600), ISA(0x0601), PCI(0x0604) | | 0x0C | 串行总线 | USB(0x0C03), FireWire(0x0C00) | ### PCI 设备拓扑图 ```C ┌─────────────────────────────────┐ │ CPU (处理器) │ └──────────────┬──────────────────┘ │ ┌──────────────▼──────────────────┐ │ 00:00.0 - i440FX Host Bridge │ │ (8086:1237) │ │ 主机桥 - 连接CPU和PCI总线 │ └──────────────┬──────────────────┘ │ ┌──────────────────────┴──────────────────────┐ │ PCI Bus 0 (PCI 总线) │ └─┬──────┬──────┬──────┬──────┬──────┬────────┘ │ │ │ │ │ │ ┌─────────▼┐ ┌─▼────┐ │ │ │ │ │00:01.0 │ │01.1 │ │ │ │ │ │PIIX3 ISA │ │IDE │ │ │ │ │ │(8086:7000│ │(7010)│ │ │ │ │ │南桥主功能│ │硬盘 │ │ │ │ │ └─────┬────┘ └──────┘ │ │ │ │ │ │ │ │ │ ┌─────▼────┐ ┌─────▼────┐ │ │ │ │00:01.3 │ │00:02.0 │ │ │ │ │ACPI/PM │ │QEMU VGA │ │ │ │ │(8086:7113│ │(1234:1111│ │ │ │ │电源管理 │ │显卡 │ │ │ │ └──────────┘ └──────────┘ │ │ │ ┌─────▼────┐ │ │ │00:03.0 │ │ │ │E1000网卡 │ │ │ │(8086:100e│ │ │ └──────────┘ │ │ │ │ 预留给其他设备的插槽 ``` ### Info pci ```C 这个命令依赖于 QEMU 中的 monitor 首先需要修改 launch.sh,添加 monitor 选项(-monitor telnet:127.0.0.1:4444,server,nowait) 添加后在 QEMU 启动时就会开启 4444 端口为 monitor,我们可以使用 nc 或者 telnet 连接 4444 端口对 QEMU 进行管理操作。 连接后输入 info pci 就可以查看到所有 PCI ``` ## 定位设备位置 - Qemu 文件中寻找关键词 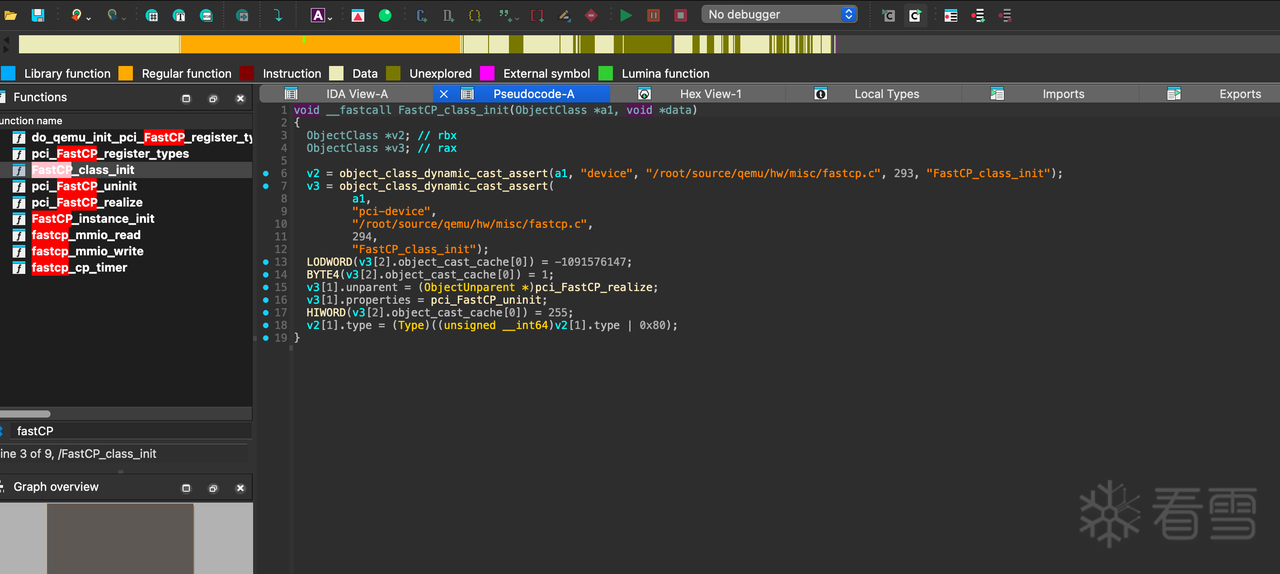 ```C++ void __fastcall FastCP_class_init(ObjectClass *a1, void *data) { ObjectClass *v2; // rbx ObjectClass *v3; // rax v2 = object_class_dynamic_cast_assert(a1, "device", "/root/source/qemu/hw/misc/fastcp.c", 293, "FastCP_class_init"); v3 = object_class_dynamic_cast_assert( a1, "pci-device", "/root/source/qemu/hw/misc/fastcp.c", 294, "FastCP_class_init"); LODWORD(v3[2].object_cast_cache[0]) = 0xBEEFDEAD; BYTE4(v3[2].object_cast_cache[0]) = 1; v3[1].unparent = (ObjectUnparent *)pci_FastCP_realize; v3[1].properties = pci_FastCP_uninit; HIWORD(v3[2].object_cast_cache[0]) = 255; v2[1].type = (Type)((unsigned __int64)v2[1].type | 0x80); } ``` - 这里可以知道 - vendor_id 为 0xdead - Device_id 为 0xbeef 然后通过 lspci 获取 pci 设备信息 ```YAML 00:01.0 Class 0601: 8086:7000 00:04.0 Class 00ff: dead:beef 00:00.0 Class 0600: 8086:1237 00:01.3 Class 0680: 8086:7113 00:03.0 Class 0200: 8086:100e 00:01.1 Class 0101: 8086:7010 00:02.0 Class 0300: 1234:1111 ``` - 那么我们就可以确定其位置为 00:04.0 ```C 00:04.0 Class 00ff: dead:beef ``` - 访问 /sys/devices/pci0000:00/0000:00:04.0/ ```Shell # ls ari_enabled firmware_node resource broken_parity_status irq resource0 class local_cpulist revision config local_cpus subsystem consistent_dma_mask_bits modalias subsystem_device d3cold_allowed msi_bus subsystem_vendor device numa_node uevent dma_mask_bits power vendor driver_override remove enable rescan ``` 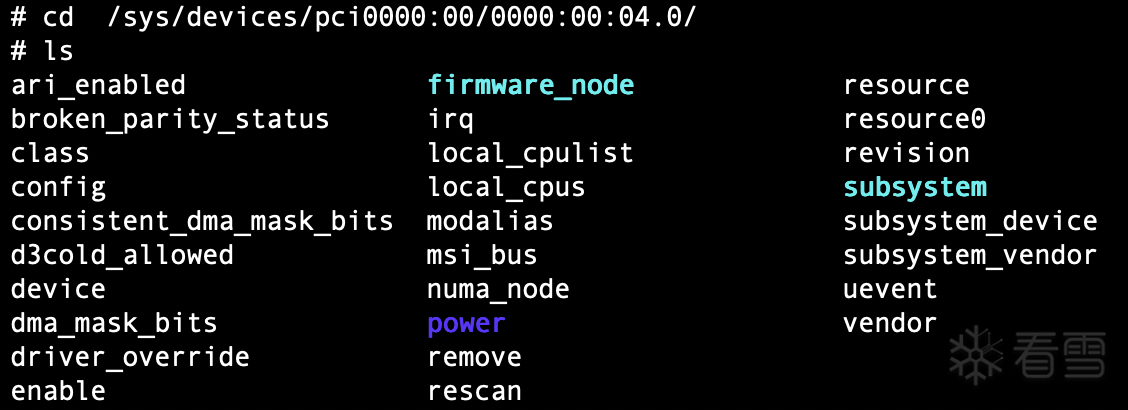 ### Sysfs PCI 设备接口 ```C /sys/devices/pci0000:00/0000:00:04.0/ │ │ │ │ │ └─ Function 号 (0-7) │ │ │ │ └──── Device 号 (0-31) │ │ │ └─────── Bus 号 (0-255) │ │ └─────────── Domain 号 (0-65535) │ └───────────────────── PCI 根总线域 └───────────────────────────────── sysfs 根目录 ``` 1. pci0000:00:PCI 根域(Domain 0000,Bus 00) 2. 0000:00:04.0:具体的 PCI 设备地址 1. 0000 = Domain(PCI 域) 2. 00 = Bus(总线号) 3. 04 = Device(设备号) 4. 0 = Function(功能号) #### 基本信息 | 文件名 | 说明 | 内容示例 | | ---------------- | ---------------------- | ------------------------- | | vendor | Vendor ID(厂商 ID) | 0x8086 (Intel) | | device | Device ID(设备 ID) | 0x7113 (PIIX4 PM) | | subsystem_vendor | 子系统厂商 ID | 0x1af4 | | subsystem_device | 子系统设备 ID | 0x1100 | | class | Class Code(类别代码) | 0x068000 | | revision | 设备版本 | 0x03 | | irq | IRQ 号 | 9 | | modalias | 模块别名 | pci:v00008086d00007113... | | uevent | udev 事件信息 | 多行文本 | #### 配置空间 config文件 : PCI 配置空间(原始数据) 256 字节 (标准 PCI) 4096 字节 (PCIe) - 读取 ```YAML # [ 507.437738] random: crng init done hexdump /sys/devices/pci0000:00/0000:00:04.0/config 0000000 dead beef 0103 0010 0001 00ff 0000 0000 0000010 0000 fea0 0000 0000 0000 0000 0000 0000 0000020 0000 0000 0000 0000 0000 0000 1af4 1100 0000030 0000 0000 0040 0000 0000 0000 010b 0000 0000040 0005 0080 0000 0000 0000 0000 0000 0000 0000050 0000 0000 0000 0000 0000 0000 0000 0000 * 0000100 ``` - 解析 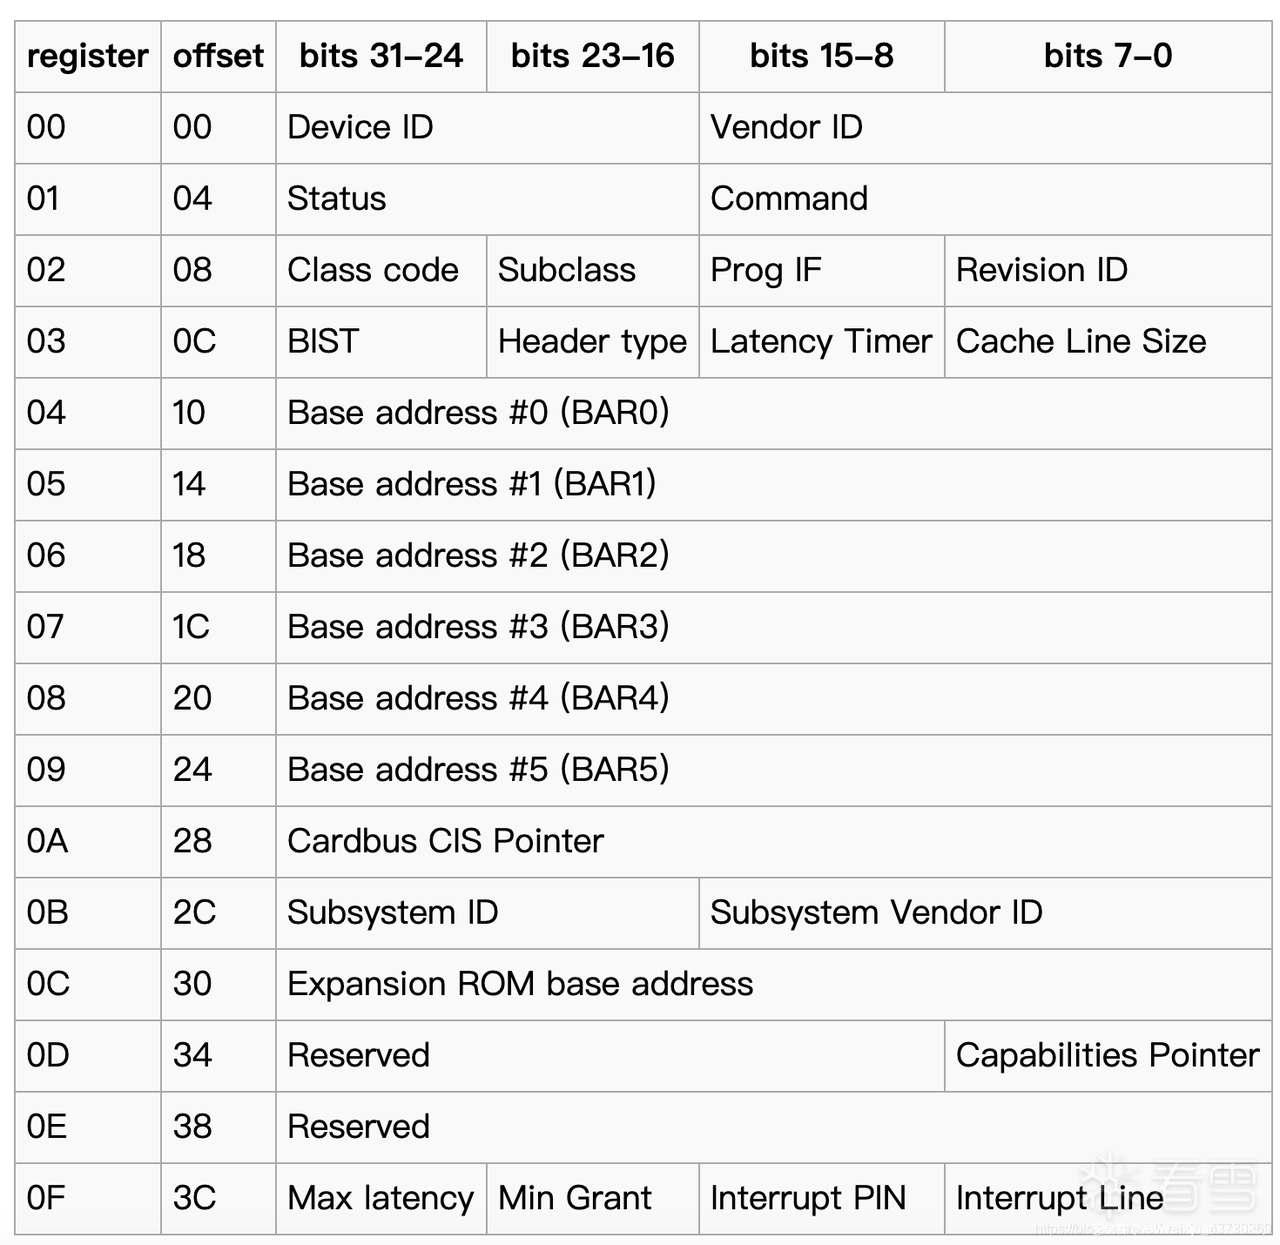 | Offset | 字段 | 值(小端) | 说明 | | ------ | --------------- | ---------- | -------------------------- | | 0x00 | Vendor ID | 0xdead | 厂商 ID(明显是自定义的) | | 0x02 | Device ID | 0xbeef | 设备 ID(典型的 CTF 魔数) | | 0x04 | Command | 0x0103 | 命令寄存器 | | 0x06 | Status | 0x0010 | 状态寄存器 | | 0x08 | Revision ID | 0x01 | 设备版本 | | 0x09 | Class Code | 0xff0000 | 类别代码 | | 0x0C | Cache Line Size | 0x00 | 缓存行大小 | | 0x0D | Latency Timer | 0x00 | 延迟定时器 | | 0x0E | Header Type | 0x00 | 头部类型(标准设备) | | 0x0F | BIST | 0x00 | 内置自检 | - BAR0 解析 - ```YAML 0x0000fea0 (小端) → 0xfea00000 (大端) 0xfea00000 的二进制: 1111 1110 1010 0000 0000 0000 0000 0000 │ └─ Bit 0 = 0: Memory Space ``` - ```Shell ┌─────────────────────────────────────┐ │ BAR0: MMIO │ │ ├─ 地址: 0xfea00000 - 0xfeafffff │ │ ├─ 大小: 1 MB │ │ ├─ 类型: 32-bit, Non-prefetchable │ │ └─ 状态: ✅ 已启用 │ ├─────────────────────────────────────┤ │ BAR1-5: 未使用 │ └─────────────────────────────────────┘ ``` #### 资源文件 BAR | 文件名 | 说明 | | --------- | ------------------------------- | | resource | 所有 BAR 的地址范围(文本格式) | | resource0 | BAR0 的原始数据(二进制) | | resource1 | BAR1 的原始数据 | | resource2 | BAR2 的原始数据 | | resource3 | BAR3 的原始数据 | | resource4 | BAR4 的原始数据 | | resource5 | BAR5 的原始数据 | - 读取 ```C # cat /sys/devices/pci0000:00/0000:00:04.0/resource 0x00000000fea00000 0x00000000feafffff 0x0000000000040200 0x0000000000000000 0x0000000000000000 0x0000000000000000 0x0000000000000000 0x0000000000000000 0x0000000000000000 0x0000000000000000 0x0000000000000000 0x0000000000000000 0x0000000000000000 0x0000000000000000 0x0000000000000000 0x0000000000000000 0x0000000000000000 0x0000000000000000 0x0000000000000000 0x0000000000000000 0x0000000000000000 0x0000000000000000 0x0000000000000000 0x0000000000000000 0x0000000000000000 0x0000000000000000 0x0000000000000000 0x0000000000000000 0x0000000000000000 0x0000000000000000 0x0000000000000000 0x0000000000000000 0x0000000000000000 0x0000000000000000 0x0000000000000000 0x0000000000000000 0x0000000000000000 0x0000000000000000 0x0000000000000000 ``` 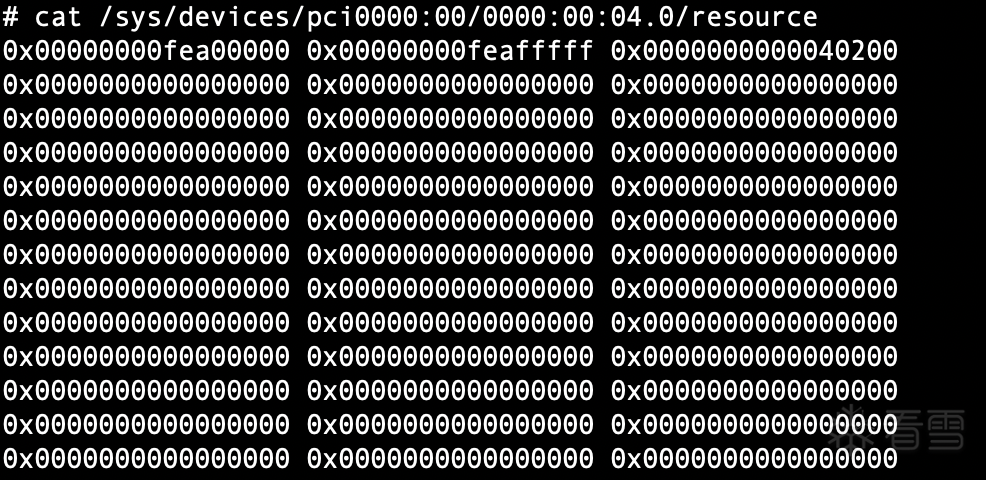 - 解析 - 每行三个字段:起始地址 结束地址 标志位(最后一位表示类型:偶数=MMIO,奇数=PMIO) - 这里可以看见仅仅是用了 BAR0 - ```Shell 0x00000000fea00000 0x00000000feafffff 0x0000000000040200 ← BAR0 0x0000000000000000 0x0000000000000000 0x0000000000000000 ← BAR1 (未使用) 0x0000000000000000 0x0000000000000000 0x0000000000000000 ← BAR2 (未使用) ... ``` - 标识位解析 - ```Shell 0x0000000000040200 ││││ │││└─ Bit 0 = 0: Memory Space (MMIO,不是 I/O) ││└── Bit 1 = 0: 32-bit address │└─── Bit 3 = 0: Non-prefetchable └──── Bit 9 = 1: 64-bit capable ``` - Bit 0:Region Type,总是为 0,用于区分此类型为 Memory - Bits 2-1:Locatable,为 0 时表示采用 32 位地址,为 2 时表示采用 64 位地址,为 1 时表示区间大小小于 1MB - Bit 3:Prefetchable,为 0 时表示关闭预取,为 1 时表示开启预取 - Bits 31-4:Base Address,以 16 字节对齐基址 #### 电源管理 | 文件名 | 说明 | | -------------------- | ------------------- | | power/control | 电源控制(auto/on) | | power/runtime_status | 运行时电源状态 | | power/wakeup | 唤醒功能 | #### 驱动信息 | 文件/目录 | 说明 | | --------------- | ---------------------- | | driver | 指向当前驱动的符号链接 | | driver_override | 强制使用特定驱动 | | | | - 查看驱动信息 ```C readlink /sys/devices/pci0000:00/0000:00:01.3/driver # 输出: ../../../../bus/pci/drivers/piix4_smbus ``` #### 其他重要文件 | 文件名 | 说明 | 操作 | | ------------------------ | -------------------- | ----------------- | | enable | 启用/禁用设备 | echo 0/1 > enable | | remove | 移除设备 | echo 1 > remove | | rescan | 重新扫描设备 | echo 1 > rescan | | reset | 复位设备 | echo 1 > reset | | broken_parity_status | 奇偶校验错误状态 | 读取 | | d3cold_allowed | 允许 D3cold 电源状态 | 读写 | | msi_bus | MSI 总线支持 | 读写 | | numa_node | NUMA 节点 | 读取 | | consistent_dma_mask_bits | DMA 掩码位数 | 读取 | ## M/PMIO 空间的读写
登录后可查看完整内容
传递专业知识、拓宽行业人脉——看雪讲师团队等你加入!!
#基础知识
#内核
收藏
・
20
点赞
・
13
打赏
分享
分享到微信
分享到QQ
分享到微博
赞赏记录
参与人
雪币
留言
时间
wx_晨梦
感谢你的贡献,论坛因你而更加精彩!
2026-7-16 07:33
不可爱了
+10
谢谢你的细致分析,受益匪浅!
2026-3-23 14:15
Red_kl
感谢你分享这么好的资源!
2026-3-8 17:31
n00bzx
感谢你分享这么好的资源!
2026-3-6 21:06
mb_vzsnpfhs
感谢你的贡献,论坛因你而更加精彩!
2026-3-6 14:52
孤独的街
期待更多优质内容的分享,论坛有你更精彩!
2026-3-5 15:36
青丝梦
+10
谢谢你的细致分析,受益匪浅!
2026-2-19 10:40
点中你的心
+1
感谢你分享这么好的资源!
2026-2-12 13:00
cr_lgdx
谢谢你的细致分析,受益匪浅!
2026-2-8 19:42
木志本柯
+5
感谢你的积极参与,期待更多精彩内容!
2026-2-8 12:38
mb_yokabxhi
感谢你分享这么好的资源!
2026-2-8 10:30
winmt
+10
感谢你分享这么好的资源!
2026-2-8 00:36
我的小拇指啊
期待更多优质内容的分享,论坛有你更精彩!
2026-2-8 00:08
查看更多
赞赏
×
1 雪花
5 雪花
10 雪花
20 雪花
50 雪花
80 雪花
100 雪花
150 雪花
200 雪花
支付方式:
微信支付
赞赏留言:
快捷留言
感谢分享~
精品文章~
原创内容~
精彩转帖~
助人为乐~
感谢分享~
最新回复
(
9
)
winmt
雪 币:
4955
活跃值:
(11920)
能力值:
(RANK:438 )
在线值:
发帖
11
回帖
89
粉丝
402
关注
私信
winmt
9
2
楼
感谢分享
2026-2-8 00:37
0
Imxz
雪 币:
110
活跃值:
(9571)
能力值:
( LV2,RANK:10 )
在线值:
发帖
6
回帖
775
粉丝
9
关注
私信
Imxz
3
楼
tql
2026-2-8 18:27
0
huangjw
雪 币:
6747
活跃值:
(11957)
能力值:
( LV2,RANK:10 )
在线值:
发帖
0
回帖
514
粉丝
2
关注
私信
huangjw
4
楼
年底干货文章很多呀。 火钳刘明
2026-2-9 09:30
0
小菜脑
雪 币:
318
活跃值:
(750)
能力值:
( LV2,RANK:10 )
在线值:
发帖
1
回帖
7
粉丝
4
关注
私信
小菜脑
5
楼
感谢大佬分享
2026-2-10 13:33
0
飞翔的猫咪
雪 币:
7308
活跃值:
(9484)
能力值:
( LV12,RANK:240 )
在线值:
发帖
26
回帖
47
粉丝
379
关注
私信
飞翔的猫咪
5
6
楼
感谢分享,如果再补充讲解一下seabios如何为各个pci设备设置mmio映射区域和edu pci设备代码就更好了
2026-2-11 09:59
1
xyzliao
雪 币:
725
活跃值:
(5683)
能力值:
( LV3,RANK:20 )
在线值:
发帖
4
回帖
131
粉丝
4
关注
私信
xyzliao
7
楼
大佬!!!
2026-2-13 14:25
0
Elenia
雪 币:
6261
活跃值:
(3344)
能力值:
( LV9,RANK:330 )
在线值:
发帖
13
回帖
19
粉丝
102
关注
私信
Elenia
7
8
楼
飞翔的猫咪
感谢分享,如果再补充讲解一下seabios如何为各个pci设备设置mmio映射区域和edu pci设备代码就更好了[em_014]
好的好的
2026-2-13 17:46
1
n00bzx
雪 币:
2703
活跃值:
(3934)
能力值:
( LV12,RANK:286 )
在线值:
发帖
7
回帖
60
粉丝
10
关注
私信
n00bzx
2
9
楼
文章的结束,思考的起点...
2026-3-6 21:06
0
不可爱了
雪 币:
0
活跃值:
(40)
能力值:
( LV2,RANK:10 )
在线值:
发帖
0
回帖
2
粉丝
0
关注
私信
不可爱了
10
楼
大佬您好,感谢您的分享,不知道有没有机会可以跟您进一步深入探讨一下?
2026-3-23 14:16
0
游客
登录
|
注册
方可回帖
回帖
表情
雪币赚取及消费
高级回复
返回
Elenia
7
13
发帖
19
回帖
330
RANK
关注
私信
他的文章
[原创] Qemu 源码分析(PCI篇)
24934
[原创] Frida 17.6 最新Hook注入方案分析(Zymbiote注入机制)
75392
[原创] Android 内核启动流程分析 (13.0.0_r3)
21438
[原创] UE4的启动流程分析
3189
[原创]Linux 内核攻击:Punch hole (2025 Backdoor skernel 复现)
21217
关于我们
联系我们
企业服务
看雪公众号
专注于PC、移动、智能设备安全研究及逆向工程的开发者社区
看原图
赞赏
×
雪币:
+
留言:
快捷留言
为你点赞!
返回
顶部