首页
社区
课程
招聘
[原创]深入解析C++ stl实现原理
发表于: 2024-10-31 16:28 2284

[原创]深入解析C++ stl实现原理

2024-10-31 16:28
2284

一、关于C++11/14

C++ STL(标准模板库)是C++重要的组成部分,我们c++程序员每天都在使用stl,对于c++11/14/17新标准。究竟stl底层是如何实现的?我们去探究一下。

C++11标准 是 C++ 语言发展史上具有里程碑意义的一个版本,掌握C++11/14以及以后得新标准是每个c++程序员基础技能!不能还停留在传统c++的知识层面上(C++98/03)。

二、STL实现原理

2.1 std::thread实现原理

2.1.1 thread::thread构造函数创建线程

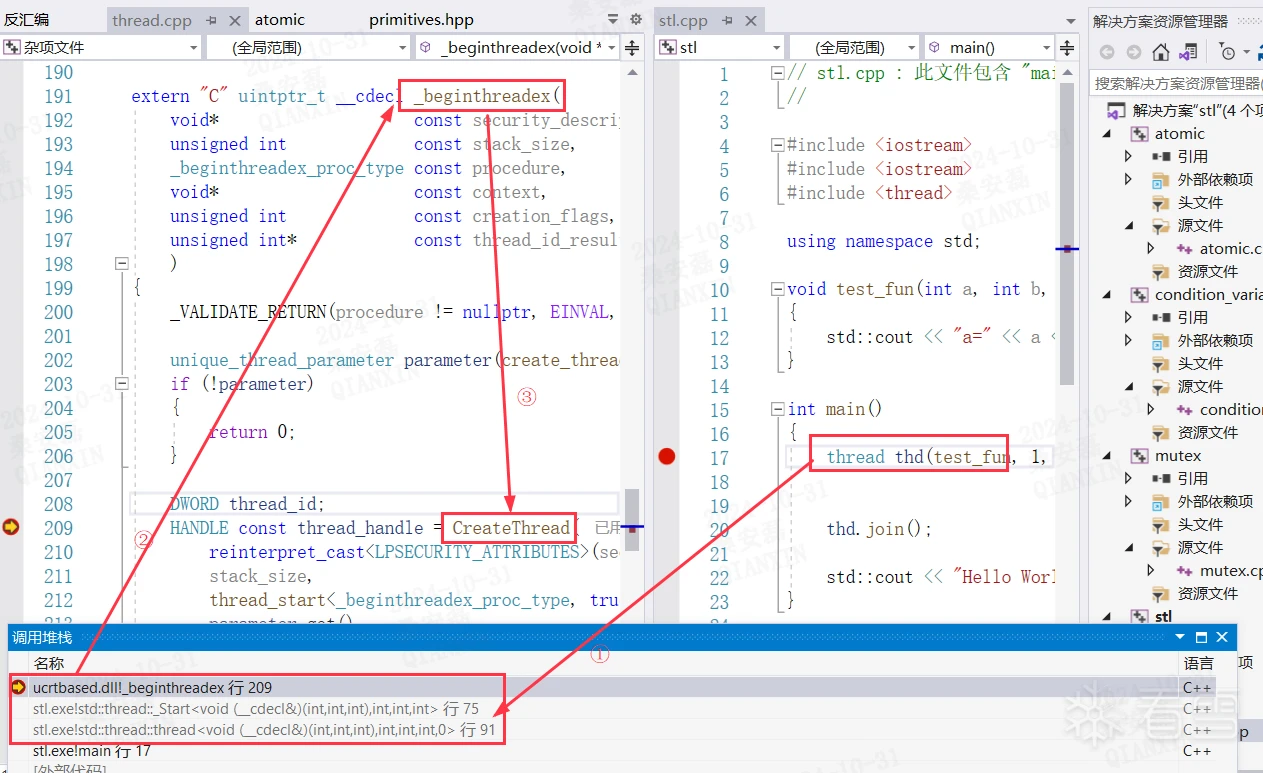
     std::thread的构造函数->c运行时库的线程函数_beginthreadex->WIN 32 API创建线程CreateThread

		#include <iostream>
		#include <thread>

		using namespace std;

		void test_fun(int a, int b ,int c)
		{
			std::cout << "a=" << a << ", b=" << b << ", c=" << c << std::endl;
		}

		int main()
		{
			thread thd(test_fun, 1, 2, 3);


			thd.join();

			std::cout << "Hello World!\n";
		}

以下是调试具体的调用流程

备注:要向单步调试到_beginthreadex需要给模块ucrtbased.dll加载符号,此函数位于文件C:\Program Files (x86)\Windows Kits\10\Source\10.0.19041.0\ucrt\startup\thread.cpp

2.1.2 thread::join等待线程结束的实现原理

     此函数的作用是阻塞等待线程执行结束。

     实现原理:thead::join()->msvcp140d.dll!_Thrd_join() ->Win32 API WaitForSingleObjectEx 等待线程的执行结束
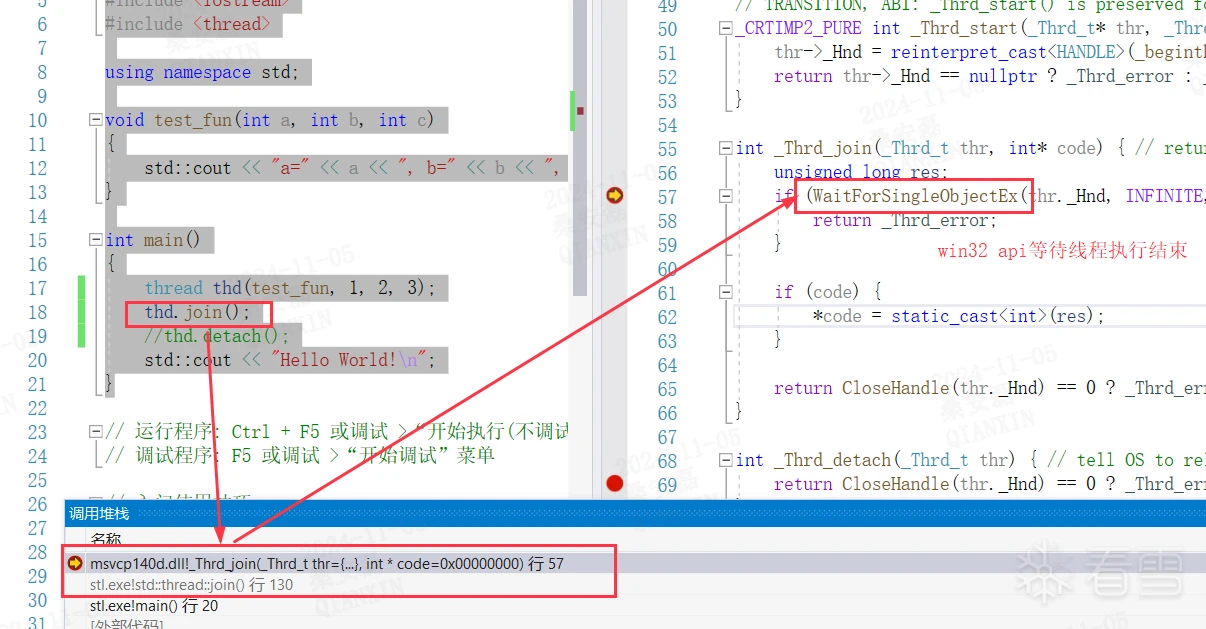
     

       备注:要想命中_Thrd_join(),需要给msvcp140d加载符号!

2.1.3 thread::detach脱离线程

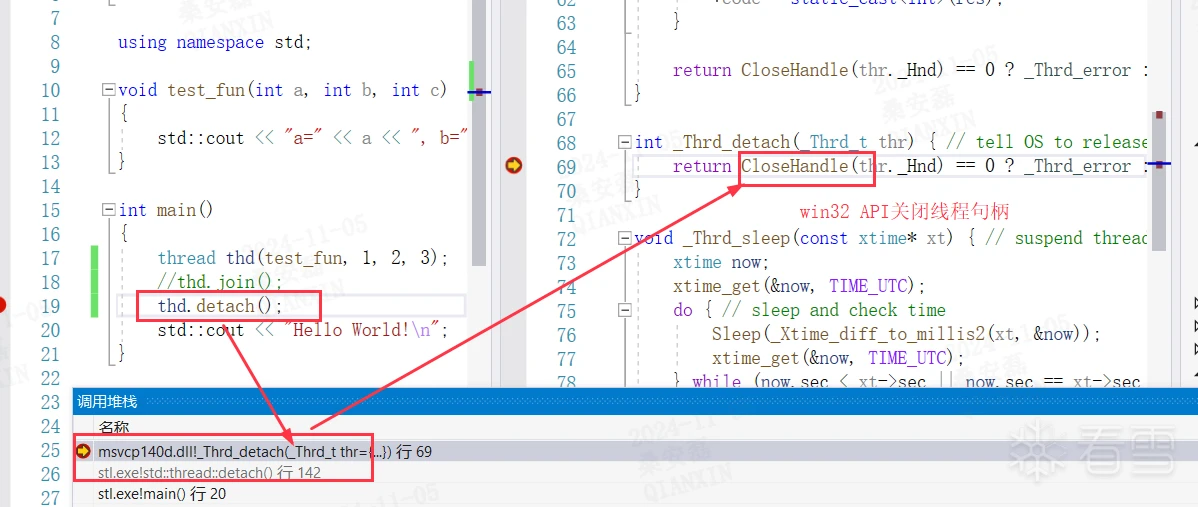
     就是不等待线程执行,主线程和工作者线程分离

     实现原理:std::thread::detach()->msvcp140d.dll!_Thrd_detach()->Win32 API CloseHandle()
  2.1.4   this_thread::sleep_for

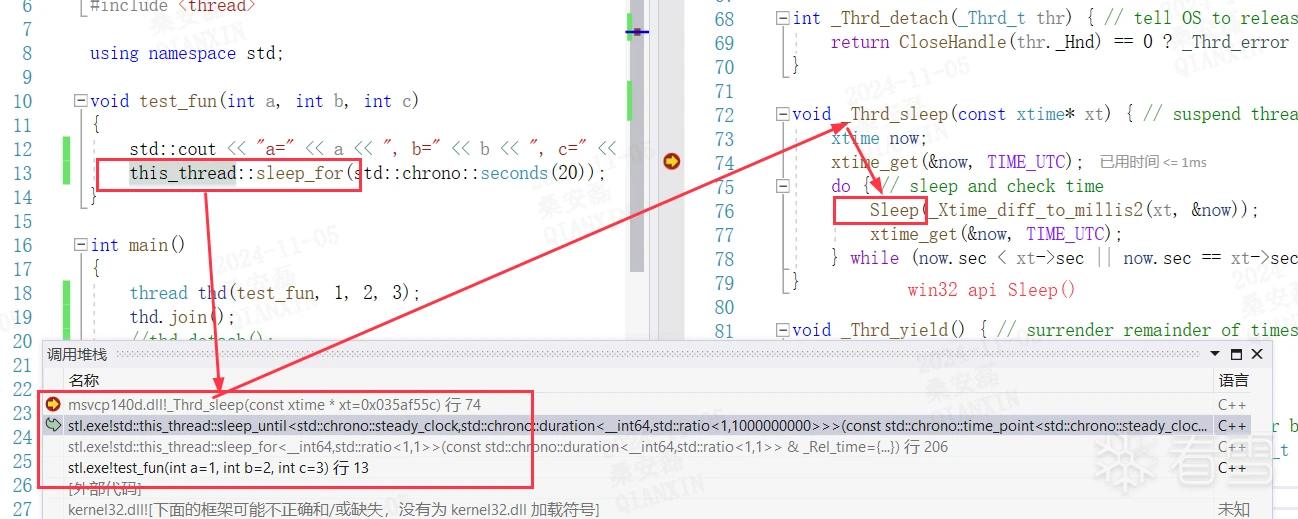
  this_thread::sleep_for() 函数=>msvcp140d.dll!Thrd_sleep()函数=>win32api Sleep()
2.2 std::mutex实现原理

2.2.1 lock函数的实现原理

std::mutex的成员函数std::_Mutex_base::lock()->msvcp140d.dll!_Mtx_lock()->

msvcp140d.dll!Concurrency::details::stl_critical_section_win7::lock() ->

Win32 API 读写锁AcquireSRWLockExclusive
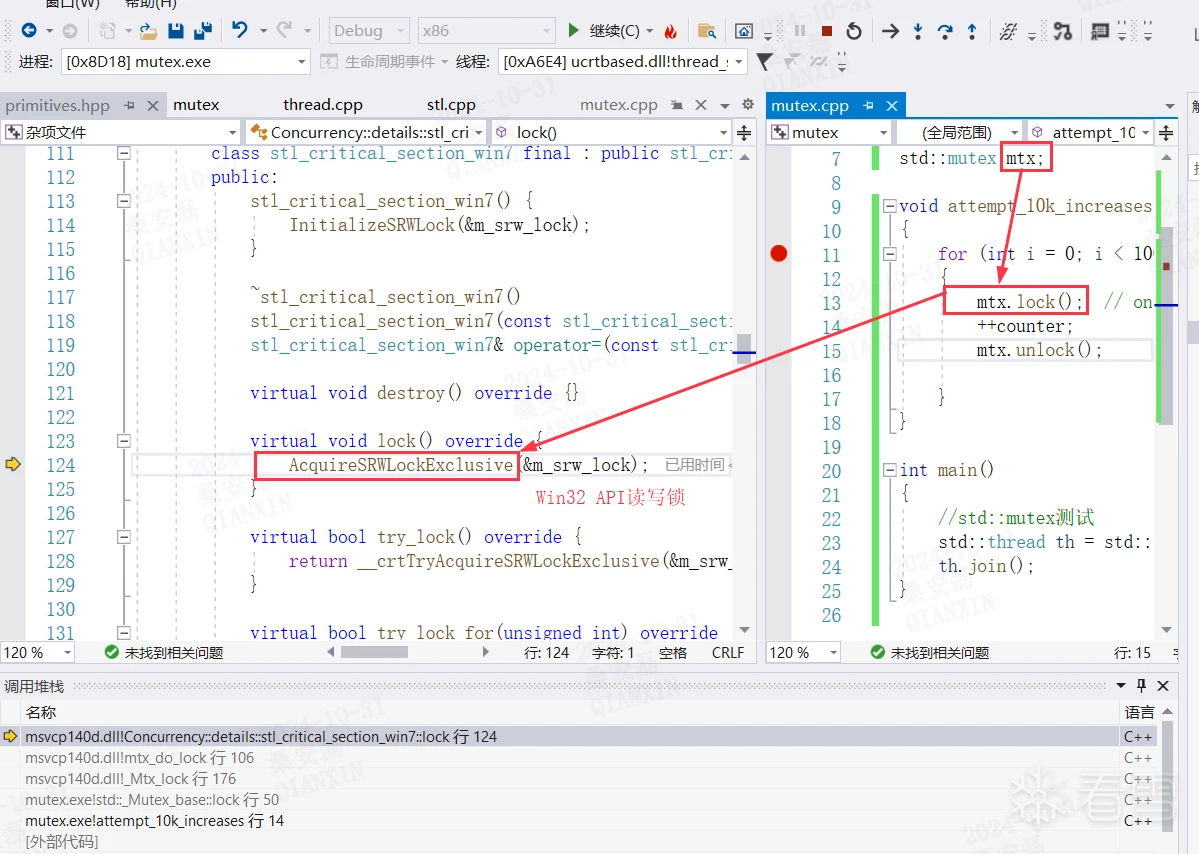
以下是测试代码:

#include <mutex>
#include <thread>

int counter = 0;
std::mutex mtx;

void attempt_10k_increases()
{
	for (int i = 0; i < 10000; ++i)
	{
		mtx.lock();  // only increase if currently not locked:
		++counter;
		mtx.unlock();

	}
}

int main()
{
	//std::mutex测试
	std::thread th = std::thread(attempt_10k_increases);
	th.join();
}

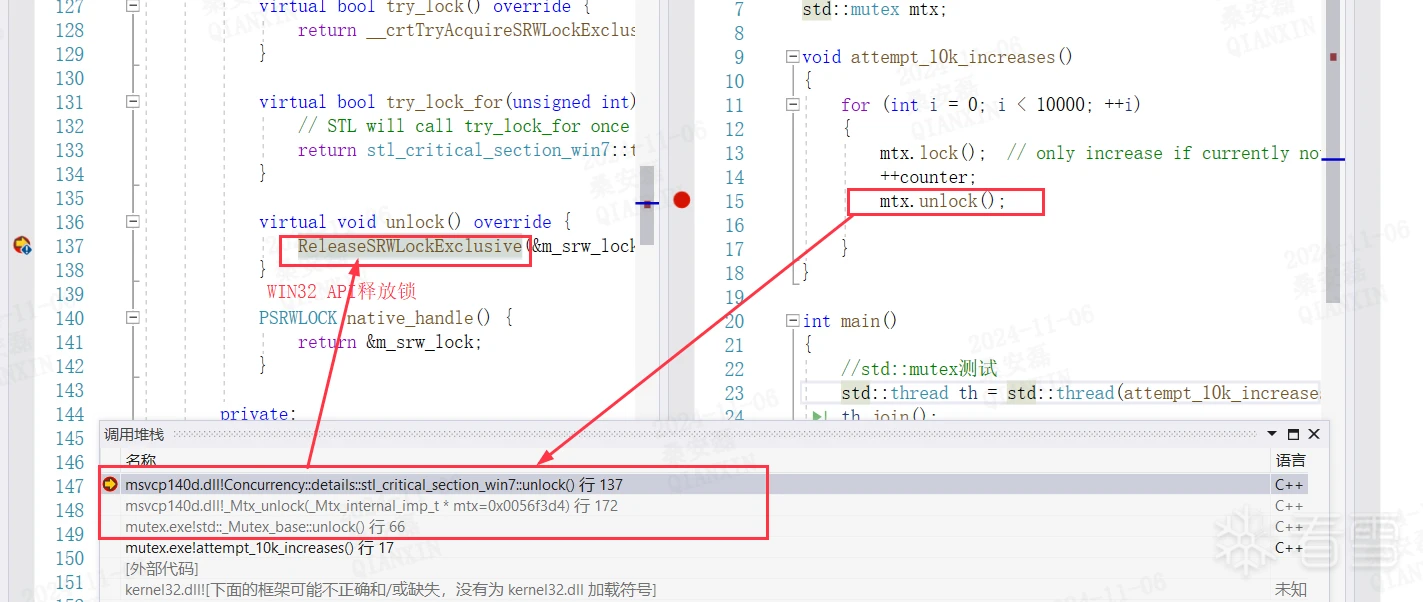
2.2.2 unlock函数的实现原理

std::mutex的成员函数std::_Mutex_base::unlock()->msvcp140d.dll!_Mtx_unlock()->msvcp140d.dll!Concurrency::details::stl_critical_section_win7::unlock()-> Win32 APIReleaseSRWLockExclusive

2.3 std::condition_variable条件变量的实现原理

     解说:条件变量,是Windows Vista中新增加的一种处理线程同步问题的机制。它可以与“关键代码段(critical section)”或“读写锁(SRWLock)”相互 配合使用,来实现线程的同步,特别是实现类似“生产者-消费者”问题  的时候,十分有效。

         先说下条件变量的各个成员函数对应的Win 32 API:

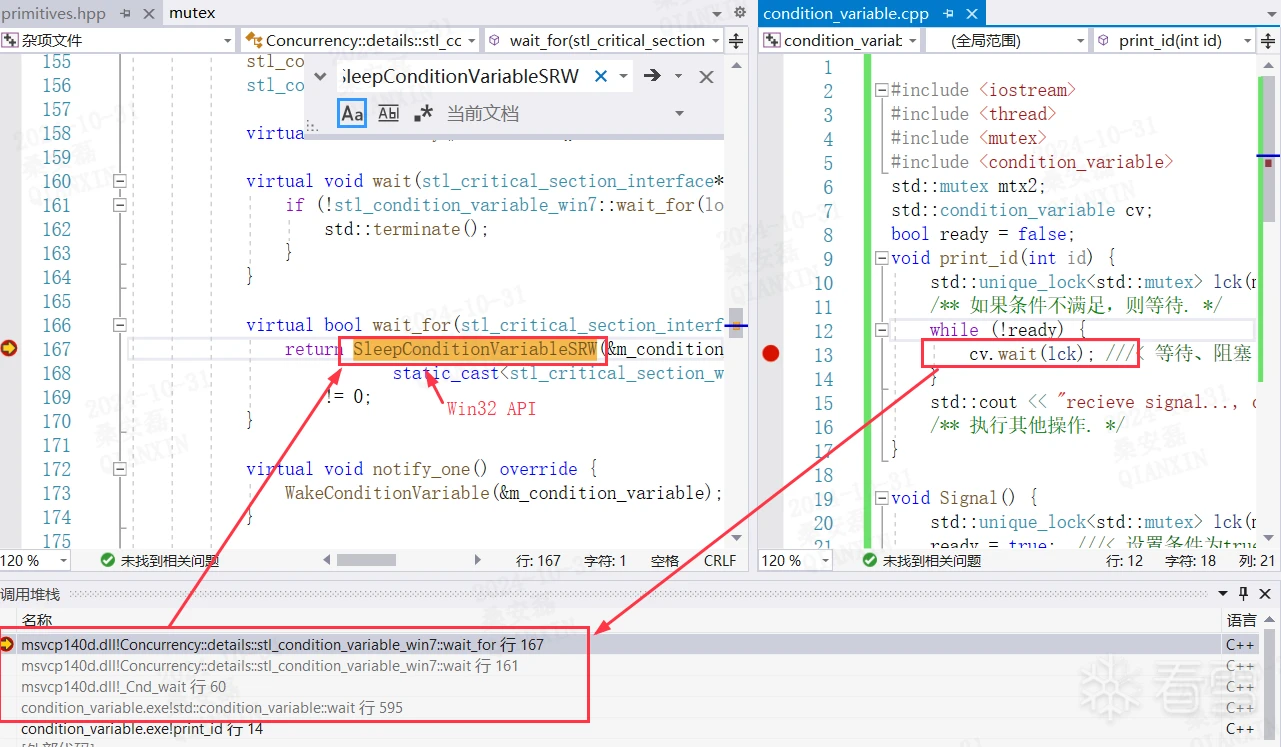
                std::condition_variable::wait()         对应win32 API:   SleepConditionVariableSRW

                std::condition_variable::notify_all         对应win32 API:   WakeAllConditionVariable

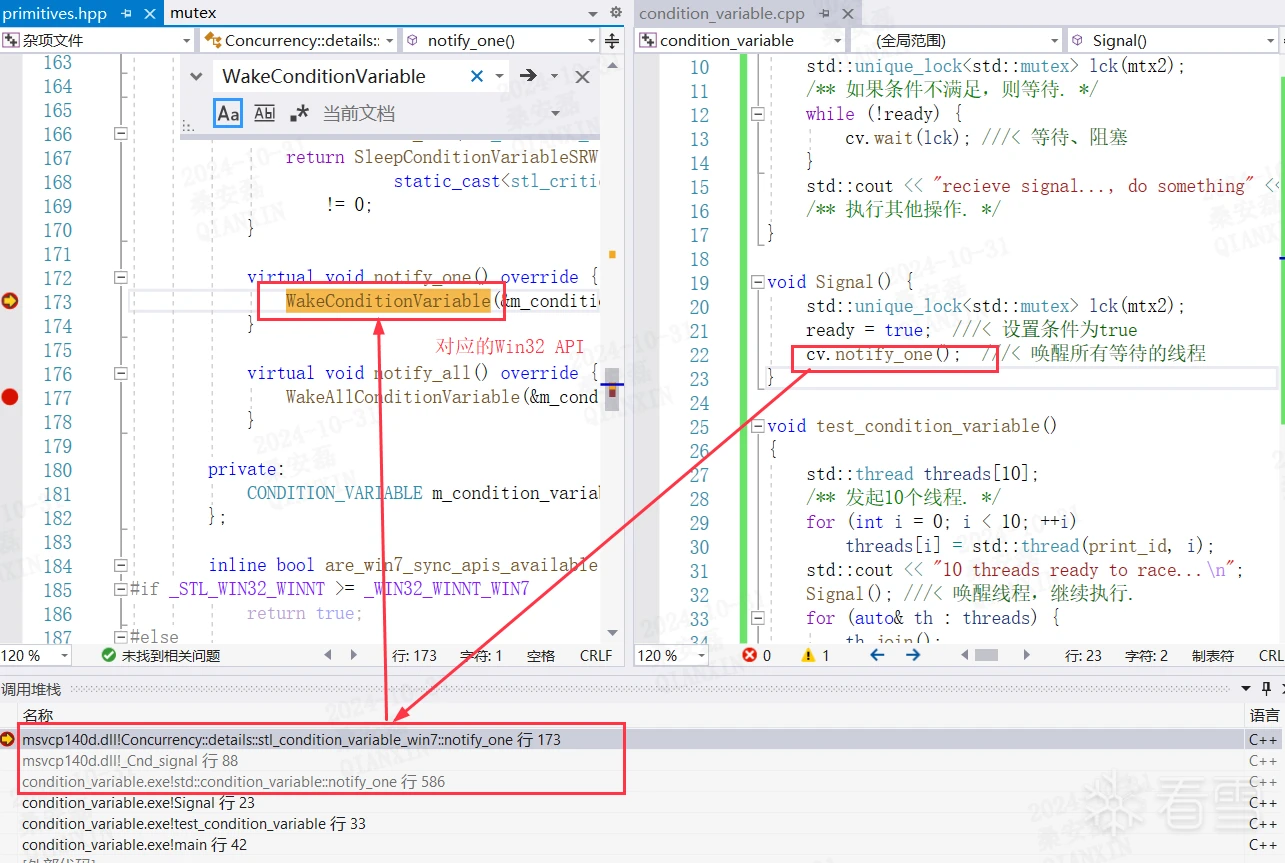
                std::condition_variable::notify_one         对应win32 API:   WakeConditionVariable

    2.3.1 std::condition_variable::wait()的实现原理

           wait() 函数底层调用的是win32 API:   SleepConditionVariableSRW


   2.3.2 std::condition_variable::notify_one()的实现原理

          notify_one()函数底层调用的是Win32 API:WakeConditionVariable


 2.3.3 std::condition_variable::notify_all()的实现原理

       notify_all()函数底层调用的是Win32 API:WakeAllConditionVariable
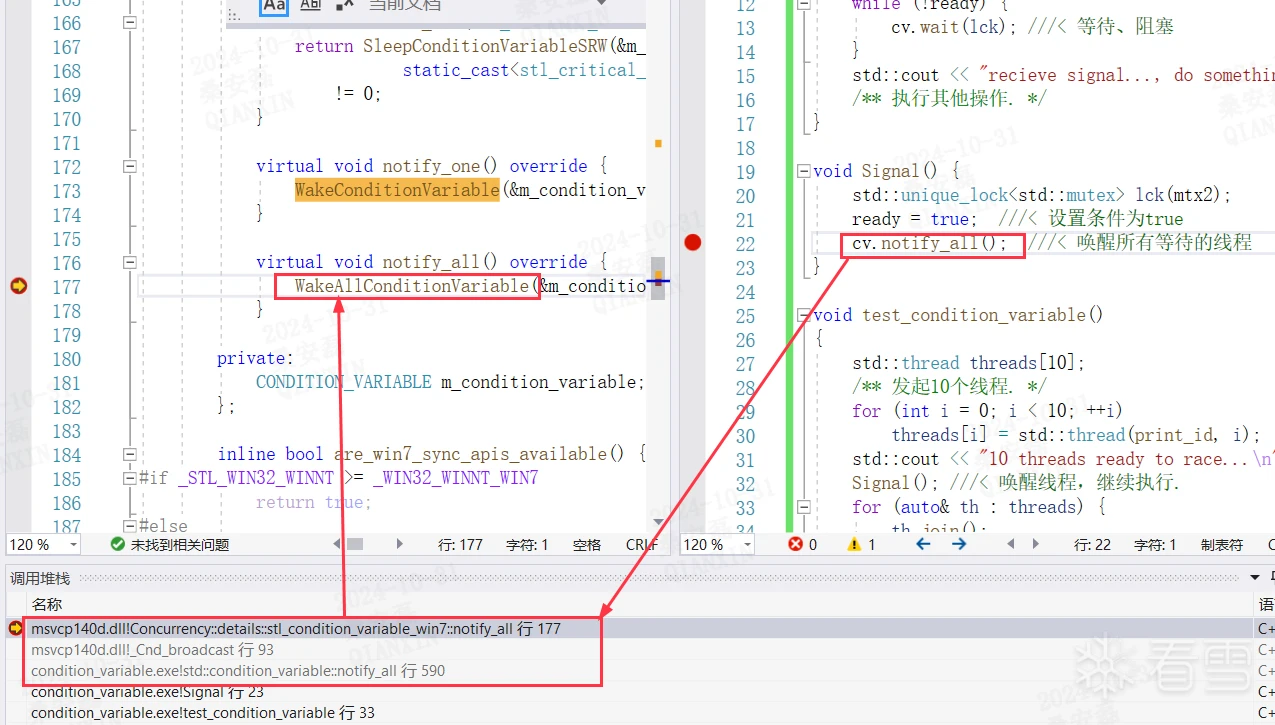
      

以下是测试代码:

		#include <iostream>  
		#include <thread>  
		#include <mutex>  
		#include <condition_variable>  
		std::mutex mtx2;
		std::condition_variable cv;
		bool ready = false;
		void print_id(int id) {
			std::unique_lock<std::mutex> lck(mtx2);
			/** 如果条件不满足,则等待. */
			while (!ready) {
				cv.wait(lck); ///< 等待、阻塞
			}
			std::cout << "recieve signal..., do something" << std::endl;
			/** 执行其他操作. */
		}

		void Signal() {
			std::unique_lock<std::mutex> lck(mtx2);
			ready = true;  ///< 设置条件为true  
			cv.notify_all();  ///< 唤醒所有等待的线程  
		}

		void test_condition_variable()
		{
			std::thread threads[10];
			/** 发起10个线程. */
			for (int i = 0; i < 10; ++i)
				threads[i] = std::thread(print_id, i);
			std::cout << "10 threads ready to race...\n";
			Signal(); ///< 唤醒线程,继续执行.
			for (auto& th : threads) {
				th.join();
			}
			getchar();
		}

2.4 std::atomic原子操作的实现原理

    原子操作的实现原理值通过支持原子操作的汇编指令实现的(无锁编程Lock-free)。底层调用的是Win32 API的无锁函数

      _InterlockedExchange、_InterlockedIncrement 等系列的函数,这种函数有很多个,可以自行查阅。

     汇编指令原子操作方法,在汇编语言中,原子操作是只不能被中断或者同时执行多个指令的操作,原子操作通常用于对共享资源的读写操作,确保在多线程环境下数组的一致性。在x86架构下,汇编指令提供了一些原子操作的方法,例如:


汇编指令功能格式备注
XCHG交换两个操作数的值。这个指令可以用来实现原子的“读-改-写”操作XCHG [地址],[寄存器]
LOCK锁定总线指令,确保指令的执行是原子的LOCK 指令
CMPXCHG比较并交换操作数的值,这个指令可以用来实现原子的比较和更新指令CMPXCHG [地址],[寄存器]
XADD将寄存器的值与内存中的值相加,并将结果存回内存,这个指令可以用于实现原子的加法操作XADD [地址],[寄存器]


    以上是一些常用的汇编指令原子操作的方法,他们可以通过锁定指令总线或者其他的硬件机制来确保操作的原子性,不同的处理器和架构可能提供不同的原子操作方法。

2.4.1 原子操作1:交换两个数的值()

           有如下代码:

      atomic_int nInt = 1;
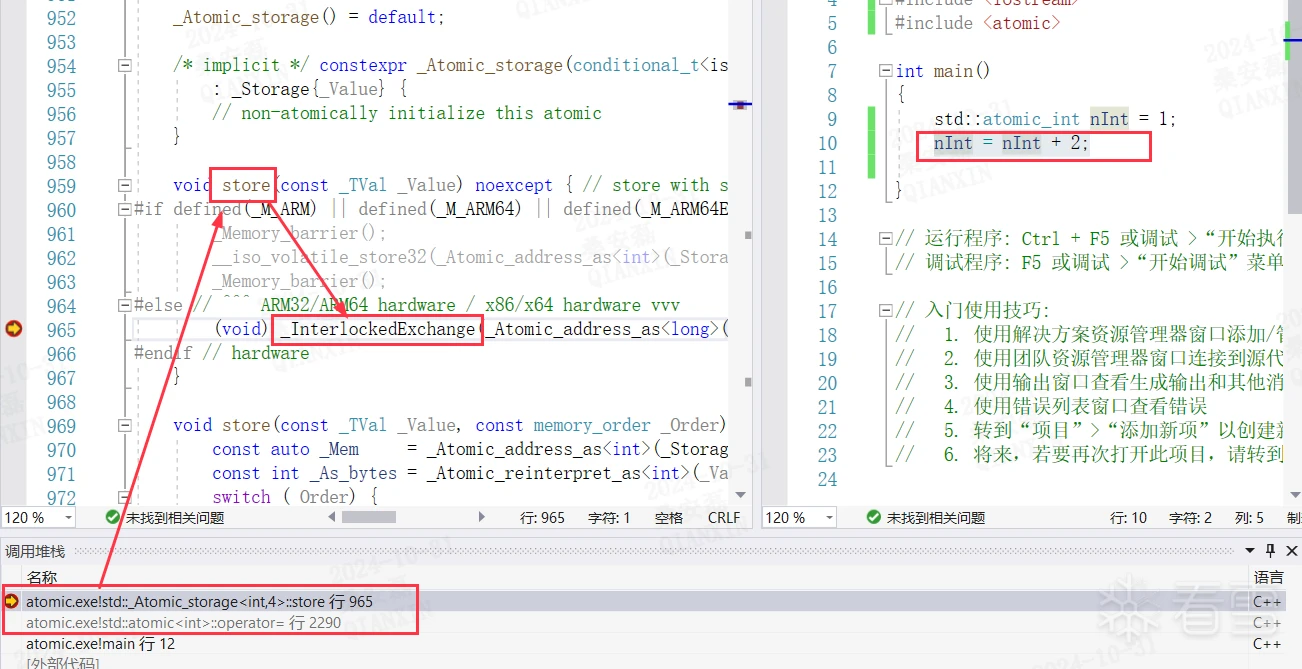
      nInt = nInt + 2;//这里会调用Win32无锁编程的函数_InterlockedExchange

   其调用过程如下,可看到nInt = nInt + 2;这一句代码底层调用的是Win32 API _InterlockedExchange(原子交换两个数的值)
     

    那么Win32 API _InterlockedExchange是如何实现原子操作的?来看一下此函数对应的汇编代码:
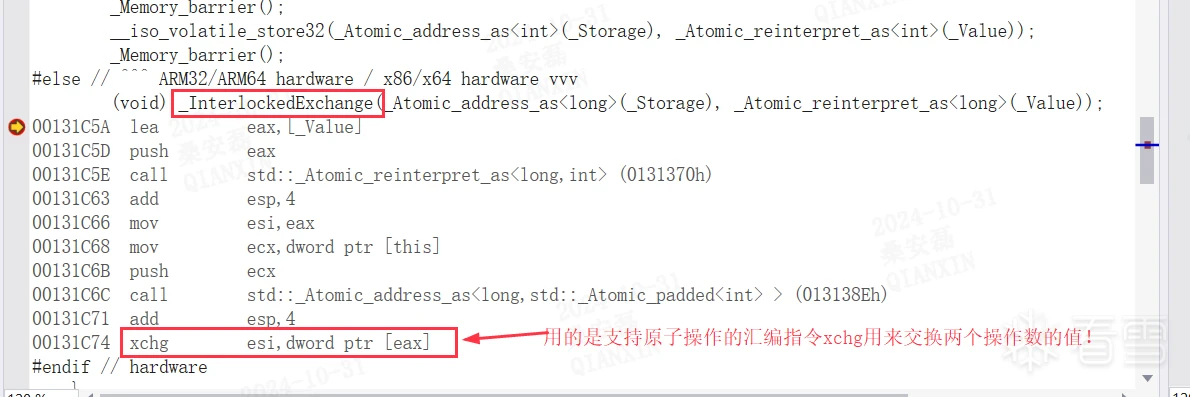
     

     通过上图可以看到 _InterlockedExchange函数用了支持原子操作的汇编指令xchg,来交换两个操作数的值。可以参考上面的表格


  2.4.1 原子操作1:原子加法操作

     有如下代码:

			atomic_int nInt = 1;
			nInt++;

    其调用过程如下:可以看到nInt++这句代码调用的是Win32 API _InterlockedIncrement(原子加法操作)
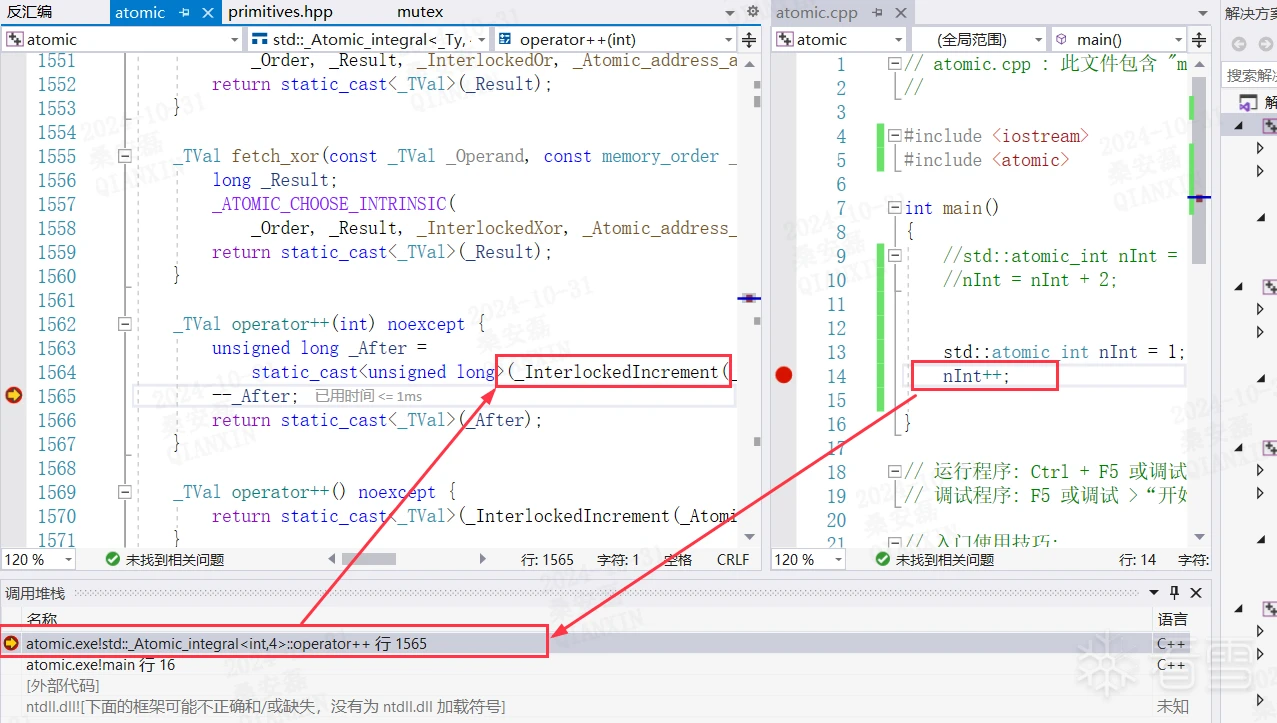
   

那么Win32 API _InterlockedIncrement是如何实现原子操作的?来看一下此函数对应的汇编代码:
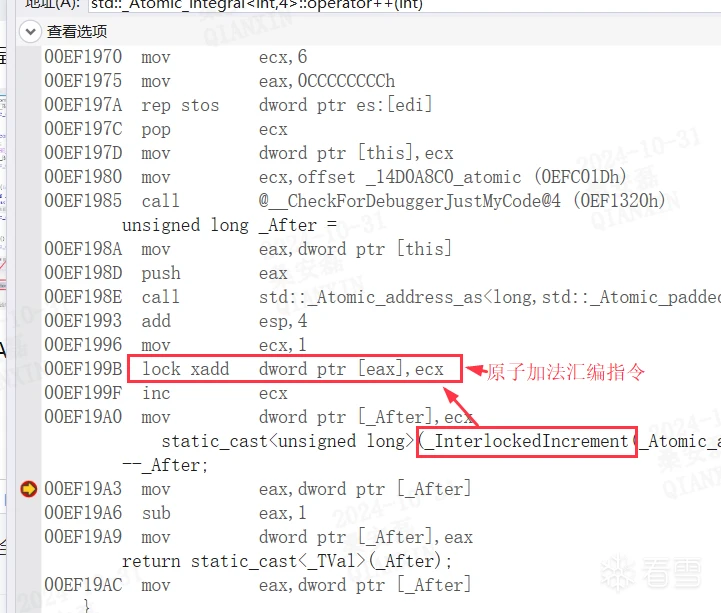
可以看到_InterlockedIncrement用到是原子加法汇编指令lock xadd,可以参考上面的表格。

2.5 万能引用、引用折叠

    万能引用的两个前提条件:一是函数模板的形参、二是类型为T&& val,否则大部分就是右值引用

    理解万能引用和引用折叠是理解完美转发std::forward和std::move的前提,所以这里首先搞明白这个概念。

关于引用折叠的核心是,C++11当中的一些构造会弄出来引用的引用,而C++不允许出现引用的引用。如果代码当中显示的出现了一个引用的引用,那代码就是不合法的,会出现编译错误。

template<typename T>
void f(T&& param) {

}

int main() {

    int x = 666;
    f(10);                           // invoke f on rvalue
    f(x);                            // invoke f on lvalue
}

当用rvalue 10调用 f 的时候, T被推导为 int,实例化的 f 看起来像这样:

void f(int&& param);             // f instantiated from rvalue

这里一切都OK。但是当我们用lvalue x 来调用 f 的时候,T 被推导为int&,而实例化的 f 就包含了一个引用的引用:

void f(int& && param);           // initial instantiation of f with lvalue

因为这里出现了引用的引用,这实例化的代码乍一看好像不合法,但是像f(x)这么写代码是完全合理的。为了避免编译器对这个代码报错,C++11引入了一个叫做“引用折叠”(reference collapsing)的规则来处理某些像模板实例化这种情况下带来的"引用的引用"的问题。

"引用的引用"就有四种可能的组合:

    a)左值引用的左值引用:int&  &                            折叠为 int&

    b)   左值引用的右值引用:int&  &&                         折叠为 int&

    c)   右值引用的左值引用:int&&  &                         折叠为 int&

    d)   右值引用的右值引用:int&&  &&                      折叠为 int&&


引用折叠只有两条规则:

         一个 rvalue reference to an rvalue reference 会变成 (“折叠为”) 一个 rvalue reference.

         所有其他种类的"引用的引用" (组合当中含有lvalue reference) 都会折叠为 lvalue reference.

下面再来看引用一种引用折叠的情况,

当一个变量本身的类型是引用类型的时候,这里就有点难搞了。这种情况下,类型当中所带的引用就被忽略了。例如

代码如下:

template<typename T>
void f(T &&param) {
    static_assert(std::is_lvalue_reference<T>::value, "T& is lvalue reference");
    cout << "T& is lvalue reference" << endl;
}
 
int main() {
    int x;
    int &&r1 = 10;// r1’s type is int&&
    int &r2 = x;// r2’s type is int&
    f(r1);
    f(r2);
}

在调用模板函数 f 的时候 r1 和 r2 的类型都被当做 int。这个扒掉引用的行为,和"universal references 在类型推导期间,lvalues 被推导为 T& ,rvalues 被推导为"T" 这条规则无关。所以,这么调用模板函数的时候r1 和r2 的类型都被推导为 int&。这是为啥呢?

首先,r1 和 r2 的引用部分被去掉了(留下的只是 int)。然后,因为它们都是 lvalues 所以当调用 f,对 universal reference 参数进行类型推导的时候,得到的类型都是int&。


2.6 std::forward完美转发

2.6.1 什么是完美转发

std::forward是C++11引入的一个模板函数,  完美转发是C++中一种高级的技术,用于在函数模板中转发参数至另一个函数,同时保持所有参数的值类别(左值、右值)和其他属性(如const修饰符)不变。这一技术主要通过模板和std::forward实现,并在泛型编程中尤为重要,因为它允许函数模板在不丢失任何参数信息的前提下传递参数。

理解完美转发的要点:

  • 仅在模板函数中,并且配合万能引用参数使用

  • 维护参数属性的完整性:确保参数的const属性和值类别在转发过程中不被改变,这对于编写通用代码库和API尤为重要

  • 完美转发可以避免在函数间传递时不必要的拷贝操作,优化性能。

下面看一个不完美转发的例子:

#include <iostream>
#include <xutility>

//形参为左值引用
void fun(int& x)
{
    std::cout << "Received an left value" << x << std::endl;
}

//形参为右值引用
void fun(int&& x)
{
    std::cout << "Received an right value" << x << std::endl;
}

template <typename T>
void MiddleLayerFun(T&& param)//形参永远是左值
{
  fun(param);//不完美转发,此时param已经是左值,永远调用左值版本的函数。

}

int main()
{
    int a = 10;
    MiddleLayerFun(a);
    MiddleLayerFun(20);
}

以上的例子,两次函数调用MiddleLayerFun,只会调用到调用到第一个函数void fun(int& x),不会调用到void fun(int&& x)

因为param是个形参,形参永远是左值,所以只会调用左值版本

下面看一个完美转发的例子:

#include <iostream>
#include <xutility>

//形参为左值引用
void fun(int& x)
{
    std::cout << "Received an left value" << x << std::endl;
}

//形参为右值引用
void fun(int&& x)
{
    std::cout << "Received an right value" << x << std::endl;
}

template <typename T>
void MiddleLayerFun(T&& param)//形参永远是左值,所以param是左值。
{
    //完美转发,
    //MiddleLayerFun(a)调用左值版本void fun(int& x),
    //MiddleLayerFun(20)调用右值版本void fun(int&& x)
    fun(std::forward<T>(param));//std::forward<T>(param)的参数param是左值,调用左值版本的forward
}

int main()
{
    int a = 10;
    MiddleLayerFun(a);//a是左值,T会被推导为int&
    MiddleLayerFun(20);//20是右值,T会被推导为int
}

MiddleLayerFun(a),参数a是个左值,通过函数模板的MiddleLayerFun和完美转发调用左值版本的函数,

MiddleLayerFun(20)调用,参数20是个右值,通过函数模板的MiddleLayerFun和完美转发调用右值版本的函数。

上面就是完美转发。

2.6.2 完美转发的原理

std::forward 根据传入参数的类型在编译时确定返回左值引用或右值引用:

  • 当传递给std::forward的参数是一个左值时,std::forward返回一个左值引用。

  • 当传递给std::forward的参数是一个右值时,它返回一个右值引用。

这种行为使得std::forward非常适合用于函数模板中,尤其是那些需要根据参数原始类型将参数转发到其他函数的模板。

下面是标准库中完美转发的实现源码:

//左值版本,把一个左值转换为左值引用或者右值引用
template <class _Ty>
_NODISCARD constexpr _Ty&& forward(
    remove_reference_t<_Ty>& _Arg) noexcept { // forward an lvalue as either an lvalue or an rvalue
    return static_cast<_Ty&&>(_Arg);
}

//右值版本,把一个右值转换为右值引用
template <class _Ty>
_NODISCARD constexpr _Ty&& forward(remove_reference_t<_Ty>&& _Arg) noexcept { // forward an rvalue as an rvalue
    static_assert(!is_lvalue_reference_v<_Ty>, "bad forward call");
    return static_cast<_Ty&&>(_Arg);
}

备注:上面的remove_reference_t的功能是:就是擦除类型引用,无论是左值引用还是右值引用,例如,如果_Ty是int&或int&&,那么std::remove_reference_t<_Ty>就是int

其源代码代码如下:

template <class _Ty>
struct remove_reference {//原始类型_Ty
    using type                 = _Ty;
    using _Const_thru_ref_type = const _Ty;
};

template <class _Ty>
struct remove_reference<_Ty&> {//左值引用_Ty&
    using type                 = _Ty;
    using _Const_thru_ref_type = const _Ty&;
};

template <class _Ty>
struct remove_reference<_Ty&&> {//右值引用_Ty&&
    using type                 = _Ty;
    using _Const_thru_ref_type = const _Ty&&;
};


2.6.2.1 调用左值版本的std::forward(完美转发)

下面分析下完美转发的实现原理:

对于章节中2.6.1中完美转发的例子

对于MiddleLayerFun(a);这句调用,会有如下过程

step 1)实例化MiddleLayerFun

MiddleLayerFun(a)调用中,a是左值,T被推导为int&, 根据万能引用的实例化规则,实例化的MiddleLayerFun如下

T = int &
void MiddleLayerFun(int& && param){
    fun(std::forward<T>(param));
}

引用折叠后,上面的代码变为:

备注:关于引用折叠,参考章节2.5

T = int &
void MiddleLayerFun(int & param){
    fun(std::forward<int &>(param));
}

step 2)实例化std::forward

左值版本的std::forward定义如下:

template <class _Ty>
_NODISCARD constexpr _Ty&& 
forward(remove_reference_t<_Ty>& _Arg) noexcept { // forward an lvalue as either an lvalue or an rvalue
    return static_cast<_Ty&&>(_Arg);
}

由于Step1中调用std::forward<int &>,所以此处我们代入T = int &,有:

constexpr int& && 
forward(remove_reference_t<int&>& _Arg) noexcept { // remove_reference的作用就是移除引用,int&&、int& 这种类型都会变成int
    return static_cast<int& &&>(_Arg);
}

根据引用折叠规则,上面的代码,等价于:

constexpr int& forward(int& _Arg) noexcept { 
    return static_cast<int&>(_Arg);
}

纵上,所以最终static_cast<int&>(_Arg);的作用就是将参数_Arg强制转型成int &,而int &为左值。所以,调用左值版本的fun。

MiddleLayerFun(a)中a是左值,经过std::forward的完美转发。保证了实参a的参数类型和左右值属性不变。


下面分析章节中2.6.1中完美转发的例子

MiddleLayerFun(20);这句调用,会有如下过程

step 1)实例化MiddleLayerFun

因为参数20是个右值,所以T被推导为int类型

T = int 
void MiddleLayerFun(int && param){
    fun(std::forward<int>(param));//因为在此函数中,形参param是个左值,所以还是会调用左值版本的std::forward。
}

备注:在实例化的MiddleLayerFun函数中右值引用变量param是个左值(形参永远都是左值),所以还是会调用左值版本的std::forword

step 2)实例化std::forward


左值版本的std::forward定义如下:

template <class _Ty>
_NODISCARD constexpr _Ty&& 
forward(remove_reference_t<_Ty>& _Arg) noexcept { // forward an lvalue as either an lvalue or an rvalue
    return static_cast<_Ty&&>(_Arg);
}

由于Step1中调用std::forward<int>,所以此处我们代入T = int ,有:

constexpr int&& 
forward(remove_reference_t<int>& _Arg) noexcept { // forward an lvalue as either an lvalue or an rvalue
    return static_cast<int&&>(_Arg);

上面的代码等价于:

constexpr int&& 
forward(int& _Arg) noexcept { // forward an lvalue as either an lvalue or an rvalue
    return static_cast<int&&>(_Arg);

纵上,MiddleLayerFun(20)中参数是右值,static_cast<int&&>(_Arg);的作用就是将参数_Arg强制转型成int &&,而int &&为右值。所以,调用右值版本的fun。

MiddleLayerFun(20)中参数是右值,经过std::forward的完美转发。保持了实参20的参数类型和左右值属性不变。

2.6.2.2 调用右值版本的std::forward

备注:章节2.6.2.2的目的不是为了完美转发,只是为了说明std::forward的右值版本,什么情况下被调用。

有以下代码会调用std::forward的右值版本。

#include <iostream>
#include <xutility>

//形参为左值引用
void fun(int& x)
{
    std::cout << "Received an left value" << x << std::endl;
}

//形参为右值引用
void fun(int&& x)
{
    std::cout << "Received an right value" << x << std::endl;
}

template <typename T>
void MiddleLayerFun(T&& param)//形参param永远是左值
{
    //这里永远调用void fun(int&& x)
    fun(std::forward<T>(std::move(param)));//std::move(param)这句会把左值param转换为右值引用,
    //所以这里会调用forward的右值版本。
    
}

int main()
{
    MiddleLayerFun(20);//20是右值,T会被推导为int
}

step 1)实例化MiddleLayerFun

在以上代码中MiddleLayerFun(20);参数20是右值,T会被推导为int

T = int 
void MiddleLayerFun(int && param){
    fun(std::forward<int>(std::move(param)));//在此函数中,形参param是个左值,std::move(param)是右值,会调用右值版本的std::forward。
}

step 2)实例化std::forward

右值版本的std::forward定义如下:

//右值版本,把一个右值转换为右值引用
constexpr _Ty&& forward(remove_reference_t<_Ty>&& _Arg) noexcept { // forward an rvalue as an rvalue
    return static_cast<_Ty&&>(_Arg);
}

std::forward的参数std::move(param)是右值,T会被推导为int

//右值版本,把一个右值转换为右值引用
T = int 
constexpr int&& forward(remove_reference_t<int>&& _Arg) noexcept { // forward an rvalue as an rvalue
    return static_cast<int&&>(_Arg);
}

上面的代码等价于:

constexpr int&& forward(int&& _Arg) noexcept { // forward an rvalue as an rvalue
    return static_cast<int&&>(_Arg);
}

综上,右值版本的forward的功能,static_cast<int&&>(_Arg), 把右值引用_Arg转换为右值引用,保持不变。


2.6.3 完美转发在标准库中的应用

  • std::thread 构造函数:使用完美转发来传递线程函数的参数。

  • std::make_unique 和 std::make_shared:这些函数使用完美转发来将参数传递给对象的构造函数。

  • std::emplace_back 和其他容器的 emplace 函数:这些函数使用完美转发来直接在容器中构造元素,避免不必要的拷贝或移动操作。

  • std::bind:使用完美转发来绑定函数参数。

2.6.4 完美转发的使用场景

2.6.4 .1 普通参数的完美转发

使用std::forward可以确保普通参数在转发时保持其原始状态(左值或右值)

#include <iostream>
//左值版本
void FinalFun(int& x) {
    std::cout << "Lvalue version" << x << std::endl;
}

//右值版本
void FinalFun(int&& x) {
    std::cout << "Rvalue version" << x << std::endl;
}

// ForwardFun 使用模板和 std::forward 完美转发参数
template<typename T>
void ForwardFun(T&& param) {
    FinalFun(std::forward<T>(param));
}

int main() {
    int x = 10;
    ForwardFun(x);  // x 作为左值传递
    ForwardFun(20); // 20 作为右值传递
}
  • ForwardFun 接收一个通过万能引用传递的参数 param。

  • 使用 std::forward<T>(param),该函数确保 param 的值类别(左值或右值)在调用 FinalFun 时保持不变。

  • 无论是传递给 ForwardFun 的是左值还是右值,FinalFun 都能接收到正确的值类别,并进行相应的处理。

2.6.4 .2 在构造函数模板中使用完美转发

在类模板的构造函数中使用完美转发可以有效地将构造参数直接转发给成员变量或基类的构造函数。

template<typename T>
class CTestClass {
public:
    T value;

    // 使用模板构造函数和完美转发来初始化成员变量
    template<typename U>
    CTestClass(U&& val) : value(std::forward<U>(val)) {}

    void Output() const {
        std::cout << "val: " << value << std::endl;
    }
};

int main() {
    std::string strTip = "How do you you ,c++!";
    CTestClass<std::string> obj1(strTip); // 传递左值
    CTestClass<std::string> obj2(std::move(strTip)); // 传递右值

    obj1.Output(); // 输出: val: How do you you ,c++!
    obj2.Output(); // 输出: val: How do you you ,c++!
}
  • obj1 通过传递一个左值字符串 strTip 构造。

  • obj2 则通过传递 strTip 的右值(使用 std::move)构造。

  • 在两种情况下,CTestClass 的构造函数都使用 std::forward<U>(val) 确保 val 的值类别在初始化 value 成员时得以保持

2.6.4 .3 在可变参数模板中使用完美转发场景1

在 C++11 及以后的版本中,可变参数模板和完美转发一起使用,允许函数接收任意数量和类型的参数,并将它们无缝地转发到其他函数。这在编写包装器、委托或代理函数时特别有用。

#include <iostream>

template<typename Func, typename... Args>
void Wrapper(Func&& f, Args&&... args) {
    f(std::forward<Args>(args)...);
}

void Output(int a, double b, const std::string& c) {
    std::cout << "int: " << a << ", double: " << b << ", string: " << c << std::endl;
}

int main() {
    std::string str = "hello c++";
    Wrapper(Output, 88, 6.789, str);
}

在上面的代码中:

  • Wrapper 函数接收一个函数 f 和好几个参数 args。

  • 使用 std::forward<Args>(args)... 完美转发所有参数到函数 f。

  • 这种方式确保了所有参数的值类别和类型在传递过程中保持不变。

2.6.4 .3 在可变参数模板中使用完美转发场景2

将目标函数中的返回值通过转发函数返回给调用者函数

当使用完美转发在可变参数模板中转发函数调用时,也可以保留被调用函数的返回值类型,并将其返回给原始调用者。

#include <iostream>
#include <utility>

template<typename Func, typename... Args>
auto my_forwarder(Func&& f, Args&&... args) -> decltype(auto) {
    return f(std::forward<Args>(args)...);
}

int sum(int x, int y) {
    return x + y;
}

int main() {
    int nRslt = my_forwarder(sum, 5, 3);
    std::cout << "nRslt val: " << nRslt << std::endl;
}
  • my_forwarder 函数不仅转发参数,还转发了 sum 函数的返回值类型。

  • 使用 decltype(auto) 自动推断返回类型,确保返回类型与 sum 函数的返回类型完全一致。

  • 这种方法允许 my_forwarder 函数保持高度的灵活性和通用性,能够处理各种返回类型的函数。


2.7 std::move移动语义

2.7.1 std::move的原理

std::move的主要作用是将其参数显式地转换为右值引用。右值引用允许我们“窃取”或“移动”资源,而不是复制它们,从而提高程序的性能和效率。

下面是标准库中std::move的源码定义:

template <class _Ty>
_NODISCARD 
constexpr remove_reference_t<_Ty>&& move(_Ty&& _Arg) noexcept { // forward _Arg as movable
    return static_cast<remove_reference_t<_Ty>&&>(_Arg);
}

std::move函数的核心是:return static_cast<remove_reference_t<_Ty>&&>(_Arg);

其中remove_reference_t的作用是去除类型的引用类型,假如_Ty是int&或这int&&,使用remove_reference_t<_Ty>后得到的就是int类型。

那么remove_reference_t<_Ty>&&这一句的代表的就是右值引用。上面std::move的源码中的constexpr后面是move函数的返回值类型。也是右值引用。

move函数的形参_Arg是个万能引用,既可以为左值引用,也可以为右值引用。

那么static_cast<remove_reference_t<_Ty>&&>(_Arg);这一句的意思就是把参数_Arg强制转换为右值引用。

以下是使用std::move的demo:

// move.cpp : 此文件包含 "main" 函数。程序执行将在此处开始并结束。
//

#include <iostream>
class Array {
public:
    Array(int size) : size_(size) {
        data_ = new int[size_];
    }
    // 深拷贝构造
    Array(const Array& temp_array) {
        size_ = temp_array.size_;
        data_ = new int[size_];
        for (int i = 0; i < size_; i++) {
            data_[i] = temp_array.data_[i];
        }
    }
    // 移动构造函数
    Array(Array&& temp_array) {
        data_ = temp_array.data_;
        size_ = temp_array.size_;
        // 为防止temp_array析构时delete data,提前置空其data_      
        temp_array.data_ = nullptr;
        temp_array.size_ = 0;
    }

    // 拷贝赋值函数(Copy Assignment Operator)
    Array& operator=(const Array& temp_array) {
        delete[] data_;

        size_ = temp_array.size_;
        data_ = new int[size_];
        for (int i = 0; i < size_; i++) {
            data_[i] = temp_array.data_[i];
        }
    }
    //移动赋值函数(Move Assignment Operator)
    Array& operator=(Array&& temp_array) {
        data_ = temp_array.data_;
        size_ = temp_array.size_;
        // 为防止temp_array析构时delete data,提前置空其data_      
        temp_array.data_ = nullptr;
        temp_array.size_ = 0;
    }

    int& operator[](size_t index) {
        return data_[index];  // 返回对应下标的元素
    }

    ~Array() {
        delete[] data_;
    }

public:
    int* data_;
    int size_;
};

int main()
{
    Array a(6);
    a[0] = 1;
    a[1] = 2;
    a[2] = 3;
    Array b(a);//调用拷贝构造函数,深拷贝,
    Array c(std::move(a));//调用移动构造函数,避免拷贝

    Array d(6);
    d[0] = 4;
    d[1] = 5;
    d[2] = 6;
    Array e = d;//拷贝赋值函数(Copy Assignment Operator)
    Array f = std::move(d);//移动赋值函数(Move Assignment Operator)
}

综上,使用std::move的好处就是调用移动构造函数或移动赋值函数,避免深拷贝,提高性能

2.7.2 std::move的使用场景

2.7.2.1  返回局部对象

当从一个函数返回一个局部对象时,可以使用std::move来避免拷贝。

2.7.2.2  传递临时对象

当需要将一个临时对象传递给另一个作用域时,可以使用`std::move`来优化资源的转移。

2.7.2.3  容器操作

#include <iostream>
#include <vector>
int main() {
    std::vector<std::string> words;
    std::string s1 = "hello";
    std::string s2 = "world";
    // 使用std::move将字符串移动到vector中
    words.push_back(std::move(s1));
    words.push_back(std::move(s2));
    for (const auto& word : words) {
        std::cout << word << std::endl;
    }
    // 在移动之后,s1和s2的内容可能是未定义的,但它们仍然是合法状态
    std::cout << "s1: " << s1 << std::endl;
    std::cout << "s2: " << s2 << std::endl;

    return 0;
}

可以看到,std::move帮助我们避免了不必要的拷贝操作,将字符串的资源直接转移到vector中。


2.8 std::remove_cv

用于擦除类型的const和volatile限定符,返回的是一个去除了const和volatile限定符的类型,例如,如果T是const int或volatile int,那么std::remove_cv_t<T>就是int。它的实现如下:

template <class _Ty>
struct remove_cv { // remove top-level const and volatile qualifiers
    using type = _Ty;

    template <template <class> class _Fn>
    using _Apply = _Fn<_Ty>; // apply cv-qualifiers from the class template argument to _Fn<_Ty>
};

template <class _Ty>
struct remove_cv<const _Ty> {
    using type = _Ty;

    template <template <class> class _Fn>
    using _Apply = const _Fn<_Ty>;
};

template <class _Ty>
struct remove_cv<volatile _Ty> {
    using type = _Ty;

    template <template <class> class _Fn>
    using _Apply = volatile _Fn<_Ty>;
};

template <class _Ty>
struct remove_cv<const volatile _Ty> {
    using type = _Ty;

    template <template <class> class _Fn>
    using _Apply = const volatile _Fn<_Ty>;
};

template <class _Ty>
using remove_cv_t = typename remove_cv<_Ty>::type;

以下是使用demo

#include <iostream>
#include <type_traits>

int main() {
    typedef std::remove_cv<const int>::type type1;
    typedef std::remove_cv<volatile int>::type type2;
    typedef std::remove_cv<const volatile int>::type type3;
    typedef std::remove_cv<const volatile int*>::type type4;
    typedef std::remove_cv<int* const volatile>::type type5;

    std::cout << "test1 " << (std::is_same<int, type1>::value
        ? "passed" : "failed") << '\n';
    std::cout << "test2 " << (std::is_same<int, type2>::value
        ? "passed" : "failed") << '\n';
    std::cout << "test3 " << (std::is_same<int, type3>::value
        ? "passed" : "failed") << '\n';
    std::cout << "test4 " << (std::is_same<const volatile int*, type4>::value
        ? "passed" : "failed") << '\n';
    std::cout << "test5 " << (std::is_same<int*, type5>::value
        ? "passed" : "failed") << '\n';
}


[培训]内核驱动高级班,冲击BAT一流互联网大厂工作,每周日13:00-18:00直播授课

最后于 2024-11-7 12:06 被sanganlei编辑 ,原因:
收藏
免费 0
支持
分享
最新回复 (0)
游客
登录 | 注册 方可回帖
返回
//