首页
社区
课程
招聘
4
[原创]自定义Android15系统跟踪Java方法
发表于: 2025-4-8 09:38 1400

[原创]自定义Android15系统跟踪Java方法

2025-4-8 09:38
1400

前言

[警告]

仅供学习参考,请勿使用非法用途!

如果你自己根据文章内容将功能实现,你对Android系统的理解将上一个层次。

操作系统

自定义Android 15(API级别35)操作系统。

操作系统版本选择原因

  1. 改完之后能用5~10年不落伍。

  2. 高版本操作系统权限管理更严格,APP的一些操作会被拒绝。

  3. 有了更严格的权限校验是优势,我的改造不会去禁用掉SELinux

构建所需硬件

我通过虚拟机构建,内存至少48GB,硬盘建议分配最大2TB的空间。

支持的能力

  1. 查看被跟踪Java方法的调用栈
  2. 跟踪Java方法调用:某个被跟踪方法执行后还直接或间接调用了哪些Java方法、第一个调用到的Native方法。举例:假设被跟踪 Java方法test调用了Java方法test1,test1调用了Native方法nativeTest3,ROM内能够识别出调用了test1和nativeTest3,将test、test1、nativeTest3这三个方法所属类、方法名,参数打印出来,打印test1和nativeTest3的时候会指出它们的调用来自于test1。
  3. 代理被跟踪Java方法
    1. 代理方法获得入参
    2. 代理方法获得返回值
    3. 代理方法改变被跟踪方法的返回值

前置知识

  1. 会写C/C++,如果你对C/C++属于“会写”的层次,建议先看C/C++面试题
  2. 对Android系统有基本了解:起码会写一个简单的Android App;知道Art虚拟机、Dalvik虚拟机

不提供的内容

  1. 不提供完整源码,需要自己学习实现
  2. 不提供如何将跟踪代码投放到其他APP的思路和代码

如果你自己根据文章内容将功能实现,你对Android系统的理解将上一个层次。

将目标方法改为解释执行

为了性能,只对被跟踪方法或者被跟踪的方法改为解释执行,不将整个APP改为解释执行。

改动ArtMethod::Invoke函数

位于runtime/art_method.cc。

这个地方判断是否通过解释器执行:

1
2
if (UNLIKELY(!runtime->IsStarted() ||
           (self->IsForceInterpreter() && !IsNative() && !IsProxyMethod() && IsInvokable()))) {

改动逻辑

  1. 把if里面的条件全部取出来,把结果赋值到一个方法局部变量内,假设赋值到isInterpreter
  2. 如果isInterpreter是true,跳转到第5步
  3. 如果isInterpreter是false,根据!IsNative() && !IsProxyMethod() && IsInvokable()判断是否是有效的Java方法,如果它返回false,跳转到第5步,如果它返回true,进入第4步
  4. 判断这个方法是否需要被跟踪,如果不需要,跳转到第5步,如果需要,将isInterpreter改为true
  5. 将上面if内的表达式替换成isInterpreter

通过ArtMethod对象获得类、方法名、方法签名

1
2
3
4
5
art::ArtMethod *artMethod = xxx;
 
std::string className = artMethod->GetDeclaringClass()->PrettyDescriptor();
const char *methodName = artMethod->GetName();
std::string signature = artMethod->GetSignature().ToString();
  • className:它的风格不是Java签名风格,返回值举例:com.a.b.c.Test
  • methodName:方法名,举例:test
  • signature:方法签名,举例:(IILjava/lang/String;)Ljava/lang/String;

ArtMethod::Invoke函数调用栈

当调用到我的测试函数的时候,调用到Invoke函数的调用栈:

1
2
3
4
5
6
7
8
9
10
11
12
13
14
15
16
17
18
19
20
21
22
23
#02  0x7344c8a508  art::ArtMethod::Invoke(art::Thread*, unsigned int*, unsigned int, art::JValue*, char const*)
#03  0x7344e6316c  bool art::interpreter::DoCall<false>(art::ArtMethod*, art::Thread*, art::ShadowFrame&, art::Instruction const*, unsigned short, bool, art::JValue*)
#04  0x734506c58c 
#05  0x7345157fdc 
#06  0x7344cbbdf8 
#07  0x7344cbb534 
#08  0x7344e6316c  bool art::interpreter::DoCall<false>(art::ArtMethod*, art::Thread*, art::ShadowFrame&, art::Instruction const*, unsigned short, bool, art::JValue*)
#09  0x734506c58c 
#10  0x7345157fdc 
#11  0x7344cbbdf8 
#12  0x7344cbb534 
#13  0x7344e6316c  bool art::interpreter::DoCall<false>(art::ArtMethod*, art::Thread*, art::ShadowFrame&, art::Instruction const*, unsigned short, bool, art::JValue*)
#14  0x734506c58c 
#15  0x7345157fdc 
#16  0x7344cbbdf8 
#17  0x7344cbb534 
#18  0x7344e6316c  bool art::interpreter::DoCall<false>(art::ArtMethod*, art::Thread*, art::ShadowFrame&, art::Instruction const*, unsigned short, bool, art::JValue*)
#19  0x734506c58c 
#20  0x7345157fdc 
#21  0x7344cbbdf8 
#22  0x7344cbbb14 
#23  0x7344cbab90 
#24  0x7345155a3c 

栈深度0号和1号是进入了自定义函数,不需要贴出来。C/C++获取调用栈是通用逻辑,此处不贴出来,自行搜索。

跟踪Java方法调用解释执行

跟踪方法的效果先看《跟踪Java方法调用》一节。

ShadowFrame传递跟踪信息

找到ShadowFrame类,它位于runtime/interpreter/shadow_frame.h。新增两个public字段:

1
2
3
4
5
6
跟踪描述数据结构 *traceObj = nullptr; // 最好用智能指针,这样不会出现内存泄漏的问题
 
/**
 * 执行跟踪深度,要值传递,不能放到"跟踪描述数据结构"里面
 */
 int depth = 0;

跟踪描述数据结构:

1
2
3
4
5
6
7
8
class 跟踪描述数据结构 {
public:
    // true: 继续跟踪; false: 不继续跟踪
    bool enable = false;
 
    // 还可以添加起始跟踪的类名、方法名、方法签名。这些数据在后续跟踪方法的日志打印中可以一起打印出来,这样就知道是从哪里开始的
    ......
};

初始化跟踪信息:

当被跟踪方法被检测到需要做跟踪的时候,在当前方法所属的ShadowFrame里面添加传递信息。在下面《代理被跟踪 Java方法》的《改动Execute函数》一节中,在检查方法是否要被跟踪的时候,能够拿到ShadowFrame对象,如果方法需要被跟踪,检查是否需要被跟踪,如果需要,在ShadowFrame对象里面添加“跟踪描述数据结构”,深度是0。

跟踪信息传递:

当调用一个Java方法的时候会创建一个新的ShadowFrame,在创建新的ShadowFrame时候调用函数的ShadowFrame也存在,在这个时候可以做跟踪信息传递,需要改动这几位置:

  1. DoCallCommon函数,位于runtime/interpreter/interpreter_common.cc。在ShadowFrame* new_shadow_frame = shadow_frame_unique_ptr.get();执行之后,判断shadow_frame里面是否有跟踪信息,如果有,那么传递给新栈帧,然后深度+1
  2. MethodHandleInvokeTransform和DoMethodHandleInvokeMethod函数,它们位于runtime/method_handles.cc。在它们调用PerformCall函数前,传递跟踪信息。

上面这三个函数都调用了ShouldStayInSwitchInterpreter函数,还需要配合这个函数做改造,请见下一节。

ShouldStayInSwitchInterpreter新增参数

函数位于runtime/interpreter/interpreter_common.cc。这个函数用于判断被调的Java方法通过解释器执行还是通过Java编译完成的机器码执行,对于需要被跟踪的方法,我们要改成解释器执行。

这个函数的源码:

1
2
3
4
5
6
7
8
9
10
11
12
13
14
15
16
17
18
19
20
21
22
23
24
25
26
27
bool ShouldStayInSwitchInterpreter(ArtMethod* method)
    REQUIRES_SHARED(Locks::mutator_lock_) {
  if (!Runtime::Current()->IsStarted()) {
    // For unstarted runtimes, always use the interpreter entrypoint. This fixes the case where
    // we are doing cross compilation. Note that GetEntryPointFromQuickCompiledCode doesn't use
    // the image pointer size here and this may case an overflow if it is called from the
    // compiler. b/62402160
    return true;
  }
 
  if (UNLIKELY(method->IsNative() || method->IsProxyMethod())) {
    return false;
  }
 
  if (Thread::Current()->IsForceInterpreter()) {
    // Force the use of interpreter when it is required by the debugger.
    return true;
  }
 
  if (Thread::Current()->IsAsyncExceptionPending()) {
    // Force use of interpreter to handle async-exceptions
    return true;
  }
 
  const void* code = method->GetEntryPointFromQuickCompiledCode();
  return Runtime::Current()->GetClassLinker()->IsQuickToInterpreterBridge(code);
}

我需要在const void* code = method->GetEntryPointFromQuickCompiledCode();这条语句之前判断是否有跟踪信息,我们的跟踪信息保存在栈帧内,但是函数没有传入栈帧,所以需要将入参从ArtMethod* method改为ShadowFrame& shadow_frame, ArtMethod* method,新增ShadowFrame类型的入参。

更改后,上面三处调用这个函数的地方需要把栈帧传递进来,不同函数传入的栈帧对象不同:

  1. DoCallCommon:不需要传入新的栈帧,传入调用来源方法的栈帧即可,因为新栈帧的创建在函数内是滞后的,如果需要跟踪,调用来源方法的栈帧中一定有跟踪信息,所以能够满足需求。
  2. MethodHandleInvokeTransform和DoMethodHandleInvokeMethod:由于在调用ShouldStayInSwitchInterpreter函数前,新栈帧已经创建完成,并且按照上面的逻辑我们传递了跟踪信息,所以这两个函数传递新栈帧,能够满足需求。

代理被跟踪 Java方法

执行流程

代理被跟踪方法架构

ArtMethod::Invoke函数内处理跟踪和代理

位于runtime/art_method.cc。在上文对这个函数的改造中,对于需要被跟踪的Java方法改成了解释执行,改动完成后会调用到Execute函数(下文会做描述),我在Execute函数内做了跟踪代理,但是如果是从Java层调用到Native函数那么不会进入Execute函数,我希望从Java直接调用到Native的函数也能被检测、代理,本节会讲如何做这件事情。

代码说明:

1
2
3
4
5
6
7
8
9
10
11
12
13
14
15
16
17
18
19
20
21
22
23
24
25
26
27
28
29
30
31
32
33
34
35
36
37
38
39
40
41
42
43
44
45
46
47
48
49
50
51
52
53
54
55
56
57
58
59
60
61
62
63
64
65
66
67
68
69
70
71
72
73
74
75
76
77
78
79
80
81
82
83
84
85
NO_STACK_PROTECTOR
void ArtMethod::Invoke(Thread* self, uint32_t* args, uint32_t args_size, JValue* result,
                       const char* shorty) {
  ......
 
  Runtime* runtime = Runtime::Current();
  // Call the invoke stub, passing everything as arguments.
  // If the runtime is not yet started or it is required by the debugger, then perform the
  // Invocation by the interpreter, explicitly forcing interpretation over JIT to prevent
  // cycling around the various JIT/Interpreter methods that handle method invocation.
  ////////////////////////////////////////////////////////////////////////////////////
  // 判断是否是有个有效的Java方法
  bool isValidJavaMethod = !IsNative() && !IsProxyMethod() && IsInvokable();
  auto isInterpreter = UNLIKELY(!runtime->IsStarted() ||
           (self->IsForceInterpreter() && isValidJavaMethod));
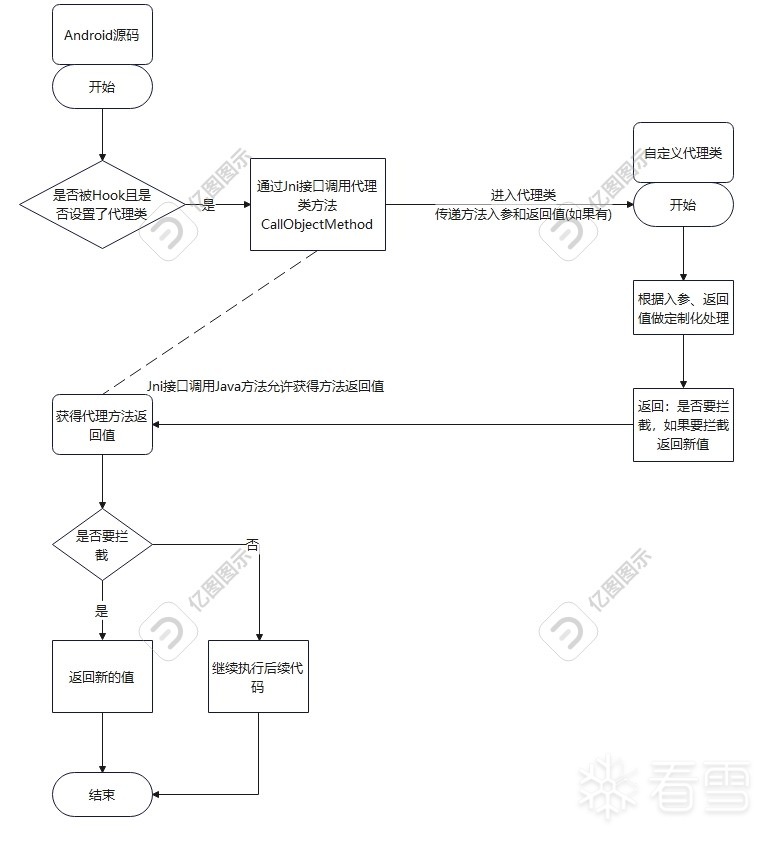
  if (这个APP是否对部分方法添加了跟踪) {
    // 这个APP对部分方法添加了跟踪
     
    /*
     为什么先判断跟踪再判断是否要解释执行?
     是因为对于在Java层注册的Native方法,也需要判断是否要被跟踪
     */
       
    // 检查这个方法是否需要被跟踪
 
    // 如果需要,那么将isInterpreter设置为true继续执行,它会执行到Execute函数内,其中会判断是否需要代理类并且做相关的逻辑
  }
  ////////////////////////////////////////////////////////////////////////////////////
  if (isInterpreter) {
    if (IsStatic()) {
      art::interpreter::EnterInterpreterFromInvoke(
          self, this, nullptr, args, result, /*stay_in_interpreter=*/ true);
    } else {
      mirror::Object* receiver =
          reinterpret_cast<StackReference<mirror::Object>*>(&args[0])->AsMirrorPtr();
      art::interpreter::EnterInterpreterFromInvoke(
          self, this, receiver, args + 1, result, /*stay_in_interpreter=*/ true);
    }
  } else {
    ......
 
      ////////////////////////////////////////////////////////////////////////////////////
 
      bool isUseNewValue = false;
      if (IsNative()) {
        // 是Natvie方法,而不是Java方法执行本地编译好的机器码
 
        if (是否需要被跟踪,上面判断过,直接复用) {
          JValue newValue;
          bool useNewValue = false;
           
          // 检查需要被跟踪的方法是否有代理类
         // 被跟踪方法有代理类的情况下,调用解析方法入参,将入参转换成jvalue数组,通过CallObjectMethodV调用到代理类,然后能获得返回对象。
         处理跟踪(被跟踪方法相关信息, &newValue, useNewValue);
          if (useNewValue) {
            // 需要被拦截,设置新的值
            *result = newValue;
            isUseNewValue = true;
          }
        }
      }
 
      if (!isUseNewValue) {
        // 使用新值的情况下,不调用原方法
 
        if (!IsStatic()) {
          (*art_quick_invoke_stub)(this, args, args_size, self, result, shorty);
        } else {
          (*art_quick_invoke_static_stub)(this, args, args_size, self, result, shorty);
        }
        ......
      }
       
      // 也可以在Native方法执行完成后调用代理方法做拦截
    } else {
      LOG(INFO) << "Not invoking '" << PrettyMethod() << "' code=null";
      if (result != nullptr) {
        result->SetJ(0);
      }
    }
  }
 
  // Pop transition.
  self->PopManagedStackFragment(fragment);
}

解析入参转换成jvalue数组

上面调用代理类、方法,是Java方法,需要将ArtMethod::Invoke的入参uint32_t* args转换成能够通过Jni接口CallObjectMethodV调用的入参,它通过jvalue*接收方法参数数组,jvalue是一个联合类型。

转换说明:

  1. 正确的取出参数:如果是解释执行,ArtMethod::Invoke函数会调用到EnterInterpreterFromInvoke函数(位于runtime/interpreter/interpreter.cc),这个函数内解析了args,将它里面的数据设置到了ShadowFrame里面,参数取值参考这段代码。

  2. 参数类型转换:

    • 基础类型:取出来后直接赋值到jvalue里面的相应字段即可。

    • 对象类型:它比较复杂,如果你阅读并理解第1步的参数取值代码就会发现,对象取出来的是ObjPtr<mirror::Object>类型,它可以取出来mirror::Object *类型,通过这个代码将它jobject:

      1
      2
      3
      4
      5
      6
      art::ScopedObjectAccess soa(env);
       
      // 创建局部引用
      jobject localRef = soa.AddLocalReference<jobject>(obj);
       
      // 然后,建议将局部引用localRef通过env->NewGlobalRef转换成全局引用,防止引用失效,接着通过env->DeleteLocalRef(localRef)释放局部引用。全局引用使用完成后记得释放

参数转换完成后,就可以通过JNI接口调用你自己的代理类、方法了。

拦截返回值,将jobject转换成JValue

我们的代理方法返回对象类型,类型结构如:

1
2
3
4
5
6
7
8
9
10
11
12
13
public class Result {
 
    /**
     * 是否拦截
     */
    public boolean useNewValue;
 
    /**
     * 拦截值
     */
    public Object value;
 
}

CallObjectMethodV调用后返回值是jobject类型,返回值是Java的Result对象,如果useNewValue等于true,我要提取对象里面的value字段并返回,此时在Native层拿到的value是jobject对象。

通过阅读代码可知我需要返回JValue类型,JValue类型内部存储的对象需要调用SetL,入参是ObjPtr<mirror::Object>类型(参考art/runtime/jvalue.h文件)。我需要将jobject转换成ObjPtr<mirror::Object>,转换代码:

1
2
3
4
art::JValue value;
art::ScopedObjectAccess soa(env);
art::ObjPtr<art::mirror::Object> innerObj = soa.Decode<art::mirror::Object>(obj);
value.SetL(innerObj);

改动Execute函数

位于runtime/interpreter/interpreter.cc。执行到这个函数意味着目前是解释执行。

这个函数内在后面一点的位置会从栈帧内获得ArtMethod对象:ArtMethod *method = shadow_frame.GetMethod();。把这个语句提到函数开头:

1
2
3
4
5
6
7
8
9
10
11
12
13
14
NO_STACK_PROTECTOR
static inline JValue Execute(
    Thread* self,
    const CodeItemDataAccessor& accessor,
    ShadowFrame& shadow_frame,
    JValue result_register,
    bool stay_in_interpreter = false,
    bool from_deoptimize = false) REQUIRES_SHARED(Locks::mutator_lock_) {
  DCHECK(!shadow_frame.GetMethod()->IsAbstract());
  DCHECK(!shadow_frame.GetMethod()->IsNative());
 
  ArtMethod *method = shadow_frame.GetMethod();
  ......
}

在获得ArtMethod *之后做下面逻辑:

  1. 判断Java方法是否需要跟踪。
  2. 如果需要跟踪,判断是否要执行代理Java方法
  3. 需要执行Java代理方法,执行完成后,判断是否要做返回值拦截

这三点在《ArtMethod::Invoke函数内处理跟踪和代理》这一节以及讲过,区别是这个函数内以及为这个被调方法创建了栈帧,我需要在栈帧内取出被调方法参数。栈帧的创建在上文中提到的EnterInterpreterFromInvoke函数内,这个函数内调用的是SetXXX函数向栈帧设置方法参数,我只需要调用相应的GetXXX方法就可以取出。

如果要知道方法参数+返回值,可以在这个函数最后调用ExecuteSwitch之后,做调用代理方法和返回值拦截相关逻辑。

为什么在ArtMethod::Invoke和Execute函数内都要检查一次是否需要跟踪?

ArtMethod::Invoke检查跟踪:

  1. 用于决定是否解释执行Java方法,如果是,那么调用链最终会调用到Execute函数
  2. 用于确定是否要对在Java层注册的Native函数做跟踪

Execute函数:

  1. 我发现有时候需要解释执行的Java方法调用,不仅来自于ArtMethod::Invoke函数,所以此处还需要判断一次(PS: 我在ArtMethod::Invoke这里判断被跟踪方法强制解释执行以及做了“跟踪Java方法调用解释执行”之后,被跟踪方法、需要跟踪的方法的执行经过ArtMethod::Invoke了,需要持续观察)

跟踪Java方法调用

效果说明

某个被跟踪方法执行后还直接或间接调用了哪些Java方法、第一个调用到的Native方法。举例:假设被跟踪 Java方法test调用了Java方法test1,test1调用了Native方法nativeTest3,ROM内能够识别出调用了test1和nativeTest3,将test、test1、nativeTest3这三个方法所属类、方法名,参数打印出来,打印test1和nativeTest3的时候会指出它们的调用来自于test1。

前置条件

上面《将目标方法改为解释执行》的步骤一定要做。

跟踪标识传递

请见《跟踪Java方法调用解释执行》一节,这一节不仅让跟踪方法解释执行,还传递了跟踪标识。

启动的时候加载跟踪数据

所谓跟踪数据是指要跟踪哪些方法。找到VMRuntime_setProcessPackageName函数,位于runtime/native/dalvik_system_VMRuntime.cc,这个函数设置了包名,我在设置了包名的时候就加载这个包对应的跟踪数据。

查看被跟踪Java方法的调用栈

找到源码中雷系下面的代码,你看一下系统是怎么遍历并打印Java调用堆栈的:

1
2
3
4
5
6
7
8
9
10
11
12
13
14
15
// Build stack trace
jobject internal =
        soa.AddLocalReference<jobject>(Thread::Current()->CreateInternalStackTrace(soa));
if (internal == nullptr) {
    return;
}
jobjectArray ste_array = Thread::InternalStackTraceToStackTraceElementArray(soa, internal);
if (ste_array == nullptr) {
    return;
}
ObjPtr<mirror::ObjectArray<mirror::StackTraceElement>> trace_array =
        soa.Decode<mirror::ObjectArray<mirror::StackTraceElement>>(ste_array);
if (trace_array == nullptr) {
    return;
}

Rom构建问题解决

符号找不到

类似下面的报错:

FAILED: out/soong/.intermediates/art/runtime/libart/android_arm_armv8-a_shared_apex31/unstripped/libart.so
prebuilts/clang/host/linux-x86/clang-r530567/bin/clang++ out/soong/.intermediates/bionic/libc/crtbegin_so/android_arm_armv8-a_apex31/crtbegin_so.o @out/soong/.intermediates/art/runtime/libart/android_arm_armv8-a_shared_apex31/unstripped/libart.so.rsp out/soong/.intermediates/bionic/libc/crtend_so/android_arm_arm
v8-a_apex31/crtend_so.o out/soong/.intermediates/bionic/libc/crt_pad_segment/android_arm_armv8-a_apex31/crt_pad_segment.o -o out/soong/.intermediates/art/runtime/libart/android_arm_armv8-a_shared_apex31/unstripped/libart.so -target armv7a-linux-androideabi31 -Wl,-z,noexecstack -Wl,-z,relro -Wl,-z,now -Wl,--build
-id=md5 -Wl,--fatal-warnings -Wl,--no-undefined-version -Wl,--exclude-libs,libgcc.a -Wl,--exclude-libs,libgcc_stripped.a -Wl,--exclude-libs,libunwind_llvm.a -Wl,--exclude-libs,libunwind.a -fuse-ld=lld -Wl,--icf=safe -Wl,--no-demangle -Wl,--compress-debug-sections=zstd -Wl,--pack-dyn-relocs=android+relr -Wl,--no-
undefined -Wl,-m,armelf -Wl,-mllvm -Wl,-enable-shrink-wrap=false  -nostdlib -Wl,--gc-sections -shared -Wl,-soname,libart.so -Wl,--exclude-libs=libziparchive.a -Wl,--keep-unique,__jit_debug_register_code -Wl,--keep-unique,__dex_debug_register_code -flto=thin -fsplit-lto-unit -Wl,-plugin-opt,-import-instr-limit=5 
-Wl,--exclude-libs=libclang_rt.builtins-arm-android.a 
ld.lld: error: undefined symbol: _ZN3art9ArtMethod17GetDeclaringClassILNS_17ReadBarrierOptionE0EEENS_6ObjPtrINS_6mirror5ClassEEEv
>>> referenced by ArtMethodHelper.cpp:19 (android_custom_my/art/runtime/mycustomcodes/art/ArtMethodHelper.cpp:19)
>>>               out/soong/.intermediates/art/runtime/libart-runtime/android_arm_armv8-a_static_afdo-libart_lto-thin_apex31/libart.so.lto.libart-runtime.a(ArtMethodHelper.o at 1631918).o:(_ZN11mycustomcodes15ArtMethodHelper11printMethodEPKcS2_PN3art6ThreadEPNS3_9ArtMethodE)
>>> referenced by ArtMethodHelper.cpp:56 (android_custom_my/art/runtime/mycustomcodes/art/ArtMethodHelper.cpp:56)
>>>               out/soong/.intermediates/art/runtime/libart-runtime/android_arm_armv8-a_static_afdo-libart_lto-thin_apex31/libart.so.lto.libart-runtime.a(ArtMethodHelper.o at 1631918).o:(_ZN11mycustomcodes15ArtMethodHelper14matchClassNameEPN3art9ArtMethodEPKc)

ld.lld: error: undefined symbol: _ZN3art9ArtMethod7GetNameEv
>>> referenced by ArtMethodHelper.cpp:26 (android_custom_my/art/runtime/mycustomcodes/art/ArtMethodHelper.cpp:26)
>>>               out/soong/.intermediates/art/runtime/libart-runtime/android_arm_armv8-a_static_afdo-libart_lto-thin_apex31/libart.so.lto.libart-runtime.a(ArtMethodHelper.o at 1631918).o:(_ZN11mycustomcodes15ArtMethodHelper11printMethodEPKcS2_PN3art6ThreadEPNS3_9ArtMethodE)

ld.lld: error: undefined symbol: _ZN3art9ArtMethod13IsProxyMethodEv
>>> referenced by ArtMethodHelper.cpp:37 (android_custom_my/art/runtime/mycustomcodes/art/ArtMethodHelper.cpp:37)
>>>               out/soong/.intermediates/art/runtime/libart-runtime/android_arm_armv8-a_static_afdo-libart_lto-thin_apex31/libart.so.lto.libart-runtime.a(ArtMethodHelper.o at 1631918).o:(_ZN11mycustomcodes15ArtMethodHelper11printMethodEPKcS2_PN3art6ThreadEPNS3_9ArtMethodE)
clang++: error: linker command failed with exit code 1 (use -v to see invocation)
10:39:52 ninja failed with: exit status 1

如果懒得看到底哪个符号找不到,把这段报错放到大模型里面让它给解析出来。这段报错是ArtMethod的一些方法找不到符号,依赖了#include "art_method.h"头文件后如果还报此类错误,那么需要依赖#include "art_method-inl.h"-inl.h结尾的头文件存放所有inline函数的实现,如果你调用到了inline函数,不能只依赖函数定义,必须要依赖实现。

代码质量问题检测

背景

我自定义ROM里面自定义了AIDL,AIDL生成的代码也会被代码质量问题检测Lint工具报错,AIDL是不能添加诸如:@SuppressLint、@NonNull这样的注解的。遇到这样的问题有几种解法:

  1. 改AIDL生成工具,让它能够生成这些注解
  2. 改Lint工具不让它检测类似问题
  3. 让Lint忽略此类错误

方案一:改Lint工具

tools/metalava/metalava/src/main/java/com/android/tools/metalava/lint/ApiLint.kt

checkFlaggedApiOnNewApi函数把report语句注释掉。

方案二:让Lint忽略此类错误

需要重新生成lint-baseline.txt文件。

Lint报错后会在后面显示类似下面的提示:

1
2
3
4
5
6
7
8
9
10
11
12
13
14
15
16
17
18
19
20
21
22
74 more error(s) omitted. Search the log for 'error:' to find all of them.
metalava wrote updated baseline to /home/asher/android/lineage/out/soong/.temp/sbox/dcabbf69fbe8e32ae16e786d21b129ef1759ab95/./out/api_lint_baseline.txt
************************************************************
Your API changes are triggering API Lint warnings or errors.
To make these errors go away, fix the code according to the
error and/or warning messages above.
 
If it is not possible to do so, there are workarounds:
 
1. You can suppress the errors with @SuppressLint("<id>")
   where the <id> is given in brackets in the error message above.
2. You can update the baseline by executing the following
   command:
       (cd $ANDROID_BUILD_TOP && cp \
       "out/soong/.intermediates/frameworks/base/api/api-stubs-docs-non-updatable/android_common/everything/api_lint_baseline.txt" \
       "frameworks/base/core/api/lint-baseline.txt")
   To submit the revised baseline.txt to the main Android
   repository, you will need approval.
************************************************************
exit status 255
23:47:10 ninja failed with: exit status 1
There was 1 action that completed after the action that failed. See verbose.log.gz for its output.

上面的第2点提示了如何重新生成基线文件(lint-baseline.xml)。运行完成后,重新编译系统。

lint-baseline.txt 的作用与局限性

  • 功能
    • lint-baseline.txt 是 Lint 工具的基线配置文件,用于标记当前项目中已知但暂时不修复的问题。
    • 它通过记录问题的类型、位置等信息,让后续的 Lint 检查忽略这些已记录的问题,避免重复报告。
  • 局限性
    • 不能动态抑制新问题:基线文件仅对已存在的旧问题生效,若新生成的代码触发了相同类型的 Lint 错误(如 UnflaggedApi),Lint 仍会报告。
    • 依赖文件路径和行号:基线文件中的条目通常包含具体的代码位置(如文件路径、行号)。如果生成的代码路径或内容发生变化(例如 AIDL 重新生成代码),原有基线条目会失效。
    • 不修改 Lint 规则本身:基线文件仅隐藏问题,而非解决根本原因。若需彻底禁用某类检查(如 UnflaggedApi),需通过其他方式配置 Lint 规则。

自定义系统服务暴露给普通APP

普通APP获得自定义系统服务

1
2
3
4
5
6
7
8
9
10
11
12
13
14
15
16
17
18
19
20
21
22
23
24
25
26
27
28
29
30
package android.mycustomcodes.services;
 
import android.os.IBinder;
import android.os.ServiceManager;
 
import androidx.annotation.Nullable;
 
public class MyCustomerSystemServiceHelper {
    private static final String MODULE = "MyCustomerSystemServiceHelper";
 
    private MyCustomerSystemServiceHelper() {
    }
 
    @Nullable
    public static IMyCustomerSystemService getService() {
        IMyCustomerSystemService service = null;
        try {
            IBinder iBinder = ServiceManager.getService(MyCustomerSystemService.SERVICE_NAME);
            if (null == iBinder) {
                Log.e(MODULE, "binder get failed");
            } else {
                service = IMyCustomerSystemService.Stub.asInterface(iBinder);
            }
        } catch (Exception e) {
             
        }
        return service;
    }
 
}

修改SELinux规则能够正常注册

如果不修改SELinux规则,注册服务的时候将会在logcat打印出这样的错误:

Exception
                                                                                                    java.lang.SecurityException: SELinux denied for service.
                                                                                                        at android.os.Parcel.createExceptionOrNull(Parcel.java:3231)
                                                                                                        at android.os.Parcel.createException(Parcel.java:3215)
                                                                                                        at android.os.Parcel.readException(Parcel.java:3198)
                                                                                                        at android.os.Parcel.readException(Parcel.java:3140)
                                                                                                        at android.os.IServiceManager$Stub$Proxy.addService(IServiceManager.java:526)
                                                                                                        at android.os.ServiceManagerProxy.addService(ServiceManagerNative.java:78)
                                                                                                        at android.os.ServiceManager.addService(ServiceManager.java:253)
                                                                                                        at android.os.ServiceManager.addService(ServiceManager.java:218)
                                                                                                        at com.android.server.SystemServer.startMyCustomerSystemService(SystemServer.java:3463)
                                                                                                        at com.android.server.SystemServer.run(SystemServer.java:955)
                                                                                                        at com.android.server.SystemServer.main(SystemServer.java:674)
                                                                                                        at java.lang.reflect.Method.invoke(Native Method)
                                                                                                        at com.android.internal.os.RuntimeInit$MethodAndArgsCaller.run(RuntimeInit.java:591)
                                                                                                        at com.android.internal.os.ZygoteInit.main(ZygoteInit.java:849) ,我添加的是自定义服务MyCustomerSystemService

进入system/sepolicy/private/system_server.te文件,添加allow system_server my_customer_system_service:service_manager add;,如果你添加到最后,注意最后一行必须是空行。

修改SELinux规则能够获得服务

如果不修改SELinux规则,获得服务的时候将会在logcat打印出这样的错误:

2025-03-25 15:31:05.571     0-0     SELinux                 kernel                               E  avc:  denied  { find } for pid=5438 uid=10208 name=my_customer_system_service scontext=u:r:untrusted_app:s0:c208,c256,c512,c768 tcontext=u:object_r:default_android_service:s0 tclass=service_manager permissive=0

打开system/sepolicy/private/service_contexts文件,添加:

my_customer_system_service                        u:object_r:my_customer_system_service:s0

这行语句不要添加到文件最后面,我添加到文件最后面的时候出现了编译失败。

在service_contexts文件的相同目录下新增文件my_customer_system_service.te,内容:

## 声明服务类型
type my_customer_system_service, service_manager_type;

## 允许所有应用查找和绑定服务
allow { untrusted_app platform_app } my_customer_system_service:service_manager { find };
allow { untrusted_app platform_app } my_customer_system_service:binder { call transfer };  # 允许调用方法

注意,最后一行必须是空行。

添加模糊测试

在SELinux规则里面新增服务编译报错:

FAILED: out/soong/.intermediates/system/sepolicy/contexts/fuzzer_bindings_test/android_common/timestamp
out/host/linux-x86/bin/fuzzer_bindings_check -s out/soong/.intermediates/system/sepolicy/contexts/plat_service_contexts/android_common/plat_service_contexts -b out/soong/.intermediates/bindings.json && touch out/soong/.intermediates/system/sepolicy/contexts/fuzzer_bindings_test/android_common/timestamp # hash of
 input list: 691a90120ba890c7387a1082f843bac17e8e7769875e131b7d72fabe549de9ef

error: Service 'my_customer_system_service' is being added, but we have no fuzzer on file for it. Fuzzers are listed at $ANDROID_BUILD_TOP/system/sepolicy/build/soong/service_fuzzer_bindings.go 

NOTE: automatic service fuzzers are currently not supported in Java (b/287102710.)In this case, please ignore this for now and add an entry for yournew service in service_fuzzer_bindings.go 

If you are writing a new service, it may be subject to attack from other potentially malicious processes. A fuzzer can be written automatically by adding these things: 
- a cc_fuzz Android.bp entry 
- a main file that constructs your service and calls 'fuzzService' 

An examples can be found here: 
- $ANDROID_BUILD_TOP/hardware/interfaces/vibrator/aidl/default/fuzzer.cpp 
- https://source.android.com/docs/core/architecture/aidl/aidl-fuzzing 

This is only ~30 lines of configuration. It requires dependency injection for your service which is a good practice, and (in AOSP) you will get bugs automatically filed on you. You will find out about issues without needing to backport changes years later, and the system will automatically find ways to reproduce
 difficult to solve issues for you. 

This error can be bypassed by adding entry for new service in $ANDROID_BUILD_TOP/system/sepolicy/build/soong/service_fuzzer_bindings.go 

- Android Fuzzing and Security teams
19:20:03 ninja failed with: exit status 1
There were 3 actions that completed after the action that failed. See verbose.log.gz for their output.

打开service_fuzzer_bindings.go文件,ServiceFuzzerBindings列表里面新增:

"my_customer_system_service":                     EXCEPTION_NO_FUZZER,

我没有放到最后,我是在列表里面插入了一条。


[培训]内核驱动高级班,冲击BAT一流互联网大厂工作,每周日13:00-18:00直播授课

最后于 2025-4-8 09:40 被不歪编辑 ,原因: 修改文章问题
收藏
免费 4
支持
分享
赞赏记录
参与人
雪币
留言
时间
sinker_
期待更多优质内容的分享,论坛有你更精彩!
2025-4-13 04:22
你瞒我瞒
期待更多优质内容的分享,论坛有你更精彩!
2025-4-9 09:15
安卓逆向test
感谢你分享这么好的资源!
2025-4-8 10:06
简单的简单
+1
感谢你的积极参与,期待更多精彩内容!
2025-4-8 09:45
最新回复 (2)
雪    币: 28
活跃值: (884)
能力值: ( LV2,RANK:10 )
在线值:
发帖
回帖
粉丝
2
看看,感谢分享。
2025-4-8 15:01
0
雪    币: 2723
活跃值: (11446)
能力值: ( LV2,RANK:10 )
在线值:
发帖
回帖
粉丝
3
按照文章说的代理方法改变被跟踪方法的返回值,这实现了hook一样效果吗
2025-4-9 09:26
0
游客
登录 | 注册 方可回帖
返回

账号登录
验证码登录

忘记密码?
没有账号?立即免费注册