首页
社区
课程
招聘
[分享]某邦企业壳frida检测绕过
发表于: 5天前 3621

[分享]某邦企业壳frida检测绕过

5天前
3621

某企业壳frida检测绕过尝试

遇见个汽车app 是个企业壳 有frida检测,导致无法注入,本文记录下绕过的过程(使用的frida版本葫芦嗒)

通过查壳发现,这是某企业壳 知其特点检测主要是在dexhelp这个so文件中,也就省去了定位检测位置这一步

尝试hook pthread_create 定位线程 通过杀线程方法干掉他
1
2
3
4
5
6
7
8
9
10
11
function hook_pthread_create(){
    var pthread_create_addr = Module.findExportByName("libc.so", "pthread_create");
    console.log("pthread_create_addr: ", pthread_create_addr);
    Interceptor.attach(pthread_create_addr,{
        onEnter:function(args){
            console.log(args[2], Process.findModuleByAddress(args[2]).name);
        },onLeave:function(retval){
        }
    });
}
hook_pthread_create();

发现没啥用 应该是检测到 pthread_create 被hook了 既然pthread_create 被检测了 那么是否还有其他方法定位线程呢,于是乎 我打开了逆向小助手 gpt 首先我去问了下pthread_create 实现原理 gpt 给出了这个回答

然后 我又去问了gpt hook pthread_create 被检测到了 该怎么办 他建议我去hook 其他相关函数 比如pthread_join clone 通过gpt给出的答案 pthread_create 的实现会调用 clone 系统调用来创建新线程

他既然检测 pthread_create 函数头被hook 那clone函数应该没有把 通过hook clone函数 得到线程相关信息然后去nop 干掉线程 是不是 也能一把梭了 说干就干

首先 我去hook dlopen 在打开dexhelp这个so的时候 去hook下jnionload 看看它做手脚的地方是否在init里面 发现不是 那我只需要去hook clone函数 打印出相关线程信息 然后 加载这个so的时候 nop 掉它 测试是否能绕过即可

于是开始写hook 首先 找gpt要了一份 clone实现创建线程的例子

1
2
3
4
5
6
7
8
9
10
11
12
13
14
15
16
17
18
19
20
21
22
23
24
25
26
27
28
29
30
31
32
33
34
35
36
37
38
39
40
#define _GNU_SOURCE
#include <sched.h>
#include <stdio.h>
#include <unistd.h>
#include <stdlib.h>
 
#define STACK_SIZE 1024*1024  // 分配线程栈空间
 
// 子线程函数
int thread_func(void *arg) {
    printf("Hello from the new thread!\n");
    return 0;
}
 
int main() {
    char *stack;  // 存放线程栈的空间
    char *stackTop;
 
    // 为线程分配栈
    stack = malloc(STACK_SIZE);
    if (stack == NULL) {
        perror("malloc");
        exit(1);
    }
    stackTop = stack + STACK_SIZE;  // 设置栈顶
 
    // 使用 clone 创建新线程
    int pid = clone(thread_func, stackTop, SIGCHLD, NULL);  // 子进程退出时会发出 SIGCHLD 信号
    if (pid == -1) {
        perror("clone");
        exit(1);
    }
 
    // 等待线程结束
    printf("Waiting for the thread to finish...\n");
    waitpid(pid, NULL, 0);
 
    free(stack);  // 释放栈空间
    return 0;
}

传进去第一个参数是 子线程函数 于是乎 嘎嘎嘎hook 并且打印 结果发现全是libc.so 这是咋回事呢 看来还得好好学习 于是乎 我拿了一份libc.so ida打开它 看pthread_create 如何 去调用clone函数创建线程的

1
2
3
4
5
6
7
8
9
10
11
12
13
14
15
16
17
18
19
20
21
22
23
24
25
26
27
28
29
// Hook clone 系统调用
Interceptor.attach(Module.findExportByName(null, 'clone'), {
    onEnter: function (args) {
        // 获取线程函数的地址(即第一个参数)
        var thread_func = args[0];
 
        // 打印线程函数地址
        console.log('Thread function address: ' + thread_func);
 
        // 获取线程函数所在模块(.so 文件)
        var module = Process.findModuleByAddress(thread_func);
        if (module) {
            console.log('Thread function is located in module: ' + module.name);
        } else {
            console.log('Thread function is not in a loaded module or location could not be determined.');
        }
    },
    onLeave: function (retval) {
        // 可以在这里修改 clone 的返回值(如需要)
    }
});
 
输出
Thread function address: 0x749b4140dc
Thread function is located in module: libc.so
Thread function address: 0x749b4140dc
Thread function is located in module: libc.so
Thread function address: 0x749b4140dc
Thread function is located in module: libc.so

在上诉 clone hook处 我打印了下堆栈 看下哪里调用了 代码和hook 结果如下

1
2
3
4
5
6
7
8
9
10
11
12
13
14
15
16
17
18
19
20
21
22
23
24
25
26
27
Interceptor.attach(Module.findExportByName(null, 'clone'), {
    onEnter: function (args) {
        // 获取线程函数地址
        var thread_func = args[0];
 
        // 尝试获取线程函数所在模块
        var module = Process.findModuleByAddress(thread_func);
        if (module) {
            console.log('Thread function is located in module: ' + module.name);
        } else {
 
        }
 
        // 打印调用栈
        console.log('Backtrace:');
        console.log(Thread.backtrace(this.context, Backtracer.ACCURATE)
            .map(DebugSymbol.fromAddress).join('\n'));
    },
    onLeave: function (retval) {
        // 返回值处理(如果需要)
    }
});
 
结果
Thread function is located in module: libc.so
Backtrace:
0x749b413e40 libc.so!pthread_create+0x27c

然后 IDA跳转到pthread_create+0x27c 此处 调用了函数E6850 于是进去瞧一瞧 发现是DCQ数据

继续使用frida hook 读取下 结果是clone 也就说这里调用了clone函数

1
2
3
4
5
6
7
8
9
10
11
12
13
14
15
16
17
18
19
20
21
22
23
24
25
26
27
28
29
Interceptor.attach(Module.findExportByName(null, 'clone'), {
    onEnter: function (args) {
        // 获取线程函数地址
        var thread_func = args[0];


        // 尝试获取线程函数所在模块
        var module = Process.findModuleByAddress(thread_func);
        if (module) {
            console.log('Thread function is located in module: ' + module.name);
            const address = module.base.add(0xF06E8);
            const value = Memory.readU64(address);
            const symbol = DebugSymbol.fromAddress(ptr(value));
            console.log("name",symbol.name)
 
        } else {
 
        }
 
        // 打印调用栈
 
    },
    onLeave: function (retval) {
        // 返回值处理(如果需要)
    }
});
 
结果 clone

观察 pthread_create 函数的传参走向 也就是 a3

此处的 E6850是clone 而 通过 pthread_create 函数创建线程传递的 线程函数 就是 v50 而clone函数的第四个参数 v27 + 96 是所需要的线程函数 这样 就可以去试试 写一下hook clone代码了

1
2
3
4
5
6
7
8
9
10
11
12
13
14
15
16
var clone = Module.findExportByName('libc.so', 'clone');
Interceptor.attach(clone, {
    onEnter: function(args) {
        // args[3] 子线程的栈地址。如果这个值为 0,可能意味着没有指定栈地址
        if(args[3] != 0){
            var addr = args[3].add(96).readPointer()
            var so_name = Process.findModuleByAddress(addr).name;
            var so_base = Module.getBaseAddress(so_name);
            var offset = (addr - so_base);
            console.log("===============>", so_name, addr,offset, offset.toString(16));
        }
    },
    onLeave: function(retval) {
 
    }
});

然后运行后发现 非常阔以 打印出来了我们所需要的参数 非常nice

最后 我们 去给他nop掉 即可

1
2
3
4
5
6
7
8
9
10
11
12
13
14
15
16
17
18
19
20
21
22
23
24
25
26
27
28
29
30
31
function hook_dlopen(so_name) {
    Interceptor.attach(Module.findExportByName(null, "android_dlopen_ext"), {
        onEnter: function (args) {
            var pathptr = args[0];
            if (pathptr !== undefined && pathptr != null) {
                var path = ptr(pathptr).readCString();
                // console.log(path)
                if (path.indexOf(so_name) !== -1) {
                    this.match = true
                }
            }
        },
        onLeave: function (retval) {
            if (this.match) {
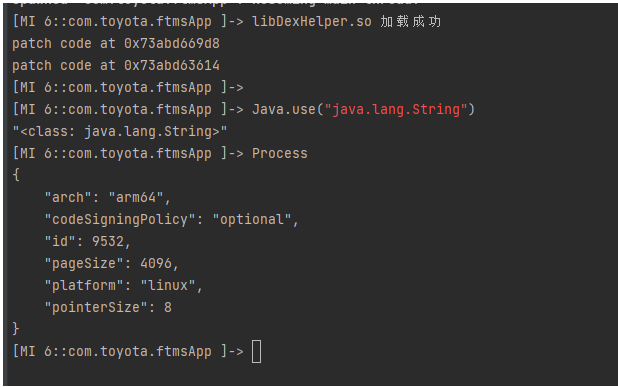
                console.log(so_name, "加载成功");
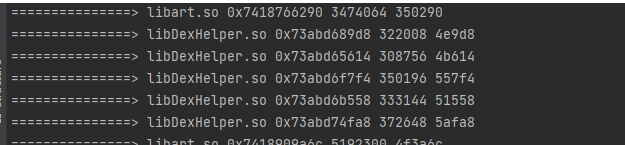
                var base = Module.findBaseAddress("libDexHelper.so")
                patch_func_nop(base.add(322008));
                patch_func_nop(base.add(308756));
 
            }
        }
    });
}
function patch_func_nop(addr) {
    Memory.patchCode(addr, 8, function (code) {
        code.writeByteArray([0xE0, 0x03, 0x00, 0xAA]);
        code.writeByteArray([0xC0, 0x03, 0x5F, 0xD6]);
        console.log("patch code at " + addr)
    });
}
hook_dlopen("libDexHelper.so")

最后 看结果


[注意]看雪招聘,专注安全领域的专业人才平台!

收藏
免费 6
支持
分享
最新回复 (11)
雪    币: 27
能力值: ( LV1,RANK:0 )
在线值:
发帖
回帖
粉丝
2
大佬可以加个好友吗
5天前
0
雪    币: 4
能力值: ( LV1,RANK:0 )
在线值:
发帖
回帖
粉丝
3
思路可以 好像不是通用 不同的邦邦检测也不一样
5天前
0
雪    币: 20
能力值: ( LV1,RANK:0 )
在线值:
发帖
回帖
粉丝
4

大佬,我的IDA反编译为何 clone函数看不到参数呢?

4天前
0
雪    币: 33
能力值: ( LV1,RANK:0 )
在线值:
发帖
回帖
粉丝
5
onwyc123 大佬,我的IDA反编译为何 clone函数看不到参数呢?
双击进去clone函数里,按F5刷新下,再退出来,然后再F5刷新下,就可以看到了

4天前
0
雪    币: 4182
活跃值: (3939)
能力值: ( LV2,RANK:10 )
在线值:
发帖
回帖
粉丝
6

得到上述错误改怎么解决

4天前
0
雪    币: 4854
活跃值: (4495)
能力值: ( LV2,RANK:10 )
在线值:
发帖
回帖
粉丝
D-t
7
黑屏 得到上述错误改怎么解决
中邮?
4天前
0
雪    币: 24
活跃值: (512)
能力值: ( LV2,RANK:10 )
在线值:
发帖
回帖
粉丝
8
学到了
4天前
0
雪    币: 4182
活跃值: (3939)
能力值: ( LV2,RANK:10 )
在线值:
发帖
回帖
粉丝
9
D-t 中邮?
嗯  能否搞一下
4天前
0
雪    币: 20
能力值: ( LV1,RANK:0 )
在线值:
发帖
回帖
粉丝
10
有用,谢谢!
3天前
0
雪    币: 177
活跃值: (2036)
能力值: ( LV2,RANK:10 )
在线值:
发帖
回帖
粉丝
11
黑屏 嗯 能否搞一下
有纯算,要吗?
3天前
0
雪    币: 200
能力值: ( LV1,RANK:0 )
在线值:
发帖
回帖
粉丝
12

1天前
0
游客
登录 | 注册 方可回帖
返回