在安卓中的app进行so加载过程中,分析一下so的动态静态的so加载过程
在 Android 中,.so 文件是 共享库文件,.so 文件可以分为 动态链接库(动态 .so 文件)和 静态链接库(静态 .a 文件),但 Android 中一般更常见的是动态 .so 文件,静态链接库通常在编译时被集成到最终的应用中,而不直接加载。所以经常看到的so文件的链接大多是都是以动态链接的
动态链接会利用对应的打包的生成的APK,按照对应的架构(lib/armeabi-v7a/,lib/arm64-v8a/,lib/x86/,lib/x86_64/)去选择对应的so文件,然后去实现在 Java 层,通过 JNI 来进行。
Java 代码使用 静态System.loadLibrary("libsofile") 来加载共享库文件。
或者通过动态加载路径的so文件的过程来实现
在 Android 中,静态链接库(.a 文件)是被链接到最终的可执行文件中的,而不是在运行时加载。Android NDK 编译时,静态库会被打包到 APK 中的应用代码部分。
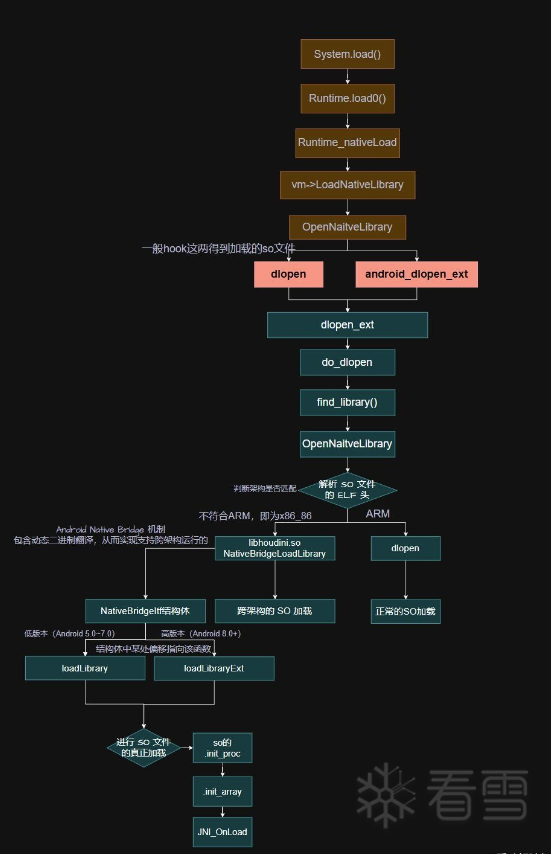
我们要去探究SO文件最真实的加载过程就要从System.load(sopath)这里开始,去剖析安卓源码
安卓源码
System.load(sopath)开始进行解析,查看整个so文件加载过程
先解释一下这里的情况Reflection.getCallerClass() 通过反射机制获取调用此方法的类的引用。它返回的是调用 load0 方法的 调用者类。这里加载到了直接去加载了load0函数。
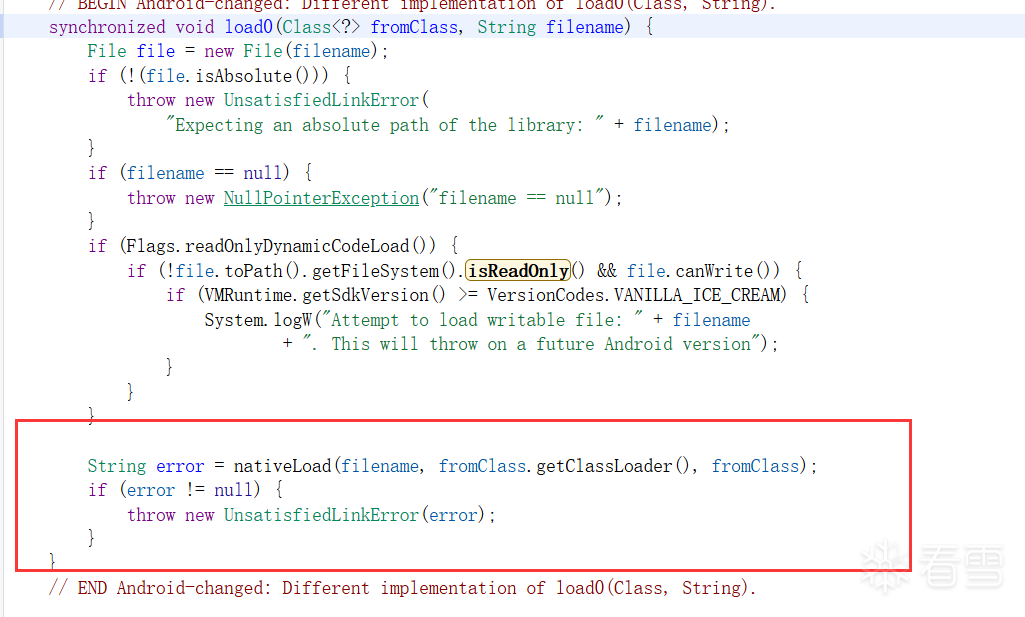
在这里去检测了对应加载过程中的sofile。然后就开始往nativeLoad函数走了
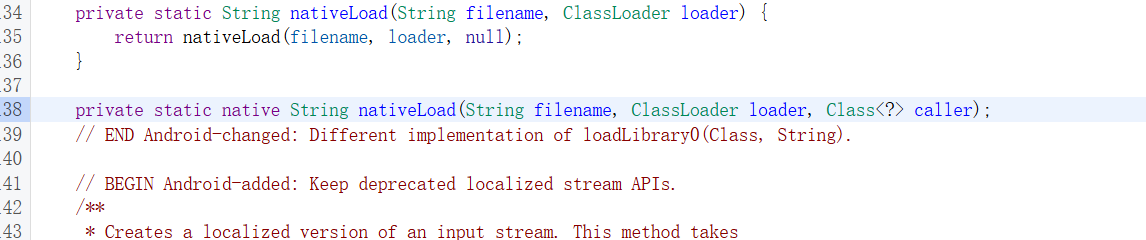
这里直接是naitve函数了,我们要去看对应的c文件,所以要重新去搜索了,这里的搜索方法就是类名_函数名的形式,转换过程就是Runtime_nativeLoad函数
这里是最正常的返回,直接走 JVM_NativeLoad(env, javaFilename, javaLoader, caller)
同样得直接向下去分析就好了 vm->LoadNativeLibrary函数
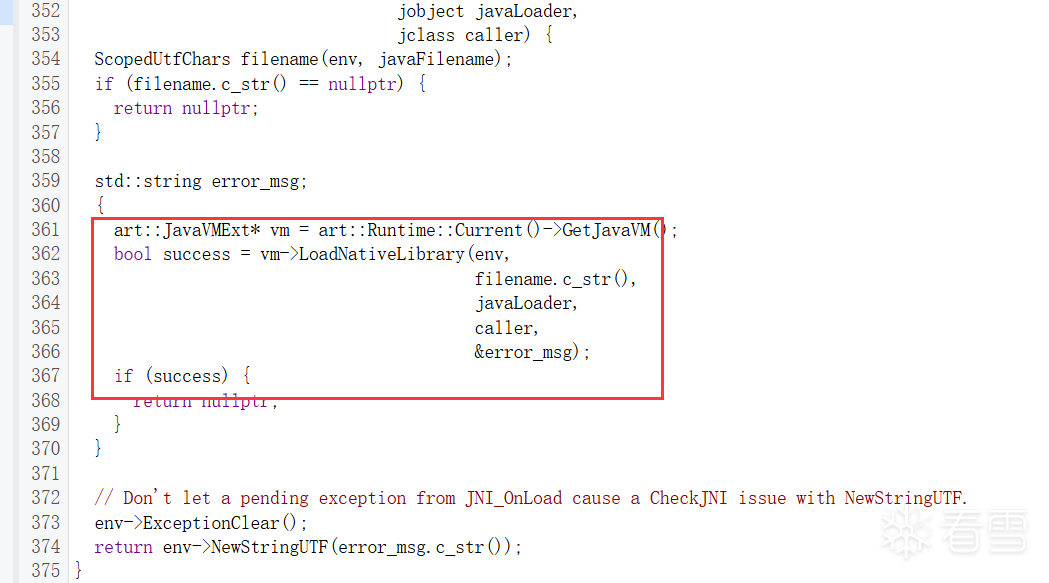
这里的大多数的函数都是对于so加载中的中途函数,也就是一层一层得调用到关键函数的,所以这里直接往下走就是了
在 JavaVMExt::LoadNativeLibrary这个函数中有需要去注意和理解的地方,同时这里也是在进行调用dlopen来进行真正so文件加载的地方。
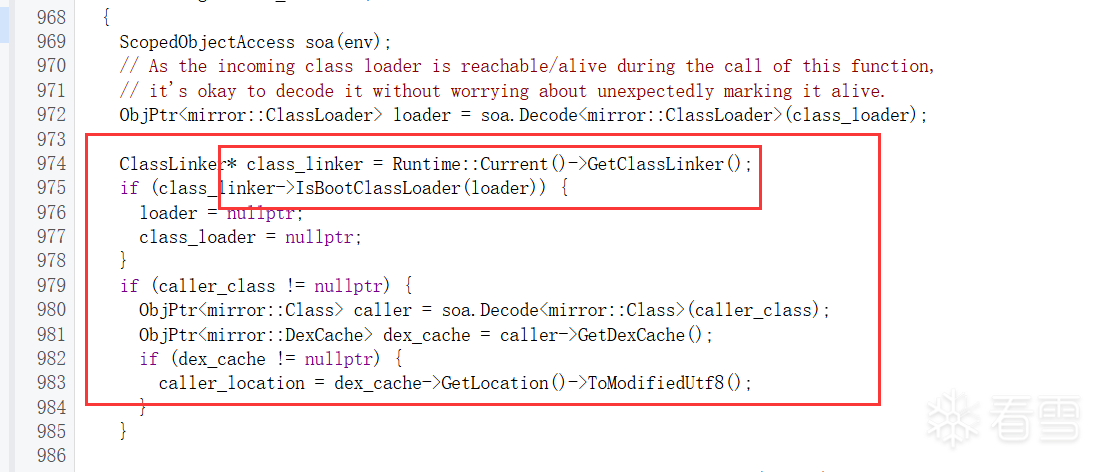
首先是这里的Linker的位置,这里去解码了 ClassLoader 和 Caller Class 信息,同时去判断了加载器是否为 BootClassLoader。其实在so加载过程也有借助linker判断so文件结构,链接的位置则是so文件的头部,判断的是so文件结构是否正确。

这里也去判断了这里加载的so文件是否以及被加载过了,最后开始的对于共享库so的加载(dlopen)
在这里开始找到了我们最为熟悉的 android_dlopen_ext(path, RTLD_NOW, &dlextinfo);函数,也就是经常进行HOOK的位置了
在android12中会直接由 android_dlopen_ext直接返回到 __loader_android_dlopen_ext函数,而在其他版本可以会到 mock->mock_dlopen_ext(这里会走到mock_dlopen_ext 会模拟 dlopen 的行为,同时通过flag和宏定义走到不同的函数位置)

这里我们固定在android12的位置去实现。
直接的返回进入下一个函数。
同样进入do_dlopen(filename, flags, extinfo, caller_addr)
在这个函数中附加了很多对于do_dlopen函数参数的检测和判断
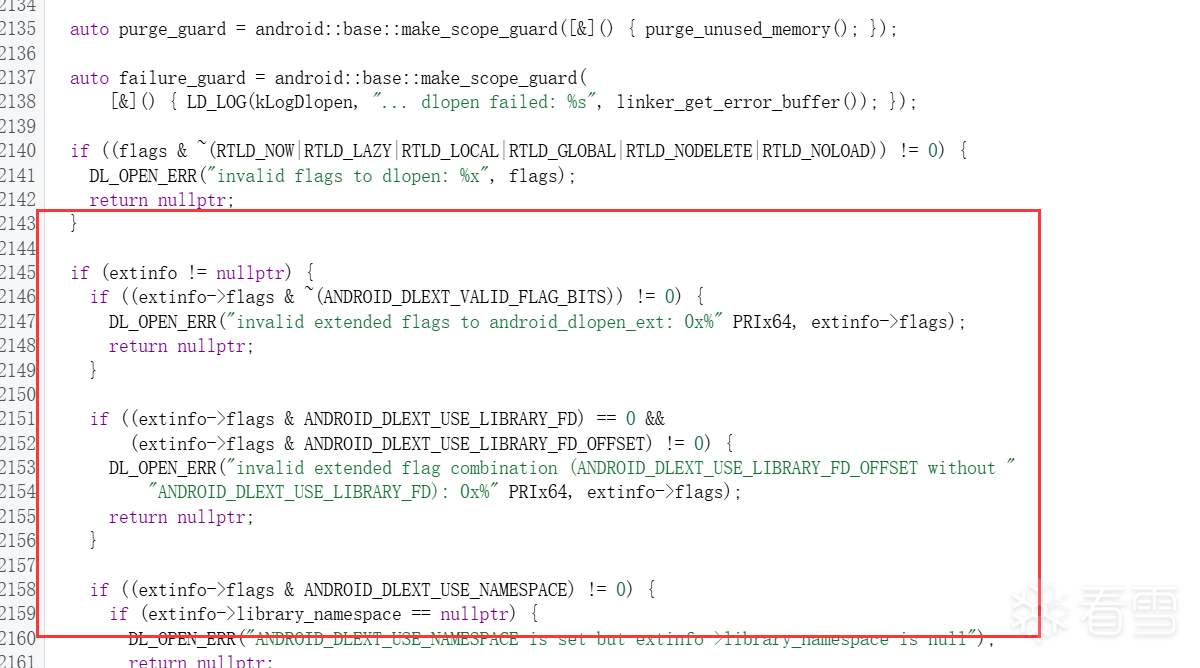
这种大面积的对于extinfo,对于so文件相关的属性进行的检测。
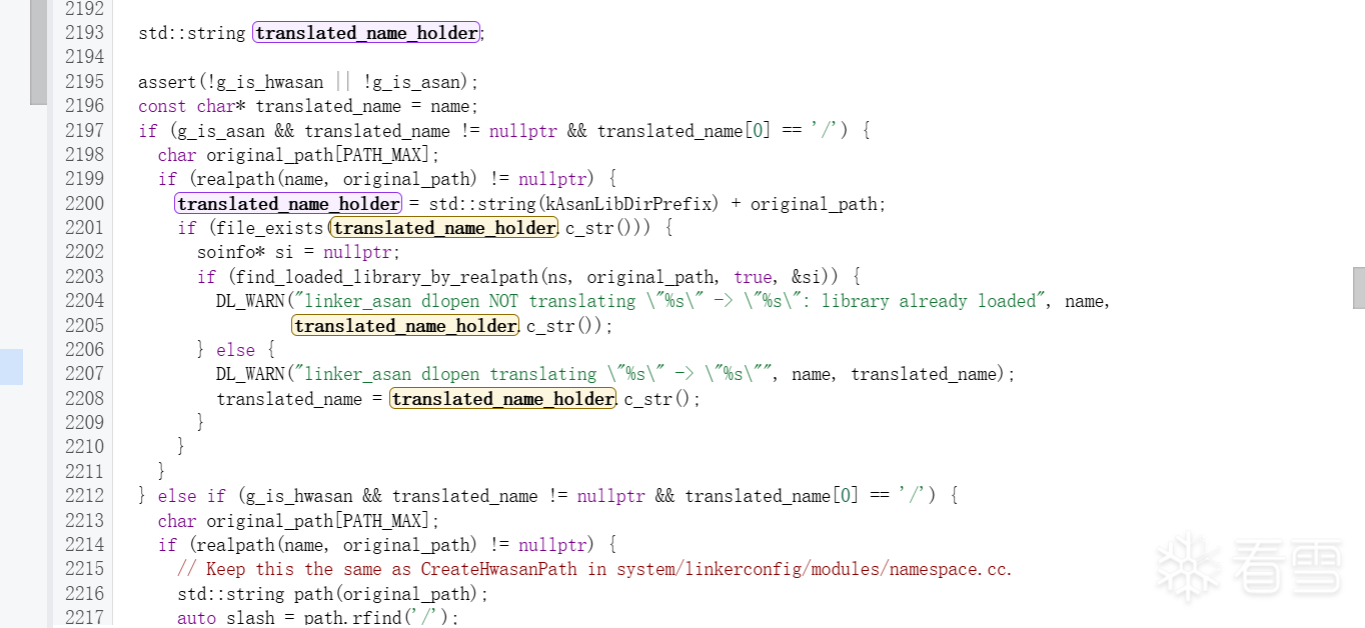
通过还对于这里的path进行了对应路径的转换和翻译。
这里是对于do_dlopen最为重要的位置,也就是在这里去实现了对于soinfo的初始化,也就是在这开始调用so的.init_proc函数,接着调用.init_array中的函数,最后才是JNI_OnLoad函数。在很多的so文件的检测点判断中很多人也会利用这里的位置对于检测点是在JNI_OnLoad函数之前还是之后的判断依据。
继续去往find_library(ns, translated_name, flags, extinfo, caller)
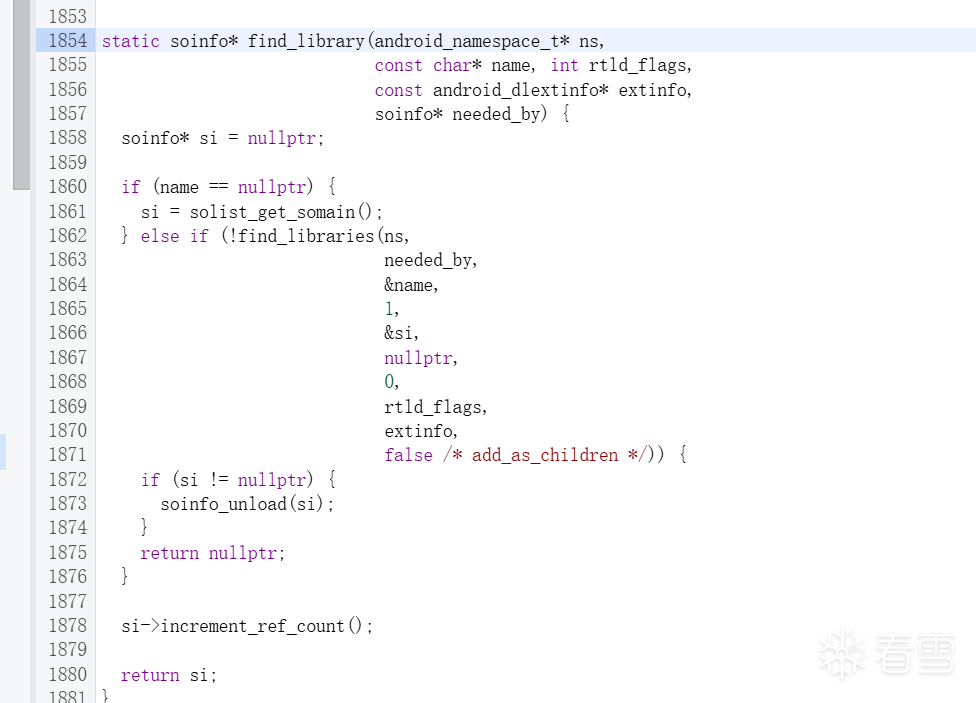
这里直接往find_libraries里面就可以了
这个函数就是在so文件加载执行流程的最后了

这里很长一部分的代码,在安卓源码中也有对于其进行了批注,一步一步得去加载和解析so文件,去实现so文件的加载
比如在Step 0 中
程序去实现了对于这个加载的so文件进行的,存储于数组中,并且去实现了条件判断,假如soinfos为空,还会去实现构造了soinfo* 的结构体指针来申请一段空间来存储
这里 task->get_needed_by() 能够看到其实是在借用上一步得到的so文件的数组去实现检测依赖关系,因为我们知道一个so文件,在ida分析中可以看到的导入表和导出表,全是so与so之间的相互依赖来实现的。通过学习过NDK开发的也知道,在so之间的相互调用中,通过也是通过dlopen来实现。
Step2 中,安卓动态链接器采用 随机顺序 加载 SO 文件(避免固定顺序带来的漏洞)。如果 extinfo 需要 ANDROID_DLEXT_RESERVED_ADDRESS_RECURSIVE,则不会进行随机化。设定地址空间参数,比如 reserved_addr(预留地址)和 reserved_size。
这里是实现预链接的位置,也是在文章之前提到实现Linker来解析ELF文件结构的地方si>prelink_image(dlext_use_relro))
这也是对于ELF文件结构处理的细节位置,只有对应的so文件是完整的才能进行加载链接
同时也将soinfo转入到了TLS中去。
这里去实现把在Step3中解析的符号表等等的信息来进行处理了DF_1_GLOBAL 标志的库会被添加到全局符号解析列表。如果是 LD_PRELOAD 方式加载的库,强制 DF_1_GLOBAL 以确保它能影响所有加载的库。
从Step5到Step7之间的这些处理就很细节了,比如有对于so文件的跨越了匿名空间的特殊处理,以及对于之前的so文件之间的依赖库的递归处理,来实现依赖so之间的函数使用。总的来说全是遍历load_tasks,之前准备的so文件,来实现的各种属性和信息的处理。
就此,整个SO文件被全部解析处理。
这里我们去重新梳理一下整个so文件加载过程,现在不管是frida检测,还是更多的防护都在so文件里面,这在APP防护和加固很重要,同样破防也是。
我们首先是通过System.load()进入
此方法最终调用 Runtime.load0(),然后进入 nativeLoad() 函数。
Runtime_nativeLoad → vm->LoadNativeLibrary
进入 JavaVMExt::LoadNativeLibrary 方法后,最终会调用 dlopen 进行真正的 SO 文件加载。
在 Android 12 及以上版本,会调用 android_dlopen_ext 返回 __loader_android_dlopen_ext。
该方法最终调用 dlopen_ext()。
do_dlopen(filename, flags, extinfo, caller_addr)
在 do_dlopen() 中,会调用 find_library() 进行 SO 文件的真正加载。
这里是对于soinfo的赋值,同时在这里开始调用so的.init_proc函数,接着调用.init_array中的函数,最后才是JNI_OnLoad函数。最后到达find_libraries 执行最后的处理。
这里附上评论区中的执行流程图包括了在模拟器下的执行流程。
我在https://bbs.kanxue.com/thread-286377.htm,这里对于模拟器下so文件执行流程做了分析。
Android系统加载so的源码分析 — 博客
安卓so加载流程源码分析 | oacia = oaciaのBbBlog~ = DEVIL or SWEET
Android Linker学习笔记 | WooYun知识库
static {
System.loadLibrary("libsofile);
}
static {
System.loadLibrary("libsofile);
}
String soPath = "/data/data/com.example.libsofile/libsofile.so";
System.load(soPath);
String soPath = "/data/data/com.example.libsofile/libsofile.so";
System.load(soPath);
@CallerSensitive
public static void load(String filename) {
Runtime.getRuntime().load0(Reflection.getCallerClass(), filename);
}
@CallerSensitive
public static void load(String filename) {
Runtime.getRuntime().load0(Reflection.getCallerClass(), filename);
}
synchronized void load0(Class<?> fromClass, String filename) {
File file = new File(filename);
if (!(file.isAbsolute())) {
throw new UnsatisfiedLinkError(
"Expecting an absolute path of the library: " + filename);
}
if (filename == null) {
throw new NullPointerException("filename == null");
}
if (Flags.readOnlyDynamicCodeLoad()) {
if (!file.toPath().getFileSystem().isReadOnly() && file.canWrite()) {
if (VMRuntime.getSdkVersion() >= VersionCodes.VANILLA_ICE_CREAM) {
System.logW("Attempt to load writable file: " + filename
+ ". This will throw on a future Android version");
}
}
}
String error = nativeLoad(filename, fromClass.getClassLoader(), fromClass);
if (error != null) {
throw new UnsatisfiedLinkError(error);
}
}
JNIEXPORT jstring JNICALL
Runtime_nativeLoad(JNIEnv* env, jclass ignored, jstring javaFilename,
jobject javaLoader, jclass caller)
{
return JVM_NativeLoad(env, javaFilename, javaLoader, caller);
}
JNIEXPORT jstring JNICALL
Runtime_nativeLoad(JNIEnv* env, jclass ignored, jstring javaFilename,
jobject javaLoader, jclass caller)
{
return JVM_NativeLoad(env, javaFilename, javaLoader, caller);
}
JNIEXPORT jstring JVM_NativeLoad(JNIEnv* env,
jstring javaFilename,
jobject javaLoader,
jclass caller) {
ScopedUtfChars filename(env, javaFilename);
if (filename.c_str() == nullptr) {
return nullptr;
}
std::string error_msg;
{
art::JavaVMExt* vm = art::Runtime::Current()->GetJavaVM();
bool success = vm->LoadNativeLibrary(env,
filename.c_str(),
javaLoader,
caller,
&error_msg);
if (success) {
return nullptr;
}
}
env->ExceptionClear();
return env->NewStringUTF(error_msg.c_str());
}
ClassLinker* class_linker = Runtime::Current()->GetClassLinker();
if (class_linker->IsBootClassLoader(loader)) {
loader = nullptr;
class_loader = nullptr;
}
if (caller_class != nullptr) {
ObjPtr<mirror::Class> caller = soa.Decode<mirror::Class>(caller_class);
ObjPtr<mirror::DexCache> dex_cache = caller->GetDexCache();
if (dex_cache != nullptr) {
caller_location = dex_cache->GetLocation()->ToModifiedUtf8();
}
}
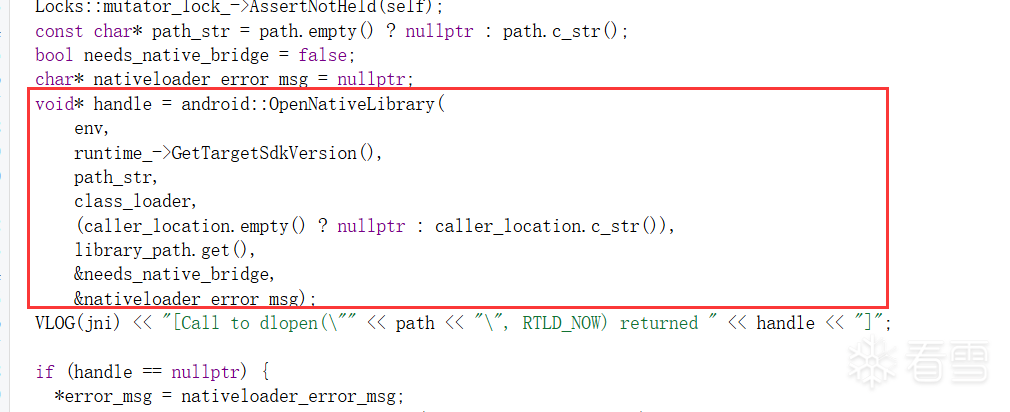
Locks::mutator_lock_->AssertNotHeld(self);
const char* path_str = path.empty() ? nullptr : path.c_str();
bool needs_native_bridge = false;
char* nativeloader_error_msg = nullptr;
void* handle = android::OpenNativeLibrary(
env,
runtime_->GetTargetSdkVersion(),
path_str,
class_loader,
(caller_location.empty() ? nullptr : caller_location.c_str()),
library_path.get(),
&needs_native_bridge,
&nativeloader_error_msg);
VLOG(jni) << "[Call to dlopen(\"" << path << "\", RTLD_NOW) returned " << handle << "]";
if (handle == nullptr) {
*error_msg = nativeloader_error_msg;
android::NativeLoaderFreeErrorMessage(nativeloader_error_msg);
VLOG(jni) << "dlopen(\"" << path << "\", RTLD_NOW) failed: " << *error_msg;
return false;
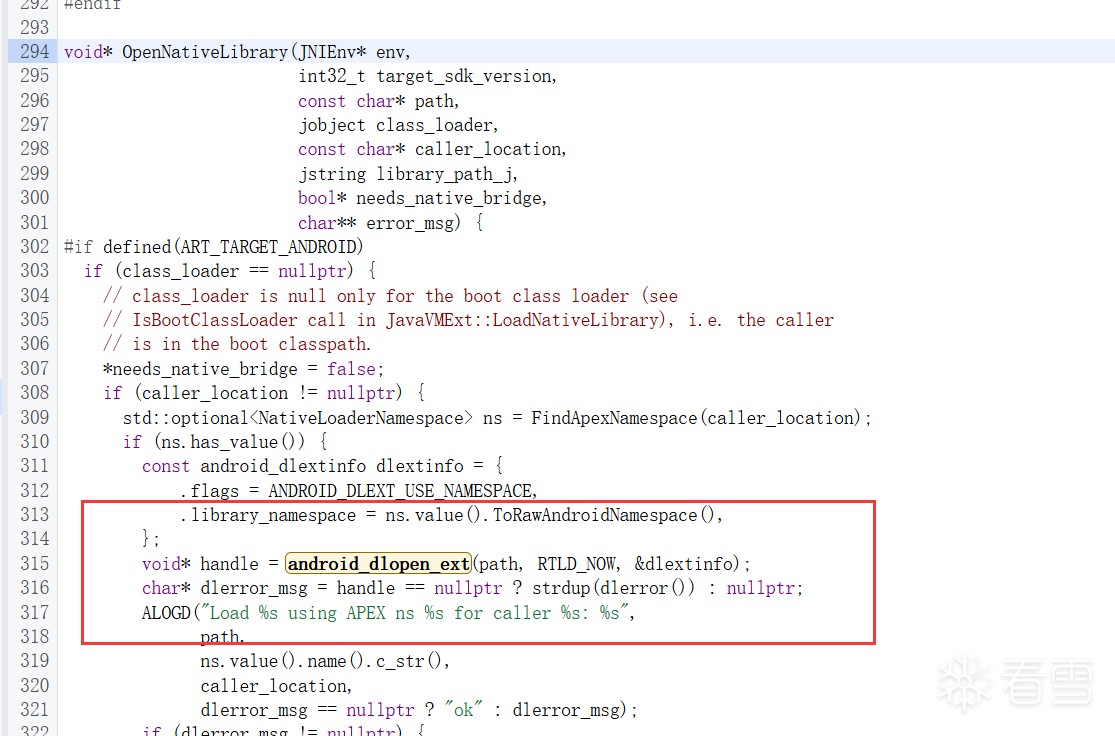
void* OpenNativeLibrary(JNIEnv* env,
int32_t target_sdk_version,
const char* path,
jobject class_loader,
const char* caller_location,
jstring library_path_j,
bool* needs_native_bridge,
char** error_msg) {
#if defined(ART_TARGET_ANDROID)
if (class_loader == nullptr) {
*needs_native_bridge = false;
if (caller_location != nullptr) {
std::optional<NativeLoaderNamespace> ns = FindApexNamespace(caller_location);
if (ns.has_value()) {
const android_dlextinfo dlextinfo = {
.flags = ANDROID_DLEXT_USE_NAMESPACE,
.library_namespace = ns.value().ToRawAndroidNamespace(),
};
void* handle = android_dlopen_ext(path, RTLD_NOW, &dlextinfo);
char* dlerror_msg = handle == nullptr ? strdup(dlerror()) : nullptr;
ALOGD("Load %s using APEX ns %s for caller %s: %s",
path,
ns.value().name().c_str(),
caller_location,
dlerror_msg == nullptr ? "ok" : dlerror_msg);
if (dlerror_msg != nullptr) {
*error_msg = dlerror_msg;
}
return handle;
}
}
void* __loader_android_dlopen_ext(const char* filename,
int flags,
const android_dlextinfo* extinfo,
const void* caller_addr) {
return dlopen_ext(filename, flags, extinfo, caller_addr);
}
void* __loader_android_dlopen_ext(const char* filename,
int flags,
const android_dlextinfo* extinfo,
const void* caller_addr) {
return dlopen_ext(filename, flags, extinfo, caller_addr);
}
static void* dlopen_ext(const char* filename,
int flags,
const android_dlextinfo* extinfo,
const void* caller_addr) {
ScopedPthreadMutexLocker locker(&g_dl_mutex);
g_linker_logger.ResetState();
void* result = do_dlopen(filename, flags, extinfo, caller_addr);
if (result == nullptr) {
__bionic_format_dlerror("dlopen failed", linker_get_error_buffer());
return nullptr;
}
return result;
}
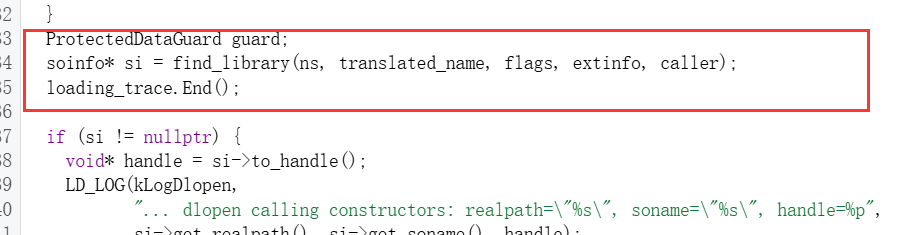
ProtectedDataGuard guard;
soinfo* si = find_library(ns, translated_name, flags, extinfo, caller);
loading_trace.End();
ProtectedDataGuard guard;
soinfo* si = find_library(ns, translated_name, flags, extinfo, caller);
loading_trace.End();
static soinfo* find_library(android_namespace_t* ns,
const char* name, int rtld_flags,
const android_dlextinfo* extinfo,
soinfo* needed_by) {
soinfo* si = nullptr;
if (name == nullptr) {
si = solist_get_somain();
} else if (!find_libraries(ns,
needed_by,
&name,
1,
&si,
nullptr,
0,
rtld_flags,
extinfo,
false )) {
if (si != nullptr) {
soinfo_unload(si);
}
return nullptr;
}
si->increment_ref_count();
return si;
}
bool find_libraries(android_namespace_t* ns,
soinfo* start_with,
const char* const library_names[],
size_t library_names_count,
soinfo* soinfos[],
std::vector<soinfo*>* ld_preloads,
size_t ld_preloads_count,
int rtld_flags,
const android_dlextinfo* extinfo,
bool add_as_children,
std::vector<android_namespace_t*>* namespaces) {
std::unordered_map<const soinfo*, ElfReader> readers_map;
LoadTaskList load_tasks;
for (size_t i = 0; i < library_names_count; ++i) {
const char* name = library_names[i];
load_tasks.push_back(LoadTask::create(name, start_with, ns, &readers_map));
}
if (soinfos == nullptr) {
size_t soinfos_size = sizeof(soinfo*)*library_names_count;
soinfos = reinterpret_cast<soinfo**>(alloca(soinfos_size));
memset(soinfos, 0, soinfos_size);
}
size_t soinfos_count = 0;
auto scope_guard = android::base::make_scope_guard([&]() {
for (LoadTask* t : load_tasks) {
LoadTask::deleter(t);
}
});
ZipArchiveCache zip_archive_cache;
soinfo_list_t new_global_group_members;
for (size_t i = 0; i<load_tasks.size(); ++i) {
LoadTask* task = load_tasks[i];
soinfo* needed_by = task->get_needed_by();
bool is_dt_needed = needed_by != nullptr && (needed_by != start_with || add_as_children);
task->set_extinfo(is_dt_needed ? nullptr : extinfo);
task->set_dt_needed(is_dt_needed);
android_namespace_t* start_ns = const_cast<android_namespace_t*>(task->get_start_from());
LD_LOG(kLogDlopen, "find_library_internal(ns=%s@%p): task=%s, is_dt_needed=%d",
start_ns->get_name(), start_ns, task->get_name(), is_dt_needed);
if (!find_library_internal(start_ns, task, &zip_archive_cache, &load_tasks, rtld_flags)) {
return false;
}
soinfo* si = task->get_soinfo();
if (is_dt_needed) {
needed_by->add_child(si);
}
bool is_ld_preload = false;
if (ld_preloads != nullptr && soinfos_count < ld_preloads_count) {
ld_preloads->push_back(si);
is_ld_preload = true;
}
if (soinfos_count < library_names_count) {
soinfos[soinfos_count++] = si;
}
if (is_ld_preload || (si->get_dt_flags_1() & DF_1_GLOBAL) != 0) {
if (!si->is_linked() && namespaces != nullptr && !new_global_group_members.contains(si)) {
new_global_group_members.push_back(si);
for (auto linked_ns : *namespaces) {
if (si->get_primary_namespace() != linked_ns) {
linked_ns->add_soinfo(si);
si->add_secondary_namespace(linked_ns);
}
}
}
}
}
LoadTaskList load_list;
for (auto&& task : load_tasks) {
soinfo* si = task->get_soinfo();
auto pred = [&](const LoadTask* t) {
return t->get_soinfo() == si;
};
if (!si->is_linked() &&
std::find_if(load_list.begin(), load_list.end(), pred) == load_list.end() ) {
load_list.push_back(task);
}
}
bool reserved_address_recursive = false;
if (extinfo) {
reserved_address_recursive = extinfo->flags & ANDROID_DLEXT_RESERVED_ADDRESS_RECURSIVE;
}
if (!reserved_address_recursive) {
shuffle(&load_list);
}
address_space_params extinfo_params, default_params;
size_t relro_fd_offset = 0;
if (extinfo) {
if (extinfo->flags & ANDROID_DLEXT_RESERVED_ADDRESS) {
extinfo_params.start_addr = extinfo->reserved_addr;
extinfo_params.reserved_size = extinfo->reserved_size;
extinfo_params.must_use_address = true;
} else if (extinfo->flags & ANDROID_DLEXT_RESERVED_ADDRESS_HINT) {
extinfo_params.start_addr = extinfo->reserved_addr;
extinfo_params.reserved_size = extinfo->reserved_size;
}
}
for (auto&& task : load_list) {
address_space_params* address_space =
(reserved_address_recursive || !task->is_dt_needed()) ? &extinfo_params : &default_params;
if (!task->load(address_space)) {
return false;
}
}
bool dlext_use_relro =
extinfo && extinfo->flags & (ANDROID_DLEXT_WRITE_RELRO | ANDROID_DLEXT_USE_RELRO);
bool any_memtag_stack = false;
for (auto&& task : load_tasks) {
soinfo* si = task->get_soinfo();
if (!si->is_linked() && !si->prelink_image(dlext_use_relro)) {
return false;
}
if (si->memtag_stack()) {
any_memtag_stack = true;
LD_LOG(kLogDlopen,
"... load_library requesting stack MTE for: realpath=\"%s\", soname=\"%s\"",
si->get_realpath(), si->get_soname());
}
register_soinfo_tls(si);
}
if (any_memtag_stack) {
if (auto* cb = __libc_shared_globals()->memtag_stack_dlopen_callback) {
cb();
} else {
__libc_shared_globals()->initial_memtag_stack_abi = true;
}
}
if (ld_preloads != nullptr) {
for (auto&& si : *ld_preloads) {
si->set_dt_flags_1(si->get_dt_flags_1() | DF_1_GLOBAL);
}
}
std::vector<soinfo*> local_group_roots;
if (start_with != nullptr && add_as_children) {
local_group_roots.push_back(start_with);
} else {
CHECK(soinfos_count == 1);
local_group_roots.push_back(soinfos[0]);
}
for (auto&& task : load_tasks) {
soinfo* si = task->get_soinfo();
soinfo* needed_by = task->get_needed_by();
bool is_dt_needed = needed_by != nullptr && (needed_by != start_with || add_as_children);
android_namespace_t* needed_by_ns =
is_dt_needed ? needed_by->get_primary_namespace() : ns;
if (!si->is_linked() && si->get_primary_namespace() != needed_by_ns) {
auto it = std::find(local_group_roots.begin(), local_group_roots.end(), si);
LD_LOG(kLogDlopen,
"Crossing namespace boundary (si=%s@%p, si_ns=%s@%p, needed_by=%s@%p, ns=%s@%p, needed_by_ns=%s@%p) adding to local_group_roots: %s",
si->get_realpath(),
si,
si->get_primary_namespace()->get_name(),
si->get_primary_namespace(),
needed_by == nullptr ? "(nullptr)" : needed_by->get_realpath(),
needed_by,
ns->get_name(),
ns,
needed_by_ns->get_name(),
needed_by_ns,
it == local_group_roots.end() ? "yes" : "no");
if (it == local_group_roots.end()) {
local_group_roots.push_back(si);
}
}
}
for (auto root : local_group_roots) {
soinfo_list_t local_group;
android_namespace_t* local_group_ns = root->get_primary_namespace();
walk_dependencies_tree(root,
[&] (soinfo* si) {
if (local_group_ns->is_accessible(si)) {
local_group.push_back(si);
return kWalkContinue;
} else {
return kWalkSkip;
}
});
soinfo_list_t global_group = local_group_ns->get_global_group();
SymbolLookupList lookup_list(global_group, local_group);
soinfo* local_group_root = local_group.front();
bool linked = local_group.visit([&](soinfo* si) {
if (!si->is_linked() && si->get_primary_namespace() == local_group_ns) {
const android_dlextinfo* link_extinfo = nullptr;
if (si == soinfos[0] || reserved_address_recursive) {
link_extinfo = extinfo;
}
if (__libc_shared_globals()->load_hook) {
__libc_shared_globals()->load_hook(si->load_bias, si->phdr, si->phnum);
}
lookup_list.set_dt_symbolic_lib(si->has_DT_SYMBOLIC ? si : nullptr);
if (!si->link_image(lookup_list, local_group_root, link_extinfo, &relro_fd_offset) ||
!get_cfi_shadow()->AfterLoad(si, solist_get_head())) {
return false;
}
}
return true;
});
if (!linked) {
return false;
}
}
if (start_with != nullptr && add_as_children) {
start_with->set_linked();
}
for (auto&& task : load_tasks) {
soinfo* si = task->get_soinfo();
si->set_linked();
}
for (auto&& task : load_tasks) {
soinfo* si = task->get_soinfo();
soinfo* needed_by = task->get_needed_by();
if (needed_by != nullptr &&
needed_by != start_with &&
needed_by->get_local_group_root() != si->get_local_group_root()) {
si->increment_ref_count();
}
}
return true;
}
bool find_libraries(android_namespace_t* ns,
soinfo* start_with,
const char* const library_names[],
size_t library_names_count,
soinfo* soinfos[],
std::vector<soinfo*>* ld_preloads,
size_t ld_preloads_count,
int rtld_flags,
const android_dlextinfo* extinfo,
bool add_as_children,
std::vector<android_namespace_t*>* namespaces) {
std::unordered_map<const soinfo*, ElfReader> readers_map;
LoadTaskList load_tasks;
for (size_t i = 0; i < library_names_count; ++i) {
const char* name = library_names[i];
load_tasks.push_back(LoadTask::create(name, start_with, ns, &readers_map));
}
if (soinfos == nullptr) {
size_t soinfos_size = sizeof(soinfo*)*library_names_count;
soinfos = reinterpret_cast<soinfo**>(alloca(soinfos_size));
memset(soinfos, 0, soinfos_size);
}
size_t soinfos_count = 0;
auto scope_guard = android::base::make_scope_guard([&]() {
for (LoadTask* t : load_tasks) {
LoadTask::deleter(t);
}
});
ZipArchiveCache zip_archive_cache;
soinfo_list_t new_global_group_members;
for (size_t i = 0; i<load_tasks.size(); ++i) {
LoadTask* task = load_tasks[i];
soinfo* needed_by = task->get_needed_by();
bool is_dt_needed = needed_by != nullptr && (needed_by != start_with || add_as_children);
task->set_extinfo(is_dt_needed ? nullptr : extinfo);
task->set_dt_needed(is_dt_needed);
android_namespace_t* start_ns = const_cast<android_namespace_t*>(task->get_start_from());
LD_LOG(kLogDlopen, "find_library_internal(ns=%s@%p): task=%s, is_dt_needed=%d",
start_ns->get_name(), start_ns, task->get_name(), is_dt_needed);
if (!find_library_internal(start_ns, task, &zip_archive_cache, &load_tasks, rtld_flags)) {
return false;
}
soinfo* si = task->get_soinfo();
if (is_dt_needed) {
needed_by->add_child(si);
}
bool is_ld_preload = false;
if (ld_preloads != nullptr && soinfos_count < ld_preloads_count) {
ld_preloads->push_back(si);
is_ld_preload = true;
}
if (soinfos_count < library_names_count) {
soinfos[soinfos_count++] = si;
}
if (is_ld_preload || (si->get_dt_flags_1() & DF_1_GLOBAL) != 0) {
if (!si->is_linked() && namespaces != nullptr && !new_global_group_members.contains(si)) {
new_global_group_members.push_back(si);
for (auto linked_ns : *namespaces) {
if (si->get_primary_namespace() != linked_ns) {
linked_ns->add_soinfo(si);
si->add_secondary_namespace(linked_ns);
}
}
}
[招生]科锐逆向工程师培训(2026年7月3日实地,远程教学同时开班, 第56期)!
最后于 2025-4-19 11:07
被ovo_帮我不c编辑
,原因: