Dobby框架推出的时间也不短了,从Github提交记录上看最早在17年就有提交了。这期间陆陆续续在使用Dobby框架,虽然对原理有大概的了解,但是还是没有从源码上入手分析,这次想完整的梳理下Dobby的实现流程,也就有了这次的文章。
对于Dobby这类inline hook框架的认识,大多数人都知道它的实现是在hook函数时,修改了函数对应汇编代码的前几行指令实现跳转到自定义函数上的,那么就沿着这个角度先从汇编调试上看看Dobby从我们原始程序的修改
使用一个最基本的Demo来作为调试对象
注意:这里直接将Dobby源码作用三方库引入,目前Dobby最新Commit无法编译,需要切换到Commit:0932d69c320e786672361ab53825ba8f4245e9d3
对Java_com_example_dobbytest1_MainActivity_stringFromJNI方法的hook,hook后主动回调原始方法
可能是由于Android Studio版本太新,没找到在Android Studio上使用lldb调试的方式,我就直接使用命令行来操作了
设备端开启lldb-server并启动App
本地使用lldb连接
此时设备端会显示Connection established.,接下里就可以attach对应的pid进行调试了
首先确定断点位置,因为代码中是对Java_com_example_dobbytest1_MainActivity_stringFromJNI进行hook,那么可以断点在该方法的首个指令地址

地址计算可以参考下面的方法
0xb110位置断点
得到结果如下
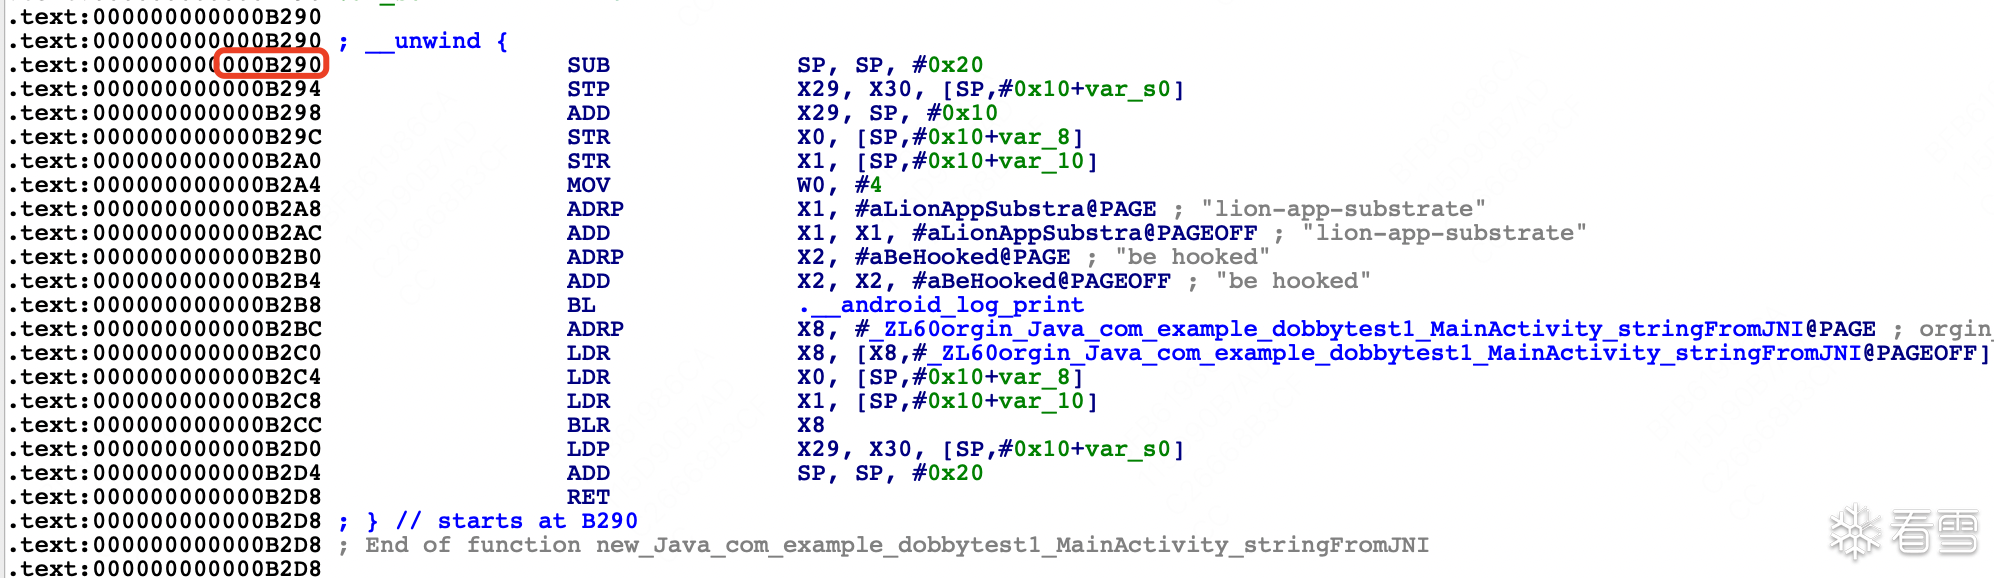
可以看到Java_com_example_dobbytest1_MainActivity_stringFromJNI函数的头三个指令发生了变化,原本的栈拉伸、寄存器入栈保护等固定指令被替换了,替换成了针对x17地址的跳转指令,看下x17对应的值是什么
x17对应的值是0x00000070ece54290,偏移是0xb290,也就对应着new_Java_com_example_dobbytest1_MainActivity_stringFromJNI方法
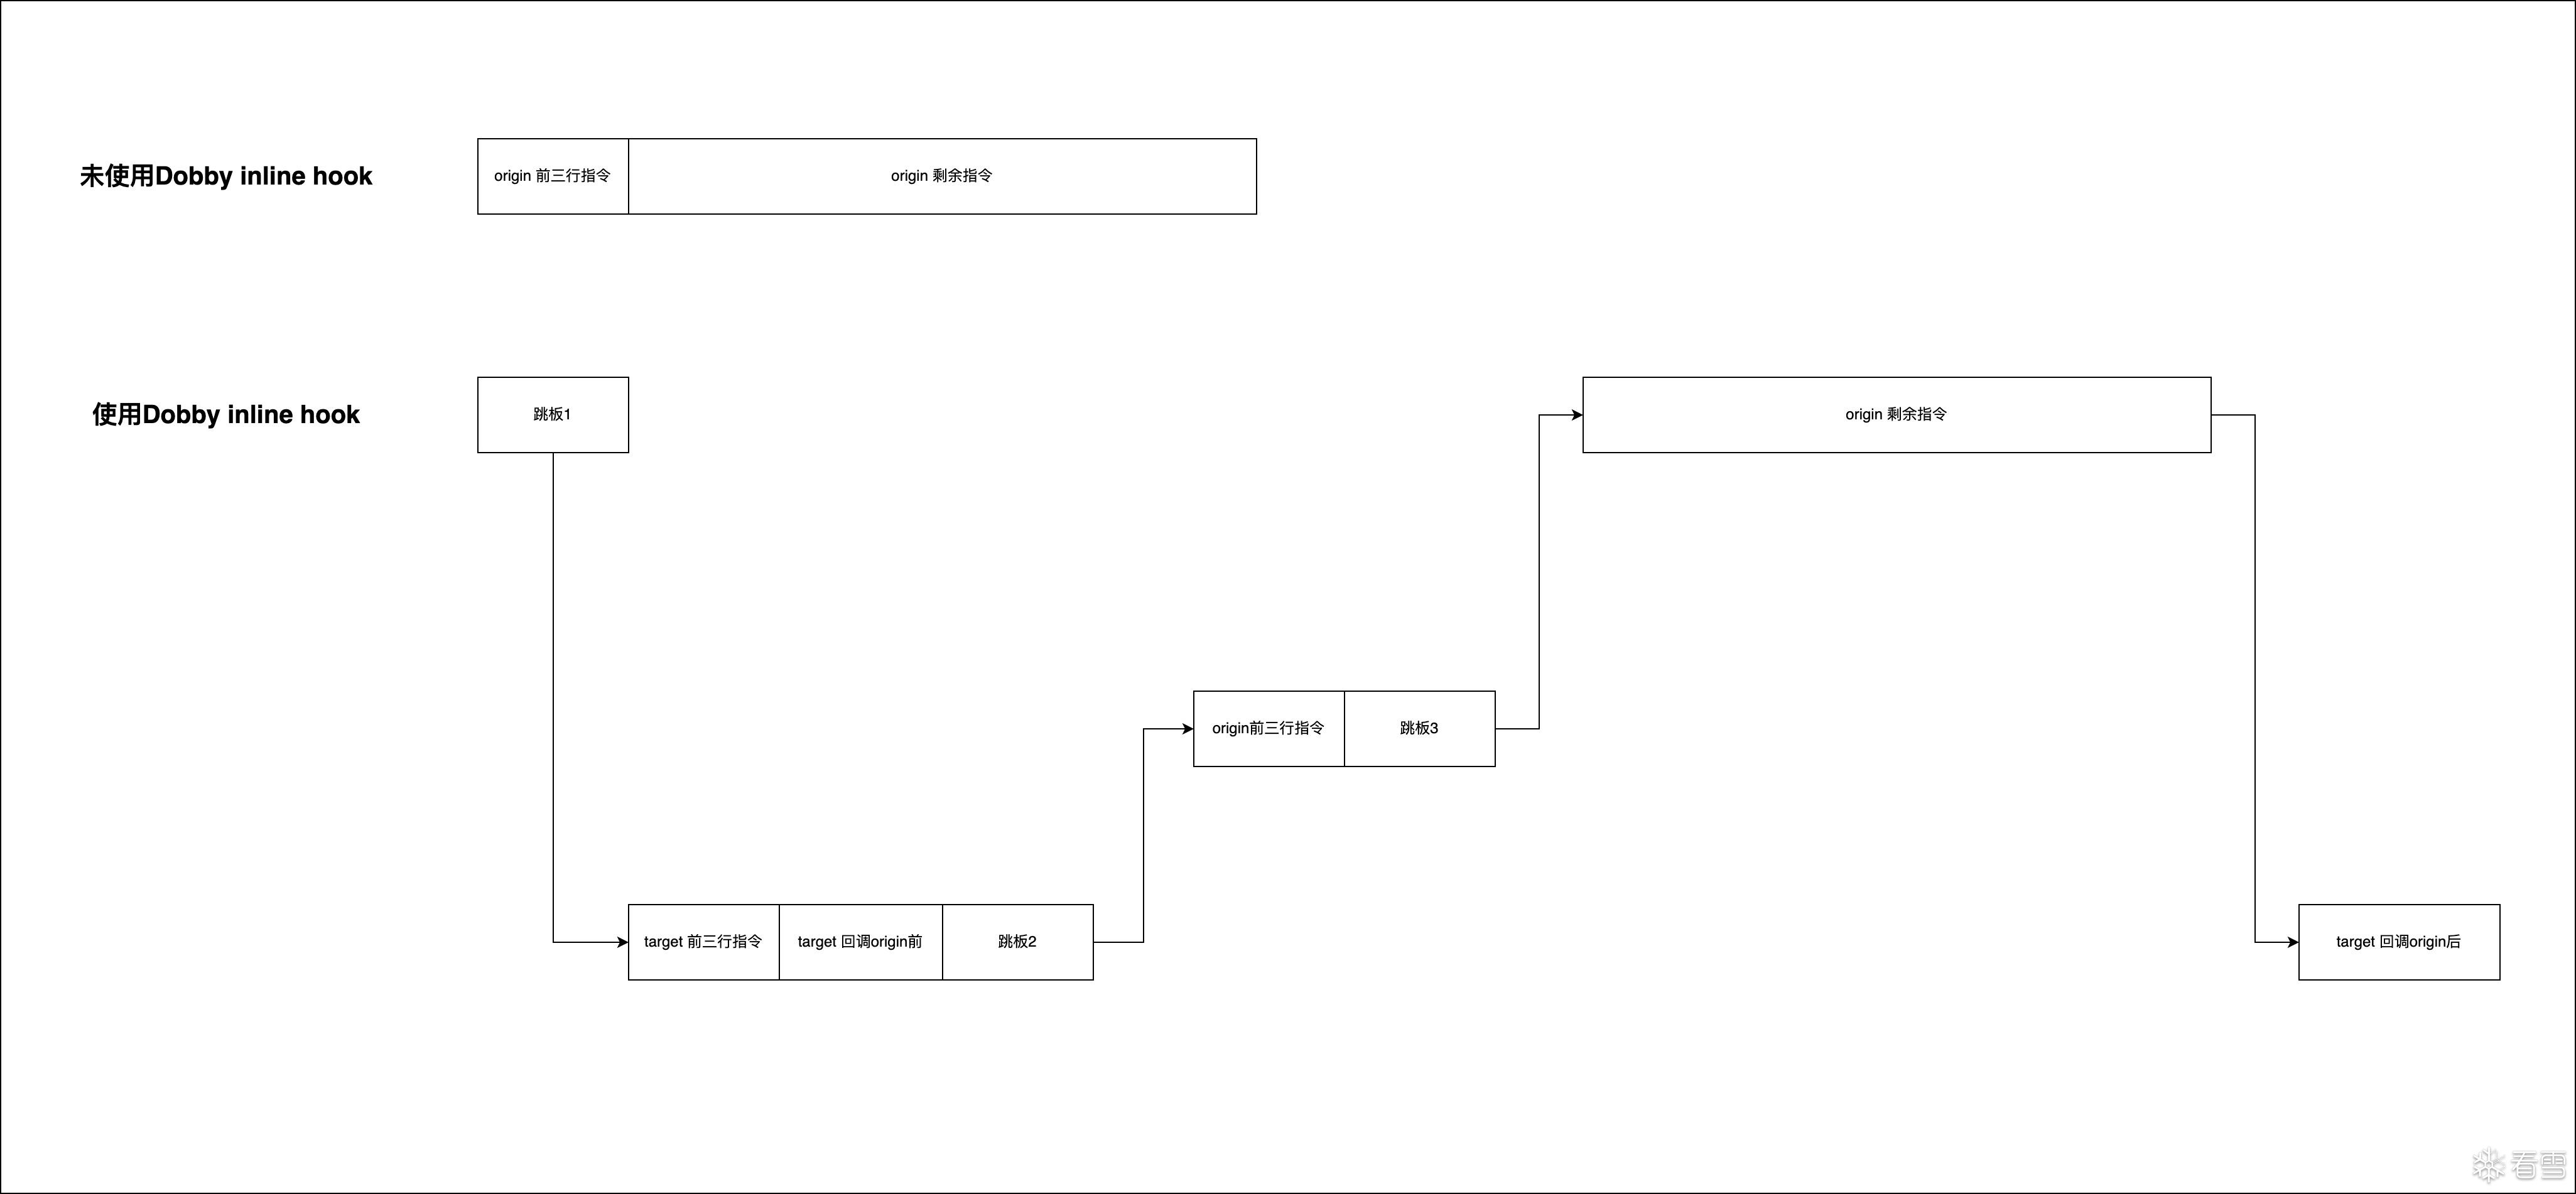
那么从这里可以看出,Dobby对函数的hook是通过修改原始函数的前三个指令来完成跳转的,那么指令替换的逻辑是什么我们后续在源码分析中继续跟踪,现在接着往下看
在替换函数中最后我们主动回调了原始函数,在0xb2cc的位置可以再下个断点
在0xb2cc的位置是跳回到原始函数,从调试信息中可以看到,首先是栈拉伸、寄存器入栈保护
可以看到,x17被重新赋予了地址,而这个地址是原始函数的第四行指令,但是这个地址又是怎么被保存下来的呢?同样放在后续源码分析中
在原始函数中继续执行代码会最终走到
完成寄存器恢复以及栈平衡,接着返回到新函数流程内
下面以完整的流程图来展示Dobby inline hook的流程
源码上从dobby.h的DobbyHook入手,源码实现在
关键在于第三步FunctionInlineHookRouting对象的处理,FunctionInlineHookRouting,从命名上看是关于inline hook跳转规则的配置。FunctionInlineHookRouting的Prepare函数为空,且父类InterceptRouting的Prepare函数也为空,可以先忽略
主要看下面这个函数DispatchRouting
从BuildRouting函数流程中来看下它做的事,to对应的是replace_func,from对应的是patched_addr,也就是origin_func对应的地址,得到这两个地址之后就调用GenerateNormalTrampolineBuffer生成trampoline_buffer_
可以看到生成了三行指令adrp, add, br,对应了上文调试中origin_func的前三行代码替换后的代码,借助assembler-arm64.h生成buffer,对应到调试指令中
第一行x17表示当前内存页的地址,0表示origin_func与replace_func地址之间的内存页差值
第二行表示replace_func在当前内存页的偏移量
第三行就是跳转指令
最后会生成这三行跳转指令对应的字节码
BuildRouting生成完Trampoline指令后调用GenerateRelocatedCode
到这里为止,对于指令的重定向都设置完了,接下来调用了Commit函数
DobbyCodePatch是直接对于指令产生修改的函数,原理也很简单,因为内存页通常的权限都是可读权限,无法修改代码。因此需要在修改时通过mprotect修改内存页权限变成可读可写可执行,修改后再将原始权限写回完成对于代码的修改
#include <jni.h>
#include <string>
#include "Dobby/include/dobby.h"
#include "logging.h"
extern "C" JNIEXPORT jstring JNICALL
Java_com_example_dobbytest1_MainActivity_stringFromJNI(
JNIEnv* env,
jobject ) {
std::string hello = "no be hooked";
return env->NewStringUTF(hello.c_str());
}
static jstring (*orgin_Java_com_example_dobbytest1_MainActivity_stringFromJNI)(JNIEnv* env,jobject );
extern "C" JNIEXPORT jstring JNICALL
new_Java_com_example_dobbytest1_MainActivity_stringFromJNI(
JNIEnv* env,
jobject jobject1) {
LOGI("be hooked");
return orgin_Java_com_example_dobbytest1_MainActivity_stringFromJNI(env,jobject1);
}
__attribute__((constructor)) static void ctor() {
DobbyHook((void *) DobbySymbolResolver(NULL, "Java_com_example_dobbytest1_MainActivity_stringFromJNI"),
(void *) new_Java_com_example_dobbytest1_MainActivity_stringFromJNI,
(void **) &orgin_Java_com_example_dobbytest1_MainActivity_stringFromJNI
);
}
./lldb-server platform --listen '*:1234' --server
./lldb-server platform --listen '*:1234' --server
选择调试平台
(lldb) platform select remote-android
Platform: remote-android
Connected: no
连接lldb-server创建的端口
(lldb) platform connect connect://:1234
Platform: remote-android
Triple: aarch64-unknown-linux-android
OS Version: 30 (4.14.186-perf-g42f990859d35)
Hostname: localhost
Connected: yes
WorkingDir: /data/local/tmp
Kernel:
(lldb)
(lldb) br set -a 0x70ece54110
Breakpoint 1: address = 0x00000070ece54110
(lldb) br set -a 0x70ece54110
Breakpoint 1: address = 0x00000070ece54110
断点信息
Process 20161 stopped
* thread
frame
-> 0x70ece54110: adrp x17, 0
0x70ece54114: add x17, x17,
0x70ece54118: br x17
0x70ece5411c: mrs x8, TPIDR_EL0
Target 0: (app_process64) stopped.
对比原始汇编代码
.text:000000000000B110 SUB SP, SP,
.text:000000000000B114 STP X29, X30, [SP,
.text:000000000000B118 ADD X29, SP,
.text:000000000000B11C MRS X8,
Process 20161 stopped
* thread
frame
-> 0x70ece54114: add x17, x17,
0x70ece54118: br x17
0x70ece5411c: mrs x8, TPIDR_EL0
0x70ece54120: ldr x8, [x8,
Target 0: (app_process64) stopped.
(lldb) register read x17
x17 = 0x00000070ece54000
(lldb) n
Process 20161 stopped
* thread
frame
-> 0x70ece54118: br x17
0x70ece5411c: mrs x8, TPIDR_EL0
0x70ece54120: ldr x8, [x8,
0x70ece54124: stur x8, [x29,
Target 0: (app_process64) stopped.
(lldb) register read x17
x17 = 0x00000070ece54290
(lldb)
Process 20161 stopped
* thread
frame
-> 0x70ece54114: add x17, x17,
0x70ece54118: br x17
0x70ece5411c: mrs x8, TPIDR_EL0
0x70ece54120: ldr x8, [x8,
Target 0: (app_process64) stopped.
(lldb) register read x17
x17 = 0x00000070ece54000
(lldb) n
Process 20161 stopped
* thread
frame
-> 0x70ece54118: br x17
0x70ece5411c: mrs x8, TPIDR_EL0
0x70ece54120: ldr x8, [x8,
0x70ece54124: stur x8, [x29,
Target 0: (app_process64) stopped.
(lldb) register read x17
x17 = 0x00000070ece54290
(lldb)
(lldb) br set -a 0x70ece542cc
Breakpoint 3: address = 0x00000070ece542cc
(lldb) c
Process 20161 resuming
Process 20161 stopped
* thread
frame
-> 0x70ece542cc: blr x8
0x70ece542d0: ldp x29, x30, [sp,
0x70ece542d4: add sp, sp,
0x70ece542d8: ret
Target 0: (app_process64) stopped.
(lldb) s
Process 20161 stopped
* thread
frame
-> 0x7183933000: sub sp, sp,
0x7183933004: stp x29, x30, [sp,
0x7183933008: add x29, sp,
0x718393300c: ldr x17,
Target 0: (app_process64) stopped.
(lldb) s
Process 20161 stopped
* thread
frame
-> 0x7183933004: stp x29, x30, [sp,
0x7183933008: add x29, sp,
0x718393300c: ldr x17,
0x7183933010: br x17
Target 0: (app_process64) stopped.
(lldb) s
Process 20161 stopped
* thread
frame
-> 0x718393300c: ldr x17,
0x7183933010: br x17
0x7183933014: .long 0xece5411c ; unknown opcode
0x7183933018: udf
Target 0: (app_process64) stopped.
(lldb) register read x17
x17 = 0x0000007185f8e970 libc.so`pthread_mutex_unlock
(lldb) s
Process 20161 stopped
* thread
frame
-> 0x7183933010: br x17
0x7183933014: .long 0xece5411c ; unknown opcode
0x7183933018: udf
0x718393301c: udf
Target 0: (app_process64) stopped.
(lldb) register read x17
x17 = 0x00000070ece5411c
(lldb) s
Process 20161 stopped
* thread
frame
-> 0x70ece5411c: mrs x8, TPIDR_EL0
0x70ece54120: ldr x8, [x8,
0x70ece54124: stur x8, [x29,
0x70ece54128: stur x0, [x29,
Target 0: (app_process64) stopped.
(lldb) s
Process 20161 stopped
* thread
frame
-> 0x718393300c: ldr x17,
0x7183933010: br x17
0x7183933014: .long 0xece5411c ; unknown opcode
0x7183933018: udf
Target 0: (app_process64) stopped.
(lldb) register read x17
x17 = 0x0000007185f8e970 libc.so`pthread_mutex_unlock
(lldb) s
Process 20161 stopped
* thread
frame
-> 0x7183933010: br x17
0x7183933014: .long 0xece5411c ; unknown opcode
0x7183933018: udf
0x718393301c: udf
Target 0: (app_process64) stopped.
(lldb) register read x17
x17 = 0x00000070ece5411c
(lldb) s
Process 20161 stopped
* thread
frame
-> 0x70ece5411c: mrs x8, TPIDR_EL0
0x70ece54120: ldr x8, [x8,
0x70ece54124: stur x8, [x29,
0x70ece54128: stur x0, [x29,
Target 0: (app_process64) stopped.
Process 20161 stopped
* thread
frame
-> 0x70ece54188: ldr x0, [sp,
0x70ece5418c: ldp x29, x30, [sp,
0x70ece54190: add sp, sp,
0x70ece54194: ret
Target 0: (app_process64) stopped.
Process 20161 stopped
* thread
frame
-> 0x70ece54188: ldr x0, [sp,
0x70ece5418c: ldp x29, x30, [sp,
0x70ece54190: add sp, sp,
0x70ece54194: ret
Target 0: (app_process64) stopped.
Process 20161 stopped
* thread
frame
-> 0x70ece54194: ret
0x70ece54198: str x0, [sp,
0x70ece5419c: mov w8, w1
0x70ece541a0: str w8, [sp,
Target 0: (app_process64) stopped.
(lldb) s
Process 20161 stopped
* thread
frame
-> 0x70ece542d0: ldp x29, x30, [sp,
0x70ece542d4: add sp, sp,
0x70ece542d8: ret
0x70ece542dc: stp x29, x30, [sp,
Target 0: (app_process64) stopped.
Process 20161 stopped
* thread
frame
-> 0x70ece54194: ret
0x70ece54198: str x0, [sp,
0x70ece5419c: mov w8, w1
0x70ece541a0: str w8, [sp,
Target 0: (app_process64) stopped.
(lldb) s
Process 20161 stopped
* thread
frame
-> 0x70ece542d0: ldp x29, x30, [sp,
0x70ece542d4: add sp, sp,
0x70ece542d8: ret
0x70ece542dc: stp x29, x30, [sp,
Target 0: (app_process64) stopped.
PUBLIC int DobbyHook(void *address, dobby_dummy_func_t replace_func, dobby_dummy_func_t *origin_func) {
......
#if defined(ANDROID)
void *page_align_address = (void *)ALIGN_FLOOR(address, OSMemory::PageSize());
if (!OSMemory::SetPermission(page_align_address, OSMemory::PageSize(), kReadExecute)) {
return -1;
}
#endif
DEBUG_LOG("----- [DobbyHook:%p] -----", address);
auto entry = Interceptor::SharedInstance()->find((addr_t)address);
if (entry) {
ERROR_LOG("%p already been hooked.", address);
return -1;
}
entry = new InterceptEntry(kFunctionInlineHook, (addr_t)address);
auto *routing = new FunctionInlineHookRouting(entry, replace_func);
routing->Prepare();
routing->DispatchRouting();
if (origin_func) {
*origin_func = (dobby_dummy_func_t)entry->relocated_addr;
#if defined(__APPLE__) && defined(__arm64__)
*origin_func = pac_sign(*origin_func);
#endif
}
routing->Commit();
Interceptor::SharedInstance()->add(entry);
return 0;
}
PUBLIC int DobbyHook(void *address, dobby_dummy_func_t replace_func, dobby_dummy_func_t *origin_func) {
......
#if defined(ANDROID)
void *page_align_address = (void *)ALIGN_FLOOR(address, OSMemory::PageSize());
if (!OSMemory::SetPermission(page_align_address, OSMemory::PageSize(), kReadExecute)) {
return -1;
}
#endif
DEBUG_LOG("----- [DobbyHook:%p] -----", address);
auto entry = Interceptor::SharedInstance()->find((addr_t)address);
if (entry) {
ERROR_LOG("%p already been hooked.", address);
return -1;
}
entry = new InterceptEntry(kFunctionInlineHook, (addr_t)address);
auto *routing = new FunctionInlineHookRouting(entry, replace_func);
routing->Prepare();
routing->DispatchRouting();
if (origin_func) {
*origin_func = (dobby_dummy_func_t)entry->relocated_addr;
#if defined(__APPLE__) && defined(__arm64__)
*origin_func = pac_sign(*origin_func);
#endif
}
[招生]科锐逆向工程师培训(2026年7月3日实地,远程教学同时开班, 第56期)!
最后于 2024-2-25 23:06
被tcc0lin编辑
,原因: