An article introducing cuda programming and cuda reverse engineering.
CUDA Toolkit 11.7 Downloads
安装好了的路径:C:\Program Files\NVIDIA GPU Computing Toolkit\CUDA\v12.0
一些文档:
CUDA C++ Programming Guide:a04K9s2c8@1M7s2y4Q4x3@1q4Q4x3V1k6Q4x3V1k6V1L8$3y4K6i4K6u0W2L8Y4k6A6k6r3W2S2i4K6u0W2j5$3!0E0i4K6u0r3j5%4g2V1j5g2)9J5c8X3y4#2k6r3q4Q4x3X3c8U0i4K6u0V1M7s2u0G2k6%4u0S2L8h3#2A6L8X3N6Q4x3X3c8Y4N6h3W2V1k6g2)9J5c8X3W2F1k6r3g2^5i4K6u0W2K9s2c8E0L8l9`.`.
CUDA Binary Utilities:877K9s2c8@1M7s2y4Q4x3@1q4Q4x3V1k6Q4x3V1k6V1L8$3y4K6i4K6u0W2L8Y4k6A6k6r3W2S2i4K6u0W2j5$3!0E0i4K6u0r3j5%4g2V1j5g2)9J5c8X3y4#2k6r3q4Q4x3X3c8T1K9h3&6S2M7Y4W2Q4x3X3c8#2N6r3W2D9K9i4c8A6k6i4x3`.
NVIDIA CUDA Compiler Driver NVCC:e21K9s2c8@1M7s2y4Q4x3@1q4Q4x3V1k6Q4x3V1k6V1L8$3y4K6i4K6u0W2L8Y4k6A6k6r3W2S2i4K6u0W2j5$3!0E0i4K6u0r3j5%4g2V1j5g2)9J5c8X3y4#2k6r3q4Q4x3X3c8U0L8$3#2H3K9h3I4W2M7W2)9J5k6r3c8J5K9i4k6W2M7W2)9J5k6r3&6$3j5$3y4Q4x3V1k6A6L8X3c8W2P5q4)9J5k6h3S2@1L8h3I4Q4x3U0y4U0N6h3c8S2i4K6u0V1j5$3!0E0M7r3W2D9j5i4c8A6L8$3&6Q4x3X3c8@1M7X3q4B7k6h3y4@1L8%4u0&6i4K6g2X3i4K6g2X3j5%4g2V1j5g2)9J5k6r3y4G2L8i4m8A6L8r3q4@1K9h3!0F1i4K6u0V1k6Y4u0G2L8g2)9J5k6r3y4#2i4K6u0V1N6r3!0Q4x3X3c8W2P5r3g2U0N6i4c8S2j5X3I4W2
CUDA Runtime api:148K9s2c8@1M7s2y4Q4x3@1q4Q4x3V1k6Q4x3V1k6V1L8$3y4K6i4K6u0W2L8Y4k6A6k6r3W2S2i4K6u0W2j5$3!0E0i4K6u0r3j5%4g2V1j5g2)9J5c8X3y4#2k6r3q4Q4x3X3c8J5N6h3&6@1K9h3#2W2i4K6u0V1j5i4m8A6i4K6u0r3K9h3&6V1k6i4S2Q4x3X3g2Z5N6r3#2D9
CUDA 工具包针对一类应用程序,其控制部分作为通用计算设备上的进程运行,并使用一个或多个 NVIDIA GPU 作为协同处理器来加速单程序、多数据 (SPMD) 并行作业。此类作业是独立的,因为它们可以由一批 GPU 线程完全执行和完成,而无需主机进程的干预,从而从并行图形硬件中获得最佳收益。
GPU 代码是作为函数集合实现的,语言本质上是 C++,但带有一些用于将它们与主机代码区分开来的注释,以及用于区分 GPU 上存在的不同类型数据存储器的注释。此类函数可能具有参数,并且可以使用与常规 C 函数调用非常相似的语法来调用它们,但为了能够指定必须执行被调用函数的 GPU 线程矩阵而略有扩展。
在其生命周期中,宿主进程可能会分派许多并行的 GPU 任务。
有关 CUDA 编程模型的更多信息,请参阅CUDA C++ Programming Guide
CUDA 应用程序的源文件混合了传统的 C++ 主机代码和 GPU 设备函数。
CUDA 将设备函数与主机代码分开编译,使用专有的 NVIDIA 编译器和汇编器编译设备函数,使用可用的 C++ 主机编译器编译主机代码,然后将编译后的 GPU 函数作为 fatbinary 嵌入到宿主对象文件中。
在链接阶段,添加特定的 CUDA 运行时库以支持远程 SPMD 过程调用和提供显式 GPU 操作,例如分配 GPU 内存缓冲区和主机-GPU数据传输。
编译轨迹涉及每个 CUDA 源文件的多个拆分、编译、预处理和合并步骤。
CUDA 编译器驱动程序NVCC的目的是向开发人员隐藏 CUDA 编译的复杂细节。它不是一个特殊的CUDA编译驱动而是在模仿一般的通用编译驱动如gcc,接受一定的传统编译选项如宏定义,库函数路径以及编译过程控制等。所有非CUDA的编译步骤都被转发给nvcc支持的C++主机编译器,nvcc将其选项翻译成适当的主机编译器命令行选项。
nvcc在以下情况下需要通用的 C++ 主机编译器:
在非 CUDA 阶段(运行阶段除外),因为这些阶段将由 nvcc 转发给此编译器。
在 CUDA 阶段,用于几个预处理阶段和主机代码编译(另请参阅 CUDA 编译轨迹)
在所有平台上,将使用在当前执行搜索路径中找到的默认主机编译器可执行文件(Linux 上的 gcc 和 g++ 和 Windows 上的 cl.exe),除非使用适当的选项另行指定。
编译阶段是一个逻辑性的翻译步骤,可以通过命令行选项来选择nvcc。一个单一的编译阶段仍然可以被nvcc分解成更小的步骤,但是这些更小的步骤只是该阶段的实现:它们依赖于nvcc使用的内部工具的看似任意的能力,而所有这些内部工具都可能随着CUDA工具包的新版本而改变。因此,只有编译阶段在不同的版本中是稳定的,尽管nvcc提供了显示其执行的编译步骤的选项,但这些选项仅用于调试目的,不得复制并用于构建脚本中。
下表指定了支持的编译阶段,以及启用此阶段执行的 nvcc 选项。它还列出了此阶段生成的输出文件的默认名称,这将在使用选项 --output-file 未指定显式输出文件名时生效:
除非指定阶段选项,否则 nvcc 将编译并链接其所有输入文件。
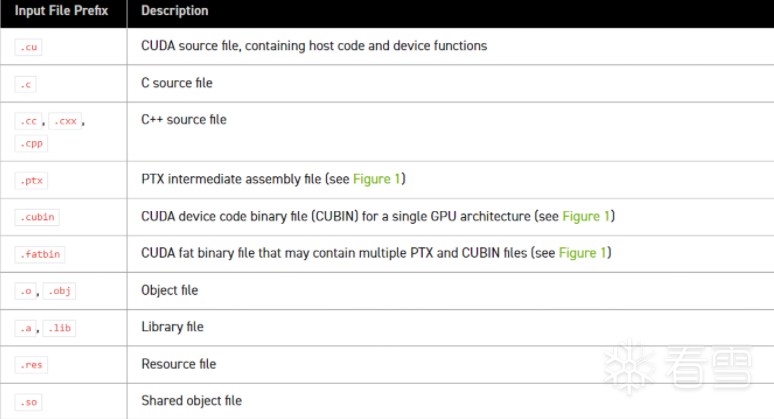
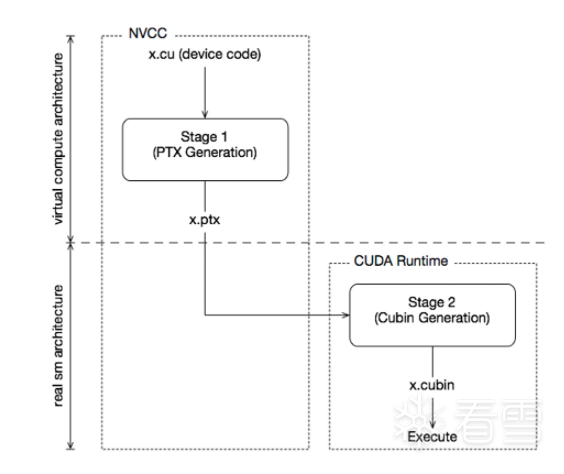
输入程序(.cu)经过设备编译编译预处理,编译成CUDA二进制(cubin)and PTX中间代码,放在一个fatbinary中。
输入程序(.cu)再次预处理以进行主机编译,并进行综合嵌入fatbinary并将CUDA特定的C++ externed(cuda 相关代码)转换为标准C++结构。
然后C++主机编译器将带有嵌入了fatbinary的合成主机代码编译成主机对象。
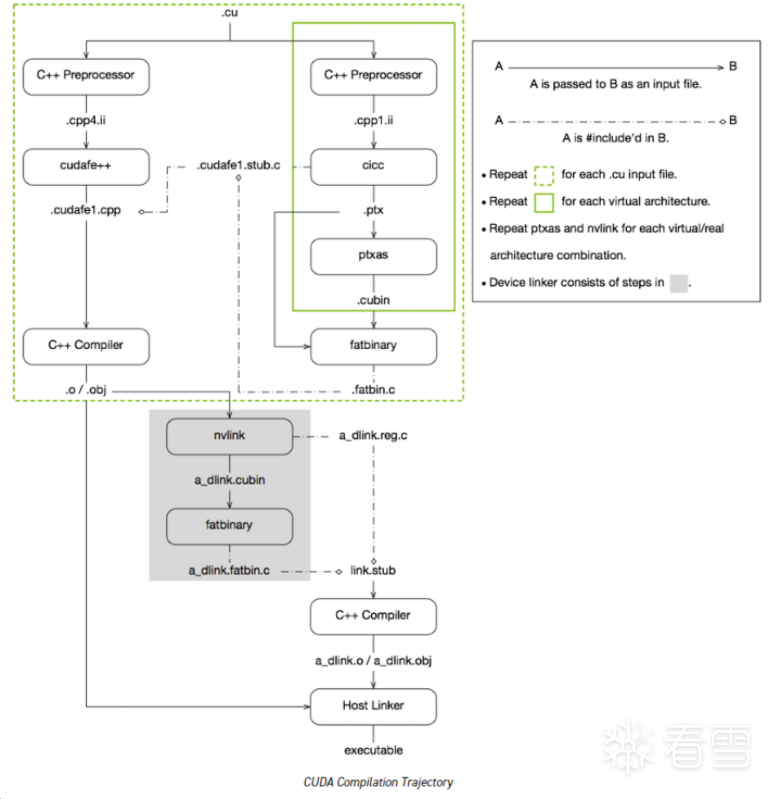
下图显示了实现此目标所遵循的确切步骤。
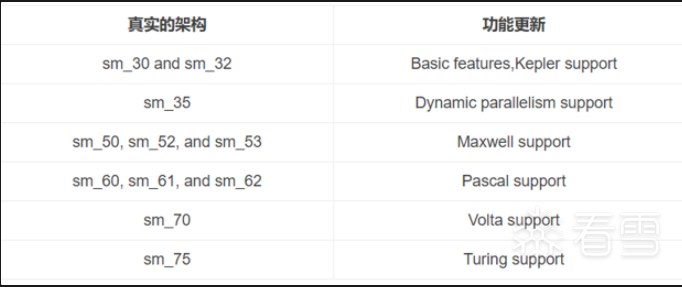
GPU中的代是指NVIDIA GPU架构和计算能力的评价标准,如sm_30、sm_70,sm_50等;分别对应不同的GPU架构;运算能力高的GPU可以运行编译成低代的程序,反之则不行,如计算能力6.1的GPU可以运行编译成compute_30,sm_30的程序;一个GPU代中的二进制兼容性可以在某些条件下得到保证,因为它们共享基本的指令集。 两个GPU版本之间的情况就是这样,它没有功能上的差异(例如,当一个版本是另一个版本的缩小版本时),或者一个版本在功能上被包含在另一个版本中。 后者的一个例子是基础的Kepler版本sm_30,其功能是所有其他Kepler版本的子集:针对sm_30编译的任何代码将在所有其他Kepler GPU上运行。
“小代”:
除了sm_20,sm_30,sm_50,sm_60这些大的代号,还有sm_21, sm_35, sm_53 ,sm_61这些小代,这些小代不会做大的改变,会有一些小的调整,如调整寄存器和处理器集群的数量,这只影响执行性能,不会改变功能。程序更精确的对应GPU代号可能可以达到最佳性能。
参考链接: Matching CUDA arch and CUDA gencode for various NVIDIA architectures
—两端式编译结构,真实GPU与虚拟GPU
CPU中不同代CPU应用程序的兼容性很好,已发布的指令集体系结构是确保当这些分布式应用程序成为主流时能够继续在新版CPU上运行的常用机制。
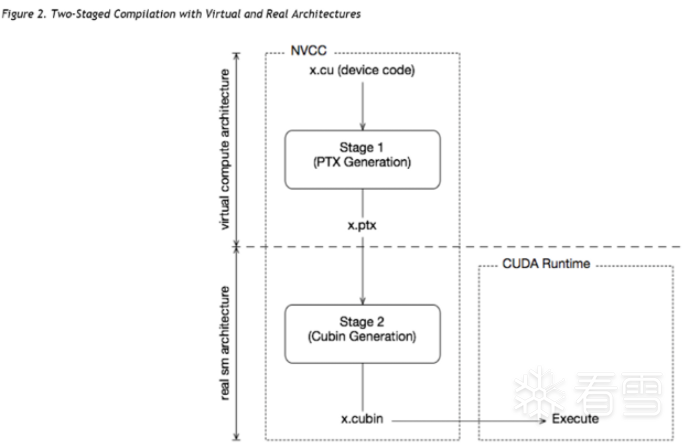
这种情况对于GPU而言是不同的,因为NVIDIA不能保证二进制兼容性,nvcc依靠两阶段编译模型来确保应用程序与未来GPU世代的兼容性。
即虚拟架构和真实架构:虚拟架构确定编译成的代号的功能,真实架构确定编译成的真实代号的功能和性能。
虚拟GPU与真实GPU之间向上兼容;当虚拟GPU版本低于真实GPU时程序能够正常运行;NVIDIA中即时编译(JIT)能够好的体现兼容性。
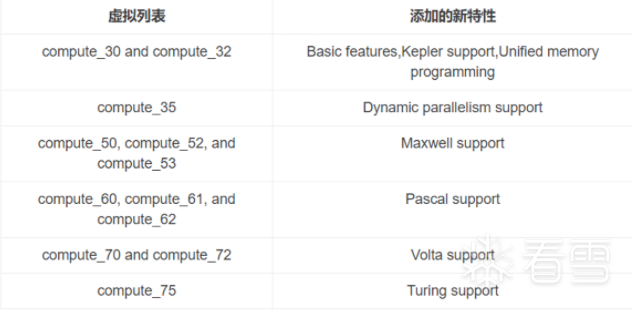
虚拟GPU架构特性表如下
NVIDIA GPU真实架构如下
NVCC在提高兼容性的处理方式上采用了两种机制:即时编译(JIT)和fatbinaries
即时编译(Just-In-Time)
通过指定虚拟代码架构而不是真实的GPU,nvcc推迟PTX代码的组装,直到应用程序运行时(目标GPU完全已知)。 例如,当应用程序在sm_50或更高版本的架构上启动时,下面的命令允许生成完全匹配的GPU二进制代码。
Just-in-Time Compilation of Device Code
即时编译,即程序运行时,再根据当前的GPU编译成自己计算能力动态编译成应用程序。这就可以让GPU选择想要的版本进行编译。即双compute_的组合。但这种只能保证同一代的兼容性。 注意:当GPU计算能力低于编译的虚拟框架时,JIT将失败。
使用--generate-code可以编译多种GPU架构的代码。
Fatbinaries
在JIT中克服启动延迟,同时仍允许在新GPU上执行的另一种解决方案是指定多个代码实例,如nvcc x.cu –gpu-architecture = compute_50 –gpu-code = compute_50,sm_50,sm_52该命令为两个Kepler变体生成精确代码,以及在遇到下一代GPU时由JIT使用的PTX代码。nvcc将其设备代码组织在fatbinaries中,这些代码能够保存相同GPU源代码的多个翻译。在运行时,CUDA驱动程序将在设备功能启动时选择最合适的翻译。 即一次保存多个精确的真实框架的二进制结果,当程序被传给GPU时,GPU选择最好的结果,因为一次性加入了多个真实框架,所以被称为‘fat‘。但这也仅仅是保证了大代之间的兼容性。 在编译参数选择时也可以使用-generate-code参数,他会在编译时产生不同代的PTX再配合JIT或者fatbinary实现所有GPU兼容。因此在使用cuda程序兼容性的时候,指定虚拟架构决定cuda运行下限,再通过指定-generate-code或者-gpu-code=xxx,xxxx,xxxx,...实现程序的兼容性;
接下来使用 --dryrun 可以打印全编译过程而不执行。为了方便理清情况使用--cuda只进行预处理工作 nvcc test.cu -o test_cuda --cuda -keep --dryrun
nvcc fatal : Cannot find compiler ‘cl.exe‘ in PATH
695K9s2c8@1M7s2y4Q4x3@1q4Q4x3V1k6Q4x3V1k6T1L8r3!0Y4i4K6u0W2j5%4y4V1L8W2)9J5k6h3&6W2N6q4)9J5c8X3q4D9M7r3R3J5y4e0S2Q4x3V1k6S2M7Y4c8A6j5$3I4W2i4K6u0r3k6r3g2@1j5h3W2D9M7#2)9J5c8U0p5H3z5e0f1#2z5e0R3#2y4b7`.`.
输出:
预处理将test.cu转变为test.cpp4.ii
生成的test.cpp4.ii就是将该源文件里的宏以及相关引用文件扩展开,然后将预编译已经产生的与C有关的CUDA系统定义的宏扩展开,并合并分支编译的结果。
……
使用cicc为test.cpp1.ii添加信息转变为test.ptx,生成中间语言
虚拟架构决定功能
类似于:
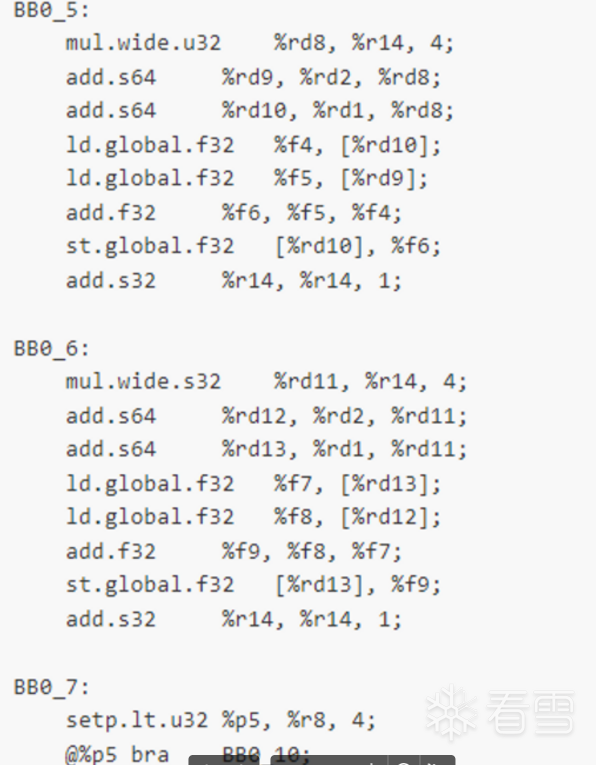
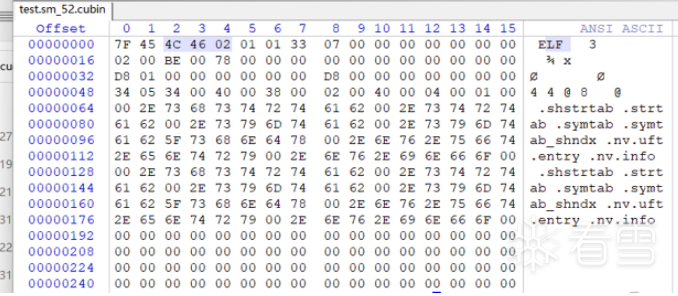
使用ptxas将test.ptx转变为test.sm_52.cubin,生成对应的显卡架构的机器码
真实架构决定功能和性能
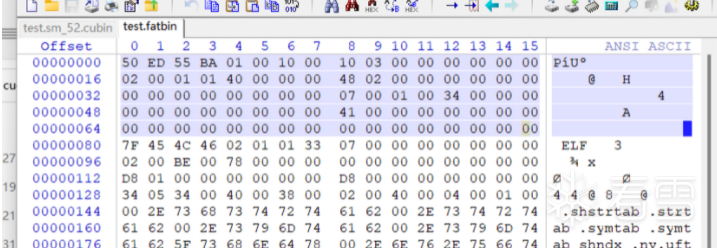
使用fatbinary将test.sm_52.cubin和test.ptx打包为test.fatbin,并将test.fatbin嵌入到test.fatbin.c中可以看见test.fatbin偏移0x50就是test.sm_52.cubin
……
其实设备使用的代码就是.ptx转换成的机器码
不过因为NVCC提供的虚拟架构方式,会生成好几份不同的代码和对应的二进制文件,并且生成对应的函数调用头文件,有点像普通的C++ 动态链接库和头文件分离,头文件中包含函数地址。
后面在在主机端生成代码,只是将cuda部分的函数声明了而已(所以主机端的程序中是没有那个函数的代码的)
总体而言,nvcc更像是qmake进行相关makefile和预处理代码的生成,调用gcc生成主机的二进制文件,调用cicc、ptxas、fatbinary分别生成汇编代码、机器码、静态代码。最后使用nvlink链接生成.obj文件,使用Host linker生成最终的可执行文件。
963K9s2c8@1M7s2y4Q4x3@1q4Q4x3V1k6Q4x3V1k6B7K9s2g2A6i4K6u0W2k6$3W2@1K9s2g2T1i4K6u0W2K9h3!0Q4x3V1j5J5x3o6p5%4i4K6u0r3x3o6y4Q4x3V1j5H3y4W2)9J5c8V1y4g2c8p5q4Q4x3V1j5`.
CUDA C++ Programming Guide:bbcK9s2c8@1M7s2y4Q4x3@1q4Q4x3V1k6Q4x3V1k6V1L8$3y4K6i4K6u0W2L8Y4k6A6k6r3W2S2i4K6u0W2j5$3!0E0i4K6u0r3j5%4g2V1j5g2)9J5c8X3y4#2k6r3q4Q4x3X3c8U0i4K6u0V1M7s2u0G2k6%4u0S2L8h3#2A6L8X3N6Q4x3X3c8Y4N6h3W2V1k6g2)9J5c8X3W2F1k6r3g2^5i4K6u0W2K9s2c8E0L8l9`.`.
图形处理单元 (GPU) 在类似的价格和功率范围内提供比 CPU 更高的指令吞吐量和内存带宽。许多应用程序利用这些更高的功能在 GPU 上比在 CPU 上运行得更快。其他计算设备,如 FPGA,也非常节能,但提供的编程灵活性远低于GPU。
GPU 和 CPU 之间存在这种功能差异,因为它们在设计时考虑了不同的目标。虽然 CPU 旨在以尽可能快的速度执行一系列操作(称为线程)并且可以并行执行几十个这样的线程,但 GPU 旨在擅长并行执行数千个线程(分摊较慢的单线程性能以实现更大的吞吐量)。
GPU 专门用于高度并行计算,因此设计为更多晶体管专用于数据处理,而不是数据缓存和流量控制。
通常,应用程序混合了并行部分和顺序部分,因此系统设计时混合使用 GPU 和 CPU 以最大限度地提高整体性能。具有高度并行性的应用程序可以利用 GPU 的这种大规模并行特性来实现比 CPU 更高的性能。
This sample code adds 2 numbers together with a GPU:
Define a kernel
使用关键字 global
该kernel将 2 个数字 a 和 b 相加并将结果存储在 c 中。
Allocate & initialize host data
在宿主机中,为内核调用分配输入输出参数,并初始化所有输入参数。
Allocate and copy host data to the device
CUDA 应用程序通过调用 CUDA Runtime来管理设备空间内存。这包括设备内存分配和释放以及主机和设备内存之间的数据传输。
我们在设备中分配空间,以便我们可以将内核(a 和 b)的输入从主机复制到设备。
我们还分配空间以便稍后将结果从设备复制到主机。
Invoke the kernel
Invoke the kernel add with parameters for a,b,c.
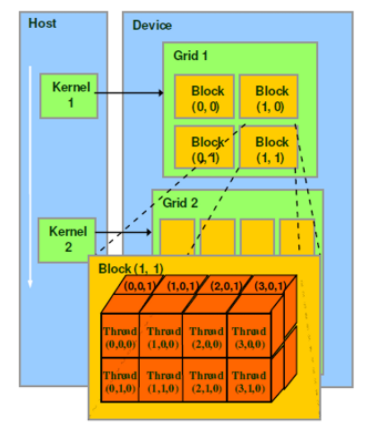
为了提供数据并行性,多线程CUDA应用程序被划分为彼此独立 (通常并发) 执行的线程块。
add的每个并行调用都称为一个block,每个block都有多个线程。这些线程块可以在 GPU 中任何可用的流式多处理器 (SM) 上进行调度。
在我们的简单示例中,因为我们只添加了一对数字<<<1,1>>>,所以我们只需要包含1个线程的1个block。(<<<numBlocks,threadsPerBlock>>>)
{ 与常规 C 函数调用相比,kernel可以由M 个 CUDA线程并行执行N次(<<<N, M>>>)。在当前的 GPU 上,一个线程block最多可包含 1024 个线程 }.
Copy kernel output to the host
将add的结果从设备复制到主机
Clean up
清理内存
complete source code
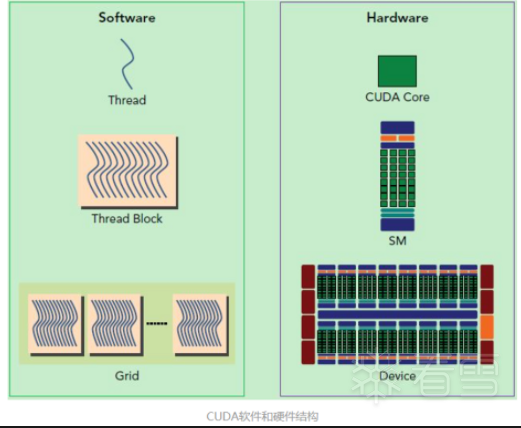
grid: 多个block则会再构成grid。
在第二个示例中,我们有6个Block,每个Block有12个thread
SP(Streaming Processor): 流处理器, 是GPU最基本的处理单元,在fermi架构开始被叫做CUDA core 。
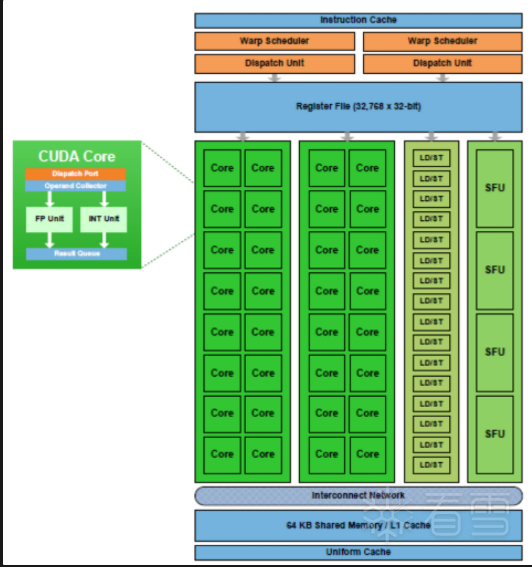
SM(Streaming MultiProcessor): 一个SM由多个CUDA core组成,每个SM根据GPU架构不同有不同数量的CUDA core,Pascal架构中一个SM有128个CUDA core。SM还包括特殊运算单元(SFU),共享内存(shared memory),寄存器文件(Register File)和调度器(Warp Scheduler)等。register和shared memory是稀缺资源,这些有限的资源就使每个SM中active warps有非常严格的限制,也就限制了并行能力。
A SM in the Fermi architecture
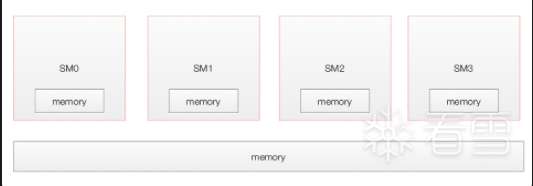
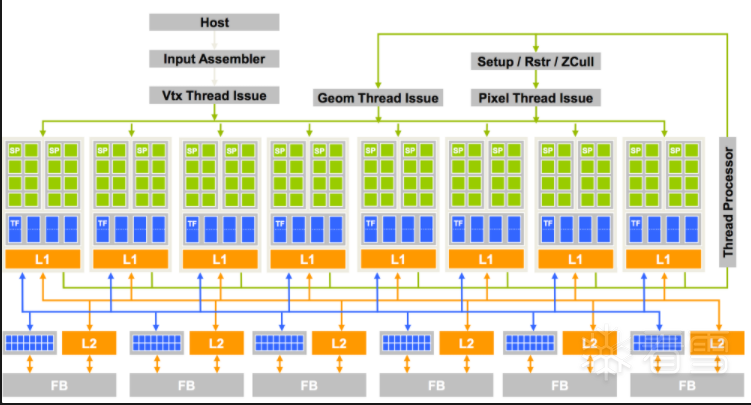
GPU由许多SM组成,具有可供所有SM访问的全局内存 和 本地内存。
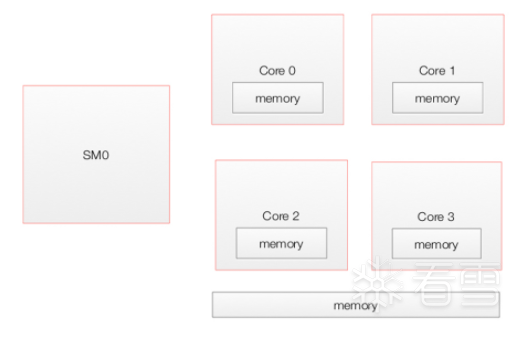
每个SM包含多个核心,它们共享一个共享内存以及一个自己的本地内存。
Here is the architect for GeoForce 8800 with 16 SMs each with 8 cores (Streaming processing SP).
Device level
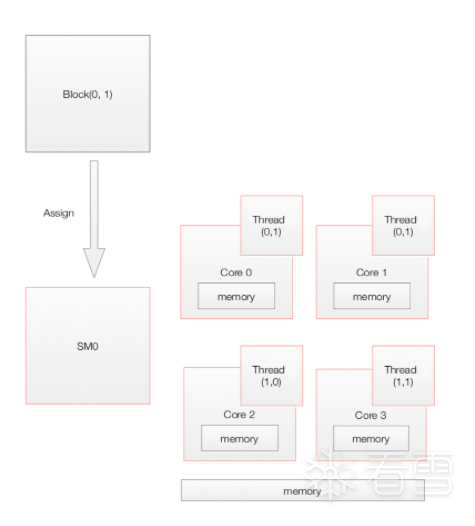
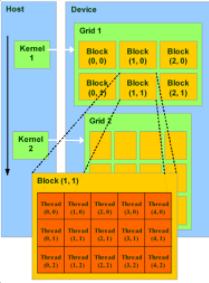
当主机上的 CUDA 应用程序调用kernel grid时,grid的block被枚举,全局工作分配引擎将它们分配给具有可用执行能力的SM。同一block的线程总是在同一个SM上运行。
多个线程块和一个线程块中的多个线程可以在一个SM上并发执行。当该线程块终止时,新块将在腾出的多处理器上启动。
grid中的所有线程都执行相同的kernel。GPU可以同时处理来自同一应用程序的多个kernel。
Pascal GP100 最多可以处理32个线程块和每个SM 2048 个线程。
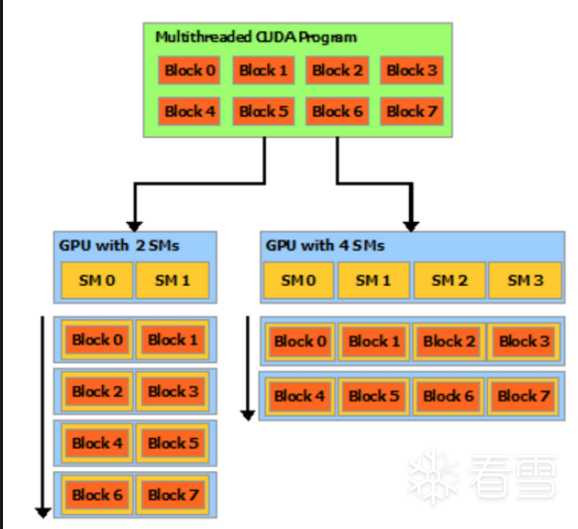
在这里,我们有一个由8个块组成的 CUDA 应用程序。它可以在具有2个SM或4个SM的GPU上执行。
notice:整个设备一次只能处理一个应用程序,应用程序之间的切换速度很慢。
Wrap
SM采用的SIMT(Single-Instruction, Multiple-Thread,单指令多线程)架构,warp(线程束)是最基本的执行单元 ,一个warp一般包含32个并行thread,这些thread以不同数据资源执行相同的指令。
当一个kernel被执行时,grid中的线程块被分配到SM 上,一个线程块的thread只能在一个SM上调度,SM一般可以调度多个线程块 ,大量的thread可能被分到不同的SM上。每个thread拥有它自己的程序计数器和状态寄存器,并且用该thread自己的数据执行指令,这就是所谓的Single Instruction Multiple Thread(SIMT)。
一个CUDA core可以执行一个thread,一个SM的CUDA core‘s会分成几个warp(即CUDA core在SM中分组),由warp scheduler负责调度。
尽管warp中的线程从同一程序地址,但可能具有不同的行为,比如分支结构,因为GPU规定warp中所有线程在同一周期执行相同的指令,warp发散会导致性能下降。一个SM同时并发的warp是有限的(active wrap is limited) ,因为资源限制,SM要为每个线程块分配共享内存,而也要为每个线程束中的线程分配独立的寄存器,所以SM的配置会影响其所支持的线程块和warp并发数量。
每个block的warp数量可以由下面的公式计算获得:
被分到一个warp中的线程必然属于同一个block,如果block所含线程数目不是warp大小的整数倍,那么多出的那些thread所在的warp中,会剩余一些inactive的thread,也就是说,即使凑不够warp整数倍的thread,硬件也会为warp凑足,只不过那些thread是inactive状态,需要注意的是,即使这部分thread是inactive的,也会消耗SM资源。
由于warp的大小一般为32,所以block所含的thread的大小一般要设置为32的倍数。
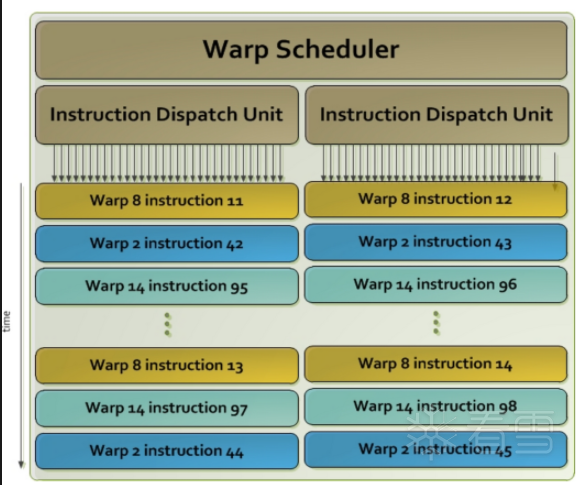
在下图中,我们有 2 个调度单元。每个运行不同的wrap。在每个warp中,它运行相同的指令。当 warp 中的线程等待上一条指令完成时,warp scheduler将选择另一个 warp 来执行。来自不同块或不同kernel的两个 warp 可以同时执行。
warp一次执行一条通用指令。每个cuda core (SP)为 warp 中的每个线程运行相同的指令。
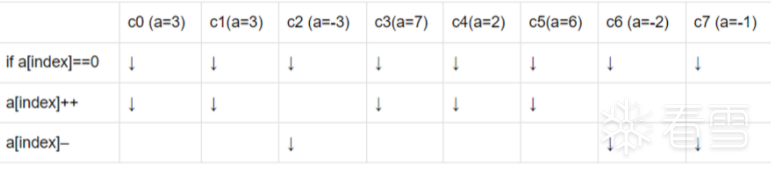
执行一个分支,如:
SM 跳过受分支条件影响的cuda core的执行:
因此,当 warp 的所有 32 个线程都分支到相同的执行路径时,就会实现最高效率。如果 warp 的线程通过数据相关的条件分支发散,则 warp 连续执行每个分支路径,禁用不在该路径上的线程,当所有路径完成时,线程会聚回到相同的执行路径。
为了最大化吞吐量,warp 中的所有线程都应遵循相同的控制流。可以重写程序,使 warp 分支中的线程转到相同的代码:
优于
for循环展开是另一种避免分支的技术:
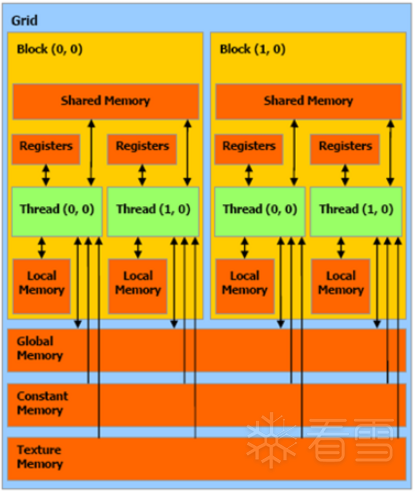
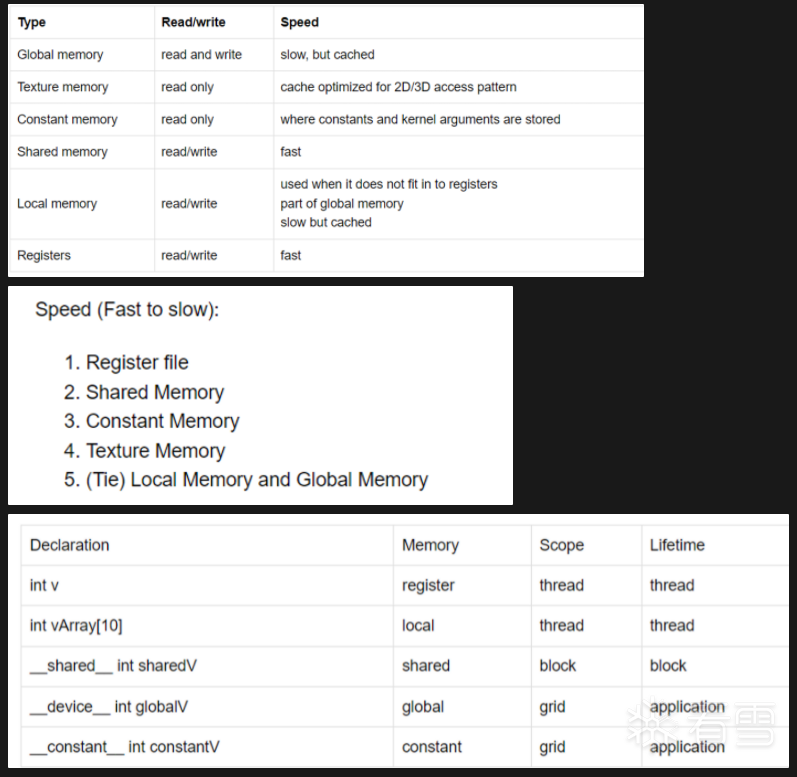
每个 SM 都有一个共享内存,可供同一块中的所有线程访问。每个线程都有自己的一组寄存器和本地内存。所有块都可以访问全局内存、常量内存(只读)和纹理内存. (空间数据的只读存储器)
本地、全局、常量和纹理内存都位于芯片外。 Local、Constant、Texture都被缓存了。每个 SM 都有一个用于全局内存引用的 L1 缓存。所有 SM 共享第二个 L2 缓存。对共享内存的访问以 TB/s 为单位。全局内存要慢一个数量级。每个 GPS 都有一个恒定的只读内存,延迟更短,吞吐量更高。纹理内存是只读的。
当 warp 中的线程从全局内存加载数据时,系统会检测它们是否连续。它将连续访问合并为对 DRAM 的一次访问。
共享内存在芯片上,比本地和全局内存快得多。共享内存延迟大约比未缓存的全局内存延迟低100 倍。线程可以访问由同一线程块中的其他线程从全局内存加载的共享内存中的数据。
可以通过线程同步来控制内存访问以避免竞争条件 (__syncthreads)。
共享内存可用作用户管理的数据缓存和高并行数据缩减。
Static shared memory
__syncthreads() 是轻量级的并且是block级同步屏障。
__syncthreads() 确保所有线程在继续之前已完成。
Dynamic Shared Memory
Constant memory
SM 积极地缓存常量内存,从而导致较短的延迟。
CUDA 使用块和线程来提供数据并行性。CUDA创建多个块,每个块有多个线程。每个线程调用同一个kernel来处理一段数据。
在这里,我们的目的是将 1024x1024 个数字相加,为了保持内核几乎保持不变,为了添加所有数字,我们创建了 4096 个块,每个块有 256 个线程。
1024×1024=4096×256×1
每个执行kernel的线程都有一个唯一的Bock ID和线程ID,可以通过内置的blockIdx.x和threadIdx.x变量在kernel中访问。我们使用这个索引来定位我们要在内核中添加的数字对。
为什么我们有block时还需要线程? CUDA 线程可以访问多个具有不同性能的内存空间。每个线程都有自己的本地内存。每个线程块都具有对该块的所有线程可见的共享内存,并且与该块具有相同的生命周期。所有线程都可以访问相同的全局内存。共享内存的数据访问比全局内存快。首先将数据从主机复制到 GPU 中的全局内存。块中的所有线程都在同一个多处理器上运行。因此,为了减少内存延迟,我们可以将块所需的所有数据从全局内存复制到共享内存。
Use shared
共享内存可以加快性能,尤其是当我们需要频繁访问数据时。在这里,我们创建了一个新的内核模板,将其所有相邻数据添加到一个半径内。
我们将块中需要的所有数据读取到共享内存中。半径为 7,块索引为 512 到 1023,我们需要读取 505(512-7) 到 1030(1023+7) 的数据。
上一节中的代码有一个致命的数据竞争问题。在访问数据之前,数据不会存储在共享内存中。例如,要计算线程 20 的结果,我们需要访问对应于 in[13] 到 in[27] 的 temp。
然而,线程 27 负责使用 in[27] 加载 temp。由于线程是在不保证顺序的情况下并行执行的,因此我们可以在线程 27 将 in[27] 存储到 temp 之前计算线程 20 的结果。
所以,和其他多线程编程一样,CUDA提供了线程同步方法syncthreads来解决这个数据竞争问题。所有线程都将被阻塞在 syncthreads 处,直到同一块中的所有线程都到达同一点。
Other synchronization methods:
在前面的示例中,线程索引 threadIdx.x 是一维的。为了更方便地访问多维矩阵,CUDA 还支持多维线程索引。
threadIdx是一个3分量向量,因此可以使用一维、二维或三维线程索引来标识线程,形成一维、二维或三维线程块。这提供了一种自然的方式来调用域中元素的计算,例如向量、矩阵或体积。
线程的索引和它的线程ID以一种直接的方式相互关联:
对于一维块,它们是相同的;对于大小为(Dx, Dy)的二维块,索引为(x, y)的线程的线程ID为(x + y Dx);对于大小为(Dx, Dy, Dz)的三维块,索引为(x, y, z)的线程的线程ID为(x + y Dx + z Dx Dy)。
以下代码将两个二维矩阵与 1 个 NxN 线程的线程块相加。threadIdx.x 和 threadIdx.y 表示二维索引,便于二维矩阵访问。
CUDA 支持类型为 dim3 的一维、二维或三维线程索引。
块可能不会与输入数据边界完全对齐。我们添加一个 if 循环以避免线程超出输入数据边界。例如,在最后一个块中,我们可能没有足够的数据来配置线程数量。
What is a CUDA Binary?
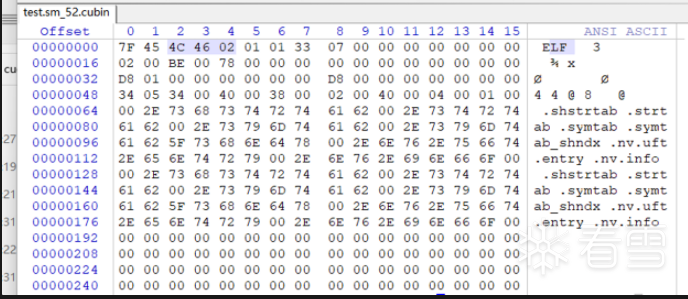
CUDA binary(也称为 cubin)文件是一种 ELF 格式的文件,它由 CUDA 可执行代码部分以及包含符号、重定位器、调试信息等的其他部分组成。
默认情况下,CUDA 编译器驱动程序 nvcc 将 cubin 文件嵌入到主机可执行文件。但它们也可以通过使用“ -cubin”选项单独生成nvcc。cubin 文件由 CUDA 驱动程序 API 在运行时加载。
上面NVIDIA CUDA Compiler Driver NVCC → example中的:
使用cicc为test.cpp1.ii添加信息转变为test.ptx,生成中间语言
虚拟架构决定功能
类似于:
使用ptxas将test.ptx转变为test.sm_52.cubin,生成对应的显卡架构的机器码
真实架构决定功能和性能
使用fatbinary将test.sm_52.cubin和test.ptx打包为test.fatbin,并将test.fatbin嵌入到test.fatbin.c中可以看见test.fatbin偏移0x50就是test.sm_52.cubin
This is an instruction set reference for NVIDIA GPU architectures Kepler, Maxwell, Pascal, Volta, Turing and Ampere.
CUDA Binary Utilities
cuobjdump、nvdisasm、cu++filt 和 nvprune,四种适用于 Linux(x86、ARM 和 P9)、Windows、Mac OS 和 Android 的 CUDA 二进制工具。
cuobjdump 从CUDA二进制文件(独立的 和 嵌入在主机二进制文件中的)中提取信息,并以人类可读的格式呈现它们。
cuobjdump的输出包括每个kernel的cuda汇编代码, CUDA ELF section headers, string tables, relocators and other CUDA specific sections。
Here’s a sample output of cuobjdump
如输出所示,a.out主机二进制文件包含sm_70的 cubin 和 ptx 代码。
使用-lelf 选项列出host binary中的cubin files
使用-xelf all选项从host binary中提取出所有的cubins
从host binary中提取名为add_new.sm_70.cubin的cubin
从host binary中提取名称中包含_old 的cubins
也就是说可以将任何子字符串传递给-xelf和-xptx选项。只有名称中包含子字符串的文件才会从输入二进制文件中提取。
To dump公共资源和每个函数的资源使用信息
请注意,REG、TEXTURE、SURFACE 和 SAMPLER 的值表示计数,而对于其他资源,它表示使用的字节数。
Command-line Options
nvdisasm从独立的 cubin 文件中提取信息并以人类可读的格式呈现它们。
nvdisasm的输出包括CUDA assembly code for each kernel, listing of ELF data sections and other CUDA specific sections,输出样式可以通过nvdisasm的command-line options控制。
nvdisasm也能做control flow analysis注释jump/branch targets并使输出更易于阅读。(nvdisasm需要完整的重定位信息来做控制流分析。如果 CUDA 二进制文件中缺少此信息,请使用nvdisasm选项-ndf关闭控制流分析,或使用ptxas和nvlink选项-preserve-relocs重新生成 cubin 文件)。
Here’s a sample output of nvdisasm
To get the control flow graph of a kernel, use the following:nvdisasm -cfg <input cubin file>
nvdisasm能够生成DOT图形描述语言格式的CUDA程序集控制流。
nvdisasm的控制流输出可以直接导入到DOT图形可视化工具,例如Graphviz 。
以下是使用Graphviz和nvdisasm生成上述cubin (a.cubin)控制流的PNG图像 (cfg.png) 的方法:
Here’s the generated graph:
nvdisasm能够显示寄存器 (general and predicate) 活动范围信息
对于CUDA汇编的每一行,能够显示给定的设备寄存器是否assigned, accessed, live or re-assigned,它还显示使用的寄存器总数,如果用户对任何特定寄存器的寿命范围或一般的寄存器使用感兴趣,这将很有用。
Here’s a sample output (为简洁起见,对输出进行了删减):
nvdisasm能够显示CUDA源文件的行号信息(这对调试很有用):nvdisasm -g <input cubin file>
以下是使用nvdisasm -g 命令的输出示例:
nvdisasm能够显示CUDA源文件的带有附加函数内联信息(如果有)的行号信息。在没有任何函数内联的情况下,输出与使用 nvdisasm -g 命令的输出相同:nvdisasm -gi
这是使用 nvdisasm -gi 命令的kernel输出示例:
Command-line Options
nvprune修剪主机对象文件和库以仅包含指定目标的设备代码。
nvprune [options] -o <outfile> <infile>
输入文件必须是可重定位的主机对象或静态库(不是主机可执行文件),输出文件将采用相同的格式。
必须使用 –arch 或 –generate-code 选项来指定要保留的目标。所有其他设备代码都从文件中丢弃。目标可以是 sm_NN arch (cubin) 或 compute_NN arch (ptx)。
例如 ,以下将修剪libcublas_static.a以仅包含sm_70 cubin而不是通常存在的所有目标:
请注意,这意味着libcublas_static70.a不会在任何其他架构上运行,因此只能在为单一架构构建时使用。
Command-line Options
尝试恢复修饰过的符号名称。
cu++filt [options] <symbol(s)>
可以处理多个符号:
Command-line Options
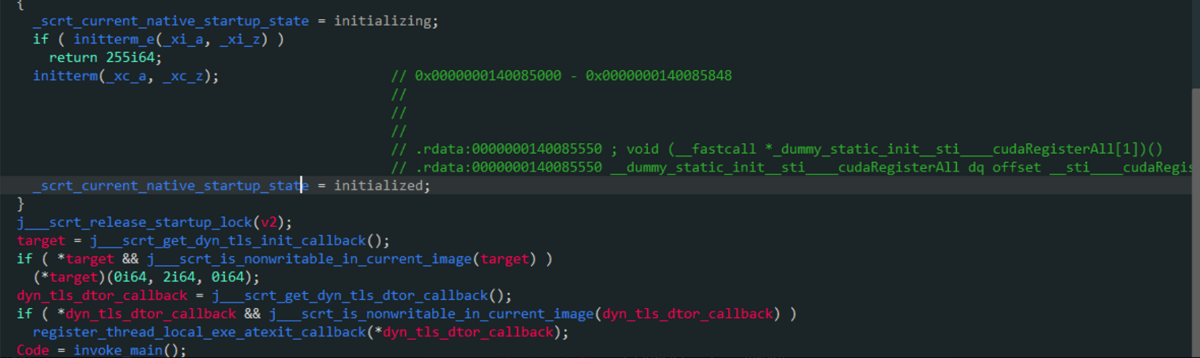
一些CUDA关键的API会在main()函数之前被调用:
回调里面是调用cudaRegisterFunction注册函数
_cudaRegisterLinkedBinary内是调用cudaRegisterFatBinary
cudaRegisterFatBinary的函数定义
这个fatCubin指针是指向的是一个结构体,此结构体定在 cuda/include/fatbinary_section.h中
__fatBinC_Wrapper_t第三个参数就是指向的真是的 fatCubin,而 fatCubin 的最开始的元数据是结构体struct fatBinaryHeader
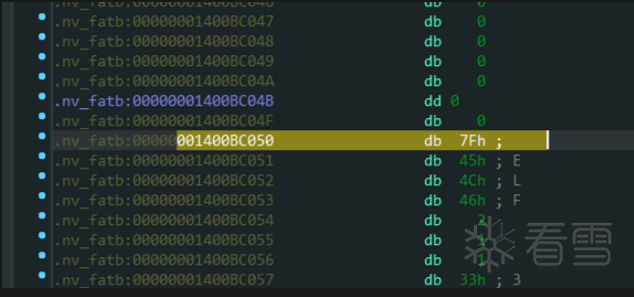
从fatcubin中提取我们想要的cubin,是通过从0x1400BC000开始固定偏移的0x50取到的cubin的header
这里开始就是cubin了
那么从这里开始要提取多少呢,可以看见我们的 fatBinaryHeader → headerSize为0x1300。
这个0x1300是从0x1400BC010,也就是fatBinaryHeader这个结构体之后开始算的。
那么从这个0x1400BC050的cubin header开始算就要提取:0x1300 - (0x1400BC050 - 0x1400BC010) = 0x12C0个字节。
Phase
nvcc Option
Default Output File Name
Long Name
Short Name
CUDA compilation to C/C++ source file
--cuda
-cuda
.cpp.ii appended to source file name, as in x.cu.cpp.ii. This output file can be compiled by the host compiler that was used by nvcc to preprocess the .cu file.
C/C++ preprocessing
--preprocess
-E
<result on standard output>
C/C++ compilation to object file
--compile
-c
Source file name with suffix replaced by o on Linux or obj on Windows
Cubin generation from CUDA source files
--cubin
-cubin
Source file name with suffix replaced by cubin
Cubin generation from PTX intermediate files.
--cubin
-cubin
Source file name with suffix replaced by cubin
PTX generation from CUDA source files
--ptx
-ptx
Source file name with suffix replaced by ptx
Fatbinary generation from source, PTX or cubin files
--fatbin
-fatbin
Source file name with suffix replaced by fatbin
Linking relocatable device code.
--device-link
-dlink
a_dlink.obj on Windows or a_dlink.o on other platforms
Cubin generation from linked relocatable device code.
--device-link--cubin
-dlink-cubin
a_dlink.cubin
Fatbinary generation from linked relocatable device code
--device-link--fatbin
-dlink-fatbin
a_dlink.fatbin
Linking an executable
<no phase option>
a.exe on Windows or a.out on other platforms
Constructing an object file archive, or library
--lib
-lib
a.lib on Windows or a.a on other platforms
make dependency generation
--generate-dependencies
-M
<result on standard output>
make dependency generation without headers in system paths.
--generate-nonsystem-dependencies
-MM
<result on standard output>
Compile CUDA source to OptiX IR output.
--optix-ir
-optix-ir
Source file name with suffix replaced by optixir
Running an executable
--run
-run
此列表中的最后一个阶段更像是一个便利阶段。它允许运行编译和链接的可执行文件,而无需显式设置 CUDA 动态库的库路径。
nvcc xx.cu –gpu-architecture=compute_50 –gpu-code=compute_50
nvcc x.cu --gpu-architecture=compute_50 --gpu-code=compute_50,sm_50,sm_52
nvcc xx.cu –gpu-architecture=compute_50 –gpu-code=compute_50
nvcc x.cu --gpu-architecture=compute_50 --gpu-code=compute_50,sm_50,sm_52
nvcc x.cu \
--generate-code arch=compute_50,code=sm_50 \
--generate-code arch=compute_50,code=sm_52 \
--generate-code arch=compute_53,code=sm_53
nvcc x.cu \
--generate-code arch=compute_50,code=compute_50 \
--generate-code arch=compute_53,code=compute_53
nvcc x.cu \
--generate-code arch=compute_50,code=[sm_50,sm_52] \
--generate-code arch=compute_53,code=sm_53
nvcc x.cu \
--generate-code arch=compute_50,code=sm_50 \
--generate-code arch=compute_50,code=sm_52 \
--generate-code arch=compute_53,code=sm_53
nvcc x.cu \
--generate-code arch=compute_50,code=compute_50 \
--generate-code arch=compute_53,code=compute_53
nvcc x.cu \
--generate-code arch=compute_50,code=[sm_50,sm_52] \
--generate-code arch=compute_53,code=sm_53
test.cu
// Kernel definition
// Run on GPU
// Adding 2 numbers and store the result in c
__global__ void add(int *a, int *b, int *c)
{
*c = *a + *b;
}
// Kernel definition
// Run on GPU
// Adding 2 numbers and store the result in c
__global__ void add(int *a, int *b, int *c)
{
*c = *a + *b;
}
int main(void) {
// Allocate & initialize host data - run on the host
int a, b, c; // host copies of a, b, c
a = 2;
b = 7;
...
}
int main(void) {
// Allocate & initialize host data - run on the host
int a, b, c; // host copies of a, b, c
a = 2;
b = 7;
...
}
int main(void) {
...
int *d_a, *d_b, *d_c; // device copies of a, b, c
// Allocate space for device copies of a, b, c
cudaMalloc((void **)&d_a, size);
cudaMalloc((void **)&d_b, size);
cudaMalloc((void **)&d_c, size);
// Copy a & b from the host to the device
cudaMemcpy(d_a, &a, size, cudaMemcpyHostToDevice);
cudaMemcpy(d_b, &b, size, cudaMemcpyHostToDevice);
...
}
int main(void) {
...
// Launch add() kernel on GPU with parameters (d_a, d_b, d_c)
add<<<1,1>>>(d_a, d_b, d_c);
...
}
int main(void) {
...
// Launch add() kernel on GPU with parameters (d_a, d_b, d_c)
add<<<1,1>>>(d_a, d_b, d_c);
...
}
// Copy result back to the host
cudaMemcpy(&c, d_c, size, cudaMemcpyDeviceToHost);
// Copy result back to the host
cudaMemcpy(&c, d_c, size, cudaMemcpyDeviceToHost);
// Cleanup
cudaFree(d_a); cudaFree(d_b); cudaFree(d_c);
// Cleanup
cudaFree(d_a); cudaFree(d_b); cudaFree(d_c);
if (a[index]==0)
a[index]++;
else
a[index]--;
if (a[index]==0)
a[index]++;
else
a[index]--;
if (a[index]<range)
... // More likely, threads with a warp will branch the same way.
else
...
if (a[index]<range)
... // More likely, threads with a warp will branch the same way.
else
...
if (a[index]%2==0)
...
else
...
if (a[index]%2==0)
...
else
...
for (int i=0; i<4; i++)
c[i] += a[i];
for (int i=0; i<4; i++)
c[i] += a[i];
c[0] = a[0] + a[1] + a[2] + a[3];
c[0] = a[0] + a[1] + a[2] + a[3];
__global__ void staticReverse(int *d, int n)
{
__shared__ int s[64];//静态共享内存, 64个int
int t = threadIdx.x;//线程索引
int tr = n-t-1;//反转后的线程索引
s[t] = d[t];
__syncthreads();//同步所有线程, 保证s[t]已经被赋值
d[t] = s[tr];
}
int main(void)
{
const int n = 64;
int a[n], r[n], d[n];
for (int i = 0; i < n; i++) {//给a赋值为[0, n-1], 给r赋值为[n-1, 0], 给d赋值为0
a[i] = i;
r[i] = n-i-1;
d[i] = 0;
}
int *d_d;
cudaMalloc(&d_d, n * sizeof(int));//为a分配设备内存
// run version with static shared memory
cudaMemcpy(d_d, a, n*sizeof(int), cudaMemcpyHostToDevice);//将a从主机内存复制到设备内存
staticReverse<<<1,n>>>(d_d, n);//以1个block, 64个thread的方式运行staticReverse函数
cudaMemcpy(d, d_d, n*sizeof(int), cudaMemcpyDeviceToHost);//将d从设备内存复制到主机内存
for (int i = 0; i < n; i++) //检查结果是否正确
if (d[i] != r[i]) printf("Error: d[%d]!=r[%d] (%d, %d)n", i, i, d[i], r[i]);
}
__global__ void dynamicReverse(int *d, int n)
{
// Dynamic shared memory
extern __shared__ int s[];
int t = threadIdx.x;
int tr = n-t-1;
s[t] = d[t];
__syncthreads();
d[t] = s[tr];
}
int main(void)
{
const int n = 64;
int a[n], r[n], d[n];
for (int i = 0; i < n; i++) {//初始化a,r,d数组
a[i] = i;
r[i] = n-i-1;
d[i] = 0;
}
int *d_d;
cudaMalloc(&d_d, n * sizeof(int)); //为a在设备上分配内存
// run dynamic shared memory version
cudaMemcpy(d_d, a, n*sizeof(int), cudaMemcpyHostToDevice);//将a从主机内存复制到设备内存
dynamicReverse<<<1,n,n*sizeof(int)>>>(d_d, n);//以1个线程块,每个线程块有n个线程,共享内存大小为n*sizeof(int)的动态共享内存版本
cudaMemcpy(d, d_d, n * sizeof(int), cudaMemcpyDeviceToHost);
for (int i = 0; i < n; i++)
if (d[i] != r[i]) printf("Error: d[%d]!=r[%d] (%d, %d)n", i, i, d[i], r[i]);
}
__constant__ float M[10];
...
cudaMemcpyToSymbol(...);
__constant__ float M[10];
...
cudaMemcpyToSymbol(...);
__global__ void add(int *a, int *b, int *c)
{
// blockIdx.x is the index of the block.
// Each block has blockDim.x threads.
// threadIdx.x is the index of the thread.
// Each thread can perform 1 addition.
// a[index] & b[index] are the 2 numbers to add in the current thread.
int index = blockIdx.x * blockDim.x + threadIdx.x;
c[index] = a[index] + b[index];
}
int main(void) {
int *a, *b, *c;
int size = N * sizeof(int);
// Alloc space for host copies of a, b, c and setup input values
a = (int *)malloc(size); random_ints(a, N);//随机生成N个整数
b = (int *)malloc(size); random_ints(b, N);//随机生成N个整数
c = (int *)malloc(size);
int *d_a, *d_b, *d_c;
// Alloc space for device copies of a, b, c
cudaMalloc((void **)&d_a, size);
cudaMalloc((void **)&d_b, size);
cudaMalloc((void **)&d_c, size);
// Copy inputs to device
cudaMemcpy(d_a, a, size, cudaMemcpyHostToDevice);
cudaMemcpy(d_b, b, size, cudaMemcpyHostToDevice);
// Launch add() kernel on GPU
add<<<N/THREADS_PER_BLOCK,THREADS_PER_BLOCK>>>(d_a, d_b, d_c);//以N/THREADS_PER_BLOCK个block,每个block有THREADS_PER_BLOCK个threads来执行addition
// Copy result back to host
cudaMemcpy(c, d_c, size, cudaMemcpyDeviceToHost);
// Cleanup
free(a); free(b); free(c);
cudaFree(d_a); cudaFree(d_b); cudaFree(d_c);
return 0;
}
__global__ void add(int *a, int *b, int *c)
{
__shared__ int temp[1000];
}
__global__ void add(int *a, int *b, int *c)
{
__shared__ int temp[1000];
}
__global__ void stencil(int *in, int *out)
{
__shared__ int temp[BLOCK_SIZE + 2 * RADIUS];
int gindex = threadIdx.x + blockIdx.x * blockDim.x;
int lindex = threadIdx.x + RADIUS;
// Read input elements into shared memory
temp[lindex] = in[gindex];
// At both end of a block, the sliding window moves beyond the block boundary.
// E.g, for thread id = 512, we wiil read in[505] and in[1030] into temp.
if (threadIdx.x < RADIUS) {
temp[lindex - RADIUS] = in[gindex - RADIUS];
temp[lindex + BLOCK_SIZE] = in[gindex + BLOCK_SIZE];
}
// Apply the stencil
int result = 0;
for (int offset = -RADIUS ; offset <= RADIUS ; offset++)
result += temp[lindex + offset];
// Store the result
out[gindex] = result;
}
for (int offset = -RADIUS ; offset <= RADIUS ; offset++)
result += temp[lindex + offset]; // Data race problem here.
for (int offset = -RADIUS ; offset <= RADIUS ; offset++)
result += temp[lindex + offset]; // Data race problem here.
if (threadIdx.x < RADIUS) {
temp[lindex - RADIUS] = in[gindex - RADIUS];
temp[lindex + BLOCK_SIZE] = in[gindex + BLOCK_SIZE];
}
if (threadIdx.x < RADIUS) {
temp[lindex - RADIUS] = in[gindex - RADIUS];
temp[lindex + BLOCK_SIZE] = in[gindex + BLOCK_SIZE];
}
__global__ void stencil_1d(int *in, int *out) {
__shared__ int temp[BLOCK_SIZE + 2 * RADIUS];
int gindex = threadIdx.x + blockIdx.x * blockDim.x;
int lindex = threadIdx.x + RADIUS;
// Read input elements into shared memory
temp[lindex] = in[gindex];
// At both end of a block, the sliding window moves beyond the block boundary.
if (threadIdx.x < RADIUS) {
temp[lindex - RADIUS] = in[gindex - RADIUS];
temp[lindex + BLOCK_SIZE] = in[gindex + BLOCK_SIZE];
}
// Synchronize (ensure all the threads will be completed before continue)
__syncthreads();
// Apply the stencil
int result = 0;
for (int offset = -RADIUS ; offset <= RADIUS ; offset++)
result += temp[lindex + offset];
// Store the result
out[gindex] = result;
}
Call
Behavior
cudaMemcpy()
阻塞 CPU 直到复制完成复制在所有前面的 CUDA 调用完成时开始
cudaMemcpyAsync()
异步,不阻塞CPU
cudaDeviceSynchronize()
阻塞 CPU,直到所有前面的 CUDA 调用都完成
__global__ void MatAdd(float A[N][N], float B[N][N],
float C[N][N])
{
// the blockIdx and treadIdx is now 2-dimensional.
int i = blockIdx.x * blockDim.x + threadIdx.x;
int j = blockIdx.y * blockDim.y + threadIdx.y;
C[i][j] = A[i][j] + B[i][j];
}
int main()
{
...
// Kernel invocation with one block of N * N * 1 threads
dim3 threadsPerBlock(N, N);//二维threads
MatAdd<<<1, threadsPerBlock>>>(A, B, C);
...
}
__global__ void MatAdd(float A[N][N], float B[N][N],
float C[N][N])
{
// the blockIdx and treadIdx is now 2-dimensional.
int i = blockIdx.x * blockDim.x + threadIdx.x;
int j = blockIdx.y * blockDim.y + threadIdx.y;
C[i][j] = A[i][j] + B[i][j];
}
int main()
{
...
// Kernel invocation with one block of N * N * 1 threads
dim3 threadsPerBlock(N, N);//二维threads
[内核课程]《Windows内核攻防实战》!从零到实战,融合AI与Windows内核攻防全技术栈,打造具备自动化能力的内核开发高手。
最后于 2023-2-6 17:47
被SYJ-Re编辑
,原因: