天堂之门 (Heaven's Gate) 是一种在32位WoW64进程中执行64位代码,以及直接调用64位WIN32 API函数的技术。从安全角度看,天堂之门可以作为一种软件保护技术,用于防止静态分析以及跨进程的API Hook;从恶意代码角度看,该技术可以绕过沙盒对WIN32 API调用的检测。
本文介绍了天堂之门技术的原理及C语言实现。
天堂之门技术的最早应用已经不可考究,我找到的最早的一篇详解天堂之门的文章是2012年的Knockin’ on Heaven’s Gate – Dynamic Processor Mode Switching ,内容非常详细,目前能找到的有关天堂之门的文章大多都引用了这篇。比较新的一个是Rebuild The Heaven's Gate: from 32-bit Hell back to 64-bit Wonderland ,貌似是一个台湾人(《惡意程式前線戰術指南》作者馬聖豪)的讲座PPT,比较简短。
简单来说WoW64是Windows x64提供的一种兼容机制,可以认为WoW64是64位Windows系统创建的一个32位的模拟环境,使得32位可执行程序能够在64位的操作系统上正常运行。
推荐一篇讲解WoW64的深度好文WoW64 internals ,这里就不再赘述了。
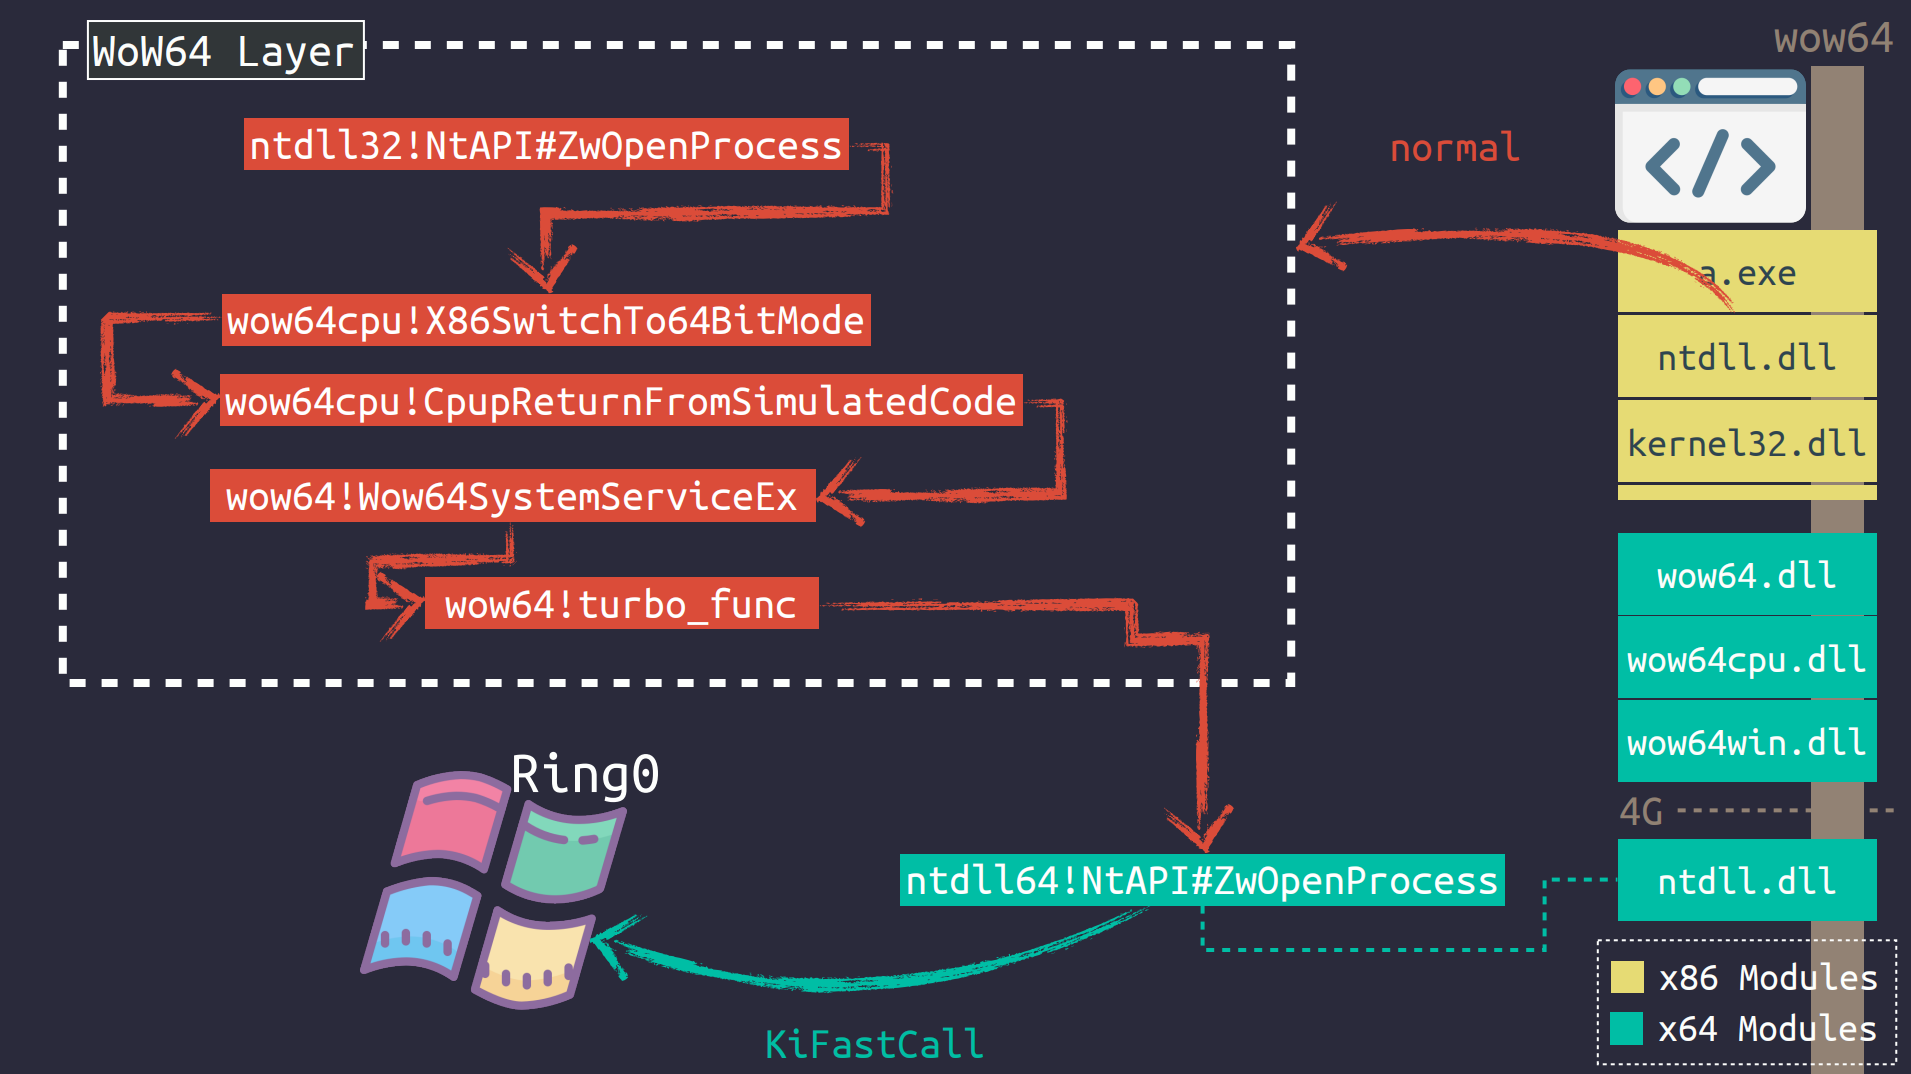
下图(来自Rebuild The Heaven's Gate: from 32-bit Hell back to 64-bit Wonderland )展示了正常情况下32位进程通过WoW64机制调用WIN32 API的过程。以ZwOpenProcess函数的调用为例:
下图展示了通过天堂之门技术调用WIN32 API的过程。这里我们通过一些操作绕过了WoW64机制,手动切换到64位模式并调用64位下的ZwOpenProcess函数,大致流程如下(和图中不太一样):
如果需要调用的是ntdll之外的函数,以kernel32.dll中的CreateFile函数为例,还需要:
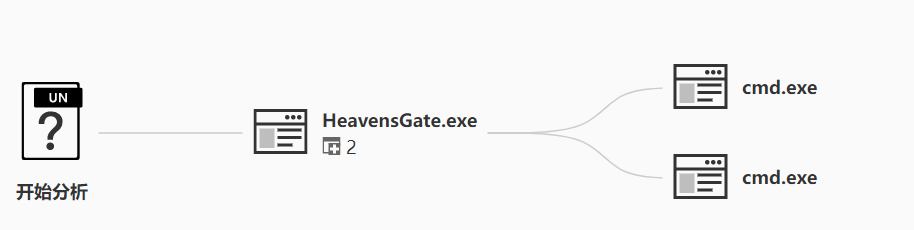
从上述过程中我们可以发现通过天堂之门的API调用并没有调用ntdll32中的函数,而目前大多数沙箱在检测32位程序时仅仅会对32位函数进行Hook,通过天堂之门,我们成功绕过了沙箱的API检测:
GitHub仓库:bluesadi/Heavens-Gate
实现天堂之门大概需要实现到以下几个函数:
MakeUTFStr:构造UNICODE_STRING结构体
GetKernel32:加载64位kernel32.dll及其依赖kernelbase.dll
接下来我们将一一讲解这些函数的实现。
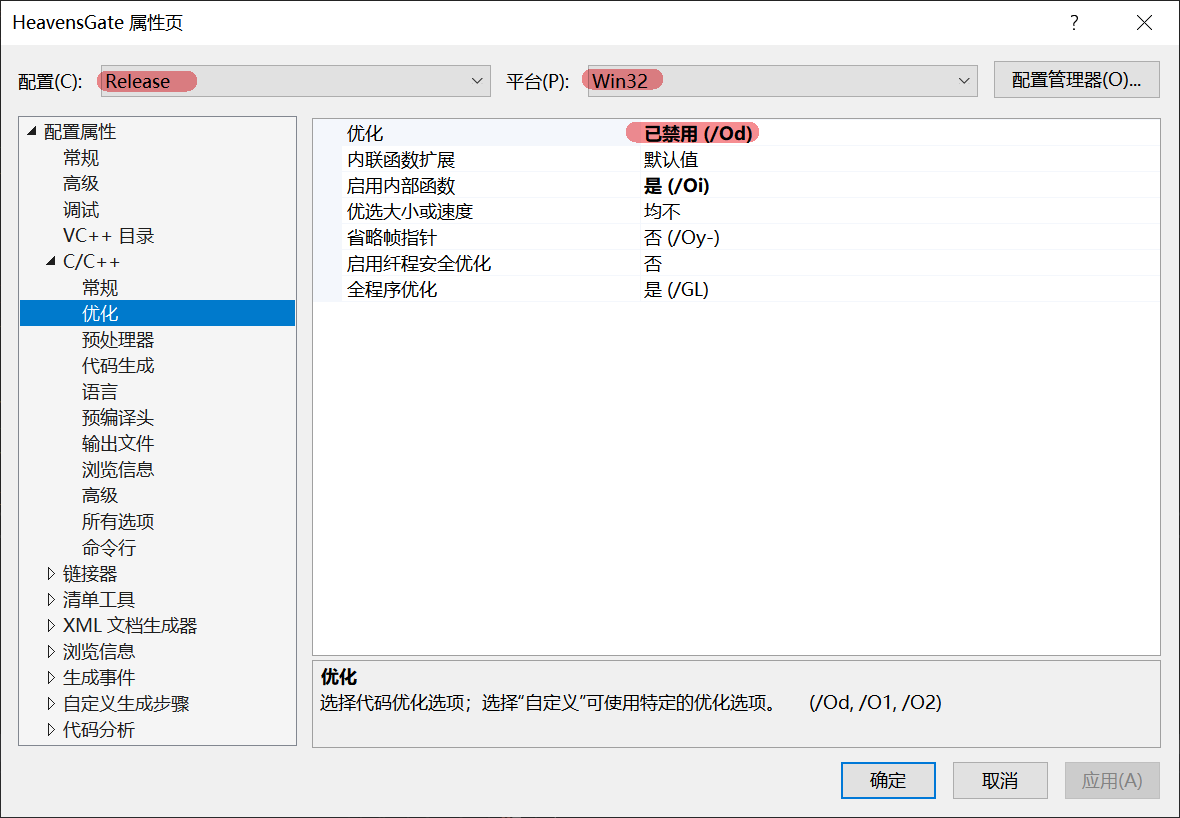
VS项目属性中选择"Release", "Win32",切记关闭优化(不关优化会出现玄学错误!!! ):
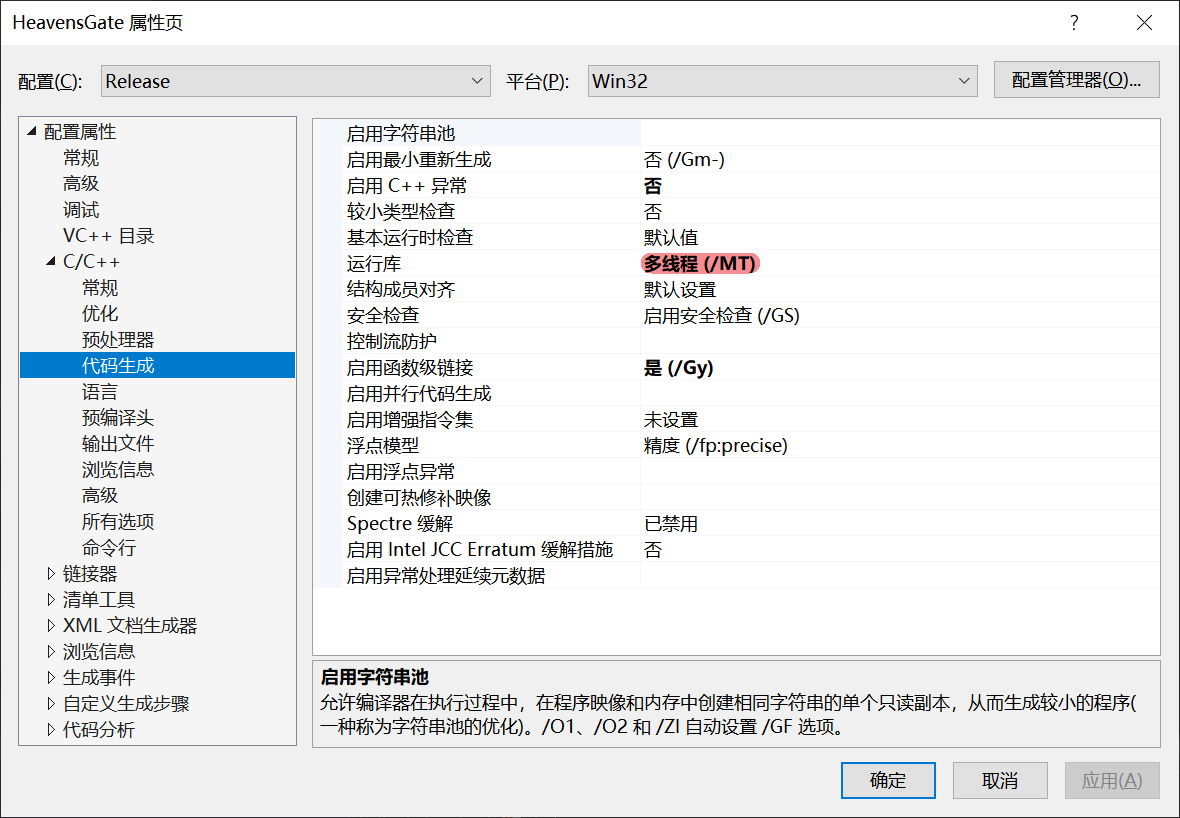
C/C++->代码生成->运行库改为“多线程(/MT)”,即静态编译:
函数声明:
该函数的作用是将64位地址src的内容拷贝到dst,拷贝sz个字节,因为我们操作的地址是64位的,所以我们必须切换到64位模式用64位的汇编实现 。
由32位切换到64位的代码如下,[bits 32]表示接下来的汇编要以32位模式编译,_next_x64_code为64位汇编代码的地址:
retf表示远返回,该指令会从栈顶取出一个返回地址,再取出一个cs段选择子,在上述代码中,retf指令会跳转到0x33:_next_x64_code,并将cs段寄存器置为0x33,此时程序切换到64位模式(Windows下cs段寄存器为0x23则以32位模式执行指令,为0x33则以64位模式执行指令)。
随后执行64位汇编指令,将src的数据拷贝到dst中,这里不再做解释:
执行完64位代码后,我们需要切回32位模式并返回。retfq中的q表示qword,即返回到64位的地址:
汇编的编译我们可以用Python的keystone模块实现:
输出得到shellcode,其中0x12345678我们要替换成_next_x64_code,也就是下一段64位汇编指令的地址:
完整的shellcode:
要执行这段shellcode,我们需要在堆中开辟新的空间,属性为PAGE_EXECUTE_READWRITE,即可读可写可执行,将shellcode拷贝到这块区域,替换_next_x64_code、src、dst、_next_x86_code的地址后执行:
完整代码:
函数声明:
该函数的作用是获取PEB64的地址。
64位中gs:[0x30]指向TEB,gs:[0x60]指向PEB,获取PEB64的地址很简单,只需要将gs:[0x60]拷贝到rax作为返回值即可:
完整代码:
函数声明:
该函数的作用是获取名为moduleName的模块的基址。
实现步骤如下:
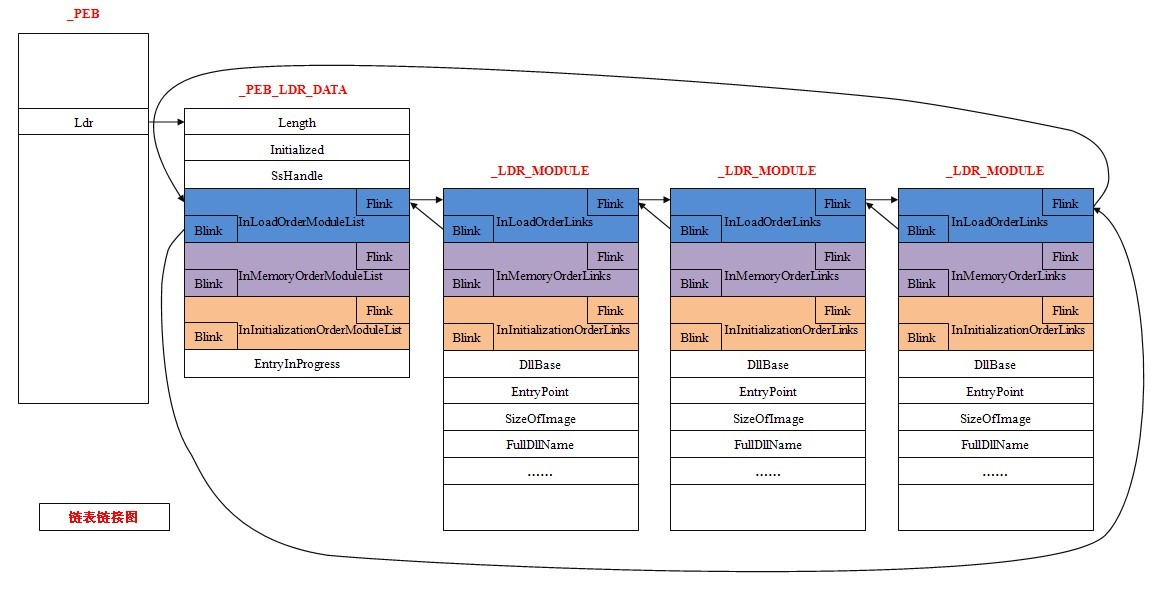
在WinDbg中使用dt指令查看结构体,可以看到Ldr的地址在PEB中的偏移为0x018:
用之前实现的memcpy64函数拷贝Ldr的地址:
打印_PEB_LDR_DATA结构体,可以看到InLoadOrderModuleList在Ldr中的偏移为0x10:
拷贝InLoadOrderModuleList的地址:
InLoadOrderModuleList的实际类型为_LDR_DATA_TABLE_ENTRY,BaseDllName中存储了DLL的名称,类型为_UNICODE_STRING:
所以Buffer的偏移量在_LDR_DATA_TABLE_ENTRY中的偏移为0x58+0x08,即96。
遍历链表的代码如下:
完整代码如下:
函数声明:
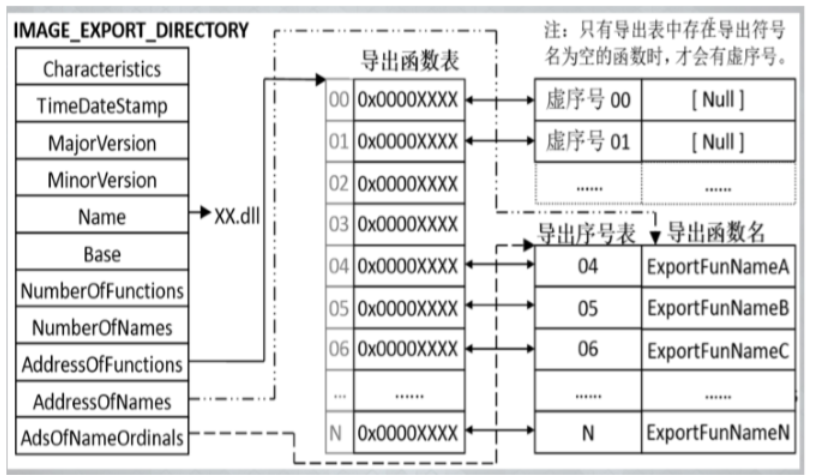
通过GetModuleHandle64获取模块地址后,此时还无法通过kernel32.dll中的GetProcAddress函数获取模块中函数的地址,可以通过遍历模块的导出表获取函数地址作为过渡方案。
首先获取导出表地址,这部分涉及PE文件结构,不再赘述了:
随后遍历导出表,从导出表中读取函数的名称和地址,将函数名称与func进行比对,比对成功则返回函数地址:
完整代码如下:
函数声明:
由于32位与64位的函数调用的传参方式不同,以及在上一步中我们通过MyGetProcAddress函数获取的函数地址为64位,肯定不能直接转化为函数指针调用,所以我们需要用64位汇编实现一个64位函数的调用。
首先来简单了解一下64位中WINAPI调用的传参方式:
构造shellcode,因为接下来我们需要对栈指针进行操作,所以首先将esp保存到ebx中,shellcode执行完毕后需要复原。and esp, 0xFFFFFFF8的作用是使rsp与8对齐,这是64位汇编的栈对齐要求,否则在执行某些系统调用时可能会出错:
切换到64位后按照64位WINAPI调用协定传参,调用函数之前保留32字节的空间,将函数返回值保存到rax。在shellcode执行前后保存和复原rsi和rdi:
最后切换回32位模式,并还原esp和ebx:
完整代码如下:
函数原型如下:
构造一个_UNICODE_STRING结构体并返回64位的地址。代码实现如下:
函数声明:
加载kernel32.dll以及kernelbase.dll
在上面提到的Knockin’ on Heaven’s Gate – Dynamic Processor Mode Switching 这篇文章中对这一部分有很复杂的叙述。kernel32.dll在Windows中的加载地址是固定的,并且只能被加载到那个地址。在该作者测试的环境下64位kernel32.dll的加载地址所在的空间已经被分配并且被映射为私有的了,会导致调用LdrLoadDll函数加载kernel32.dll时失败并返回0xC0000018 ( STATUS_CONFLICTING_ADDRESSES )。
Any attempts to load kernel32.dll using the LdrLoadDll function would result to the error code 0xC0000018 ( STATUS_CONFLICTING_ADDRESSES ). This is due to the fact that the default memory location of kernel32 is already mapped as private.
解决的思路非常简单:即调用NtFreeVirtualMemory函数将这块已经分配的空间释放掉,再用LdrLoadDll重新加载。但代码写起来非常复杂,可以参考dadas190/Heavens-Gate-2.0 的实现。
但是在我的操作系统上(Windows 10 x64 20H2),并没有找到作者提到的分配和映射过程,并且直接调用LdrLoadDll函数也能正常加载kernel32.dll,可能是在某个Windows版本中被移除了吧。
所以加载kernel64这部分的代码就变得非常简单了:
函数原型:
获取了kernel64的地址后我们就能直接通过GetProcAddress函数获取模块中函数的地址了。代码实现如下:
函数原型:
调用kernel64的LoadLibraryA函数加载其他DLL,如user32.dll等等。
代码实现如下:
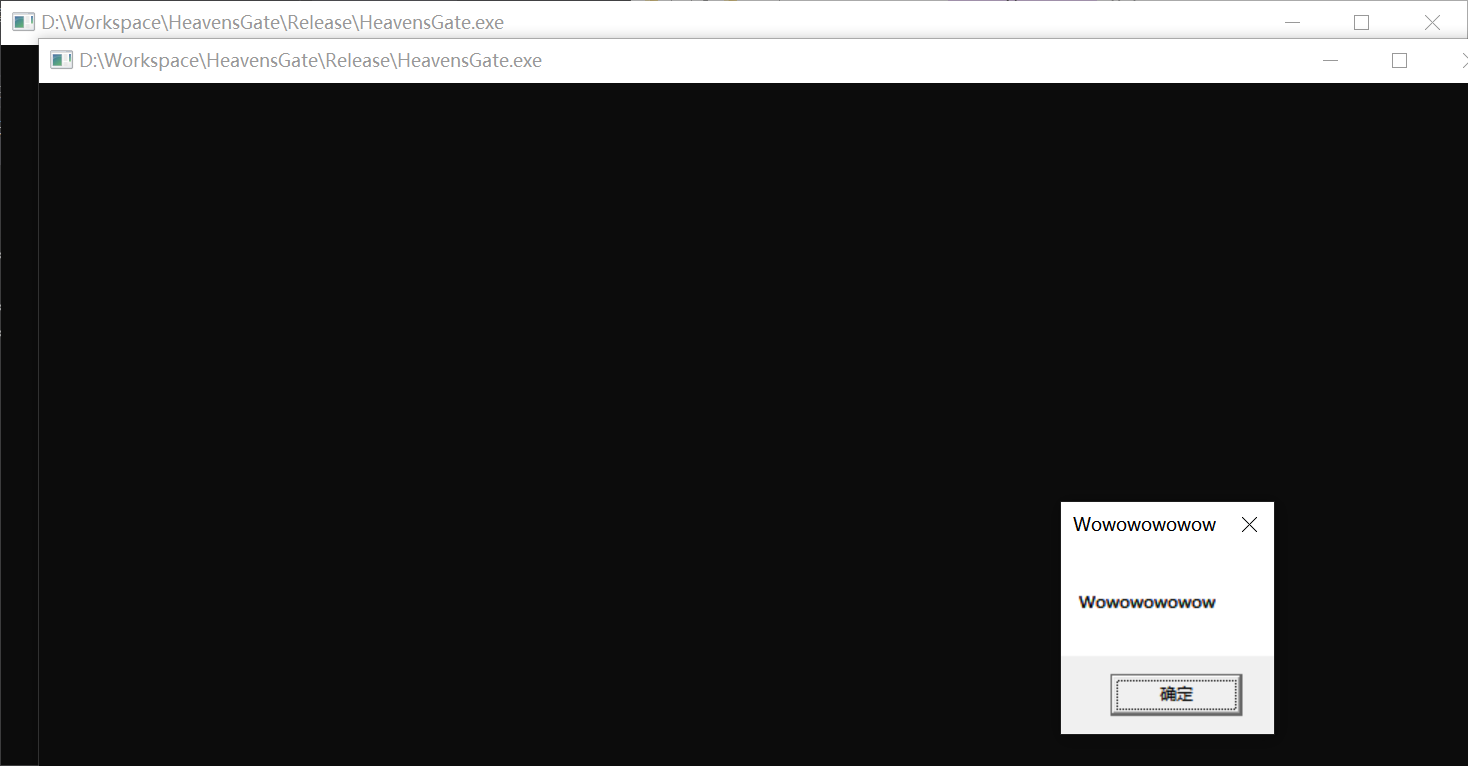
测试一下典中典之MessageBox弹窗:
运行效果:
首先测试一段正常的文件读写代码:
检测到了文件释放:
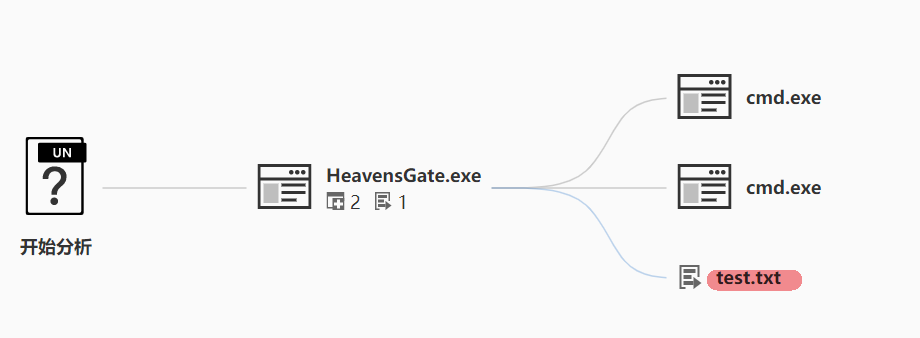
再测试一下用天堂之门实现的同样功能的代码:
没有检测到文件释放:
直接崩了,无语:
最终没能逃出火绒剑的魔爪:
目前还有一些玄学Bug,原因不明:
最后,由于我在Windows和恶意代码这块还是新手,难免有理解不当的地方,如果文章内容有什么问题欢迎各位师傅指正!
Heavens-Gate-2.0 by sdadas190
天堂之门技术 by Tardis
Rebuild The Heaven's Gate: from 32-bit Hell back to 64-bit Wonderland by Sheng-Hao Ma
通过PEB结构遍历进程模块
PE基础2-导出表-导入表
void memcpy64(uint64_t dst, uint64_t src, uint64_t sz);
void memcpy64(uint64_t dst, uint64_t src, uint64_t sz);
[bits 32]
push 0x33
push _next_x64_code
retf
[bits 32]
push 0x33
push _next_x64_code
retf
[bits 64]
push rsi
push rdi
mov rsi, src
mov rdi, dst
mov rcx, sz
rep movsb
pop rsi
pop rdi
[bits 64]
push rsi
push rdi
mov rsi, src
mov rdi, dst
mov rcx, sz
rep movsb
pop rsi
pop rdi
[bits 64]
push 0x23
push _next_x86_code
retfq
[bits 32]
ret
[bits 64]
push 0x23
push _next_x86_code
retfq
[bits 32]
ret
from keystone import *
code =
ks = Ks(KS_ARCH_X86, KS_MODE_32)
asm, cnt = ks.asm(code)
print(code)
for b in asm:
print('0x' + hex(b)[2:].upper(), end=', ')
from keystone import *
code =
ks = Ks(KS_ARCH_X86, KS_MODE_32)
asm, cnt = ks.asm(code)
print(code)
for b in asm:
print('0x' + hex(b)[2:].upper(), end=', ')
push 0x33
push 0x12345678
retf
0x6A, 0x33, 0x68, 0x78, 0x56, 0x34, 0x12, 0xCB,
push 0x33
push 0x12345678
retf
0x6A, 0x33, 0x68, 0x78, 0x56, 0x34, 0x12, 0xCB,
static uint8_t code[] = {
/* [bits 32]
push 0x33
push _next_x64_code
retf
*/
0x6A, 0x33, 0x68, 0x78, 0x56, 0x34, 0x12, 0xCB,
/* [bits 64]
push rsi
push rdi
mov rsi, src
mov rdi, dst
mov rcx, sz
rep movsb
pop rsi
pop rdi
*/
0x56, 0x57,
0x48, 0xBE, 0x88, 0x77, 0x66, 0x55, 0x44, 0x33, 0x22, 0x11,
0x48, 0xBF, 0x88, 0x77, 0x66, 0x55, 0x44, 0x33, 0x22, 0x11,
0x48, 0xB9, 0x88, 0x77, 0x66, 0x55, 0x44, 0x33, 0x22, 0x11,
0xF3, 0xA4,
0x5E, 0x5F,
/* [bits 64]
push 0x23
push _next_x86_code
retfq
*/
0x6A, 0x23, 0x68, 0x78, 0x56, 0x34, 0x12, 0x48, 0xCB,
/* [bits 32]
ret
*/
0xC3
};
static uint32_t ptr = NULL;
if (!ptr) {
ptr = (uint32_t)VirtualAlloc(NULL, sizeof(code), MEM_COMMIT | MEM_RESERVE, PAGE_EXECUTE_READWRITE);
for (int i = 0; i < sizeof(code); i++) ((PBYTE)ptr)[i] = code[i];
}
*(uint32_t*)(ptr + 3) = ptr + 8;
*(uint64_t*)(ptr + 12) = src;
*(uint64_t*)(ptr + 22) = dst;
*(uint64_t*)(ptr + 32) = sz;
*(uint32_t*)(ptr + 47) = ptr + 53;
((void(*)())ptr)();
void memcpy64(uint64_t dst, uint64_t src, uint64_t sz) {
static uint8_t code[] = {
/* [bits 32]
push 0x33
push _next_x64_code
retf
*/
0x6A, 0x33, 0x68, 0x78, 0x56, 0x34, 0x12, 0xCB,
/* [bits 64]
push rsi
push rdi
mov rsi, src
mov rdi, dst
mov rcx, sz
rep movsb
pop rsi
pop rdi
*/
0x56, 0x57,
0x48, 0xBE, 0x88, 0x77, 0x66, 0x55, 0x44, 0x33, 0x22, 0x11,
0x48, 0xBF, 0x88, 0x77, 0x66, 0x55, 0x44, 0x33, 0x22, 0x11,
0x48, 0xB9, 0x88, 0x77, 0x66, 0x55, 0x44, 0x33, 0x22, 0x11,
0xF3, 0xA4,
0x5E, 0x5F,
/* [bits 64]
push 0x23
push _next_x86_code
retfq
*/
0x6A, 0x23, 0x68, 0x78, 0x56, 0x34, 0x12, 0x48, 0xCB,
/* [bits 32]
ret
*/
0xC3
};
static uint32_t ptr = NULL;
if (!ptr) {
ptr = (uint32_t)VirtualAlloc(NULL, sizeof(code), MEM_COMMIT | MEM_RESERVE, PAGE_EXECUTE_READWRITE);
for (int i = 0; i < sizeof(code); i++) ((PBYTE)ptr)[i] = code[i];
}
*(uint32_t*)(ptr + 3) = ptr + 8;
*(uint64_t*)(ptr + 12) = src;
*(uint64_t*)(ptr + 22) = dst;
*(uint64_t*)(ptr + 32) = sz;
*(uint32_t*)(ptr + 47) = ptr + 53;
((void(*)())ptr)();
}
void GetPEB64(void* peb64);
void GetPEB64(void* peb64);
[bits 64]
mov rax, gs:[0x60]
mov [esi], rax
[bits 64]
mov rax, gs:[0x60]
mov [esi], rax
void GetPEB64(void *peb64) {
static uint8_t code[] = {
/* [bits 32]
mov esi, peb64
push 0x33
push _next_x64_code
retf
*/
0xBE, 0x78, 0x56, 0x34, 0x12, 0x6A, 0x33, 0x68, 0x78, 0x56, 0x34, 0x12, 0xCB,
/* [bits 64]
mov rax, gs:[0x60]
mov [esi], rax
*/
0x65, 0x48, 0xA1, 0x60, 0x0, 0x0, 0x0, 0x0, 0x0, 0x0, 0x0, 0x67, 0x48, 0x89, 0x6,
/* [bits 64]
push 0x23
push _next_x86_code
retfq
*/
0x6A, 0x23, 0x68, 0x78, 0x56, 0x34, 0x12, 0x48, 0xCB,
/* [bits 32]
ret
*/
0xC3
};
static uint32_t ptr = NULL;
if (!ptr) {
ptr = (uint32_t)VirtualAlloc(NULL, sizeof(code), MEM_COMMIT | MEM_RESERVE, PAGE_EXECUTE_READWRITE);
for (int i = 0; i < sizeof(code); i++) ((PBYTE)ptr)[i] = code[i];
}
*(uint32_t*)(ptr + 1) = (uint32_t)peb64;
*(uint32_t*)(ptr + 8) = ptr + 13;
*(uint32_t*)(ptr + 31) = ptr + 37;
((void(*)())ptr)();
}
uint64_t GetModuleHandle64(const WCHAR *moduleName);
uint64_t GetModuleHandle64(const WCHAR *moduleName);
0:000> dt _PEB
ntdll!_PEB
+0x000 InheritedAddressSpace : UChar
+0x001 ReadImageFileExecOptions : UChar
+0x002 BeingDebugged : UChar
+0x003 BitField : UChar
+0x003 ImageUsesLargePages : Pos 0, 1 Bit
+0x003 IsProtectedProcess : Pos 1, 1 Bit
+0x003 IsImageDynamicallyRelocated : Pos 2, 1 Bit
+0x003 SkipPatchingUser32Forwarders : Pos 3, 1 Bit
+0x003 IsPackagedProcess : Pos 4, 1 Bit
+0x003 IsAppContainer : Pos 5, 1 Bit
+0x003 IsProtectedProcessLight : Pos 6, 1 Bit
+0x003 IsLongPathAwareProcess : Pos 7, 1 Bit
+0x004 Padding0 : [4] UChar
+0x008 Mutant : Ptr64 Void
+0x010 ImageBaseAddress : Ptr64 Void
+0x018 Ldr : Ptr64 _PEB_LDR_DATA
uint64_t peb64;
uint64_t ldrData;
GetPEB64(&peb64);
memcpy64((uint64_t)&ldrData, peb64 + 0x18, 8);
uint64_t peb64;
uint64_t ldrData;
GetPEB64(&peb64);
memcpy64((uint64_t)&ldrData, peb64 + 0x18, 8);
0:000> dt _PEB_LDR_DATA
ntdll!_PEB_LDR_DATA
+0x000 Length : Uint4B
+0x004 Initialized : UChar
+0x008 SsHandle : Ptr64 Void
+0x010 InLoadOrderModuleList : _LIST_ENTRY
+0x020 InMemoryOrderModuleList : _LIST_ENTRY
+0x030 InInitializationOrderModuleList : _LIST_ENTRY
+0x040 EntryInProgress : Ptr64 Void
+0x048 ShutdownInProgress : UChar
+0x050 ShutdownThreadId : Ptr64 Void
uint64_t head;
uint64_t pNode;
head = ldrData + 0x10;
memcpy64((uint64_t)&pNode, head, 8);
uint64_t head;
uint64_t pNode;
head = ldrData + 0x10;
memcpy64((uint64_t)&pNode, head, 8);
0:000> dt _LDR_DATA_TABLE_ENTRY
ntdll!_LDR_DATA_TABLE_ENTRY
+0x000 InLoadOrderLinks : _LIST_ENTRY
+0x010 InMemoryOrderLinks : _LIST_ENTRY
+0x020 InInitializationOrderLinks : _LIST_ENTRY
+0x030 DllBase : Ptr64 Void
+0x038 EntryPoint : Ptr64 Void
+0x040 SizeOfImage : Uint4B
+0x048 FullDllName : _UNICODE_STRING
+0x058 BaseDllName : _UNICODE_STRING
0:000> dt _UNICODE_STRING
ntdll!_UNICODE_STRING
+0x000 Length : Uint2B
+0x002 MaximumLength : Uint2B
+0x008 Buffer : Ptr64 Wchar
while (pNode != head) {
uint64_t buffer;
memcpy64((uint64_t)(unsigned)(&buffer), pNode + 96, 8); // tmp = pNode->BaseDllName->Buffer
if (buffer) {
WCHAR curModuleName[32] = {0};
memcpy64((uint64_t)curModuleName, buffer, 60);
if (!lstrcmpiW(moduleName, curModuleName)) {
uint64_t base;
memcpy64((uint64_t)&base, pNode + 48, 8);
return base;
}
}
memcpy64((uint64_t)&pNode, pNode, 8); // pNode = pNode->Flink
}
uint64_t GetModuleHandle64(const WCHAR *moduleName) {
uint64_t peb64;
/* nt!_PEB_LDR_DATA
+0x000 Length : Uint4B
+0x004 Initialized : UChar
+0x008 SsHandle : Ptr64 Void
+0x010 InLoadOrderModuleList : _LIST_ENTRY
*/
uint64_t ldrData;
/*
ptr to InLoadOrderModuleList
*/
uint64_t head;
/*
typedef struct _LDR_MODULE {
+0x000 LIST_ENTRY InLoadOrderModuleList;
+0x010 LIST_ENTRY InMemoryOrderModuleList;
+0x020 LIST_ENTRY InInitializationOrderModuleList;
+0x030 PVOID BaseAddress;
+0x038 PVOID EntryPoint;
+0x040 ULONG SizeOfImage;
+0x048 UNICODE_STRING FullDllName;
+0x058 UNICODE_STRING BaseDllName;
...
} LDR_MODULE, *PLDR_MODULE;
*/
uint64_t pNode;
GetPEB64(&peb64);
memcpy64((uint64_t)&ldrData, peb64 + 0x18, 8);
head = ldrData + 0x10;
memcpy64((uint64_t)&pNode, head, 8);
while (pNode != head) {
uint64_t buffer;
memcpy64((uint64_t)(unsigned)(&buffer), pNode + 96, 8); // tmp = pNode->BaseDllName->Buffer
if (buffer) {
WCHAR curModuleName[32] = {0};
memcpy64((uint64_t)curModuleName, buffer, 60);
if (!lstrcmpiW(moduleName, curModuleName)) {
uint64_t base;
memcpy64((uint64_t)&base, pNode + 48, 8);
return base;
}
}
memcpy64((uint64_t)&pNode, pNode, 8); // pNode = pNode->Flink
}
return NULL;
}
uint64_t GetModuleHandle64(const WCHAR *moduleName) {
uint64_t peb64;
/* nt!_PEB_LDR_DATA
+0x000 Length : Uint4B
+0x004 Initialized : UChar
+0x008 SsHandle : Ptr64 Void
+0x010 InLoadOrderModuleList : _LIST_ENTRY
*/
uint64_t ldrData;
/*
ptr to InLoadOrderModuleList
*/
uint64_t head;
/*
typedef struct _LDR_MODULE {
+0x000 LIST_ENTRY InLoadOrderModuleList;
+0x010 LIST_ENTRY InMemoryOrderModuleList;
+0x020 LIST_ENTRY InInitializationOrderModuleList;
+0x030 PVOID BaseAddress;
+0x038 PVOID EntryPoint;
+0x040 ULONG SizeOfImage;
+0x048 UNICODE_STRING FullDllName;
+0x058 UNICODE_STRING BaseDllName;
...
} LDR_MODULE, *PLDR_MODULE;
*/
uint64_t pNode;
GetPEB64(&peb64);
memcpy64((uint64_t)&ldrData, peb64 + 0x18, 8);
head = ldrData + 0x10;
memcpy64((uint64_t)&pNode, head, 8);
[内核课程]《Windows内核攻防实战》!从零到实战,融合AI与Windows内核攻防全技术栈,打造具备自动化能力的内核开发高手。
最后于 2021-11-6 15:41
被34r7hm4n编辑
,原因: