|
|
|
|
|
[原创]多核与cache
1.2 从修改bios开始 上一节末尾,我们决定对apic编程,让cpu的每个AP核执行一段loop代码,使屏幕上的对应区域的字符不停跳跃,变动。 你肯定觉得,应该在mbr里写我们的代码。是的,我开始就是这么做的。像这样( 这不是我最初的“版本”,那个“版本”被逐渐修改掉了): org 0x7c00 [bits 16] ;re-map apic base address to 0x8000 mov ecx, 1bh rdmsr and eax, 0xfff or eax, 0x8000 wrmsr ;copy boot code for ap ;memcpy( ( char *)0x7000, unified_entry, 0xff ) mov ax, 0 mov es, ax mov ds,ax mov di, 0x7000 mov si, unified_entry cld mov cx, 0xff ;enough rep movsb ;send ipi mov bx,0 mov ds,bx mov dword [0x8300], 0xc4500 ;INIT IPI mov dword [0x8300], 0xc4600|7 ;sipi, 7=0x7000<<12 jmp $ unified_entry: ;boot code for ap inc word [ap_count] mov bx,0xb800 mov gs,bx mov bx, [ap_count] shl bx, 1 .spin: inc byte [gs:bx] jmp .spin ap_count: dw 0 jmp $ times 510-($-$$) db 0 dw 0x55aa 这些代码你能看个大概,除了开头一段。那是把APIC寄存器映射到低端内存, 因为它默认是影射在0xFEE00300处,实模式下访问不了¹。 但是,当我们把这个文件汇编,dd到虚拟硬盘,启动bochs²————屏幕上没有动静。 这真是糟糕,这几乎是最坏的结果。我们宁可bochs崩溃,那至少说明我们的指令做了什么。 现在,怎么应对就因人而异了: 我们的第一反应的大概都是Ctrl+C, info一下cpu,开始思索怎么调试,但你很快发现在bochs下调试smp不那么容易,我们只能info出来bsp的cpu,而且像APIC这种内存映射式的寄存器,用xp命令查不了(那就是怎么都查不了了 ); 然后大概是google。网上能搜到的资料只有intel文档.你可以选择更细致的读它(这是比较考验心理素质的); 最后就是去论坛(比较少,我知道的只有osdev)问,像这种问题,只能是贴代码问,似乎有些扫兴。这还不是最坏的,最坏的是你在依赖论坛来解决非解决不可的问题,如果你有自学的经历,你应该知道我在说什么。 所以,作者从修改bios开始,只是作者选择的一种途径。因为我之前知道bios有对apic的操作。我们准备找到它那一部分代码,先涂涂抹抹————我们急切的想看到APIC乃至AP能对我们的编程,作出一点响应。 bochs的bios代码放在bochs-2.6/bios目录下,它与bochs虚拟机是独立的,不会被编译链接进bochs,这个目录下有一个Makefile文件,控制其中的代码最终生成一个BIOS-bochs-latest的二进制文件,它相当于真实机器里bios rom的镜像,bios启动时,会把它加载到0xf0000地址并跳去执行,这与真实的机器没有区别。 bios起始是在16位模式下运行的, 中途会切换到保护模式,最后再切回实模式。我们关心的代码集中在两个文件:rombios32start.S和rombios32.c。下面,我们快速的把它们浏览一遍。 汇编代码准备好保护模式的运行环境后,会跳到c函数rombios32_init。我们在rombios32start.S一开始就看到这个跳转动作: >>>>>>>>>>>>>>>>>>>>>>>>>>> _start: /* clear bss section */ xor %eax, %eax mov $__bss_start, %edi mov $__bss_end, %ecx sub %edi, %ecx rep stosb /* copy data section */ mov $_end, %esi mov $__data_start, %edi mov $__data_end, %ecx sub %edi, %ecx rep movsb jmp rombios32_init <<<<<<<<<<<<<<<<<<<<<<<< C函数robios32_init位于rombios32.c,函数不长,也很易读: >>>>>>>>>>>>>>>>>>>>>>>( 删掉了部分针对qemu, EBDA的条件编译,异常关机和屏幕打印代码 ) void rombios32_init(uint32_t *s3_resume_vector, uint8_t *shutdown_flag) { ... ram_probe(); cpu_probe(); setup_mtrr(); smp_probe(); find_bios_table_area(); if (*shutdown_flag == 0xfe) { ... } pci_bios_init(); mptable_init(); if (bios_table_cur_addr != 0 && i440_pcidev.bus != -1) { uuid_probe(); smbios_init(); } if (acpi_enabled) acpi_bios_init(); ... } <<<<<<<<<<<<<<<<<<<<<<<<<<<<<< 'probe'是“探测”,我们注意到上面调用了smp_probe()这个函数,没错,apic的初始化就是在这儿完成的: >>>>>>>>>>>>>>>>>>>>>>>>>>>>>> /* find the number of CPUs by launching a SIPI to them */ void smp_probe(void) { uint32_t val, sipi_vector; writew(&smp_cpus, 1); if (cpuid_features & CPUID_APIC) { /* enable local APIC */ val = readl(APIC_BASE + APIC_SVR); val |= APIC_ENABLED; writel(APIC_BASE + APIC_SVR, val); /* copy AP boot code */ memcpy((void *)AP_BOOT_ADDR, &smp_ap_boot_code_start, &smp_ap_boot_code_end - &smp_ap_boot_code_start); /* broadcast SIPI */ writel(APIC_BASE + APIC_ICR_LOW, 0x000C4500); sipi_vector = AP_BOOT_ADDR >> 12; writel(APIC_BASE + APIC_ICR_LOW, 0x000C4600 | sipi_vector); ... } <<<<<<<<<<<<<<<<<<<<<<<<<<<<<<<<<<<<< writew和writel分别是写双字节和4字节(^.^), 这段c代码简直就是我们刚才mbr的汇编码的双胞胎,唯一不同的是,它在一开始操作了一个叫APIC_SVR的寄存器,这是我们闻所未闻的,原来APIC默认是disable的! 这是一个好的信号,随着对bios的熟悉,我们不经意发现原先的代码可能错在哪儿,它为什么不工作。 但此时,我才懒得回去折腾那段mbr呢(我对它已经有恐惧症了),就是要在bios里改,熟悉到瓜熟蒂落。那接下来做什么呢?我们把那段字符跳跃的代码,搬到bios的AP init code里。 bios的AP code位于rombios32start.S: >>>>>>>>>>>>>>>>>>>>>>>>>>>>>>>>>>>> .code16 smp_ap_boot_code_start: cli xor %ax, %ax mov %ax, %ds mov $SMP_MSR_ADDR, %ebx 11: mov 0(%ebx), %ecx test %ecx, %ecx jz 12f mov 4(%ebx), %eax mov 8(%ebx), %edx wrmsr add $12, %ebx jmp 11b 12: lock incw smp_cpus 1: hlt jmp 1b <<<<<<<<<<<<<<<<<<<<<<<<<<<<<<<<<<<< 除了几行对MSR的操作会困扰我们, AP只是递增下cpu记数,然后就挂住了。smp_cpus是个汇编label, 相当于C变量。 话不多说,我们现在就动手修改。 >>>>>>>>>>>>>>>>>>>>>>>>>>> smp_ap_boot_code_start: ... lock incw smp_cpus /* smp_cpus++*/ mov smp_cpus, %si /* si = smp_cpus */ shl $1, %si /* si *= 2*/ mov $0xb800, %bx mov %bx, %ds 1: incb 0(%si) /*hlt*/ jmp 1b smp_ap_boot_code_end: <<<<<<<<<<<<<<<<<<<<<<<<<< AT&T风格的汇编虽然不大好,但经常混迹在内核,还是免不了要学的。不过我们不在以后的新代码里用它,也希望这种汇编能在我们这一代结束。 好啦,回到正题。代码本身没什么好说的,每个核根据smp_cpus在屏幕上定位不同的"点",并循环递增其ascii码,只是注意两点: 1,写完之后,先要在bios目录make一下。这一步需要bcc,用apt-get就可以安装。 2,接着,还要到源码根目录下,也就是bochs-2.6/,执行sudo make install。它会把刚生成的ROM-BIOS-latest送到特定的路径。 然后启动bochs就行啦,我们看到——————屏幕上第4个字符在跳~ 这真是喜忧参半,因为我们有3个AP核³,应该是2,3,4号位的字符同时跳才对。我们的汇编码明明是这么安排的。 问题出在哪里呢? 有多核经验的读者,其实一开始就皱眉头了,"你这样写是错的": lock incw smp_cpus mov smp_cpus, %si 对,尽管我们预期AP1,AP2,AP3的执行顺序是: lock incw smp_cpus mov smp_cpus, %si lock incw smp_cpus mov smp_cpus, %si lock incw smp_cpus mov smp_cpus, %si 但实际很可能不是这样,而是,AP1的incw刚刚结束,内存总线就被AP2抢到了,从而又执行一句incw,接着是AP3的incw... 最后,3个CPU读到的smp_cpus都是4,这恰好对应我们刚才观察到的现象。 解决的方法,就是加锁,这里先贴一种解决方案,我们下一小节见~~ 2015,10,11 >>>>>>>>>>>>>>>>>>>>>>>>> ... jmp 11b 12: get_lock: lock bts $0, 0x6000 jc get_lock lock incw smp_cpus mov $smp_cpus, %bx lock btr $0, 0x6000 /*release lock*/ mov 0(%bx), %si ... smp_ap_boot_code_end: <<<<<<<<<<<<<<<<<<<<<<<< 1,可以访问,但反而需要对保护模式有更深的了解。本文假设读者是不知道保护模式的。 2,关于smp下bochs的开发环境的配置,参见我另一篇文章。 3,我在.bochsrc里配的是4核。 下一节 冰山一角————多核下的原子操作 |
|
|
[原创]多核与cache
1.1 初识APIC 从P6家族的CPU开始,intel引入了初始化多核的硬件机制. cpu上电之后,硬件会自动选择一个核作为BSP(boot-strap processor), 剩余的核作为AP(application processor).注意,取这两个名字,并不是因为这些核在硬件结构上有区别,这些核是一模一样的.只是在初始化阶段,扮演的角色不同,AP几乎²是刚上电就halt住¹,而BSP则会像传统的单核cpu里那样,跳去执行bios代码. 那么,怎样把一段代码交给某个ap执行呢? 这是我才接触多核时,第一关心的问题. 因为知道这一点,就知道怎么写一个多核的操作系统了. 先不看intel是怎么做的,现在假设你是硬件工程师,你会怎么设计? AP核都已经"睡着"了,只有BSP核在运行我们的代码,所以需要bsp给AP发消息,告诉它去执行哪一段代码. 发消息就是发中断. cpu³通过中断号跳转到某段代码是我们再熟悉不过的了. intel跟我们设计的大同小异, 为了实现核与核之间的通信,它设计了新的中断控制器,取代旧有的8259A,名字也很形象,就叫andvanced programmable interrupt controller(APIC). 每个核有一个属于自己的apic. 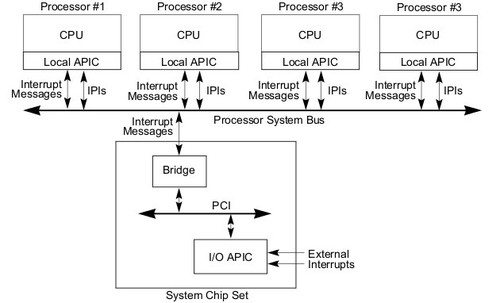 (图中的"IPI"即inter-processor interrupt, 即刚才提到的"核于核之间的中断", 图中的#processor都是一个core) 向所有AP广播IPI是很简单的,只需要操作APIC的64位⁴的ICR寄存器: 往低32位写入一个double word, IPI就发出去了. 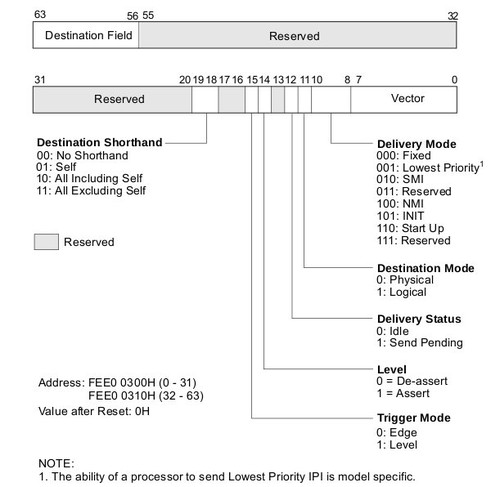 我们关心的位段是: Destination Shothand: 00 No Shorthand 即禁用shorthand模式,因为有时我们往指定 的core发送IPI,就需要往ICR高32位寄存器的 destination field里填写详细的地址(通常是目 标core的apic id) 01 self 10 all Including self 11 all excluding self 这个是我们需要的 Delivery Mode: 发送什么类型的IPI 000: Fixed 即常规中断,中断号在vector位段里 100: NMI 不可屏蔽中断,会导致硬件重启. vector ignored 101: INIT cause target core perform an INIT. vector must be 0 110: Start Up Delivery Status: read only, 指示上次IPI的发送状态 0: Idle 发送完成 1: Send Pending 发送未完成 一些不常用的位,我们设置一下就不管它了. Destination Mode: 0 Level : 1 Trigger Mode: 0 我们再回忆一下我们的构想:我们要给APs广播一个IPI,通过这个IPI携带的中断号,让所有的AP跳去执行某段代码. 就FIX类型的IPI而言, 它的实现跟我们的构想完全一致.但在对AP的初始化上,也就是cpu上电后,APs进入等待状态,怎么让它们由这个状态跳去执行"某段代码"(通常是为他们安排的初始化代码)呢,intel的做了专门的设计,这个设计属于IA32上smp 初始化协议⁵的一部分: 1, 要往AP广播两次IPI,而不是一次. 首先广播一个INIT类型的IPI,然后广播一个start-up类型的IPI. 2, start-up IPI里的vector位段存放的不是中断号,而是(target code address base / 0x1000). intel应该是刻意的避免smp的初始化依赖于实模式的中断机制.⁶ 好了, 现在我们可以畅想一下自己的代码了(虽然对APIC的编程还不是很有信心). 我们计划让APs跳去执行这样一段代码⁷: inc byte [cpu_count] mov bx, 0xb800 mov ds, bx l: inc [cpu_count] jmp l cpu_count: db 0 预想的结果,是屏幕左上角开始的第2个字符,一直到第(2+AP_count-1)个字符,会同时快速的跳跃. 每个字符的跳跃,对应着一个核的运转. 下一小节见. 2015,10,4 --------------------------------------------------------------------- 1. 我用halt,只是形容它的状态,不是说它执行了hlt指令. 2. 会完成一个硬件上的minimal self-configuration. 3. 准确说应该是"核", 以后此类的都需要你靠上下文区分. 4, In xAPIC mode the ICR is addressed as two 32-bit registers, ICR_LOW(ffe0 0300H) and ICR_HIGH(FFE0 0310H). 5, Multiprocessor Specification Version 1.4, 所谓协议,应该是跟bios程序员的协议吧~ 6, 在hlt模式下能不能直接用FIX IPI做跳转, 目前还没测. 7, nasm语法,以后的汇编器也会使用nasm. 下一节 从修改bios开始 |
|
|
[原创]找个好日子,准备升级正式会员
支持~~~ |

操作理由
RANk
{{ user_info.golds == '' ? 0 : user_info.golds }}
雪币
{{ experience }}
课程经验
{{ score }}
学习收益
{{study_duration_fmt}}
学习时长
基本信息
荣誉称号:
{{ honorary_title }}
勋章
兑换勋章

证书
证书查询 >
能力值

