|
|
|
|
|
|
|
|
[原创]破解Hopper Disassembler v3.7.8 for mac的艰难历程
vmaddr 0x0000000100000000 addr 0x0000000100006fa0 addr 的值比vmaddr大,怎么能vmadr减addr? offset = fileoff + vmadr - addr 还有,楼主贴的那些c++代码,是在xcode里开发编译的吗? 如果是的话,能否把整个工程也传上来。 |
|
|
[招聘]深圳华为移动项目招人
暂时微软还是软的,所以暂时不会搞wp |
|
|
[招聘]深圳华为移动项目招人
补充一点,我们部门是后勤部门,所以每天正常上下班,无加班,无压力;且培训多多,牛人多多,机会多多。 |
|
|
[招聘]深圳华为移动项目招人
目前 搞windows c++的暂不需要 |
|
|
[分享]OS X and iOS 驱动开发
arm汇编: arm使用RISC指令集。有16个寄存器:R0 -- R15。 R0-R3:用于函数参数及返回值的传递 R4-R6, R8, R10-R11:没有特殊规定,就是普通的通用寄存器 R7:栈帧指针(Frame Pointer).指向前一个保存的栈帧(stack frame)和链接寄存器(link register, lr)在栈上的地址。 R9:操作系统保留 R12:又叫IP(intra-procedure scratch ) R13:又叫SP(stack pointer),是栈顶指针 R14:又叫LR(link register),存放函数的返回地址。 R15:又叫PC(program counter),指向当前指令地址。 CPSR:当前程序状态寄存器(Current Program State Register),在用户状态下存放像condition标志中断禁用等标志的。 其中有3个是特殊的:R13是SP(栈指针寄存器),R14是LR(链接寄存器),R15是PC(程序计数器)。与x86不同的是,这3个寄存器都是普通的,意味着你可以给PC寄存器设置任意的值,从而改变程序的执行流程。 arm函数调用的方式和x86的一样,先入栈右边的参数;栈中的地址是由高地址向低地址生长的,压栈使得sp的值减小。 arm执行模式:ARM、Thumb、Thumb-2(从ARMv7开始) ARM的指令是32位的。Thumb的指令是16位的。Thumb-2的指令是混合了16位和32位。 通过设置CPSR里的值来改变arm处理器的执行模式。 ios函数调用: 采用arm的标准调用方式。前4个参数存放在R0—R3中,其他的压到堆栈中。返回值保存在R0中。 这个地方感觉很熟悉,查了以前的帖子,发现和x64汇编很相似。(在x64汇编中,前四个参数通过四个寄存器传递:RCX、RDX、R8、R9,如果还有更多的参数,才通过椎栈传递。) BL指令和x86汇编里的CALL指令一样,通过将返回地址存放到LR中,执行函数后还能返回。 |
|
|
[招聘]深圳华为移动项目招人
招人继续,,, |
|
|
[分享]OS X and iOS 驱动开发
系统调用有4类:  1、POSIX/BSD系统调用 bsd调用需要用到sysent table 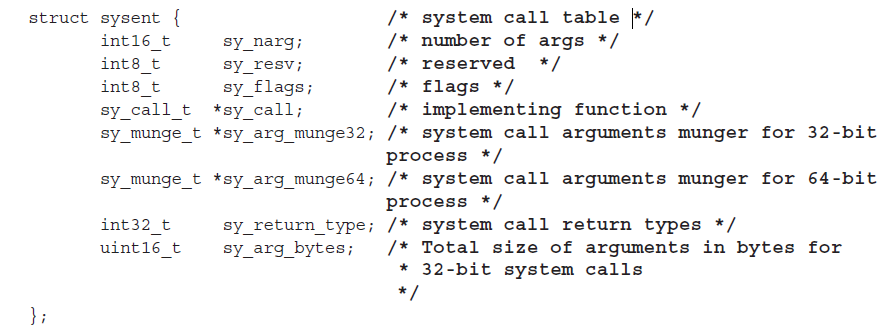 2、Mach陷阱 需要用到mach_trap_table 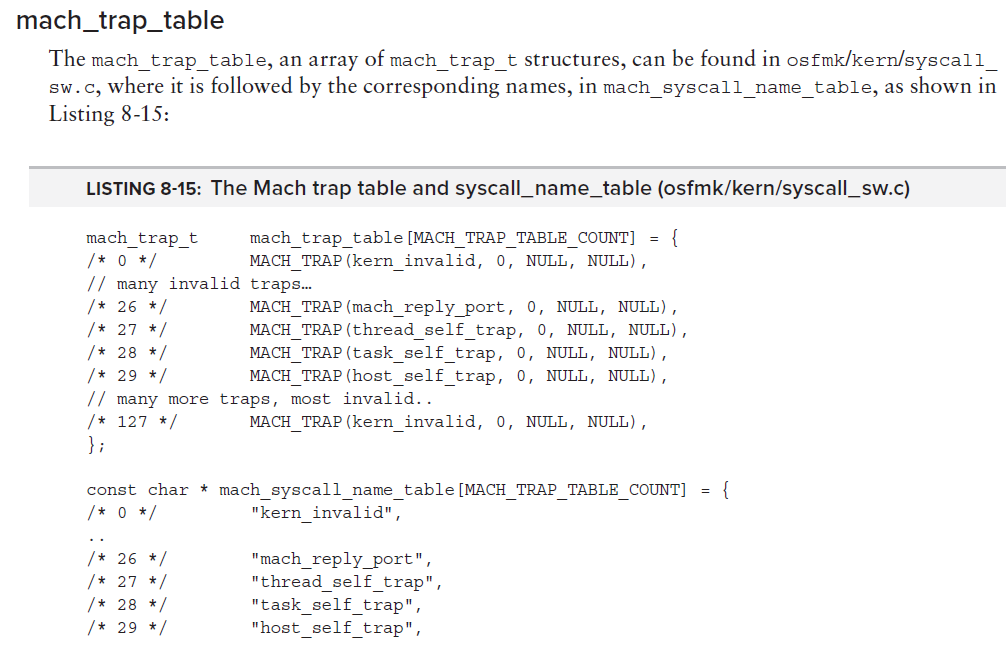 3、机器相关的调用 需要用到machdep_call_table 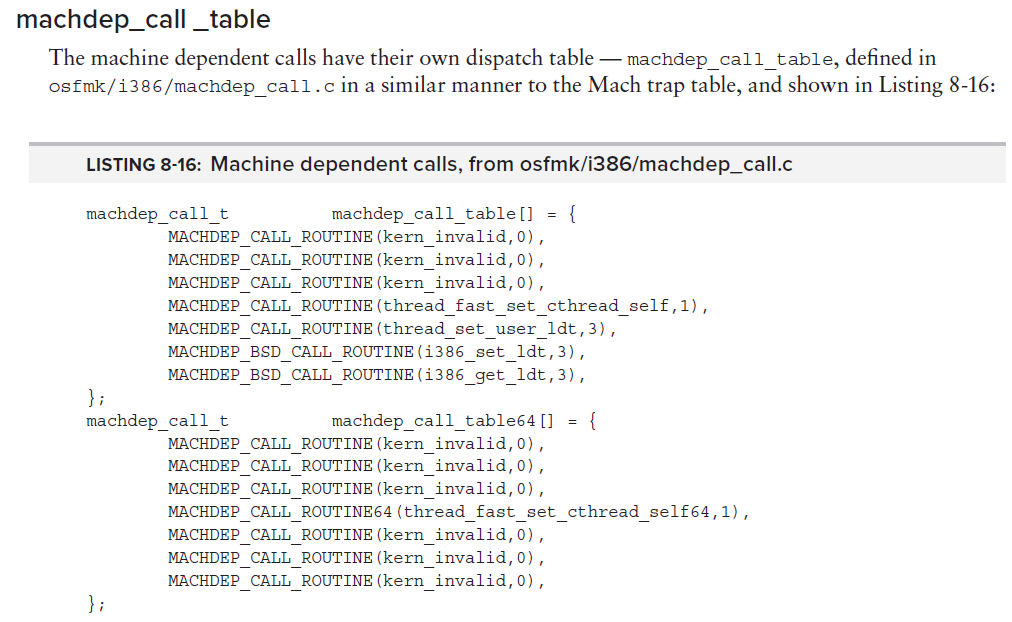 4、诊断调用 当内核全局变量dgWork.dgFlags设置了enaDiagSCS时起效。 enaDiagSCS在osmfk/i386/Diagnostics.h 中定义为值 0x00000008 |
|
|
[分享]OS X and iOS 驱动开发
既然有了用户模式和内核模式之分,那么用户模式怎么进入内核呢? 有2种类型: 1、调用系统调用; 2、中断、异常和处理器自陷发生时。 1是主动的,2是被动的。 其实不管是主动还是被动,都是通过中断机制实现。 2就不必说了,着重来说1。 1不是真正的发生了中断,而是模拟中断。“模拟”这个词说得很形象。 先看看windows的系统调用,来自《Windows内核情景分析》:  0x2e就是软中断。 ios下呢,也是如此。先看下中断设置: 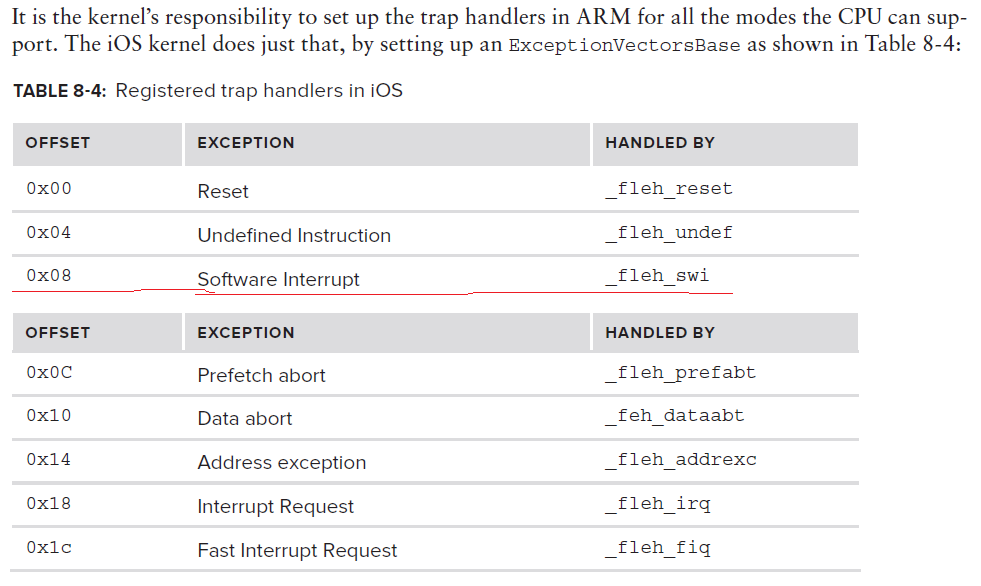 也可以用otool查看下中断:  具体的系统调用过程: 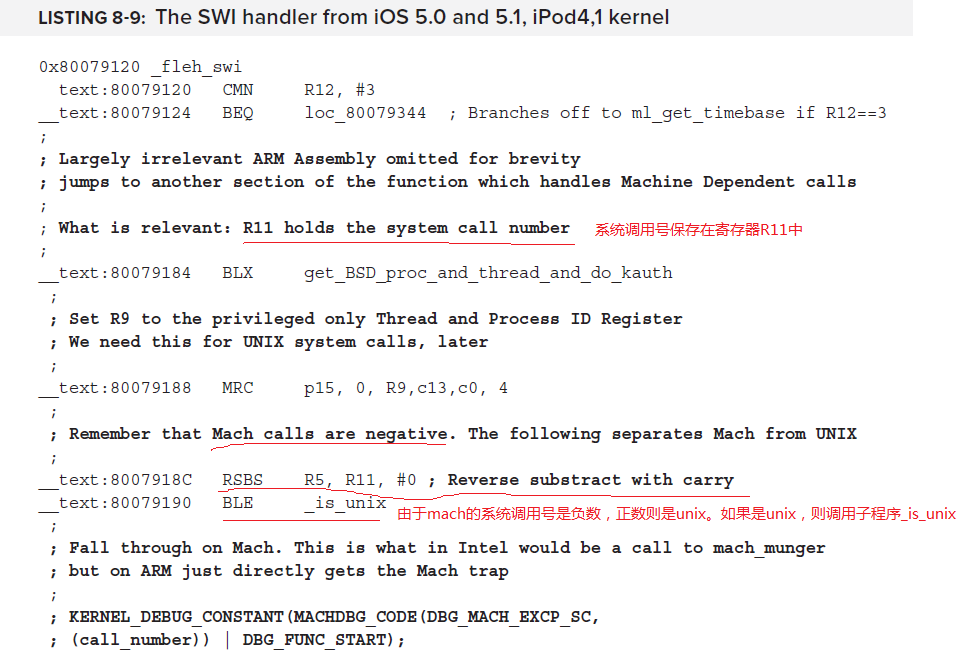 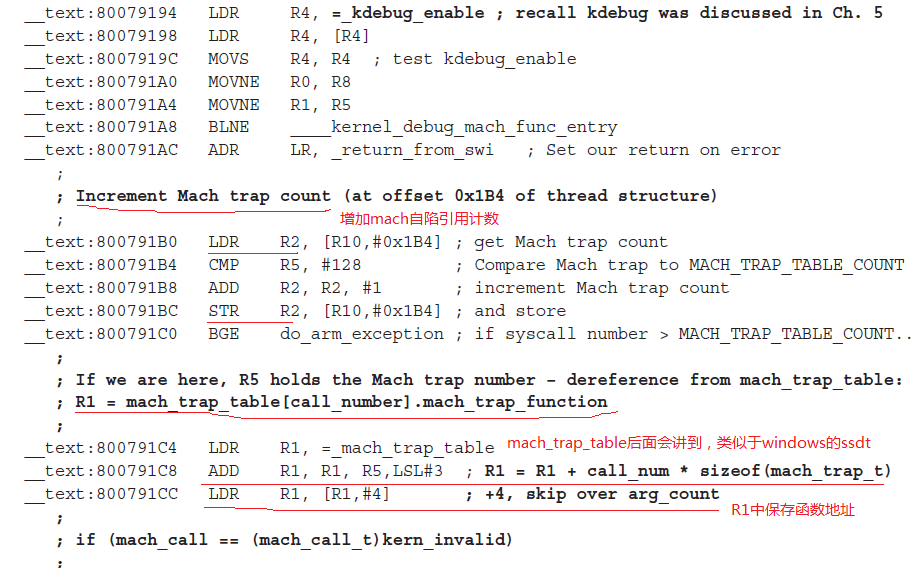 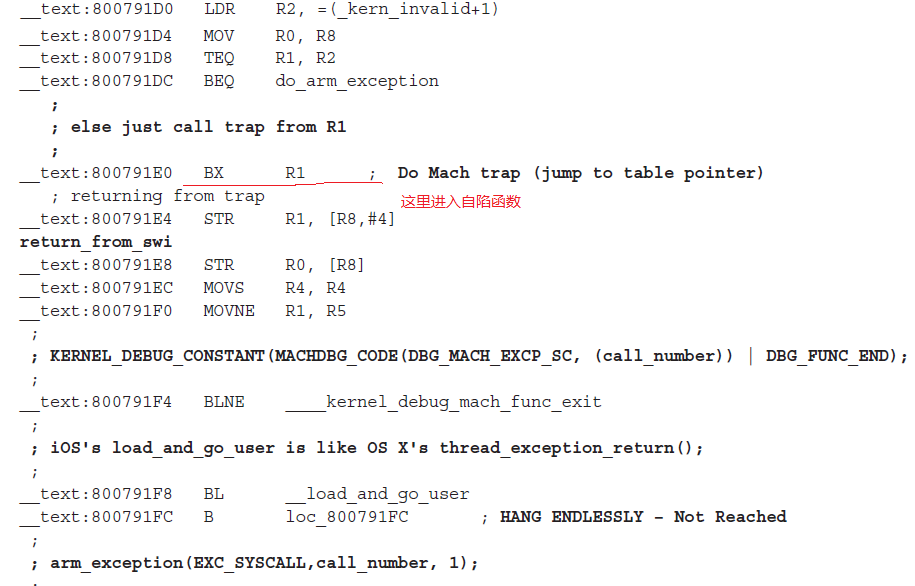 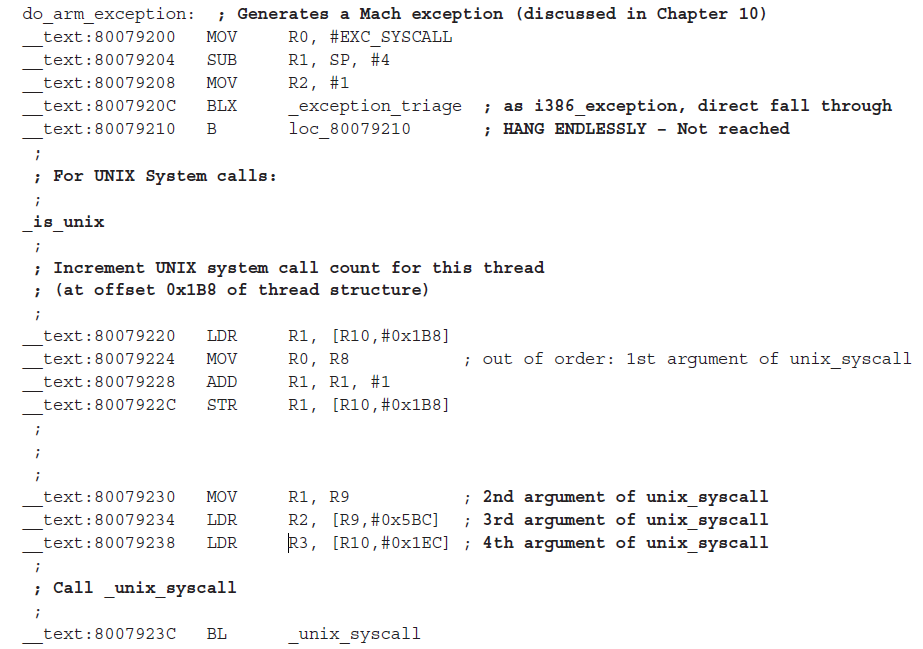 看到这里,再联想到《Windows内核情景分析》里系统调用的那段汇编代码,发现windows和ios在这个地方极其的相似。 |
|
|
|
|
|
[分享]OS X and iOS 驱动开发
用户模式和内核模式 用户模式里的程序通常有很多问题,为了稳定性和安全性,需要将用户模式和内核模式分隔开。 在基于intel的系统中,提供了硬件隔离机制,称之为“保护模式”。通过设置cr0来实现。不清楚的可以查下资料。貌似它现在用得最多的是用来修改ssdt等内存。 __inline VOID WPOFF( IN PULONG pValue ) { ULONG uAttr = 0; if( NULL == pValue ) return; #ifdef _WIN64 *pValue = __readcr0(); __writecr0( *pValue & 0x0fffffffffffeffff ); _disable(); #else _asm { push eax; mov eax, cr0; mov uAttr, eax; and eax, 0FFFEFFFFh; // CR0 16 BIT = 0 mov cr0, eax; pop eax; cli } *pValue = uAttr; //保存原有的 CRO 屬性 #endif } arm架构的系统也是使用一个特殊的寄存器来定义工作模式。CPSR(current program status register),具体值如下: 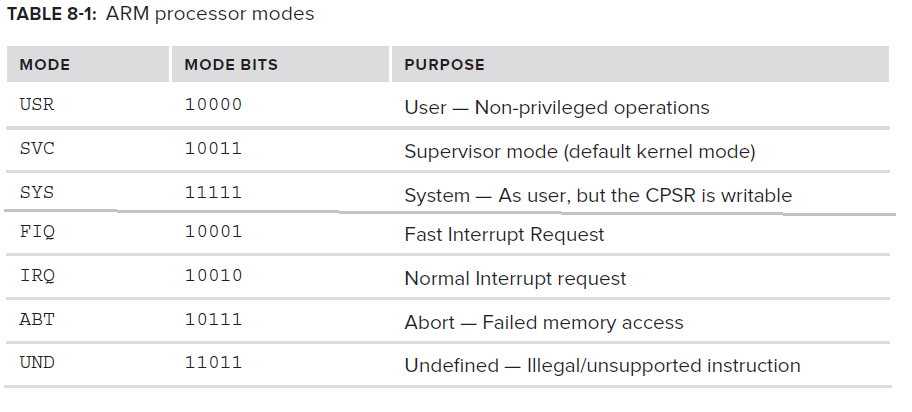
|
|
|
[分享]OS X and iOS 驱动开发
内核架构 1、单内核 Monolithic Kernels 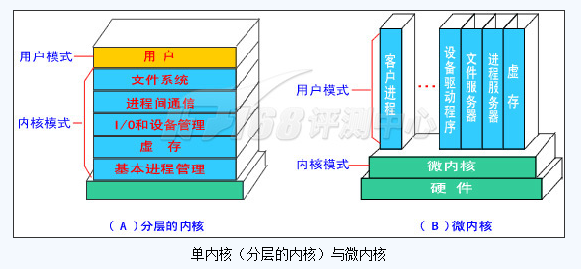 单内核是个很大的进程。它的内部又能够被分为若干模块(或层次,或其他),但是在运行的时候,它是一个单独的大型二进制映象。因为是在同一个进程内,其模块间的通讯是通过直接调用其他模块中的函数实现的,而不是微内核那样在多个进程之间进行消息传递。因此在运行效率上,单内核会具有一定的好处。 2、微内核 Micro kernels 在微内核中,最常用的功能被精心挑选设计在内核模式(或者按照上一页的说法,在x86上是Ring 0权限下)运行的一个进程上,而其它大部分不怎么重要的核心功能都作为单独的进程运行在用户模式下(类似地,Ring 3权限下)运行,它们通过消息传递进行通讯(例如,Windows采用的进程间通信IPC机制,IPC就是Inter Process Communication)。最基本的思想就是要尽量地小。通常微内核只包含了进程调度、内存管理和进程间通信这几个根本的功能。 这种设计具有许多好处,例如增加了灵活性,易于维护,易于移植。微内核的模块化设计让其他核心功能模块都只依赖于微内核模块或其他模块,并不直接依赖硬件。要添加新的特性只需要另行编写用户模式的微内核服务器。而只需把微内核本身进行移植就能够完成将整个内核移植到新的平台上。 由于模块化的设计,不包含在微内核内的驱动程序可以动态地加载,或者卸载。同时,微内核也不依赖于固定的文件系统,用户可以随意选择对文件系统的支持。用户甚至能够在系统运行时将研发出的新系统模块或需要替换现有模块的模块直接而且迅速的加入系统。不需要的模块将不会被加载到内存中,因此微内核就能够更有效的利用内存。微内核还具有的好处是实时性、安全性比较好,并且更适合于构建分布式操作系统和面向对象操作系统。 3、混合内核 Hybrid Kernels 最内层:服务调度、进程间通信和虚拟内存,采用微内核架构。 最内层外面的则采用单内核架构。这样就兼顾了高效率和易于移植的特点。 4、os x 和windows 从技术上说,xnu和windows内核都是混合内核架构。但是它们有区别。 windows包含有微内核架构,但是它的nt模块是单内核架构。因为它有2g的常驻内存(32位系统下)为所有的进程所共享。一旦驱动出现问题,就会出现蓝屏,就跟unix的kernel panic(内核惊慌)一样。 os x的xnu也是混合内核架构,但是微内核架构更多一些。其mach核心就是真正的微内核架构,bsd则为单内核架构。由于bsd的单内核架构,mach内部消息传递的内容是指针。这样避免了数据的冗余拷贝,提高了效率。 |
|
|
[分享]OS X and iOS 驱动开发
关于launchd 主要功能是运行进程和作业(jobs)。 只能被这样(调用函数load_init_program())运行起来,不能被用户手动运行。 第一个launchd守护程序(pid为1),是系统范围的。 每个用户登录后,都会启动一个launchd。 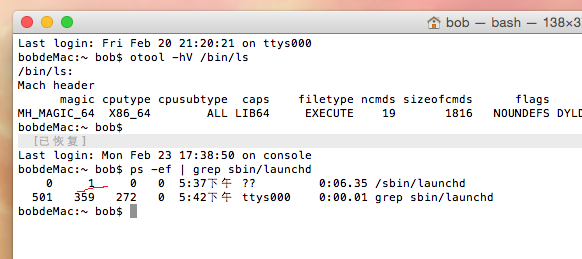 系统关机时,它是最后一个退出的。 它和unix系统中的init程序一样,不能被杀掉或者意外死掉,否则系统会崩溃。 |
|
|
[分享]OS X and iOS 驱动开发
紧接上回,开始进入内核启动了。 主要的引导过程: 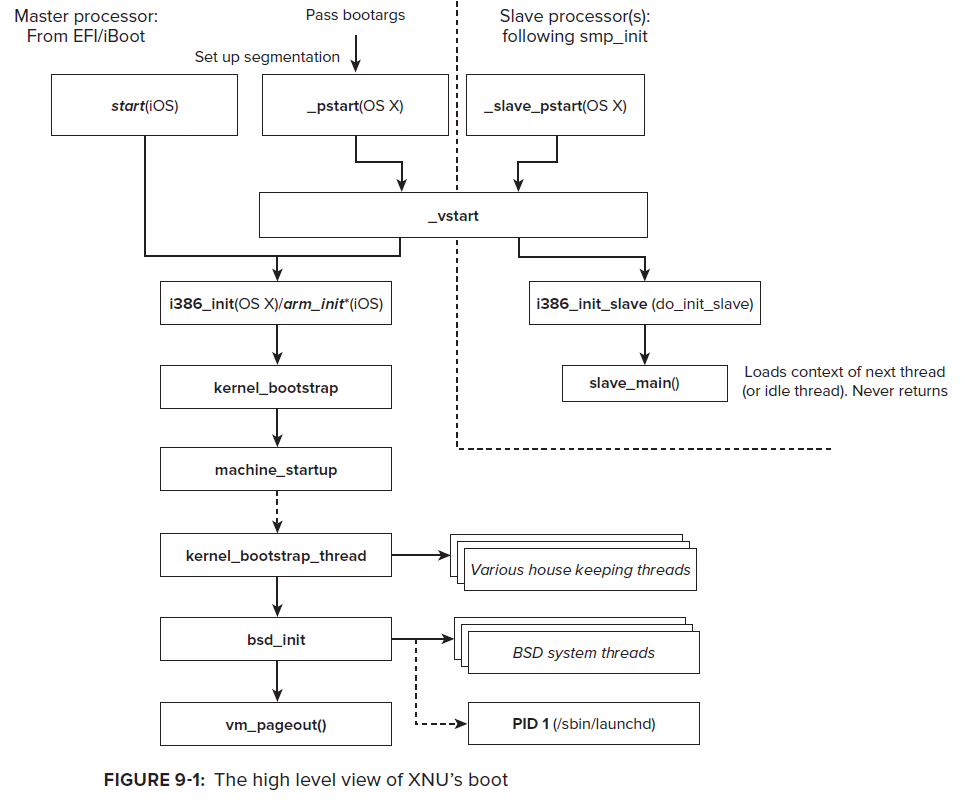 1、start(ios)和_vstart() 将启动过程从汇编代码转到c代码,并做一些初始化操作。比如:初始化MSR、物理页映射、安装中断处理函数。 2、[i386|arm]_init 初始化相应的平台,为内核启动做准备。 3、machine_startup 主要解析命令行参数和调试参数。 4、kernel_bootstrap 安装和初始化mach内核的子系统。包括:进程间通信、时钟、访问策略、进程和线程调度。 5、kernel_bootstrap_thread 创建idle线程,初始化iokit设备驱动框架,初始化应用程序和dyld运行所需的共享模块。如果内核开启了mac(强制访问控制)策略,则会进行mac的初始化,以确保系统的安全。 6、bsd_init 这个函数做了大量的工作,内核部分剩余的事情都由其来做。网络、文件系统、管道、内存cache、线程、进程、同步对象、权限策略等等。 一切完成后,会执行/sbin/launchd来创建一个launchd,它是用户模式里所有进程的父进程。 |
|
|
[分享]OS X and iOS 驱动开发
ios设备的启动过程: 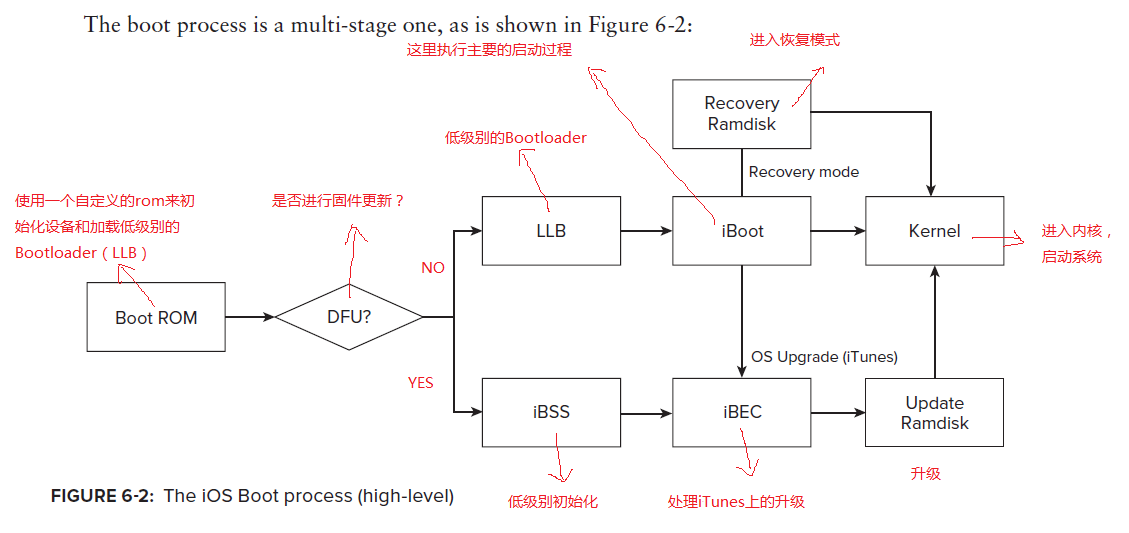 除了Boot ROM,其他步骤都是加密和数字签名的。这些保护方式一直持续到内核里, 所以说原理上是不可能在中间进行干涉和注入代码的。但是,很遗憾,这些机制都失效了。 boot rom和iBoot的漏洞经常被利用来越狱。boot rom的越狱最强大,无法用更新软件来修复,只能更换硬件。而iBoot的越狱则可以通过软件升级来修复。 另:这个过程用的是EFI,不是用的BIOS。 走到Kernel,就开始启动系统了。 明天再看吧。 |
|
|
[分享]OS X and iOS 驱动开发
应用程序崩溃,会产生log日志。 在ios和OS X中,log日志的目录在~/Library/Logs或者/Library/Logs 目录下。 另外,如果你装了Xcode,也能很容易通过Xcode从你的设备上获得崩溃日志。将iOS设备连接到电脑上,然后打开Xcode。从菜单栏上选择 Window 菜单, 然后选择 Organizer (快捷方式是 Shift-CMD-2).在 Organizer 窗口上, 选中 Devices 标签栏. 在左侧的导航面板上,选中 Device Logs, 如下图所示: 
|
|
|
[分享]OS X and iOS 驱动开发
Mach-O文件格式: Mach-O File Format 一个Mach-O文件的内容可以通过下图来表示: 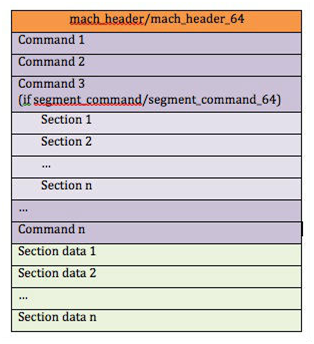 首先是一个mach_header结构体,描述了整个文件的基本信息。(如果是64位执行程序,则是mach_header_64,两者差别不大)。mach_header结构体的定义是: struct mach_header { uint32_t magic; cpu_type_t cputype; cpu_subtype_t cpusubtype; uint32_t filetype; uint32_t ncmds; uint32_t sizeofcmds; uint32_t flags; }; 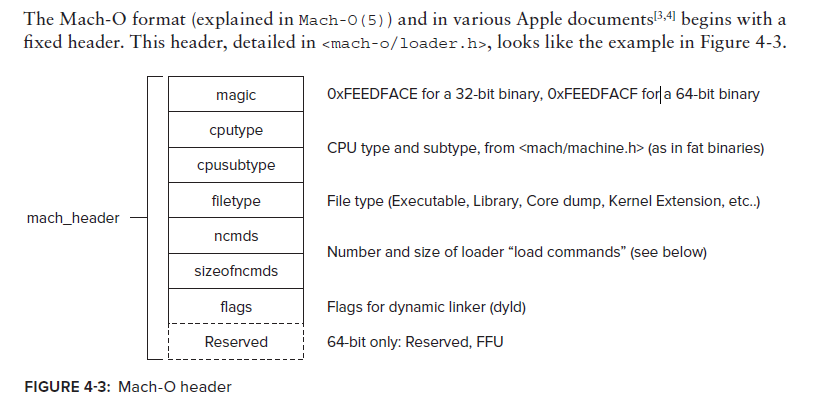 其中magic用来标识执行程序的类型,比如区分是32位或64位。另一个重要参数是ncmds,说明后续有多少个command。 可以用otool来查看文件头:  紧接着mach_header,就是连续的这些load command。这些load command基本描述了具体的一些段信息,以及各种在系统中的加载特性。command种类很多,想详细了解,就看参考手册吧。每一个command都具有不同的结构体格式,在前两个字段都是相同的。为了方便编程,定义了一个结构体: struct load_command { uint32_t cmd; uint32_t cmdsize; }; cmd表示command编号,cmdsize表示这个command的实际长度。注意,这个结构体并不是独立存在的,它只是为了表示方便,真正的command的后面还有一部分内容。比如segment_command,其结构体是: struct segment_command { uint32_t cmd; uint32_t cmdsize; char segname[16]; uint32_t vmaddr; uint32_t vmsize; uint32_t fileoff; uint32_t filesize; vm_prot_t maxprot; vm_prot_t initprot; uint32_t nsects; uint32_t flags; }; 看到了吧?前面两个字段就是一个load_command。 对于segment_command,紧接着就存放了segment_command所包含的section的说明。这也是官方文档的结构图上所没有画清楚的,竟然将这个信息省略了,看起来会云里雾里的。其中的nsects说明了后面跟了几个section。section结构体的定义是: struct section { char sectname[16]; char segname[16]; uint32_t addr; uint32_t size; uint32_t offset; uint32_t align; uint32_t reloff; uint32_t nreloc; uint32_t flags; uint32_t reserved1; uint32_t reserved2; }; 最重要的定义是size和offset。size表示这个section的内容的长度,而offset表示在执行程序中的文件偏移。通过这两个信息,我们对于机器指令的section,就能读出机器指令了。 |
|
|
[分享]OS X and iOS 驱动开发
关于mac os系统驱动调试: 用gdb进行双机调试,用网线或者火线。 被调试的系统需要开启相关设置,用命令 $ sudo nvram boot-args="debug=0x144 -v". 调试主机也需要是mac os系统的,最好配备下面的东西: The Kernel Debug Kit contains the following: • Debug version of the kernel (mach_kernel) • Debug version of I/O Kit families and selected KEXTs • Symbol files • Various scripts • Macros for GDB |

操作理由
RANk
{{ user_info.golds == '' ? 0 : user_info.golds }}
雪币
{{ experience }}
课程经验
{{ score }}
学习收益
{{study_duration_fmt}}
学习时长
基本信息
荣誉称号:
{{ honorary_title }}
勋章
兑换勋章

证书
证书查询 >
能力值

