|
|
[讨论]C++反汇编与逆向分析 是否有光盘
您好,感谢您对《C++反汇编与逆向分析技术揭秘》一书的支持和关注 处于环保和成本的考虑,该书没有配套光盘,但作者整理了公布在论坛里 下载地址:http://bbs.pediy.com/showthread.php?t=141304 如您对本书有任何想法或意见,欢迎随时反馈,非常感谢! 祝您阅读愉快! |
|
|
|
|
|
[推荐]《C++反汇编与逆向分析技术揭秘》第12章 从内存角度看继承和多重继承
本章讲解了对象之间发生继承和派生关系后的内存布局情况,以及相关的处理和操作。读者应该结合C++语法上机进行验证,以熟悉各种内存布局。因为对象之间的关系结构不同,所以它们的内存布局、构造函数、析构函数都有差别,这些是编译器作者为了实现C++的语法而设计的内存结构和执行代码。在其他的编译环境下,其内存结构和相关的处理会有差异,由于不同的C++编译器都需要满足C++的语法标准,故差异也不会太大。要分析由其他编译器创建的程序,可先编写一些简单的语法示例(类似于本章体现各个语法知识点的示例),然后用其他编译器编译,通过反汇编观察其内存布局、构造函数和析构函数的处理流程。 思考题答案: |
|
|
[推荐]《C++反汇编与逆向分析技术揭秘》第12章 从内存角度看继承和多重继承
菱形继承是最复杂的对象结构,菱形结构会将单一继承与多重继承进行组合,如图12-12所示。 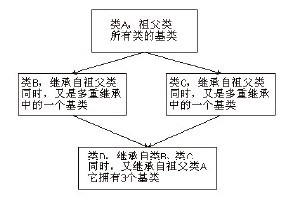 图12-12 菱形继承结构图 在图12-12中,类D属于多重继承中的子类,其父类为类B和类C,类B和类C拥有同一个父类A,如代码清单12-13所示。 代码清单12-13 菱形结构的类继承和派生—C++源码 // 定义家具类,等同于类A
class CFurniture{
public:
CFurniture(){
m_nPrice = 0;
}
virtual ~CFurniture(){ // 家具类的虚析构函数
printf("virtual ~CFurniture()\r\n");
}
virtual int GetPrice(){ // 获取家具价格
return m_nPrice;
};
protected:
int m_nPrice; // 家具类的成员变量
};
// 定义沙发类,继承自类CFurniture,等同于类B
class CSofa : virtual public CFurniture{
public:
CSofa(){
m_nPrice = 1;
m_nColor = 2;
}
virtual ~CSofa(){ // 沙发类虚析构函数
printf("virtual ~CSofa()\r\n");
}
virtual int GetColor(){ // 获取沙发颜色
return m_nColor;
}
virtual int SitDown(){ // 沙发可以坐下休息
return printf("Sit down and rest your legs\r\n");
}
protected:
int m_nColor; // 沙发类成员变量
};
// 定义床类,继承自类CFurniture,等同于类C
class CBed : virtual public CFurniture{
public:
CBed(){
m_nPrice = 3;
m_nLength = 4;
m_nWidth = 5;
}
virtual ~CBed(){ // 床类的虚析构函数
printf("virtual ~CBed()\r\n");
}
virtual int GetArea(){ // 获取床面积
return m_nLength * m_nWidth;
}
virtual int Sleep(){ // 床可以用来睡觉
return printf("go to sleep\r\n");
}
protected:
int m_nLength; // 床类成员变量
int m_nWidth;
};
// 子类沙发床的定义,派生自类CSofa和类CBed,等同于类D
class CSofaBed : public CSofa, public CBed{
public:
CSofaBed(){
m_nHeight = 6;
}
virtual ~CSofaBed(){ // 沙发床类的虚析构函数
printf("virtual ~CSofaBed()\r\n");
}
virtual int SitDown(){ // 沙发可以坐下休息
return printf("Sit down on the sofa bed\r\n");
}
virtual int Sleep(){ // 床可以用来睡觉
return printf("go to sleep on the sofa bed\r\n");
}
virtual int GetHeight(){
return m_nHeight;
}
protected:
int m_nHeight; // 沙发类的成员变量
};
void main(int argc, char* argv[]){
CSofaBed SofaBed;
}
代码清单12-13中一共定义了4个类,分别为CFurniture、CSofa、CBed和CSofaBed。CFurniture为祖父类,从CFurniture类中派生了两个子类:CSofa与CBed,它们在继承时使用了virtual的方式,即虚继承。 使用虚继承可以避免共同派生出的子类产生多义性的错误。那么,为什么要将virtual加在两个父类上而不是它们共同派生的子类呢?这个问题与现实世界中动物的繁衍很相似,例如,熊猫在繁衍时要避免具有血缘关系的雄性与雌性“近亲繁殖”,因为“近亲繁殖”的结果会使繁殖出的后代出现基因重叠的问题,从而造成残缺现象。类CBed与类CSofa就如同是一对兄妹,它们的父亲为CSofaBed,当类CBed与类CSofa“近亲结合”后“生下”存在基因问题的子类CSofaBed时,也会存在基因重叠问题,因此通过虚继承来防止这个问题的发生。 接下来介绍菱形结构中子类CSofaBed的对象在内存中是如何存放的,如图12-13所示。 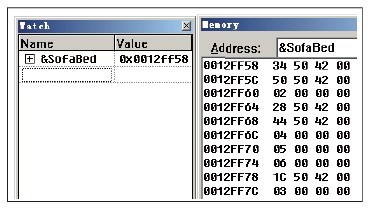 图12-13 CSofaBed的内存结构 图12-13中显示了SofaBed在内存中的信息,初步观察内存中保存的数据可得知,有些数据类似地址值。这些地址值都有哪些含义呢?图12-14对各个地址数据进行了注解。  图12-14 CSofaBed内存结构的注解 通过图12-14虽然可以知道各个数据所具有的含义,但是还存在一些模糊不清的数据无法理解,如CSofaBed_vt(new)和vt_offset,它们又都代表着什么呢?带着这个疑问,我们将代码清单12-13转换成汇编代码,如代码清单12-14所示。 代码清单12-14 菱形结构的虚表指针转换过程 // C++源码对比,加入了父类指针的转换代码
void main(int argc, char* argv[]){
CSofaBed SofaBed;
CFurniture * pFurniture = &SofaBed; // 转换成祖父类指针
CSofa * pSofa = &SofaBed; // 转换成父类指针
CBed * pBed = &SofaBed; // 转换成父类指针
}
// C++源码与对应汇编代码讲解
void main(int argc, char* argv[]){
CSofaBed SofaBed;
0040F718 push 1 ; 是否构造祖父类的标志,TRUE表示构造,FALSE表示不构造
0040F71A lea ecx,[ebp-28h] ; 传入对象的首地址作为this指针
0040F71D call @ILT+10(CSofaBed::CSofaBed) (0040100f) ; 调用构造函数
CFurniture * pFurniture = &SofaBed;
0040F722 lea eax,[ebp-28h] ; 获取对象的首地址
0040F725 test eax,eax ; 检查代码
0040F727 jne main+32h (0040f732) ; 跳转到0x0040f732
0040F729 mov dword ptr [ebp-38h],0
0040F730 jmp main+3Fh (0040f73f)
; 取出对象的第二项数据vt_offset,此地址指向的数据如图12-14所示
0040F732 mov ecx,dword ptr [ebp-24h]
0040F735 mov edx,dword ptr [ecx+4] ; 取出偏移值后存入edx中
0040F738 lea eax,[ebp+edx-24h] ; 得到祖父类数据的所在地址
0040F73C mov dword ptr [ebp-38h],eax ; 利用中间变量保存祖父类的首地址
0040F73F mov ecx,dword ptr [ebp-38h]
0040F742 mov dword ptr [ebp-2Ch],ecx ; 赋值pFurniture
CSofa * pSofa = &SofaBed;
0040F745 lea edx,[ebp-28h] ; 直接转换SofaBed对象的首地址为父类CSofa的指针
0040F748 mov dword ptr [ebp-30h],edx
CBed * pBed = &SofaBed;
0040F74B lea eax,[ebp-28h] ; 获取对象SofaBed的首地址
0040F74E test eax,eax ; 地址检查
0040F750 je main+5Ah (0040f75a)
0040F752 lea ecx,[ebp-1Ch] ; 获取第二个CSofaBed_vt(new)指针
0040F755 mov dword ptr [ebp-3Ch],ecx
0040F758 jmp main+61h (0040f761)
0040F75A mov dword ptr [ebp-3Ch],0
0040F761 mov edx,dword ptr [ebp-3Ch]
0040F764 mov dword ptr [ebp-34h],edx ; 保存转换后的SofaBed地址到pSofa中
}
从代码清单12-14中的指针转换过程可以看出,vt_offset指向的内存地址中保存的数据为偏移数据,如图12-15所示,图中每个vt_offset对应的数据有两项:第一项为-4,即vt_offset所属类对应的虚表指针相对于vt_offset的偏移值;第二项保存的是父类虚表指针相对于vt_offset的偏移值。  图12-15 vt_offset指向的数据 根据对代码清单12-13的分析可知,3个虚表指针分别为0x00425034、0x00425028、0x0042501C,它们所指向的数据如图12-16所示。 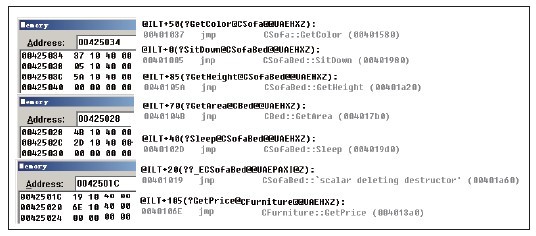 图12-16 各个虚表信息 如图12-16所示,这三个虚表指针所指向的虚表包含了子类CSofaBed含有的虚函数。有了这些记录就可以随心所欲地将虚表指针转换成任意的父类指针。在利用父类指针访问虚函数时,只能调用子类与父类共有的虚函数,子类继承自其他父类的虚函数是无法调用的,虚表中也没有相关的记录。当子类的父类也存在多个父类时,会在图12-15所显示的表格中依次记录它们的偏移。 学习了菱形结构中子类的内存布局后,接下来分析其子类的构造函数,看看这些数据是如何产生的,如代码清单12-15所示。 代码清单12-15 菱形结构的子类构造 CSofaBed SofaBed;
0040F730 push 1 ; 压入参数1
0040F732 lea ecx,[ebp-34h] ; 传递this指针
0040F735 call @ILT+10(CSofaBed::CSofaBed) (0040100f); 调用构造函数
; 构造函数实现
CSofaBed(){
; 部分代码分析略
004011FE pop ecx ; 还原this指针
004011FF mov dword ptr [ebp-10h],ecx
00401202 mov dword ptr [ebp-14h],0 ; 传入构造标记
; 比较参数是否为0,为0则执行JE跳转,防止重复构造
00401209 cmp dword ptr [ebp+8],0
0040120D je CSofaBed::CSofaBed+6Eh (0040123e)
0040120F mov eax,dword ptr [ebp-10h]
; 设置父类CSofa中的vt_offset域
00401212 mov dword ptr [eax+4],offset CSofaBed::'vbtable' (00425050)
00401219 mov ecx,dword ptr [ebp-10h]
; 设置父类CBed中的vt_offset域
0040121C mov dword ptr [ecx+10h],offset CSofaBed::'vbtable' (00425044)
00401223 mov ecx,dword ptr [ebp-10h]
00401226 add ecx,20h ; 调整this指针
; 调用祖父类构造函数,祖父类为最上级,它的构造函数和无继承关系的构造函数相同,这里不予分析
00401229 call @ILT+45(CFurniture::CFurniture) (00401032)
0040122E mov edx,dword ptr [ebp-14h] ; 获取构造标记
00401231 or edx,1 ; 将构造标记置为1
00401234 mov dword ptr [ebp-14h],edx ; 修改构造标记
00401237 mov dword ptr [ebp-4],0
0040123E push 0 ; 压入0作为构造标记
00401240 mov ecx,dword ptr [ebp-10h] ; 获取对象首地址作为this指针
00401243 call @ILT+110(CSofa::CSofa) (00401073); 调用父类构造函数
00401248 mov dword ptr [ebp-4],1
0040124F push 0 ; 压入0作为构造标记
00401251 mov ecx,dword ptr [ebp-10h]
00401254 add ecx,0Ch ; 调整this指针
00401257 call @ILT+130(CBed::CBed) (00401087) ; 调用父类构造函数
0040125C mov eax,dword ptr [ebp-10h]
; CSofaBed对应CSofa的虚表指针
0040125F mov dword ptr [eax],offset CSofaBed::'vftable' (00425034)
00401265 mov ecx,dword ptr [ebp-10h]
; CSofaBed对应CBed的虚表指针
00401268 mov dword ptr [ecx+0Ch],offset CSofaBed::'vftable' (00425028)
0040126F mov edx,dword ptr [ebp-10h] ;通过this指针和vt_offset定位到祖;父类的虚表指针
00401272 mov eax,dword ptr [edx+4] ; vt_offset存入eax中
00401275 mov ecx,dword ptr [eax+4] ; 父类虚表指针相对于vt_offset的偏移存入eax中
00401278 mov edx,dword ptr [ebp-10h]
; CSofaBed对应CFurniture的虚表指针
0040127B mov dword ptr [edx+ecx+4],offset CSofaBed::'vftable' (0042501c)
m_nHeight = 6;
00401283 mov eax,dword ptr [ebp-10h]
00401286 mov dword ptr [eax+1Ch],6
}
004012B1 ret 4
代码清单12-15展示了子类CSofaBed的构造过程,它的特别之处是在调用时要传入一个参数。这个参数是一个标志信息。构造过程中要先构造父类,然后构造自己。CSofaBed的两个父类有一个共同的父类,如果没有构造标记,它们共同的父类将会被构造两次,因此需要使用构造标记来防止重复构造的问题,构造顺序如下:
CSofa(根据标记跳过CFurniture构造) CBed(根据标记跳过CFurniture构造) CSofaBed自身 CSofaBed也使用了构造标记,当CSofaBed也是父类时,这个标记将产生作用,跳过所有父类的构造,只构造自身。当标记为1时,则构造父类;当标记为0时,则跳过构造函数。构造时可以使用标记来防止重复构造,同样也不能出现重复析构的错误,那么这又如何实现呢?我们来看一下代码清单12-16。 代码清单12-16 菱形结构的子类析构 // CSofaBed 调用析构代理函数,因为是编译器自动添加的,所以无源码对照
CSofaBed::'vbase destructor':
; 部分代码分析略
00401AE9 pop ecx
00401AEA mov dword ptr [ebp-4],ecx
00401AED mov ecx,dword ptr [ebp-4]
00401AF0 add ecx,20h
; 调用CSofaBed的析构函数
00401AF3 call @ILT+90(CSofaBed::~CSofaBed) (0040105f)
00401AF8 mov ecx,dword ptr [ebp-4]
00401AFB add ecx,20h
; 调用祖父类的析构函数
00401AFE call @ILT+60(CFurniture::~CFurniture) (00401041)
; CSofaBed::~CSofaBed实现
virtual ~CSofaBed(){
; 部分代码分析略
00401B5E pop ecx ; 还原this指针
00401B5F mov dword ptr [ebp-10h],ecx ; 调整this指针
00401B62 mov eax,dword ptr [ebp-10h]
; 设置自身虚表
00401B65 mov dword ptr [eax-20h],offset CSofaBed::'vftable' (00425034)
00401B6C mov ecx,dword ptr [ebp-10h]
; 设置自身虚表
00401B6F mov dword ptr [ecx-14h],offset CSofaBed::'vftable' (00425028)
00401B76 mov edx,dword ptr [ebp-10h]
00401B79 mov eax,dword ptr [edx-1Ch]
00401B7C mov ecx,dword ptr [eax+4]
00401B7F mov edx,dword ptr [ebp-10h]
; 设置自身虚表。到此为止,3个虚表指针设置完毕,执行析构函数内的代码
00401B82 mov dword ptr [edx+ecx-1Ch],offset CSofaBed::'vftable' (0042501c)
00401B8A mov dword ptr [ebp-4],0
printf("virtual ~CSofaBed()\r\n");
}
00401B9E mov eax,dword ptr [ebp-10h]
00401BA1 sub eax,20h ; 获取this指针
00401BA4 test eax,eax ; 检查this指针
00401BA6 je CSofaBed::~CSofaBed+83h (00401bb3)
00401BA8 mov ecx,dword ptr [ebp-10h]
00401BAB sub ecx,14h
00401BAE mov dword ptr [ebp-14h],ecx
00401BB1 jmp CSofaBed::~CSofaBed+8Ah (00401bba)
00401BB3 mov dword ptr [ebp-14h],0
00401BBA mov ecx,dword ptr [ebp-14h]
00401BBD add ecx,10h ; 调整this指针
00401BC0 call @ILT+75(CBed::~CBed) (00401050) ; 调用父类析构函数
00401BC5 mov dword ptr [ebp-4],0FFFFFFFFh
00401BCC mov ecx,dword ptr [ebp-10h]
00401BCF sub ecx,14h ; 调整this指针
00401BD2 call @ILT+125(CSofa::~CSofa) (00401082) ; 调用父类析构函数
; 部分代码分析略
00401BF1 ret
根据对代码清单12-16的分析可知,菱形结构中子类的析构函数执行流程并没有像构造函数那样使用标记来防止重复析构,而是将祖父类放在最后调用。先依次执行两个父类CBed和CSofa的析构函数,然后执行祖父类的析构函数。Release版下的原理也是如此,这里就不再重复分析了。 |
|
|
[推荐]《C++反汇编与逆向分析技术揭秘》第12章 从内存角度看继承和多重继承
虚基类也被称为抽象类,既然是抽象事物,就不存在实体。如平常所说的东西,它就不能被实例化。将某一物品描述为东西,等同于没有描述。 在生活中,我们会经常遇到此类情况。例如,在你的书桌上有钢笔一支、水杯一个、书一本,这时你的同桌突然对你说:“把你桌子上的那个东西借我一下”,由于没有具体的描述,你无法知道他所指的“那个东西”到底是哪一件物品。 在编码过程中,虚基类的定义需要配合虚函数使用。在虚函数的声明结尾处添加“=0”,这种虚函数被称为纯虚函数。纯虚函数是一个没有实现只有声明的函数,它的存在就是为了让类具有虚基类的功能,让继承自虚基类的子类都具有虚表以及虚表指针。在使用过程中,利用虚基类指针可以更好地完成多态的工作。多态的实现分析已经在前面介绍过,而这个纯虚函数是如何实现的呢?对于一个没有实现的函数,编译器又是如何处理的呢?关于纯虚函数的分析如代码清单12-12所示。 代码清单12-12 纯虚函数的分析—Debug版 // C++源码说明:定义虚基类和派生类
class CVirtualBase{
public:
virtual void Show() = 0; // 定义纯虚函数
};
class CVirtualChild : public CVirtualBase{ // 定义继承虚基类的子类
public:
virtual void Show(){ // 实现纯虚函数
printf("虚基类分析\r\n");
}
};
void main(int argc, char* argv[]){
CVirtualChild VirtualChild;
VirtualChild.Show();
}
// 反汇编代码分析,跟踪到虚基类构造函数中,查看其虚表信息
CVirtualBase::CVirtualBase: // 虚基类构造函数
00401829 pop ecx
0040182A mov dword ptr [ebp-4],ecx
0040182D mov eax,dword ptr [ebp-4]
; 设置虚基类虚表指针,虚表地址在0x00425068处,虚表信息如图12-10所示
00401830 mov dword ptr [eax],offset CVirtualBase::'vftable' (00425068)
00401836 mov eax,dword ptr [ebp-4]
0040183F ret
; 虚基类CVirtualBase中虚表信息的第一项所指向的函数首地址
void __cdecl _purecall(void){
00401E90 push ebp
00401E91 mov ebp,esp
_amsg_exit(_RT_PUREVIRT);
00401E93 push 19h ; 压入错误编码
00401E95 call _amsg_exit (00401fd0) ; 结束程序
00401E9A add esp,4
}
00401E9D pop ebp
00401E9E ret
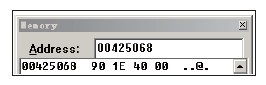 图12-10 虚基类CVirtualBase的虚表信息 如代码清单12-12所示,在虚基类CVirtualBase的虚表信息中,由于纯虚函数没有实现代码,因此没有首地址。编译器为了防止误调用纯虚函数,将虚表中保存的纯虚函数的首地址项替换成函数_purecall,用于结束程序,并发出错误编码信息0x19。 根据这一特性,在分析过程中,一旦在虚表中发现函数地址为_purecall函数的地址时,我们就可以高度怀疑此虚表对应的类是一个虚基类。当虚基类中定义了多个纯虚函数时,虚表中将保存相同的函数指针。在代码清单12-12中,插入新的纯虚函数,并在子类中予以实现。经过编译后,再次查看虚表信息,如图12-11所示。 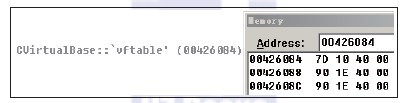 图12-11 存在多个纯虚函数的类虚表信息 在Release版下,编译器会进行优化,纯虚函数将会被优化掉。 |
|
|
[推荐]《C++反汇编与逆向分析技术揭秘》第12章 从内存角度看继承和多重继承
12.1节讲解了类与类之间的关系,但所接触的派生类都只有一个父类。当子类拥有多个父类(如类C继承自类A同时也继承自类B)时,便构成了多重继承关系。在多重继承的情况下,子类所继承的父类变为多个,但其结构与单一继承相似。 分析多重继承的第一步是了解派生类中各数据成员在内存中的布局情况。在12.1节中,子类继承自一个父类,其内存中首先存放的是父类的数据成员。当子类产生多重继承时,其父类数据成员在内存中又该如何存放呢?我们通过代码清单12-8来看看多重继承类的定义。 代码清单12-8 多重继承类的定义—C++源码 // 定义沙发类
class CSofa{
public:
CSofa(){
m_nColor = 2;
}
virtual ~CSofa(){ // 沙发类虚析构函数
printf("virtual ~CSofa()\r\n");
}
virtual int GetColor(){ // 获取沙发颜色
return m_nColor;
}
virtual int SitDown(){ // 沙发可以坐下休息
return printf("Sit down and rest your legs\r\n");
}
protected:
int m_nColor; // 沙发类成员变量
};
// 定义床类
class CBed {
public:
CBed(){
m_nLength = 4;
m_nWidth = 5;
}
virtual ~CBed(){ // 床类虚析构函数
printf("virtual ~CBed()\r\n");
}
virtual int GetArea(){ // 获取床面积
return m_nLength * m_nWidth;
}
virtual int Sleep(){ // 床可以用来睡觉
return printf("go to sleep\r\n");
}
protected:
int m_nLength; // 床类成员变量
int m_nWidth;
};
// 子类沙发床定义,派生自CSofa类和CBed类
class CSofaBed : public CSofa, public CBed{
public:
CSofaBed(){
m_nHeight = 6;
}
virtual ~CSofaBed(){ // 沙发床类的虚析构函数
printf("virtual ~CSofaBed()\r\n");
}
virtual int SitDown(){ // 沙发可以坐下休息
return printf("Sit down on the sofa bed\r\n");
}
virtual int Sleep(){ // 床可以用来睡觉
return printf("go to sleep on the sofa bed\r\n");
}
virtual int GetHeight(){
return m_nHeight;
}
protected:
int m_nHeight; // 沙发类的成员变量
};
代码清单12-8中定义了两个父类:沙发类和床类,通过多重继承,以它们为父类派生出沙发类,它们都拥有各自的属性以及方法。main函数中定义了子类SofaBed的对象,其中包含两个父类的数据成员,此时SofaBed在内存中占多少字节呢?如图12-7所示为对象SofaBed占用内存空间的大小。 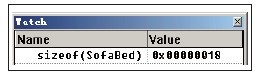 图12-7 对象SofaBed占用内存空间的大小 根据图12-7所示,对象SofaBed占用的内存空间大小为0x18字节。这些数据的内容是什么?它们又是如何存放在内存中的?具体如图12-8所示。 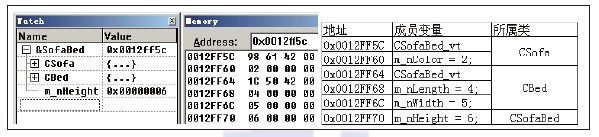 图12-8 对象SofaBed的内存信息 如图12-8所示,对象SofaBed的首地址在0x0012FF5C处,在图中可看到子类的数据成员和两个父类中的数据成员。数据成员的排列顺序由继承父类的先后顺序所决定,从左向右依次排列。除此之外,还剩余两个地址值,分别为0x00426198与0x0042501C,这两个地址处的数据如图12-9所示。 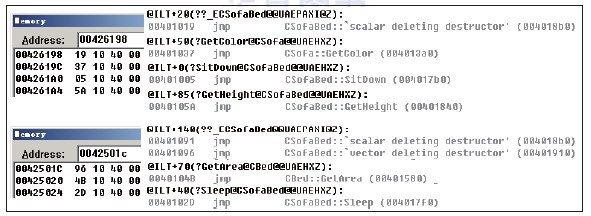 图12-9 子类对象的虚表指针对应的虚表信息 图12-9中显示了Debug下两个虚表指针所指向的虚表信息。查看图12-9中的两个虚表信息后会发现,这两个虚表中保存了子类的虚函数与父类的虚函数,父类的这些虚函数都是在子类中没有实现的。由此可见,编译器将子类CSofaBed的虚函数制作了两份。为什么会产生两份虚函数呢?我们先从对象SofaBed的构造入手,循序渐进地进行分析,过程如代码清单12-9所示。 代码清单12-9 对象SofaBed的构造过程—Debug版 // 源码参考见代码清单12-7
CSofaBed SofaBed; // 定义对象
0040F72D lea ecx,[ebp-24h] ; 传递this指针
0040F730 call @ILT+10(CSofaBed::CSofaBed) (0040100f) ; 调用构造函数
// 分析构造函数CSofaBed
CSofaBed(){
; 部分代码分析略
004011FE pop ecx ; 还原this指针
004011FF mov dword ptr [ebp-10h],ecx
00401202 mov ecx,dword ptr [ebp-10h] ; 以对象首地址作为this指针
00401205 call @ILT+110(CSofa::CSofa) (00401073) ; 调用沙发父类的构造函数
0040120A mov dword ptr [ebp-4],0
00401211 mov ecx,dword ptr [ebp-10h]
00401214 add ecx,8 ; 将this指针调整到第二个虚表指针地址处
00401217 call @ILT+130(CBed::CBed) (00401087) ; 调用床父类的构造函数
0040121C mov eax,dword ptr [ebp-10h] ; 获取第二个虚表指针地址
; 设置虚表指针
0040121F mov dword ptr [eax],offset CSofaBed::'vftable' (00426198)
00401225 mov ecx,dword ptr [ebp-10h] ; 获取对象的首地址
; 设置虚表指针
00401228 mov dword ptr [ecx+8],offset CSofaBed::'vftable' (0042501c)
; 部分代码分析略
0040125D ret
在代码清单12-9的子类构造中,根据继承关系的顺序,首先调用了父类CSofa的构造函数。在调用另一个父类CBed时,并不是直接将对象的首地址作为this指针传递,而是向后调整了父类CSofa的大小,以调整后的地址值作为this指针,最后再调用父类CBed的构造函数。 由于有了两个父类,因此子类在继承时也将它们的虚表指针一起继承了过来,也就有了两个虚表指针。可见,在多重继承中,子类虚表指针的个数取决于所继承的父类的个数,有几个父类便会出现对应个数的虚表指针(虚基类除外,详见12.3节的讲解)。 这些虚表指针在将子类对象转换成父类指针时使用,每个虚表指针对应着一个父类,如代码清单12-10所示。 代码清单12-10 多重继承子类对象转换为父类指针 CSofaBed SofaBed; CSofa *pSofa = &SofaBed; 0040F73C lea eax,[ebp-24h] ; 直接将首地址转换为父类指针 0040F73F mov dword ptr [ebp-28h],eax CBed *pBed = &SofaBed; 0040F742 lea ecx,[ebp-24h] 0040F745 test ecx,ecx ; 检查对象首地址 0040F747 je main+51h (0040f751) 0040F749 lea edx,[ebp-1Ch] ; 即lea edx, [ebp-24h+8h],调整为CBed的指针 0040F74C mov dword ptr [ebp-30h],edx 0040F74F jmp main+58h (0040f758) 0040F751 mov dword ptr [ebp-30h],0 0040F758 mov eax,dword ptr [ebp-30h] 0040F75B mov dword ptr [ebp-2Ch],eax ; 保存调整后的this指针 在代码清单12-10中,在转换CBed指针时,会调整首地址并跳过第一个父类所占用的空间。这样一来,当使用父类CBed的指针访问CBed中实现的虚函数时,就不会错误地寻址到继承自CSofa类的成员变量。 了解了多重继承中子类的构造函数,以及父类指针的转换过程后,接下来通过分析代码清单12-11来学习多重继承中子类对象的析构过程。 代码清单12-11 多重继承的类对象析构函数—Debug版 ; 子类析构函数的实现过程
virtual ~CSofaBed(){ // 沙发床类的虚析构函数
; 部分代码略
0040170E pop ecx ; 还原this指针
0040170F mov dword ptr [ebp-10h],ecx
00401712 mov eax,dword ptr [ebp-10h]
; 将两个虚表指针设置为各个父类的虚表首地址
00401715 mov dword ptr [eax],offset CSofaBed::'vftable' (00426198)
0040171B mov ecx,dword ptr [ebp-10h]
0040171E mov dword ptr [ecx+8],offset CSofaBed::'vftable' (0042501c)
00401725 mov dword ptr [ebp-4],0
; 执行子类虚函数内的代码
printf("virtual ~CSofaBed()\r\n");
}
; 比较对象地址,与子类对象转为父类指针相似
00401739 cmp dword ptr [ebp-10h],0 ; 当this==NULL时不需调整
0040173D je CSofaBed::~CSofaBed+6Ah (0040174a)
0040173F mov edx,dword ptr [ebp-10h]
00401742 add edx,8
00401745 mov dword ptr [ebp-14h],edx ; 将调整后的this指针保存到[ebp-14h]
00401748 jmp CSofaBed::~CSofaBed+71h (00401751)
0040174A mov dword ptr [ebp-14h],0
00401751 mov ecx,dword ptr [ebp-14h]
; 调用父类CBed的析构函数
00401754 call @ILT+75(CBed::~CBed) (00401050)
00401759 mov dword ptr [ebp-4],0FFFFFFFFh
00401760 mov ecx,dword ptr [ebp-10h]
; 无需转换this指针,直接调用父类CSofa的析构函数
00401763 call @ILT+125(CSofa::~CSofa) (00401082)
00401768 mov ecx,dword ptr [ebp-0Ch]
0040176B mov dword ptr fs:[0],ecx
; 部分代码略
00401782 ret
代码清单12-11演示了对象SofaBed的析构过程。由于具有多个同级父类(多个同时继承的父类),因此在子类中产生了多个虚表指针。在对父类进行析构时,需要设置this指针,用于调用父类的析构函数。由于具有多个父类,当在析构的过程中调用各个父类的析构函数时,传递的首地址将有所不同,编译器会根据每个父类在对象中占用的空间位置,对应地传入各个父类部分的首地址作为this指针。 在Debug版下,由于侧重调试功能,因此使用了两个临时变量来分别保存两个this指针,它们对应的地址分别为两个虚表指针的首地址。在Release版下,虽然会进行优化,但原理不变,子类析构函数调用父类的析构函数时,仍然会传入在对象中父类对应的地址,当做this指针。 前面讲解了多重继承中子类对象的生成与销毁过程,以及在内存中的分布情况,对比单继承类,两者特征总结如下: 单继承类 ● 多重继承类 ● 在对象模型的还原过程中,可根据以上特性识别出继承关系。对于有虚函数的情况,可利用虚表的初始化,使用IDA中的引用参考进行识别还原。引用参考的使用请回顾第11章的相关内容。 |
|
|
[推荐]《C++反汇编与逆向分析技术揭秘》第12章 从内存角度看继承和多重继承
在C++的继承关系中,子类具备父类所有的成员数据和成员函数。子类对象可以直接使用父类中声明为公有和保护的数据成员与成员函数。在父类中声明为私有(private)的成员,虽然子类对象无法直接访问,但是在子类对象的内存结构中,父类私有的成员数据依然存在。C++语法规定的访问控制仅限于编译层面,在编译的过程中由编译器进行语法检查,因此访问控制不会影响对象的内存结构。本节将以公有(public)继承为例进行讲解,首先来看一下代码清单12-1中的代码。 代码清单12-1 定义派生类和继承类—C++源码 class CBase{ // 基类定义
public:
CBase(){
printf("CBase\r\n");
}
~CBase(){
printf("~CBase\r\n");
}
void SetNumber(int nNumber){
m_nBase = nNumber;
}
int GetNumber(){
return m_nBase;
}
public:
int m_nBase;
};
class CDervie : public CBase{ // 派生类定义
public:
void ShowNumber(int nNumber){
SetNumber (nNumber);
m_nDervie = nNumber + 1;
printf("%d\r\n", GetNumber());
printf("%d\r\n", m_nDervie);
}
public:
int m_nDervie;
};
// main函数实现
void main(int argc, char* argv[]){
CDervie Dervie;
Dervie.ShowNumber(argc);
}
代码清单12-1中定义了两个具有继承关系的类。父类CBase中定义了数据成员m_nBase、构造函数、析构函数和两个成员函数。子类中只有一个成员函数ShowNumber和一个数据成员m_nDervie。根据C++的语法规则,子类CDervie将继承父类中的成员数据和成员函数。那么,当申请了子类对象Dervie时,它在内存中如何存储,又是如何使用父类成员函数的呢?调试代码清单12-1,查看其内存结构及程序执行流程,其汇编代码如代码清单12-2所示。 代码清单12-2 代码清单12-1的调试分析—Debug版 // C++源码与汇编代码对比分析
void main(int argc, char* argv[]){
; 函数入口部分略
CDervie Dervie;
0040108D lea ecx,[ebp-14h] ; 获取对象首地址作为this指针
; 调用类CDervie的构造函数,编译器为CDervie提供了默认的构造函数
00401090 call @ILT+50(CDervie::CDervie) (00401014)
00401095 mov dword ptr [ebp-4],0
Dervie.ShowNumber(argc);
0040109C mov eax,dword ptr [ebp+8]
0040109F push eax
004010A0 lea ecx,[ebp-14h] ; 调用CDervie成员函数,传入this指针
004010A3 call @ILT+55(CDervie::ShowNumber) (0040101e)
}
004010A8 mov dword ptr [ebp-4],0FFFFFFFFh
004010AF lea ecx,[ebp-14h]
; 调用类CDervie的析构函数,编译器为CDervie提供了默认的析构函数
004010B2 call @ILT+45(CDervie::~CDervie) (0040100f)
004010D1 ret
// 子类CDervie的默认构造函数分析
CDervie::CDervie:
; 函数入口部分略
00401219 pop ecx ; 还原this指针
0040121A mov dword ptr [ebp-4],ecx
; 以子类对象首地址作为父类的this指针,调用父类构造函数
0040121D mov ecx,dword ptr [ebp-4]
00401220 call @ILT+35(CBase::CBase) (00401028)
00401225 mov eax,dword ptr [ebp-4]
; 函数出口部分略
00401238 ret
// 子类CDervie的默认析构函数分析
CDervie::~CDervie:
; 函数入口部分略
004012B9 pop ecx
004012BA mov dword ptr [ebp-4],ecx
004012BD mov ecx,dword ptr [ebp-4]
; 调用父类析构函数
004012C0 call @ILT+5(CBase::~CBase) (0040100a)
; 函数出口部分略
004012D5 ret
对代码清单12-2进行分析后发现,编译器提供了默认构造函数与析构函数。当子类中没有构造函数或析构函数,而其父类却需要构造函数与析构函数时,编译器会为该父类的子类提供默认的构造函数与析构函数。 由于子类继承了父类,因此子类中需要拥有父类的各成员,类似于在子类中定义了父类的对象作为数据成员使用。代码清单12-1中的类关系如果转换成以下代码,则它们的内存结构等价。 class CBase{...}; // 类定义见代码清单12-1
class CDervie{
public:
CBase m_Base; // 原来的父类CBase成为成员对象
int m_nDervie; // 原来的子类派生数据
};
原来的父类CBase成为了CDervie的一个成员对象,当产生CDervie类的对象时,将会先产生成员对象m_Base,这需要调用其构造函数。当CDervie类没有构造函数时,为了能够在CDervie类对象产生时调用成员对象的构造函数,编译器同样会提供默认构造函数,以实现成员构造函数的调用。 但是,如果子类含有构造函数,而父类不存在构造函数,则编译器不会为父类提供默认的构造函数。在构造子类时,由于父类中没有虚表指针,也不存在构造祖先类的问题,因此添加默认构造函数对父类没有任何意义。父类中含有虚函数的情况则不同,此时的父类需要初始化虚表工作,因此编译器会为其提供默认的构造函数,以初始化虚表指针。 当子类对象被销毁时,其父类也同时被销毁,为了可以调用父类的析构函数,编译器为子类提供了默认的析构函数。在子类的析构函数中,析构函数的调用顺序与构造函数相反,先执行自身的析构代码,再执行其父类的析构代码。 依照构造函数与析构函数的调用顺序,不仅可以顺藤摸瓜找出各类之间的关系,还可以根据调用顺序区别出构造函数与析构函数。 子类对象在内存中的数据排列为:先安排父类的数据,后安排子类新定义的数据。当类中定义了其他对象作为成员,并在初始化列表中指定了某个成员的初始化值时,构造的顺序会是怎样的呢?我们先来看下面的代码: //源码对照
class CInit{
public:
CInit(){
m_nNumber = 0;
}
int m_nNumber;
};
class CDervie : public CBase{
public:
CDervie():m_nDervie(1){
printf("使用初始化列表\r\n");
}
CInit m_Init; // 在类中定义其他对象作为成员
int m_nDervie;
};
// main函数实现
void main(int argc, char* argv[]){
CDervie Dervie;
}
//反汇编代码分析
; 函数入口代码略
00401068 lea ecx,[ebp-0Ch] ; 传递this指针,调用CDervie的构造函数
0040106B call @ILT+10(CDervie::CDervie) (0040100f)
; 进一步查看CDervie的构造函数,函数入口代码分析略
004010CF mov dword ptr [ebp-10h],ecx ; [ebp-10h]保存了this指针
; 传递this指针,并调用父类构造函数
004010D2 mov ecx,dword ptr [ebp-10h]
004010D5 call @ILT+25(CBase::CBase) (0040101e)
004010DA mov dword ptr [ebp-4],0 ; 调试版产生的对象计数代码,不必理会
; 根据this指针调整到类中定义的对象m_Init的首地址处,并调用其构造函数
004010E1 mov ecx,dword ptr [ebp-10h]
004010E4 add ecx,4
004010E7 call @ILT+30(CInit::CInit) (00401023)
; 执行初始化列表,this指针传递给eax后,[eax+8]是对成员数据m_nDervie进行寻址
004010EC mov eax,dword ptr [ebp-10h]
004010EF mov dword ptr [eax+8],1
; 最后才是执行CDervie的构造函数代码
004010F6 push offset string "使用初始化列表\r\n " (0042501c)
004010FB call printf (004012b0)
00401100 add esp,4
; 其余代码分析略
根据以上分析,在有初始化列表的情况下,将会优先执行初始化列表中的操作,其次才是自身的构造函数。构造的顺序为:先构造父类,然后按声明顺序构造成员对象和初始化列表中指定的成员,最后才是自身的构造函数。读者可自行修改类中各个成员的定义顺序,初始化列表的内容,然后按以上方法分析并验证其构造的顺序。 回到代码清单12-2的分析中,在子类对象Dervie的内存布局中,首地址处的第一个数据是父类数据成员m_nBase,向后的4字节数据为自身数据成员m_nDervie,如表12-1所示。 表12-1 Dervie对象内存结构 this+0 父类CBase部分 m_nBase this+4 子类CDervie部分 m_nDervie 有了这样的内存结构,不但可以使用指向子类对象的子类指针间接寻址到父类定义的成员,而且可以使用指向子类对象的父类指针间接寻址到父类定义的成员。在使用父类成员函数时,传递的this指针也可以是子类对象首地址。因此,在父类中,可以根据以上内存结构将子类对象的首地址视为父类对象的首地址来对数据进行操作,而且不会出错。由于父类对象的长度不超过子类对象,而子类对象只要派生新的数据,其长度即可超过父类,因此子类指针的寻址范围不小于父类指针。在使用子类指针访问父类对象时,如果访问的成员数据是父类对象所定义的,那么不会出错;如果访问的是子类派生的成员数据,则会造成访问越界。 我们先看看正确的情况,如代码清单12-3所示。 代码清单12-3 子类调用父类函数—Debug版 // ShowNumber源码对照代码清单12-1
void ShowNumber(int nNumber){
; 函数入口代码略
0040ECC9 pop ecx
0040ECCA mov dword ptr [ebp-4],ecx ; [ebp-4]中保留了this指针
41: SetNumber (nNumber);
0040ECCD mov eax,dword ptr [ebp+8] ; 访问参数nNumber并保存到eax中
0040ECD0 push eax
;由于this指针同时也是对象中父类部分的首地址,因此在调用父类成员函数时,this指针的值和子类
;对象等同
0040ECD1 mov ecx,dword ptr [ebp-4]
0040ECD4 call @ILT+45(CBase::SetNumber) (00401032)
42: m_nDervie = nNumber + 1;
0040ECD9 mov ecx,dword ptr [ebp+8]
0040ECDC add ecx,1 ; 将参数值加1
0040ECDF mov edx,dword ptr [ebp-4] ; edx获得this指针
; 参考内存结构,edx+4是子类成员m_nDervie的地址
0040ECE2 mov dword ptr [edx+4],ecx
43: printf("%d\r\n", GetNumber());
0040ECE5 mov ecx,dword ptr [ebp-4]
0040ECE8 call @ILT+60(CBase::GetNumber) (00401041)
0040ECED push eax
0040ECEE push offset string "%d\r\n" (0042501c)
0040ECF3 call printf (004012b0)
0040ECF8 add esp,8
44: printf("%d\r\n", m_nDervie);
0040ECFB mov eax,dword ptr [ebp-4] ; eax获得this指针
; 参考内存结构,eax+4是子类成员m_nDervie的地址
0040ECFE mov ecx,dword ptr [eax+4]
0040ED01 push ecx
0040ED02 push offset string "%d\r\n" (0042501c)
0040ED07 call printf (004012b0)
0040ED0C add esp,8
; 函数退出代码略
}
; 父类成员函数SetNumber分析
void SetNumber(int nNumber){
00401199 pop ecx ; 还原this指针
0040119A mov dword ptr [ebp-4],ecx ; [ebp-4]中保留了this指针
m_nBase = nNumber;
0040119D mov eax,dword ptr [ebp-4] ; eax得到this指针
004011A0 mov ecx,dword ptr [ebp+8] ; ecx得到参数
; 这里的[eax]相当于[this+0],参考内存结构,是父类成员m_nBase
004011A3 mov dword ptr [eax],ecx
}
父类中成员函数SetNumber在子类中并没有被定义,但根据派生关系,子类中可以使用父类的公有函数。编译器是如何实现正确匹配的呢? 如使用对象或对象的指针调用成员函数,编译器可根据对象所属作用域来使用“名称粉碎法”,以实现正确匹配。在成员函数中调用其他成员函数时,可匹配当前作用域。 在调用父类成员函数时,虽然其this指针传递的是子类对象的首地址,但是在父类成员函数中可以成功寻址到父类中的数据。回想之前提及的对象内存布局,父类数据成员被排列在地址最前端,之后是子类数据成员。ShowNumber运行过程中的内存信息如图12-1所示。 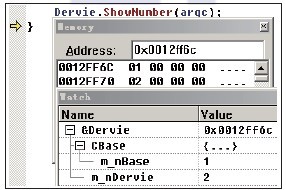 图12-1 子类对象Dervie的内存布局 这时,首地址处为父类数据成员,而父类中的成员函数SetNumber在寻址此数据成员时,会将首地址的4字节数据作为数据成员m_nBase。由此可见,父类数据成员被排列在最前端的目的是为了在添加派生类后方便子类使用父类中的成员数据,并且可以将子类指针当父类指针使用。按照继承顺序依次排列各个数据成员,这样一来,不管是操作子类对象还是父类对象,只要确认了对象的首地址,对父类成员数据的偏移量而言都是一样的。对子类对象而言,使用父类指针或者子类指针都可以正确访问其父类数据。反之,如果使用一个子类对象的指针去访问父类对象,则存在越界访问的危险,如代码清单12-4所示。 代码清单12-4 子类对象的指针访问父类对象存在的危险—Debug版 // C++源码说明:类型定义见代码清单12-1
int nTest = 0x87654093;
CBase base;
CDervie *pDervie = (CDervie *)&base;
printf("%x\r\n", pDervie->m_nDervie);
对应的反汇编讲解如下:
54: int nTest = 0x87654093;
00401138 mov dword ptr [ebp-4],87654093h ; 局部变量赋初值
55: CBase base;
0040113F lea ecx,[ebp-8] ; 传递this指针
00401142 call @ILT+20(CBase:: CBase) (00401019) ; 调用构造函数
56: CDervie *pDervie = (CDervie *)&base;
00401147 lea eax,[ebp-8]
0040114A mov dword ptr [ebp-0Ch],eax ; 指针变量[ebp-0Ch]得到base的地址
57: printf("%x\r\n", pDervie->m_nDervie);
0040114D mov ecx,dword ptr [ebp-0Ch]
;注意,ecx中保留了base的地址,而[ecx+4]的访问超出了base的内存范围,实际上,这里访问局部变
;量nTest的内存空间
00401150 mov edx,dword ptr [ecx+4]
00401153 push edx
00401154 push offset string "%x\r\n" (0042201c)
00401159 call printf (00401210)
0040115E add esp,8
学习虚函数时,我们分析了类中的隐藏数据成员—虚表指针。正因为有这个虚表指针,调用虚函数的方式改为查表并间接调用,在虚表中得到函数首地址并跳转到此地址处执行代码。利用此特性即可通过父类指针访问不同的派生类。在调用父类中定义的虚函数时,根据指针所指向的对象中的虚表指针,可得到虚表信息,间接调用虚函数,即构成了多态。 以“人”为基类,可以派生出不同国家的人:中国人、美国人、德国人等。这些人有着一个共同的功能—说话,但是他们实现这个功能的过程不同,例如,中国人说汉语、美国人说英语、德国人说德语等。每个国家的人都有不同的说话方法,为了让“说话”这个方法有一个通用接口,可以设立一个“人”类将其抽象化。使用“人”类的指针或引用调用具体对象的“说话”方法,这样就形成了多态。此关系的描述如代码清单12-5所示。 代码清单12-5 人类说话方法的多态模拟类结构—C++源码 class CPerson{ // 基类—"人"类
public:
CPerson(){}
virtual ~CPerson(){}
virtual void ShowSpeak(){ // 纯虚函数,后面会讲解
}
};
class CChinese : public CPerson{ // 中国人:继承自人类
public:
CChinese(){}
virtual ~CChinese(){}
virtual void ShowSpeak(){ // 覆盖基类虚函数
printf("Speak Chinese\r\n");
}
};
class CAmerican : public CPerson{ // 美国人:继承自人类
public:
CAmerican(){}
virtual ~CAmerican(){}
virtual void ShowSpeak(){ // 覆盖基类虚函数
printf("Speak American\r\n");
}
};
class CGerman : public CPerson{ // 德国人:继承自人类
public:
CGerman(){}
virtual ~CGerman(){}
virtual void ShowSpeak(){ // 覆盖基类虚函数
printf("Speak German\r\n");
}
};
void Speak(CPerson * pPerson){ // 根据虚表信息获取虚函数首地址并调用
pPerson->ShowSpeak();
}
// main函数实现代码
void main(int argc, char* argv[]){
CChinese Chinese;
CAmerican American;
CGerman German;
Speak (&Chinese);
Speak (&American);
Speak (&German);
}
在代码清单12-5中,利用父类指针可以指向子类的特性,可以间接调用各子类中的虚函数。虽然指针类型为父类,但由于虚表的排列顺序是按虚函数在类继承层次中首次声明的顺序依次排列的,因此,只要继承了父类,其派生类的虚表中的父类部分的排列就与父类一致,子类新定义的虚函数将会按照声明顺序紧跟其后。所以,在调用过程中,我们给Speak函数传递任何一个基于CPerson的派生对象地址都能够正确调用虚函数ShowSpeak。在调用虚函数的过程中,程序是如何通过虚表指针访问虚函数的呢?具体分析如代码清单12-6所示。 代码清单12-6 虚函数调用过程—Debug版 // main函数分析略
// Speak函数讲解
void Speak (CPerson * pPerson){
pPerson->ShowSpeak();
00401108 mov eax,dword ptr [ebp+8] // eax获取参数pPerson的值
0040110B mov edx,dword ptr [eax] // 取虚表首地址并传递给edx
0040110D mov esi,esp
0040110F mov ecx,dword ptr [ebp+8] // 设置this指针
// 利用虚表指针edx,间接调用函数。回顾父类CPerson的类型声明,其中第一个声明的虚函数是析构函数,
// 第二个声明的虚函数是ShowSpeak,所以ShowSpeak在虚表中的位置排第二,[edx+4]即ShowSpeak
// 的函数地址
00401112 call dword ptr [edx+4]
00401115 cmp esi,esp
00401117 call __chkesp (004017c0)
}
在代码清单12-6中,虚函数的调用过程使用了间接寻址方式,而非直接调用一个函数地址。由于虚表采用间接调用机制,因此在使用父类指针pPerson调用虚函数时,没有依照其作用域调用CPerson类中定义的成员函数ShowSpeak。 对比第11章代码清单11-3中的虚函数调用后可以发现,当没有使用对象指针或者对象引用时,调用虚函数指令的寻址方式为直接调用方式,从而无法构成多态。由于代码清单12-6中使用了对象指针来调用虚函数,因此会产生间接调用方式,进而构成多态。代码清单11-3的代码片段如下: MyVirtual.SetNumber(argc); 00401050 mov eax,dword ptr [ebp+8] 00401053 push eax 00401054 lea ecx,[ebp-8] ; 这里是直接调用,无法构成多态 00401057 call @ILT+5(CVirtual::SetNumber) (0040100a) 当父类中定义有虚函数时,将会产生虚表。当父类的派生类产生对象时,根据代码清单12-2的分析,将会在调用子类构造函数前优先调用父类构造函数,并以子类对象的首地址作为this指针传递给父类构造函数。在父类构造函数中,会先初始化子类虚表指针为父类的虚表首地址。此时,如果在父类构造函数中调用虚函数,虽然虚表指针属于子类对象,但指向的地址却是父类的虚表首地址,这时可判断出虚表所属作用域与当前作用域相同,于是会转换成直接调用方式,从而造成构造函数内的虚函数失效。修改代码清单12-5,在CPerson类的构造函数中添加虚函数调用,如下所示。 class CPerson{
public:
CPerson(){
ShowSpeak(); // 调用虚函数,将失效
}
virtual ~CPerson(){}
virtual void ShowSpeak(){
printf("Speak No\r\n");
}
};
以上代码执行过程如图12-2所示。 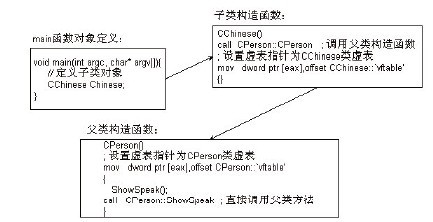 图12-2 构造函数调用虚函数 图12-2演示了构造函数中使用虚函数的流程。按C++规定的构造顺序,父类构造函数会在子类构造函数之前运行,在执行父类构造函数时将虚表指针修改为当前类的虚表指针,也就是父类的虚表指针,因此导致虚函数的特性失效。如果父类构造函数内部存在虚函数调用,这样的顺序能防止在子类中构造父类时,父类会根据虚表错误地调用子类的成员函数。 虽然在构造函数和析构函数中调用虚函数会使其多态性失效,但是为什么还要修改虚表指针呢?编译器直接把构造函数或析构函数中的虚函数调用修改为直接调用方式,不就可以避免这类问题了吗?大家不要忘了,程序员仍然可以自己编写其他成员函数间接调用本类中声明的其他虚函数。假设类A中定义了成员函数f1( )和虚函数f2( ),而且类B继承自类A并重写了f2( )。根据前面的讲解我们可以知道,在子类B的构造函数执行前会先调用父类A的构造函数,此时如果在类A的构造函数中调用f1( ),显然不会构成多态,编译器会产生直接调用f1( )的代码。但是,如果在f1( )中又调用了f2( ),此时就会产生间接调用的指令,形成多态。如果类B的对象的虚表指针没有更换为类A的虚表指针,就会导致在访问类B的虚表后调用到类B中的f2( )函数,而此时类B的对象尚未完成构造,其数据成员是不确定的,这时在f2( )中引用类B的对象中的数据成员是很危险的。 同理,在析构类B的对象时,会先执行类B的析构函数,然后执行类A的析构函数。如果在类A的析构函数中调用f1( ),显然也不能构成多态,编译器同样会产生直接调用f1( )的代码。但是,如果f1( )中又调用了f2( ),此时会构成多态,如果这个对象的虚表指针没有更换为类A的虚表指针,同样也会导致访问虚表并调用类B中的f2( )。但是,此时B类对象已经执行过析构函数,所以B类中定义的数据已经不可靠了,对其进行操作同样是很危险的。 稍后我们会以IDA为分析工具将各个知识点串联起来一起讲解。 在析构函数中,同样需要处理虚函数的调用,因此也需要处理虚函数。按C++中定义的析构顺序,首先调用自身的析构函数,然后调用成员对象的析构函数,最后调用父类的析构函数。在对象析构时,首先设置虚表指针为自身虚表,再调用自身的析构函数。如果有成员对象,则按声明的顺序以倒序方式依次调用成员对象的析构函数。最后,调用父类析构函数。在调用父类的析构函数时,会设置虚表指针为父类自身的虚表。 我们来修改代码清单12-5中的构造函数和析构函数的实现过程,通过调试来分析其执行过程,如代码清单12-7所示。 代码清单12-7 构造函数和析构函数中调用虚函数的流程 // 修改代码清单12-5后的示例,在构造函数与析构函数中添加虚函数调用
class CPerson{ // 基类—"人"类
public:
CPerson(){
ShowSpeak(); // 添加虚函数调用
}
virtual ~CPerson(){
ShowSpeak(); // 添加虚函数调用
}
virtual void ShowSpeak(){
printf("Speak No\r\n");
}
};
// main函数实现过程
void main(int argc, char* argv[]){
CChinese Chinese;
}
// C++源码与汇编代码对比分析
// Chinese 构造函数调用过程分析
CChinese(){}
00401139 pop ecx ; 还原this指针
0040113A mov dword ptr [ebp-4],ecx
0040113D mov ecx,dword ptr [ebp-4] ; 传入当前this指针,将其作为父类的this指针
00401140 call @ILT+30(CPerson::CPerson) (00401023) ; 调用父类构造函数
; 执行父类构造函数后,将虚表设置为子类的虚表
00401145 mov eax,dword ptr [ebp-4] ; 获取this指针,这个指针也是虚表指针
00401148 mov dword ptr [eax],offset CChinese::'vftable' (0042201c)
; 设置虚表指针为子类的虚表
0040114E mov eax,dword ptr [ebp-4] ; 将返回值设置为this指针
// 父类构造函数分析
CPerson(){}
00401199 pop ecx ; 还原this指针,此时指针为子类对象的首地址
0040119A mov dword ptr [ebp-4],ecx
0040119D mov eax,dword ptr [ebp-4] ; 取出子类的虚表指针,设置为父类虚表
004011A0 mov dword ptr [eax],offset CPerson::'vftable' (00422028)
ShowSpeak();
004011A6 mov ecx,dword ptr [ebp-4] ; 虚表是父类的,可以直接调用父类虚函数
004011A9 call @ILT+15(CPerson::ShowSpeak) (00401014)
004011C1 ret
// Chinese 析构函数调用过程分析
virtual ~CChinese(){}
00401309 pop ecx ; 还原this指针
0040130A mov dword ptr [ebp-4],ecx
0040130D mov eax,dword ptr [ebp-4] ; 再次设置子类的虚表
00401310 mov dword ptr [eax],offset CChinese::'vftable' (0042201c)
00401316 mov ecx,dword ptr [ebp-4] ; 调用父类的析构函数
00401319 call @ILT+20(CPerson::~CPerson) (00401019)
// 父类析构函数分析
virtual ~CPerson(){
004012B9 pop ecx
004012BA mov dword ptr [ebp-4],ecx
004012BD mov eax,dword ptr [ebp-4]
; 由于当前虚表指针指向了子类虚表,需要重新修改为父类虚表,以防止调用子类的虚函数
004012C0 mov dword ptr [eax],offset CPerson::'vftable' (00422028)
ShowSpeak();
004012C6 mov ecx,dword ptr [ebp-4] ; 虚表是父类的,可以直接调用父类虚函数
004012C9 call @ILT+15(CPerson::ShowSpeak) (00401014)
}
004012DE ret
在代码清单12-7的子类构造函数代码中,首先调用了父类的构造函数,然后设置虚表指针为当前类的虚表首地址。而析构函数中的顺序却与构造函数相反,首先设置虚表指针为当前类的虚表首地址,然后再调用父类的析构函数。通过上面的分析可知构造和析构的顺序如下: 构造:基类→基类的派生类→……→当前类 析构:当前类→基类的派生类→ ……→基类 在代码清单12-5中,析构函数被定义为虚函数。为什么要将析构函数定义为虚函数呢?由于可以使用父类指针保存子类对象的首地址,因此当使用父类指针指向子类堆对象时,就会出问题。当使用delete释放对象的空间时,如果析构函数没有被定义为虚函数,那么编译器将会按指针的类型调用父类的析构函数,从而引发错误。而使用了虚析构函数后,会访问虚表并调用对象的析构函数。两种析构函数的调用过程如以下代码所示。 // 没有声明为虚析构函数 CPerson * pPerson = new CChinese; delete pPerson; // 部分代码分析略 mov ecx,dword ptr [ebp-1Ch] ; 直接调用父类的析构函数 call @ILT+10(CPerson::'scalar deleting destructor') (0040100f) // 声明为虚析构函数 CPerson * pPerson = new CChinese; delete pPerson; // 部分代码分析略 mov ecx,dword ptr [ebp-1Ch] ; 获取pPerson并保存到ecx中 mov edx,dword ptr [ecx] ; 取得虚表指针 mov ecx,dword ptr [ebp-1Ch] ; 传递this指针 call dword ptr [edx] ; 间接调用虚析构函数 以上代码对普通析构函数与虚析构函数进行了对比,说明了为什么类在有了派生与继承关系后,需要声明虚析构函数的原因。对于没有派生和继承关系的类结构,是否将析构函数声明为虚析构函数不会影响调用的过程,但是在编写析构函数时应养成习惯,无论当前是否有派生或继承关系,都应将析构函数声明为虚析构函数,以防止将来更新和维护代码时发生析构函数的错误调用。 了解了派生和继承的执行流程与实现原理后,又该如何利用这些知识去识别代码中类与类之间的关系呢?最好的办法还是先定位构造函数,有了构造函数就可根据构造的先后顺序得到与之有关的其他类。在构造函数中只构造自己的类很明显是个基类。对于构造函数中存在调用父类构造函数的情况时,可利用虚表,在IDA中使用引用参考的功能便可得到所有的构造函数和析构函数,进而得到了它们之间的派生和继承关系。 将代码清单12-5修改为如下所示的代码,我们以Release选项组对这段代码进行编译,然后利用IDA对其进行分析。 // 综合讲解(建议读者先用VC++分析一下Debug选项组编译的过程,然后再看本内容)
class CPerson{ // 基类—人类
public:
CPerson(){
ShowSpeak(); // 注意,构造函数调用了虚函数
}
virtual ~CPerson(){
ShowSpeak(); // 注意,析构函数调用了虚函数
}
virtual void ShowSpeak(){ // 在这个函数里调用了其他的虚函数GetClassName()
printf("%s::ShowSpeak()\r\n", GetClassName());
return;
}
virtual char* GetClassName()
{
return "CPerson";
}
};
class CChinese : public CPerson{ // 中国人,继承自"人"类
public:
CChinese(){
ShowSpeak();
}
virtual ~CChinese(){
ShowSpeak();
}
virtual char* GetClassName(){
return "CChinese";
}
};
void main(int argc, char* argv[]){
CPerson *pPerson = new CChinese;
pPerson->ShowSpeak();
delete pPerson;
}
; 反汇编讲解
; 在IDA中打开执行文件,载入sig,定位到main函数,得到如下代码
.text:00401080 ; int __cdecl main(int argc, const char **argv, const char **envp)
.text:00401080 _main proc near ; CODE XREF: start+AFp
.text:00401080
.text:00401080 var_10= dword ptr -10h
.text:00401080 var_C= dword ptr -0Ch
.text:00401080 var_4= dword ptr -4
.text:00401080 argc= dword ptr 4
.text:00401080 argv= dword ptr 8
.text:00401080 envp= dword ptr 0Ch
.text:00401080
.text:00401080 push 0FFFFFFFFh
.text:00401082 push offset unknown_libname_35 ; Microsoft VisualC 2-9/net runtime
.text:00401087 mov eax, large fs:0
.text:0040108D push eax
.text:0040108E mov large fs:0, esp ; 注册C++异常处理
.text:00401095 push ecx
.text:00401096 push esi ; 保存寄存器环境
.text:00401097 push 4 ; unsigned int
.text:00401099 call ??2@YAPAXI@Z ; operator new(uint)申请4字节堆空间
.text:0040109E mov esi, eax ; esi保存new调用的返回值
.text:004010A0 add esp, 4 ; 平衡new调用的参数
.text:004010A3 mov [esp+14h+var_10], esi ; new返回值保存到局部变量var_10中
; 编译器插入了检查new返回值的代码,如果返回值为0,则跳过构造函数的调用
.text:004010A7 test esi, esi
; 在IDA中单击var_4,引用处会高亮显示,可以观察出这个变量是计数标记
.text:004010A9 mov [esp+14h+var_4], 0
; 单击下面这个跳转指令的标号loc_4010F2,目标处会高亮显示,结合目标处上面的一条指令(地址
; 004010F0处),可以看出这是一个分支结构,跳转的目标是new返回值为0时的处理(将esi置为0)。读
; 者可以按照命名规范重新定义这些标号(IDA中重命名的快捷键是N,选中标号以后按N键即可)
.text:004010B1 jz short loc_4010F2
; 如果new返回值不为0,则ecx保存堆地址,结合004010BB地址处的call指令,可推测是thiscall
; 的调用方式,需要到004010BB处看看有没有访问ecx才能进一步确定
.text:004010B3 mov ecx, esi
; 这个地方很关键,需要查看off_40C0DC中的内容
.text:004010B5 mov dword ptr [esi], offset off_40C0DC
off_40C0DC中的内容为:
.rdata:0040C0DC off_40C0DC dd offset sub_401170 ; DATA XREF: _main+35↑o
.rdata:0040C0DC ; sub_40ACFB:loc_401120↑o sub_401170+3↑o sub_4011E0+49↑o
.rdata:0040C0E0 dd offset sub_401140
IDA以注释的形式给出了反汇编代码中所有引用了标号off_40C0DC的指令地址,以便于我们分析时参考。如“; DATA XREF: _main+35”,这表示在main函数的首地址偏移35h字节处的指令引用了标号off_40C0DC,最后的上箭头“↑”表示引用处的地址在当前标号的上面,也就是说引用处的地址值比这个标号的地址值小。 接着观察sub_401170和sub_401140中的内容,双击后可以看到这两个名称都是函数名称,可证实off_40C0DC是函数指针数组的首地址,而且其中每个函数都有对ecx的引用,在引用前没有给ecx赋值,说明这两个函数都是将ecx作为参数传递的。结合004010B5处的指令“mov dword ptr [esi], offset off_40C0DC”,其中esi中保存的是new调用所申请的堆空间首地址,这条指令在首地址处放置了函数指针数组的地址。 结合以上种种信息,我们可以认定,esi中的地址是对象的地址,而函数指针数组就是虚表。退一步讲,即使源码不是这样,我们按此还原后的C++代码在功能和内存布局上也是等价的。 接着按N键将off_40C0DC重命名,这里先命名为vTable_40C0DC,在接下来的分析中如果找到更详细的信息,还可以继续修改这个名称,使代码的可读性更强。 .text:004010B5 mov dword ptr [esi], offset vTable_40C0DC 既然是对虚表指针进行初始化,就要满足构造函数的充分条件,但是我们看到这里并没有调用构造函数,而是直接在main函数中完成了虚表指针的初始化,这说明构造函数被编译器内联优化了。接下来我们来看一个内存间接调用: .text:004010BB call ds:off_40C0E4 off_40C0E4中的内容如下: .rdata:0040C0DC vTable_40C0DC dd offset sub_401170 ; DATA XREF: _main+35↑o .rdata:0040C0DC ; sub_40ACFB:loc_401120↑o sub_401170+3↑o sub_4011E0+49↑o .rdata:0040C0E0 dd offset sub_401140 .rdata:0040C0E4 off_40C0E4 dd offset sub_401160 ; DATA XREF: _main+3Br 不难发现,这个地址就在刚才我们分析的虚函数表的首地址附近,这很可能是虚表中的一部分!不过现在只能是怀疑,我们还没有证据。先看看这个函数的功能。双击地址0040C0E4 处“off_40C0E4 dd offset sub_401160”中的sub_401160,定位到sub_401160的代码实现处,此处内容如下所示: .text:00401160 sub_401160 proc near .text:00401160 mov eax, offset aCperson ; "CPerson" ; 功能很简单,返回名称字符串 .text:00401165 retn .text:00401165 sub_401160 endp 顺手修改sub_401160的名称,这里先修改为GetCPerson,以后有更多信息时再进一步修改。对应地,由于在off_40C0E4中保存了函数GetCPerson的地址,说明它是一个函数指针,因此也可以将其名称修改为pfnGetCPerson,修改完毕后如下所示: .rdata:0040C0E4 pfnGetCPerson dd offset GetCPerson ; DATA XREF: _main+3Br 接着分析其后的代码: .text:004010C1 push eax .text:004010C2 push offset aSShowspeak ; "%s::ShowSpeak()\r\n" .text:004010C7 call _printf .text:004010CC add esp, 8 ; 调用printf,并平衡参数 .text:004010CF mov ecx, esi .text:004010D1 mov byte ptr [esp+14h+var_4], 1 ; 计数器加1 .text:004010D6 mov dword ptr [esi], offset off_40C0D0 ;写入虚表指针,分析过程与上;面的内容一致,略 .text:004010DC call ds:off_40C0D8 ; 内存间接调用 双击off_40C0D8,查看调用目标: .rdata:0040C0D8 off_40C0D8 dd offset sub_4011B0 ; DATA XREF: _main+5Cr off_40C0D8中保存了函数sub_4011B0的地址,双击sub_4011B0,其功能如下所示: .text:004011B0 sub_4011B0 proc near .text:004011B0 mov eax, offset aCchinese ; "CChinese" ; 功能很简单,返回名称字符串 .text:004011B5 retn .text:004011B5 sub_4011B0 endp 修改一下这个函数的名称,这里改为GetCChinese,也对应修改函数指针off_40C0D8的名称为pfnGetCChinese,修改完毕后如下所示: .rdata:0040C0D8 pfnGetCChinese dd offset GetCChinese ; DATA XREF: _main+5Cr 接着分析后面的代码: .text:004010E2 push eax .text:004010E3 push offset aSShowspeak ; "%s::ShowSpeak()\r\n" .text:004010E8 call _printf .text:004010ED add esp, 8 ; 调用printf并平衡参数 .text:004010F0 jmp short loc_4010F4 ; 跳过else分支 .text:004010F2 ; -------------------------------------------------------------- .text:004010F2 .text:004010F2 loc_4010F2: ; CODE XREF: _main+31j .text:004010F2 xor esi, esi ; 如果new调用的返回值为0,则esi为0 到此为止,我们分析了new调用后的整个分支结构。当new调用成功时,会执行对象的构造函数,而编译器对这里的构造函数进行了内联优化,但这不会影响我们对构造函数的鉴定。首先存在写入虚表指针的充分条件,同时也满足前面章节讨论的必要条件,还要出现在new调用的正确分支中,因此,我们可以把new调用的正确分支中的代码判定为构造函数的内联方式。在new调用的正确分支内,由于esi所指向的对象有两次写入虚表指针的代码,如下所示: .text:004010B5 mov dword ptr [esi], offset vTable_40C0DC ;中间代码略 .text:004010D6 mov dword ptr [esi], offset vTable_40C0D0 我们可以借此得到派生关系,在构造函数中先填写父类的虚表,然后按继承的层次关系逐层填写子类的虚表,由此可以判定vTable_40C0DC是父类的虚表,vTable_40C0D0是子类的虚表。以写入虚表的指令为界限,可以粗略划分出父类的构造函数和子类的构造函数的实现代码,但是细节上要按照程序逻辑找到界限之内其他函数传递参数的几行代码,并排除在外,如下所示: ; 先定位到new调用的正确分支处 .text:00401099 call ??2@YAPAXI@Z ; operator new(uint) ; 调用new .text:0040109E mov esi, eax .text:004010A0 add esp, 4 .text:004010A3 mov [esp+14h+var_10], esi .text:004010A7 test esi, esi ; 判定new调用后的返回值 .text:004010A9 mov [esp+14h+var_4], 0 .text:004010B1 jz short loc_4010F2 ; 返回值为0,则跳转到错误逻辑处 ; 从这里开始就是正确的逻辑,同时也是父类构造函数的起始代码处 .text:004010B3 mov ecx, esi .text:004010B5 mov dword ptr [esi], offset vTable_40C0DC .text:004010BB call ds:pfnGetCPerson .text:004010C1 push eax .text:004010C2 push offset Format ; "%s::ShowSpeak()\r\n" .text:004010C7 call _printf .text:004010CC add esp, 8 ; 注意这里的传参(this指针),从这里开始就不是父类的构造函数实现代码了 .text:004010CF mov ecx, esi .text:004010D1 mov byte ptr [esp+14h+var_4], 1 .text:004010D6 mov dword ptr [esi], offset vTable_40C0D0 .text:004010DC call ds:pfnGetCChinese .text:004010E2 push eax .text:004010E3 push offset Format ; "%s::ShowSpeak()\r\n" .text:004010E8 call _printf .text:004010ED add esp, 8 ; new调用的正确分支末尾,同时也是子类构造函数的结束处 .text:004010F0 jmp short loc_4010F4 继续看后面的代码: .text:004010F4 .text:004010F4 loc_4010F4: ; CODE XREF: _main+70↑j .text:004010F4 mov eax, [esi] ; 取得虚表指针 .text:004010F6 mov ecx, esi ; 传递this指针 .text:004010F8 mov [esp+14h+var_4], 0FFFFFFFFh ; 修改计数器 .text:00401100 call dword ptr [eax+4] ; 调用虚表第二项的函数 分析一下这里的虚函数调用,先看看最后一次写入虚表的地址,单击esi,往上观察高亮处,寻找最后一次写入的指令,如图12-3所示。  图12-3 寻找最后一次写入虚表的指令 细心的读者一定找到了!没错,正是004010D6地址处!指令“call dword ptr [eax+4]”揭示出虚表中至少有两个元素。接下来分析在004010D6处写入虚表vTable_40C0D0中的第二项内容到底是什么。 .rdata:0040C0D0 vTable_40C0D0 dd offset sub_4011C0 ; 虚表偏移0处,也就是虚表的第一项 .rdata:0040C0D4 off_40C0D4 dd offset sub_401140 ; 虚表偏移4处,也就是虚表的第二项 .rdata:0040C0D8 pfnGetCChinese dd offset GetCChinese ; 现在不能确定这一项是否为虚表的内容 双击sub_401140,得到以下代码: .text:00401140 sub_401140 proc near ; 未赋值就直接使用ecx,说明ecx是在传递参数 .text:00401140 mov eax, [ecx] ; eax得到虚表 .text:00401142 call dword ptr [eax+8] ; 调用虚表第三项,形成了多态 指令“call dword ptr [eax+8]”揭示出虚表中至少有三个元素!接下来分析虚表第三项是什么内容。 .rdata:0040C0D0 vTable_40C0D0 dd offset sub_4011C0 ; 虚表偏移0处,也就是虚表的第一项 .rdata:0040C0D4 off_40C0D4 dd offset sub_401140 ; 虚表偏移4处,也就是虚表的第二项 ; 虚表偏移8处,也就是虚表的第三项,现在可以确定GetCChinese是虚表的元素之一 .rdata:0040C0D8 pfnGetCChinese dd offset GetCChinese 接着往下看: .text:00401145 push eax ; 向printf传入GetCChinese的返回值,是个字符串首地址 .text:00401146 push offset Format ; "%s::ShowSpeak()\r\n" .text:0040114B call _printf .text:00401150 add esp, 8 ; 调用printf显示字符串,并平衡参数 .text:00401153 retn .text:00401153 sub_401140 endp 这个函数的作用是调用虚表第三项元素,得到字符串,并将字符串格式化输出。由于是按虚表调用的,因此会形成多态性。顺便把这个函数的名称修改为ShowShtring,对应的虚表内的函数指针 off_40C0D4修改为pfnShowShtring,修改后虚表结构如下所示: .rdata:0040C0D0 vTable_40C0D0 dd offset sub_4011C0 .rdata:0040C0D4 pfnShowShtring dd offset ShowShtring .rdata:0040C0D8 pfnGetCChinese dd offset GetCChinese 我们回到main函数处,继续分析: .text:00401103 test esi, esi .text:00401105 jz short loc_40110F ; 检查堆指针,不为0则往下执行 .text:00401107 mov edx, [esi] ; edx得到虚表 .text:00401109 push 1 ; 传入参数 .text:0040110B mov ecx, esi ; 传递this指针 .text:0040110D call dword ptr [edx] ; 调用虚表中的第一项 .text:0040110F ; 从00401105处跳转到此,其上没有jmp,所以这里是个单分支结构 .text:0040110F loc_40110F: .text:0040110F mov ecx, [esp+14h+var_C] ; 函数退出,恢复环境,还原SEH .text:00401113 pop esi .text:00401114 mov large fs:0, ecx .text:0040111B add esp, 10h .text:0040111E retn .text:0040111E _main endp call dword ptr [edx]命令调用虚表的第一项。在详细分析虚表的第一项之前,我们体验一下IDA中的交叉参考功能,一次性定位所有的构造函数和析构函数,先定位到虚表vTable_40C0D0处,然后右击,如图12-4所示。 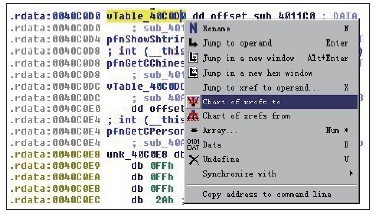 图12-4 交叉参考 在右键菜单中选择“Chart of xrefs to”,得到所有直接引用这个地址的位置,如图12-5所示。  图12-5 IDA自动生成的交叉参考图示 可以看到,除了main函数访问了虚表vTable_40C0D0之外,sub_4011E0也访问了虚表vTable_40C0D0。通过前面的分析可知,是因为main函数中内联的构造函数存在写入虚表的操作,从而导致vTable_40C0D0被访问到。由于存在虚表,就算类中没有定义析构函数,编译器也会产生默认的析构函数,因此,毫无疑问另一个访问虚表的函数sub_4011E0就是析构函数。交叉参考这个功能很好用,如果你发现了一个父类的构造函数,想知道这个父类有多少个派生类,也能利用这个功能快速定位。 以代码清单12-5的Debug版为例,使用IDA对其进行分析,先找到某个子类的构造函数。由于子类的构造函数必然会先调用父类的构造函数,因此我们利用交叉参考功能即可查询出所有引用这个父类构造函数的指令的位置,这当然包括这个父类的所有直接子类构造函数的位置,借此即可判定父类派生的所有直接子类,如图12-6所示。 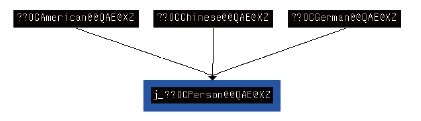 图12-6 父类派生关系图 接下来分析sub_4011E0函数的功能,反汇编代码如下所示: ; 注意这里的引用提示:是在sub_4011C0函数中调用本函数,稍后会带领读者去这个地址"探险" .text:004011E0 sub_4011E0 proc near ; CODE XREF: sub_4011C0+3↑p .text:004011E0 .text:004011E0 var_10= dword ptr -10h .text:004011E0 var_C= dword ptr -0Ch .text:004011E0 var_4= dword ptr -4 .text:004011E0 .text:004011E0 push 0FFFFFFFFh .text:004011E2 push offset unknown_libname_36 ; Microsoft VisualC 2-9/net runtime .text:004011E7 mov eax, large fs:0 .text:004011ED push eax .text:004011EE mov large fs:0, esp .text:004011F5 push ecx .text:004011F6 push esi ; 以上注册异常处理,保留寄存器环境 .text:004011F7 mov esi, ecx .text:004011F9 mov [esp+14h+var_10], esi ; 在虚表指针处写入子类虚表地址 .text:004011FD mov dword ptr [esi], offset vTable_40C0D0 .text:00401203 mov [esp+14h+var_4], 0 ; 计数器置为0 .text:0040120B call ds:pfnGetCChinese .text:00401211 push eax ; 获取字符串,并向printf传递参数 .text:00401212 push offset Format ; "%s::ShowSpeak()\r\n" .text:00401217 call _printf .text:0040121C add esp, 8 ; 执行printf,并平衡参数 .text:0040121F mov ecx, esi ; 传递this指针 .text:00401221 mov [esp+14h+var_4], 0FFFFFFFFh ; 将计数器置为-1 ; 在虚表指针处写入父类虚表地址 .text:00401229 mov dword ptr [esi], offset vTable_40C0DC .text:0040122F call ds:pfnGetCPerson .text:00401235 push eax ; 获取字符串,并向printf传递参数 .text:00401236 push offset Format ; "%s::ShowSpeak()\r\n" .text:0040123B call _printf ; 流水线优化,因为mov large fs:0, ecx和当前指令依赖同一个寄存器ecx,会造成指令相关性,所以 ; 提前到add esp, 8之上,以提高流水线的并行能力 .text:00401240 mov ecx, [esp+1Ch+var_C] .text:00401244 add esp, 8 ; 执行printf,并平衡参数 .text:00401247 mov large fs:0, ecx ; 恢复环境并还原SEH .text:0040124E pop esi .text:0040124F add esp, 10h .text:00401252 retn .text:00401252 sub_4011E0 endp 以上代码中存在虚表的写入操作,其写入顺序和前面分析的构造函数相反,先写入子类自身的虚表,然后写入父类的虚表,满足了析构函数的充分条件。我们将虚构函数命名为Destructor_4011E0,IDA会提示符号名称过长,不必理会,单击“确定”按钮即可。 Destructor_4011E0被sub_4011C0调用,因此接下来分析sub_4011C0,这个函数有一个参数,IDA给出的名称为arg_0。 ; 查看引用参考可得知,这个函数是在虚表vTable_40C0D0中定义的第一个虚函数 .text:004011C0 sub_4011C0 proc near ; DATA XREF: .rdata:vTable_40C0D0o .text:004011C0 .text:004011C0 arg_0= byte ptr 4 .text:004011C0 .text:004011C0 push esi .text:004011C1 mov esi, ecx ; esi保留了this指针 .text:004011C3 call Destructor_4011E0 ; 先调用析构函数 .text:004011C8 test [esp+4+arg_0], 1 ; 如果参数为1,则以对象首地址为目标释放内存,否则本函数仅仅执行对象的析构函数 .text:004011CD jz short loc_4011D8 .text:004011CF push esi ; 传入对象的首地址 .text:004011D0 call ??3@YAXPAX@Z ; operator delete(void *) .text:004011D5 add esp, 4 ; 调用delete,并平衡参数 .text:004011D8 .text:004011D8 loc_4011D8: ; CODE XREF: sub_4011C0+Dj .text:004011D8 mov eax, esi .text:004011DA pop esi .text:004011DB retn 4 .text:004011DB sub_4011C0 endp 显而易见,这是一个析构函数的代理,它的任务是负责调用析构函数,然后根据参数值调用delete。将这个函数重命名为_Destructor_4011E0,重命名后,虚表结构是这个样子: .rdata:0040C0D0 vTable_40C0D0 dd offset _Destructor_4011E0 .rdata:0040C0D4 pfnShowShtring dd offset ShowShtring .rdata:0040C0D8 pfnGetCChinese dd offset GetCChinese _Destructor_4011E0函数是虚表的第一项,我们可以回到main函数中来观察其参数传递的过程: .text:00401103 test esi, esi ; 当对象指针esi不为0时执行_Destructor_4011E0 .text:00401105 jz short loc_40110F .text:00401107 mov edx, [esi] ; edx获得虚表 .text:00401109 push 1 ; 传递参数值1 .text:0040110B mov ecx, esi ; 传递this指针 .text:0040110D call dword ptr [edx] ; 调用_Destructor_4011E0 .text:0040110F .text:0040110F loc_40110F: 在main函数中调用虚表第一项时传递的值为1,那么在_Destructor_4011E0函数中,执行完析构函数后就会调用delete释放对象的内存空间。为什么要用这样一个参数来控制函数内释放空间的行为呢?为什么不能直接释放呢? 因为析构函数和释放堆空间是两回事,有的程序员喜欢自己维护析构函数,或者反复使用同一个堆对象,这时显式调用析构函数的同时不能释放堆空间,如下代码所示: void main(int argc, char* argv[]){
CPerson *pPerson = new CChinese;
pPerson->ShowSpeak();
pPerson->~CPerson(); // 显式调用析构函数
// 将堆内存中pPerson指向的地址作为CChinese的新对象的首地址,并调用CChinese的构造函数。这
// 样可以重复使用同一个堆内存,以节约内存空间
pPerson = new(pPerson)CChinese();
delete pPerson;
}由于显式调用析构函数时不能马上释放堆内存,因此在析构函数的代理函数中通过一个参数来控制是否释放内存,以便于程序员自己管理析构函数的调用。这个代理函数的反汇编代码很简单,请读者自己上机验证。 在通过分析反汇编代码来识别类关系时,对于含有虚函数的类而言,利用IDA的交叉参考功能可简化分析识别过程。根据以上分析可知,具有虚函数,必然存在虚表指针。为了初始化虚表指针必然要准备构造函数,有了构造函数就可利用以上方法,顺藤摸瓜得到类关系,还原出对象模型。 思考题 大家在调试以上程序时会发现,比如CChinese的对象,在构造函数执行时虚表已经初始化完成了,在析构函数执行时,其虚表指针已经是子类的虚表了,为什么编译器还要在析构函数中再次将虚表设置为子类虚表呢?这是冗余操作吗?如果不这么做,会引发什么后果?答案见本章小结。 |
|
|
[讨论]已经预定了~
感谢支持,期待您的阅读反馈意见,^_^ |
|
|
[推荐]《C++反汇编与逆向分析技术揭秘》第5章 流程控制语句的识别
本章介绍了各类流程控制语句的识别方法和原理,读者应多多体会识别其中的要点和优化的思路,并且以反汇编的注释作为向导,亲自上机验证一下,理解后再多多阅读其他类似的源码。初学的时候可以先分析自己写的代码,分析完了再进行印证,慢慢地就可以脱离源码并尝试分析其他未公开源码的程序流程。按照这种方式不断地“修炼”,可以达到看反汇编代码如看武侠小说的境界。分析能力很大程度体现在分析效率上,笔者只能教方法,要提高分析速度,还需要读者多加强练习。 |
|
|
[推荐]《C++反汇编与逆向分析技术揭秘》第5章 流程控制语句的识别
5.7节介绍了3种循环结构,在执行效率上,do循环结构是最高的。由于do循环在结构上非常精简,利用了程序执行时由低地址到高地址的特点,只使用一个条件跳转指令就完成了循环,因此已经无需在结构上进行优化处理。 由于循环结构中也有分支功能,所以4.4.2节介绍的分支优化同样适用于循环结构。分支优化会使用目标分支缓冲器,预读指令。由于do循环是先执行后比较,因此执行代码都在比较之前,如下所示。 int i = 0;
00401248 mov dword ptr [ebp-4],0
do
{
i++;
0040124F mov eax,dword ptr [ebp-4]
00401252 add eax,1
00401255 mov dword ptr [ebp-4],eax
printf("%d", i);
; printf讲解略
} while(i < 1000);
; 此处的汇编代码在退出循环时才预测失败
00401269 cmp dword ptr [ebp-4],3E8h
00401270 jl main+1Fh (0040124f)
do循环结构中只使用了一次跳转就完成了循环功能,大大提升了程序的执行效率。因此,在三种循环结构中,它的执行效率最高。 while循环结构的效率要比do循环结构低。while循环结构先比较再循环,因此无法利用程序执行顺序来完成循环。同时,while循环结构使用了2个跳转指令,在程序流程上就弱于do循环结构。为了提升while循环结构的效率,可以将其转成效率较高的do循环结构。在不能直接转换成do循环结构的情况下,可以使用if单分支结构,将do循环结构嵌套在if语句块内,由if语句判定是否能执行循环体。因此,所有的while循环都可以转换成do循环结构,如图5-13所示。 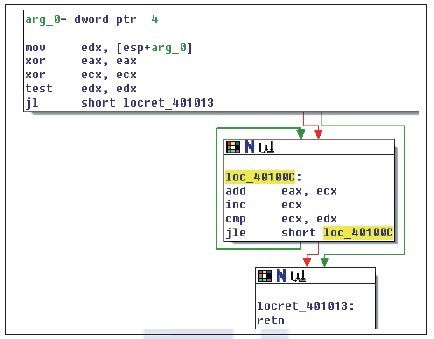 图5-13 while循环结构的优化图 图5-13为代码清单5-23使用O2选项后编译的Release版结构流程图,该图截取自IDA。图5-13划分了程序的流程,箭头方向显示,反汇编代码中有一个单分支结构与循环结构。首先由条件跳转指令jl比较参数,小于等于0则跳转。可见这是一个if语句。 如果jl跳转失败,则顺序向下执行,进入标号loc_40100C处。这是一个循环语句块。此语句块内使用条件跳转指令jle,当ecx小于等于edx时,跳转到地址标号loc_40100C处。edx中保存参数数据,ecx每次加1,使eax每次对ecx累加。先执行,后判断,有了这个特性便可将图5-13所对应的代码还原成由单分支结构中嵌套do循环结构的高级代码。转换成对应的C++代码如下: int LoopWhile(int nCount){
int nSum = 0;
int nIndex = 0;
if(nCount >= 0){
do{
nSum += nIndex;
nIndex++;
}while(nIndex <= nCount)
}
return nSum;
}经过转换后,代码的功能没有任何改变,只是在结构上有了调整,变成了单分支结构加do循环结构。 以上讨论了while循环结构的优化,可以将其转换为do循环结构来提升效率。 从结构特征上可知,for循环是执行速度最慢的,它需要三个跳转指令才能够完成循环,因此也需要对其进行优化。for循环可以这么转换吗?从循环结构上看,其结构特征和while循环结构类似。由于赋初值部分不属于循环体,可以忽略。只要将比较部分放到循环体内,即是一个while循环结构。既然可以转换while循环结构,那么自然可以转换为do循环结构进行优化以提升效率。 有了for循环结构的优化方案,那么在对其优化过程中,VC++ 6.0能否按照此方案进行优化呢?将代码清单5-24使用O2选项进行重新编译,优化后的for循环反汇编代码如代码清单5-25所示。 代码清单5-25 for循环结构—Release版 .text:00401000 sub_401000 proc near ; 函数参数标号定义arg_0 .text:00401000 arg_0 = dword ptr 4 ; 使用edx保存参数arg_0 .text:00401000 mov edx, [esp+arg_0] ; 清空eax,ecx .text:00401004 xor eax, eax .text:00401006 xor ecx, ecx .text:00401008 test edx, edx ; 检查edx,小于0则跳转到标号short locret_401013处,该函数结束 .text:0040100A jl short locret_401013 ; 说明此处标号在地址sub_401000+0x11处被调用 .text:0040100C loc_40100C: ; 执行eax加等于ecx操作 .text:0040100C add eax, ecx ; 执行ecx自加1操作 .text:0040100E inc ecx .text:0040100F cmp ecx, edx ; 比较ecx与edx,小于等于则跳转到标号short loc_40100C处,这是一个向上跳 .text:00401011 jle short loc_40100C ; 函数返回地址标号locret_401013处,被地址标号sub_401000+0x0A处调用 .text:00401013 locret_401013: .text:00401013 retn 分析代码清单5-25发现,它与图5-13的思路竟然完全一致。编译器通过检查,将for循环结构最终转换成了do循环结构。使用if单分支结构进行第一次执行循环体的判断,再将转换后的do循环嵌套在if语句中,就形成了“先执行,后判断”的do循环结构。由于在O2选项下,while循环及for循环都可以使用do循环进行优化,所以在分析经过O2选项优化的反汇编代码时,很难转换回相同源码,只能尽量还原等价源码。读者可根据个人习惯转换对应的循环结构。 从结构上优化循环后,还需从细节上再次优化,以进一步提高循环的效率。4.4节介绍了编译器的各种优化技巧,循环结构的优化也使用这些技巧,其中常见的优化方式是“代码外提”。例如,循环结构中经常有重复的操作,在对循环结构中语句块的执行结果没有任何影响的情况下,可选择相同代码外提,以减少循环语句块中的执行代码,提升循环执行效率,如代码清单5-26所示。 代码清单5-26 循环结构优化—代码外提 // C++源码说明:for循环完成整数累加和
int CodePick(int nCount){
int nSum = 0;
int nIndex = 0;
do {
nSum += nIndex;
nIndex++;
// 此处代码每次都要判断nCount – 1,nCount并没有自减,仍然为一个固定值
// 可在循环体外先对nCount进行减等于1操作,再进入循环体
} while(nIndex < nCount - 1);
return nSum;
}
// 经过优化后的反汇编代码
.text:00401000 sub_401000 proc near; CODE XREF: _main+21-p
.text:00401000 arg_0 = dword ptr 4
; 获取参数到edx中
.text:00401000 mov edx, [esp+arg_0]
.text:00401004 xor eax, eax
.text:00401006 xor ecx, ecx
; 代码外提,对edx执行自减1操作
.text:00401008 dec edx
; 进入循环体,在循环体内直接对保存参数的edx进行比较,没有任何减1操作
.text:00401009 loc_401009: ; CODE XREF: sub_401000+Ej
.text:00401009 add eax, ecx
.text:0040100B inc ecx
.text:0040100C cmp ecx, edx
.text:0040100E jl short loc_401009
.text:00401010 retn
.text:00401010 sub_401000 endp
分析代码清单5-26可知,编译器将循环比较“nIndex < nCount - 1”中的“nCount – 1”进行了外提。由于“nCount – 1”中nCount在循环体中没有被修改,因此对它的操作是可以被拿到循环体外。被外提后的代码如下: int CodePick(int nCount){
int nSum = 0;
int nIndex = 0;
nCount -= 1; // 外提代码
do {
nSum += nIndex;
nIndex++;
} while(nIndex < nCount); // 原来的nCount-1被外提了
return nSum;
}这种外提是有选择性的—只有在不影响循环结果的情况下,才可以外提。 除了代码外提,还可以通过一些方法进一步提升循环结构的执行效率—强度削弱,即用等价的低强度运算替换原来代码中的高强度运算,例如,用加法代替乘法,如代码清单5-27所示。 代码清单5-27 循环强度降低优化—Release版 // C++源码说明:强度削弱
int main(int argc){
int t = 0;
int i = 0;
while (t < argc){
t = i * 99; // 强度削弱后,这里将不会使用乘法运算
i++; // 此处转换后将为 t = i; i += 99;
} // 利用加法运算替换掉了指令周期长的乘法运算
printf("%d", t);
return 0;
}
; 优化后的反汇编代码
.text:00401020 arg_0 = dword ptr 4
; 将参数信息保存到edx中
.text:00401020 mov edx, [esp+arg_0]
.text:00401024 xor eax, eax ; 清空eax
.text:00401026 test edx, edx
.text:00401028 jle short loc_401035
.text:0040102A xor ecx, ecx ; 清空ecx
.text:0040102C
; 循环语句块首地址
.text:0040102C loc_40102C: ; CODE XREF: sub_401020+13j
.text:0040102C mov eax, ecx ; 将ecx传入eax中
; ecx自加63h,即十进制99,等价于ecx每次加1乘以99
.text:0040102E add ecx, 63h
.text:00401031 cmp eax, edx
.text:00401033 jl short loc_40102C ; eax小于edx则执行跳转
.text:00401035
.text:00401035 loc_401035: ; CODE XREF: sub_401020+8j
;printf函数调用处略
.text:00401043 retn
.text:00401043 sub_401020 endp
|
|
|
[推荐]《C++反汇编与逆向分析技术揭秘》第5章 流程控制语句的识别
VC++使用三种语法来完成循环结构,分别为为do、while、for。虽然它们完成的功能都是循环,但是每种语法有着不同的执行流程。 ● 对每种结构进行分析,了解它们生成的汇编代码,它们之间的区别,以及如何根据每种循环结构的特性进行还原。 (1)do循环 do循环的工作流程清晰,识别起来也相对简单。根据其特性,先执行语句块,再进行比较判断。当条件成立时,会继续执行语句块。C++中的goto语句也可以用来模拟do循环结构,如代码清单5-21所示。 代码清单5-21 使用goto语句模拟do循环 // goto模拟do循环完成正数累加和
int GoToDo(int nCount){
int nSum = 0;
int nIndex = 0;
// 用于goto语句跳转使用标记
GOTO_DO:
// 此处为循环语句块
nSum += nIndex; // 保存每次累加和
nIndex++; // 指定循环步长为每次递增1
// 若nIndex大于nCount,则结束goto调用
if (nIndex <= nCount){
goto GOTO_DO;
}
return nSum; // 返回结果
}
代码清单5-21演示了使用goto语句与if分支结构来实现do循环过程。程序执行流程是自上向下地顺序执行代码,通过goto语句向上跳转修改程序流程,实现循环。do循环结构也是如此,如代码清单5-22所示。 代码清单5-22 do循环—Debug版 // C++源码说明:do循环完成整数累加和
int LoopDO(int nCount){
int nSum = 0;
int nIndex = 0;
do {
nSum += nIndex;
nIndex++;
// 循环判断,是否结束循环体
} while(nIndex <= nCount);
return nSum;
}
// C++源码与对应汇编代码讲解
// C++源码对比,变量初始化
int nSum = 0;
0040B4D8 mov dword ptr [ebp-4],0
int nIndex = 0;
0040B4DF mov dword ptr [ebp-8],0
// C++源码对比,进入循环语句块
do{
nSum += nIndex;
; 循环语句块的首地址,即循环跳转地址
0040B4E6 mov eax,dword ptr [ebp-4]
0040B4E9 add eax,dword ptr [ebp-8]
0040B4EC mov dword ptr [ebp-4],eax
nIndex++;
0040B4EF mov ecx,dword ptr [ebp-8]
0040B4F2 add ecx,1
0040B4F5 mov dword ptr [ebp-8],ecx
// C++源码对比,比较是否结束循环
} while(nIndex <= nCount);
0040B4F8 mov edx,dword ptr [ebp-8]
; 比较两个内存中的数据
0040B4FB cmp edx,dword ptr [ebp+8]
; 根据比较结果,使用条件跳转指令JLE,小于等于则跳转到地址0x0040B4E6处
0040B4FE jle LoopDO+26h (0040b4e6)
return nSum;
0040B500 mov eax,dword ptr [ebp-4]
代码清单5-22中的循环比较语句“while(nIndex <= nCount)”转换成的汇编代码和if分支结构非常相似,分析后发现它们并不相同。if语句的比较是相反的,并且跳转地址大于当前代码的地址,是一个向下跳转的过程;而do中的跳转地址小于当前代码的地址,是一个向上跳转的过程,所以条件跳转的逻辑与源码中的逻辑相同。有了这个特性,if语句与do循环判断就很好区分了。 总结: DO_BEGIN: …… ; 循环语句块 ; 影响标记位的指令 jxx DO_BEGIN ; 向上跳转 如果遇到以上代码块,即可判定它为一个do循环结构,只有do循环结构无需先检查,直接执行循环语句块。根据条件跳转指令所跳转到的地址,可以得到循环语句块的首地址,jxx指令的地址为循环语句块的结尾地址。在还原while比较时,应该注意,它与if不同,while的比较数并不是相反,而是相同的。依此分析即可还原do循环结构的原型。 (2)while循环 while循环和do循环正好相反,在执行循环语句块之前,必须要进行条件判断,根据比较结果再选择是否执行循环语句块,如代码清单5-23所示。 代码清单5-23 while循环—Debug版 // C++源码说明:while循环完成整数累加和 int LoopWhile(int nCount){ int nSum = 0; int nIndex = 0; // 先执行条件比较,再进入循环体 while (nIndex <= nCount){ nSum += nIndex; nIndex++; } return nSum; } // C++源码于对应汇编代码讲解 int nSum = 0; 0040B7C8 mov dword ptr [ebp-4],0 int nIndex = 0; 0040B7CF mov dword ptr [ebp-8],0 // C++源码对比,判断循环条件 while (nIndex <= nCount) 0040B7D6 mov eax,dword ptr [ebp-8] 0040B7D9 cmp eax,dword ptr [ebp+8] ; 条件判断比较,使用JG指令,大于则跳转到地址0x0040B7F2处,和if语句一样 ; 地址0x0040B7F2为while循环结束地址 0040B7DC jg LoopWhile+42h (0040b7f2) { // 循环语句块 nSum += nIndex; 0040B7DE mov ecx,dword ptr [ebp-4] 0040B7E1 add ecx,dword ptr [ebp-8] 0040B7E4 mov dword ptr [ebp-4],ecx nIndex++; 0040B7E7 mov edx,dword ptr [ebp-8] 0040B7EA add edx,1 0040B7ED mov dword ptr [ebp-8],edx } ; 执行跳转指令JMP,跳转到地址0x0040B7D6处 0040B7F0 jmp LoopWhile+26h (0040b7d6) return nSum; 0040B7F2 mov eax,dword ptr [ebp-4] 在代码清单5-23中,转换后的while比较和if语句一样,也是比较相反,向下跳转。如何区分代码中是分支结果还是循环结构呢?查看条件指令跳转地址0x0040B7F2,如果这个地址上有一句JMP指令,并且此指令跳转到的地址小于当前代码地址,那么很明显是一个向上跳转。要完成语句循环,就需要修改程序流程,回到循环语句处,因此向上跳转就成了循环结构的明显特征。根据这些特性可知while循环结构的特征,在条件跳转到的地址附近会有JMP指令修改程序流程,向上跳转,回到条件比较指令处。 while循环结构中使用了两次跳转指令完成循环,由于多使用了一次跳转指令,因此while循环要比do循环效率低一些。 总结: WHILE_BEGIN: ; 影响标记位的指令 jxx WHILE_END ; 条件成立跳转到循环语句块结尾处 …… ; 循环语句块 jmp WHILE_BEGIN ; 跳转到取出条件比较数据处 WHILE_END: 遇到以上代码块,即可判定它为一个while循环结构。根据条件跳转指令,可以还原相反的while循环判断。循环语句块的结尾地址即为条件跳转指令的目标地址,在这个地址之前会有一条jmp跳转指令,指令的目标地址为while循环的起始地址。需要注意的是,while循环结构很可能会被优化成do循环结构,被转换后的while结构由于需要检查是否可以被成功执行一次,通常会被嵌套在if单分支结构中,其还原的高级代码如下所示: if(xxx)
{
do
{
// ……
}while(xxx)
}
(3)for循环 for循环是三种循环结构中最复杂的一种。for循环由赋初值、设置循环条件、设置循环步长这三条语句组成。由于for循环更符合人类的思维方式,在循环结构中被使用的频率也最高。根据for语句组成特性分析代码清单5-24。 代码清单5-24 for循环结构—Debug版 // C++源码说明:for循环完成整数累加和
int LoopFor(int nCount){
int nSum = 0;
// 初始计数器变量、设置循环条件、设置循环步长
for (int nIndex = 0; nIndex <= nCount; nIndex++){
nSum += nIndex;
}
return nSum;
}
// C++源码于对应汇编代码讲解
int nSum = 0;
0040B818 mov dword ptr [ebp-4],0
// C++源码对比,for语句
for (int nIndex = 0; nIndex <= nCount; nIndex++)
;=====================================================
; 初始化计数器变量—nIndex 1.赋初值部分
0040B81F mov dword ptr [ebp-8],0
; 跳转到地址0x0040B831处,跳过步长操作
0040B826 jmp LoopFor+31h (0040b831)
;=====================================================
; 取出计数器变量,用于循环步长 2.步长计算部分
0040B828 mov eax,dword ptr [ebp-8]
; 对计数器变量执行加1操作,步长值为1
0040B82B add eax,1
; 将加1后的步长值放回计数器变量—nIndex
0040B82E mov dword ptr [ebp-8],eax
;=====================================================
; 取出计数器变量nIndex放入ecx 3.条件比较部分
0040B831 mov ecx,dword ptr [ebp-8]
; ebp+8地址处存放数据为参数nCount,见C++源码说明
0040B834 cmp ecx,dword ptr [ebp+8]
; 比较nIndex与nCount,大于则跳转到地址0x0040B844处,结束循环
0040B837 jg LoopFor+44h (0040b844)
;=====================================================
{
// for循环内执行语句块
nSum += nIndex;
mov edx,dword ptr [ebp-4] ; 4.循环体代码
0040B83C add edx,dword ptr [ebp-8]
0040B83F mov dword ptr [ebp-4],edx
}
; 跳转到地址0x0040B828处,这是一个向上跳
0040B842 jmp LoopFor+28h (0040b828)
return nSum;
// 设置返回值eax为ebp-4,即nSum
0040B844 mov eax,dword ptr [ebp-4]
代码清单5-24演示了for循环结构在Debug调试版下的汇编代码组成。需要由3次跳转来完成循环过程,其中一次为条件比较跳转,另外两次为jmp跳转。for循环结构为什么要设计得如此复杂呢?由于for循环分为赋初值、设置循环条件、设置循环步长这三个部分,为了可以单步调试程序,将汇编代码与源码进行一一对应,因此在Debug版下有了这样的设计,其循环流程如图5-12所示。 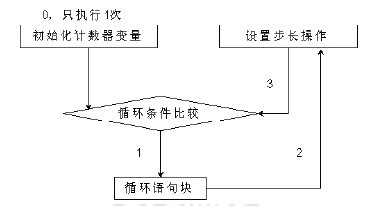 图5-12 for循环结构流程图 根据对代码清单5-24及图5-12中for循环流程的分析,总结出for循环结构在Debug版下的特性。 总结: mov mem/reg, xxx ; 赋初值 jmp FOR_CMP ; 跳到循环条件判定部分 FOR_STEP: ; 步长计算部分 ; 修改循环变量Step mov reg, Step add reg,xxxx ; 修改循环变量的计算过程,在实际分析中,视算法不同而不同 mov Step,eax FOR_CMP: ; 循环条件判定部分 mov ecx,dword ptr Step ; 判定循环变量和循环终止条件StepEnd 的关系,满足条件则退出for循环 cmp ecx, StepEnd jxx FOR_END ; 条件成立则结束循环 …… jmp FOR_STEP ; 向上跳转,修改流程回到步长计算部分 FOR_END: 遇到以上代码块,即可判定它为一个for循环结构。这种结构是for循环独有的,在计数器变量被赋初值后,利用jmp跳过第一次步长计算。然后,可以通过三个跳转指令还原for循环的各个组成部分:第一个jmp指令之前的代码为初始化部分;从第一个jmp指令到循环条件比较处(也就是上面代码中FOR_CMP标号的位置)之间的代码为步长计算部分;在条件跳转指令jxx之后寻找一个jmp指令,这jmp指令必须是向上跳转的,且其目标是到步长计算的位置,在jxx和这个jmp(也就是上面代码中省略号所在的位置)之间的代码即为循环语句块。 在这三种循环结构中,while循环和for循环一样,都是先判断再循环。由于需要先判断,因此需要将判断语句放置在循环语句之前,这就使while循环和for循环在结构上没有do循环那么简洁。那么在效率上这三个循环之间又有哪些区别呢?下一节将分析这三者间的效率对比。 |
|
|
[推荐]《C++反汇编与逆向分析技术揭秘》第5章 流程控制语句的识别
5.5节讲述了对非线性索引表的优化,讨论了最大case值和最小case值之差在255以内的情况。当最大case值与最小case值之差大于255,超出索引1字节的表达范围时,上述优化方案同样会造成空间的浪费,此时采用另一种优化方案—判定树:将每个case值作为一个节点,从这些节点中找到一个中间值作为根节点,以此形成一棵二叉平衡树,以每个节点为判定值,大于和小于关系分别对应左子树和右子树,这样可以提高效率。 如果打开O1选项—体积优先,由于有序线性优化和索引表优化都需要消耗额外的空间,因此在体积优先的情况下,这两种优化方案是不被允许的。编译器尽量以二叉判定树的方式来降低程序占用的体积,如代码清单5-17所示。 代码清单5-17 switch树的C++源码 int nIndex = 0;
scanf("%d", &nIndex);
switch(nIndex){
case 2: printf("nIndex == 2\n"); break;
case 3: printf("nIndex == 3\n"); break;
case 8: printf("nIndex == 8\n"); break;
case 10: printf("nIndex == 10\n"); break;
case 35: printf("nIndex == 35\n"); break;
case 37: printf("nIndex == 37\n"); break;
case 666: printf("nIndex == 666\n"); break;
default: printf("default\n"); break;
}
如果代码清单5-17中没有case 666这句代码,可以采用非线性索引表方式进行优化。有了case 666这句代码后,便无法使用仿造if else优化、有序线性优化、非线性索引表优化等方式。需要使用更强大的解决方案,将switch做成树,Debug版代码见代码清单5-18。 代码清单5-18 树结构switch片段—Debug版 switch(nIndex){ // 源码对比
00401490 mov ecx,dword ptr [ebp-4]
00401493 mov dword ptr [ebp-8],ecx
; 取出变量nIndex进行比较
00401496 cmp dword ptr [ebp-8],0Ah
; 条件跳转,大于10跳转到地址0x004014B9处
0040149A jg SwitchTree+59h (004014b9)
0040149C cmp dword ptr [ebp-8],0Ah
; 条件跳转,等于10跳转到地址0x004014FD处
004014A0 je SwitchTree+9Dh (004014fd)
004014A2 cmp dword ptr [ebp-8],2
; 条件跳转,等于2跳转到地址0x004014D0处
004014A6 je SwitchTree+70h (004014d0)
004014A8 cmp dword ptr [ebp-8],3
; 条件跳转,等于3跳转到地址0x004014DF处
004014AC je SwitchTree+7Fh (004014df)
004014AE cmp dword ptr [ebp-8],8
; 条件跳转,等于8跳转到地址0x004014EE处
004014B2 je SwitchTree+8Eh (004014ee)
; JE跳转失败,直接跳转到地址0x00401539(default块首地址)处
004014B4 jmp SwitchTree+0D9h (00401539)
004014B9 cmp dword ptr [ebp-8],23h
; 条件跳转,等于35跳转到地址0x0040150C处
004014BD je SwitchTree+0ACh (0040150c)
004014BF cmp dword ptr [ebp-8],25h
; 条件跳转,等于37跳转到地址0x0040151B处
004014C3 je SwitchTree+0BBh (0040151b)
004014C5 cmp dword ptr [ebp-8],29Ah
; 条件跳转,等于666跳转到地址0x0040152A处
004014CC je SwitchTree+0CAh (0040152a)
; JE跳转失败,直接跳转到地址0x00401539(default块首地址)处
004014CE jmp SwitchTree+0D9h (00401539)
…… // case 语句块部分略
// default 语句块
default:printf("default\n");break; // 源码对比
00401539 push offset string "default\n" (004230b0)
0040153E call printf (004015e0)
00401543 add esp,4
分析代码清单5-18得出,在switch的处理代码中,比较判断的次数非常之多。首先与10进行了比较,大于10跳转到地址0x004014B9处,这个地址对应的代码又是条件跳转操作,比较的数值为35。如果不等于35,则与37比较;不等于37又再次与666进行比较;与666比较失败后会跳转到switch结尾或default块的首地址处。到此为止,大于10的比较就全部结束了。从这几处比较可以发现,这类似一个if 分支结构。 继续分析,第一次与10进行比较,小于10则顺序向下执行。再次与2进行比较,如果不等于2,就继续与3比较;如果不等于3,再继续与8进行比较。小于10的比较操作到此就都结束了,很明显,条件跳转指令后,没有语句块,这是一个仿造if else的switch分支结构。大于10的比较情况与小于10的类似,也是一个仿造的if else分支结构。如果每一次比较都以失败告终,最后将只能够执行JMP指令,跳转到地址0x00401539处,即default块首地址。将这两段比较组合后的结构图如图5-9所示。 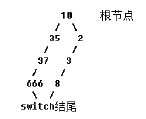 图5-9 二叉判定树 图5-9为代码清单5-18的结构图,从图中可以发现,这棵树的左右两侧并不平衡,而是两个if else结构。由于判断较少,平衡后的效果并不明显,且进行树平衡的效率明显低于if else。这时,编译器采取的策略是,当树中的叶子节点数小于等于3时,就会转换形成一个if else 结构。 当向左子树中插入一个叶子节点10000时,左子树叶子节点数大于4。此时if else的转换已经不适合了,优先查看是否可以匹配有序线性优化、非线性索引表优化,如果可以,则转换为相应的优化。在不符合以上两个优化规则的情况下,就做成平衡树。 在Release版下,使用IDA查看编译器是如何优化的。树结构流程图如图5-10所示。 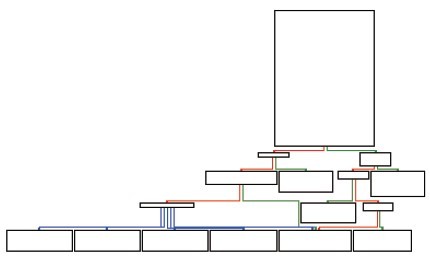 图5-10 树结构流程图 图5-10是从IDA中提取出来的,根据流程走向可以看出,有一个根节点,左边的多分支流程结构很像一个switch,而右边则是一个多次比较判断,和if else类似。进一步观察汇编代码,如代码清单5-19所示。 代码清单5-19 判定树结构片段1—Release版 .text:00401018 mov eax, [esp+0Ch+var_4] ; 平衡scanf的参数 .text:0040101C add esp, 8 ; eax中保存着switch语句的参数,与35 比较 .text:0040101F cmp eax, 35 ; 大于35跳转到标号short loc_401080处 .text:00401022 jg short loc_401080 ; 等于35跳转到标号short loc_401071处 .text:00401024 jz short loc_401071 ; 用eax加-2,进行下标平衡 .text:00401026 add eax, 0FFFFFFFEh ; switch 9 cases ; 比较最大case值,之前进行了减2的对齐下标操作 ; 这里的比较数为8,考察对齐下标操作后,说明这里的最大case值为10 .text:00401029 cmp eax, 8 ; 大于8跳转到标号short loc_401093处 ; IDA已经识别出这是个default分支 .text:0040102C ja short loc_401093 ; default ; 看到这种4字节的相对比例因子寻址方式,之前又进行了下标判断比较, ; 可以肯定这个off_4010D0标号的地址为case地址表 .text:0040102E jmp ds:off_4010D0[eax*4] ; switch jump 判定树中的case地址表如图5-11所示。 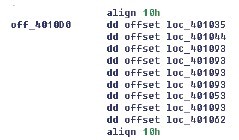 图5-11 判定树中的case地址表—Release版 图5-11中的编号off_4010D0并不容易识别,可将此标号重新命名—按N键重新命名为CASE_JMP_TABLE,表示这是一个case跳转表。这个表保存了10个case块的首地址,其中的5个地址值相同,这5个地址值表示的可能是default语句块的首地址或者switch的结束地址。将编号loc_401093修改为SWITCH_DEFAULT,这样,图5-11中还剩下4个地址标号需要解释。 根据之前所学的知识,这个表中的第0项为下标值加下标对齐值—下标对齐值为2,地址标号loc_401035为表中第0项,对应的case值为0 + 2,将其修改为CASE_2。类似地,标号loc_401044为 case 3代码块的首地址,可修改为CASE_3;标号loc_401053为 case 8代码块的首地址,可修改为CASE_8;标号loc_401062为 case 10代码块的首地址,可修改为CASE_10。这样线性表部分就全都分析完了。 在代码清单5-19中还有两个标号short loc_401080与short loc_401071。标号short loc_40107表示的是比较等于35后才会跳转到的地址,可以判断这个标号表示的地址为case 35语句块的首地址,将其重新命名为CASE_35。如果大于35,则会跳转到标号short loc_401080表示的地址处。继续分析汇编代码,如代码清单5-20所示。 代码清单5-20 树结构片段2—Release版 .text:00401080 loc_401080: .text:00401080 cmp eax, 37 ; 比较是否等于37,等于则跳转到标号short loc_4010C0 .text:00401083 jz short loc_4010C0 .text:00401085 cmp eax, 666 ; 比较是否等于666,等于则跳转到标号short loc_4010B1 .text:0040108A jz short loc_4010B1 .text:0040108C cmp eax, 10000 ; 比较是否等于10000,等于则跳转到标号short loc_4010A2 .text:00401091 jz short loc_4010A2 代码清单5-20中的多分支结构为一个仿if else的switch结构,在两个比较跳转中间没有任何语句执行块。根据比较的数值可以知道跳转的地址标号代表的case语句。标号short loc_4010C0表示 case 37代码块的首地址,可修改为 CASE_37,标号short loc_4010B1表示 case 666代码块的首地址,可修改为 CASE_666,标号short loc_4010A2表示case 10000代码块的首地址,可修改为CASE_10000。至此,这个switch结构分析完毕。 为了降低树的高度,在树的优化过程中,检测树的左子树或右子树能否满足if else优化、有序线性优化、非线性索引优化,利用这三种优化来降低树高度。选择哪种优化也是有顺序的,谁的效率最高,又满足其匹配条件,就可以被优先使用。以上三种优化都无法匹配,就会选择使用判定树。 |
|
|
[推荐]《C++反汇编与逆向分析技术揭秘》第5章 流程控制语句的识别
互动网:http://product.china-pub.com/198624 卓越网:http://www.amazon.cn/dp/B005OGEL7I 当当网:http://product.dangdang.com/product.aspx?product_id=22507674 目前这三家书店还都处于预订状态,正在紧急发货上架,让大家久等了 嘿嘿,问题回答完毕,我就继续发样张,让大家先解解馋啦 |
|
|
[推荐]《C++反汇编与逆向分析技术揭秘》第5章 流程控制语句的识别
通过5.4节的学习可知,当switch为一个有序线性组合时,会对其case语句块制作地址表,以减少比较跳转次数。但并非所有switch结构都是有序线性的,当两个case值的间隔较大时,仍然使用switch的结尾地址或者default语句块的首地址来代替地址表中缺少的case地址,这样就会造成极大的空间浪费。 对于非线性的switch结构,可以采用制作索引表的方法来进行优化。索引表优化,需要两张表:一张为case语句块地址表,另一张为case语句块索引表。 地址表中的每一项保存一个case语句块的首地址,有几个case语句块就有几项。default语句块也在其中,如果没有则保存一个switch结束地址。这个结束地址在地址表中只会保存一份,不会像有序线性地址表那样,重复保存switch的结束地址。 索引表中保存地址表的编号,它的大小等于最大case值和最小case值的差。当差值大于255时,这种优化方案也会浪费空间,可通过树方式优化,这里就只讨论差值小于或等于255的情况。表中的每一项为一个字节大小,保存的数据为case语句块地址表中的索引编号。 当case值比较稀疏,且没有明显的线性关系时,如将代码清单5-11中case 7改为case 15,并且还采用有序线性的方式优化,则在case地址表中,下标7~15之间将保存switch结构的结尾地址,这样会浪费很多空间。所以,这样的情况可以采用二次查表法来查找地址。 首先将所有case语句块的首地址保存在一个地址表中,参见图5-8。地址表中的表项个数会根据程序中case分支来决定。有多少个case分支,地址表就会有多少项,不会像有序线性那样过多浪费内存。但是,如何通过case值获取对应地址表中保存的case语句块首地址呢?为此建立了一张对应的索引表,参见图5-7,索引表中保存了地址表中的下标值。索引表中最多可以存储256项,每一项的大小为1字节,这决定了case值不可以超过1字节的最大表示范围(0~255),因此索引表也只能存储256项索引编号。 在数值间隔过多的情况下,与上节介绍的制作单一的case线性地址表相比,制作索引表的方式更加节省空间,但是由于在执行时需要通过索引表来查询地址表,会多出一次查询地址表的过程,因此效率会有所下降。我们可以通过图5-6来了解非线性索引表的组成结构。 此方案所占用的内存空间如下: (MAX - MIN)* 1字节 = 索引表大小 SUM * 4字节 = 地址表大小 占用总字节数 = ((MAX - MIN)* 1字节)+(SUM * 4字节) 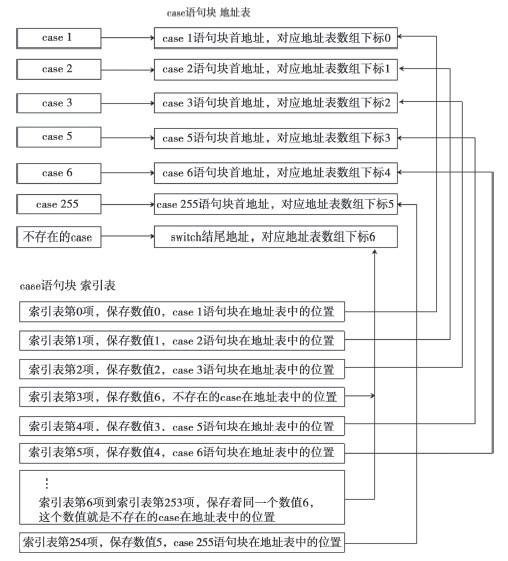 图5-6 索引表结构模拟图 看了这么多的理论,你可能会觉得烦琐,通过实际调试,你会发现这个优化结构很简单,并没有想象中的那么复杂,如代码清单5-15所示。 代码清单5-15 非线性索引表的C++代码 int nIndex = 0;
scanf("%d", &nIndex);
switch(nIndex){
case 1: printf("nIndex == 1");break;
case 2: printf("nIndex == 2");break;
case 3: printf("nIndex == 3");break;
case 5: printf("nIndex == 5");break;
case 6: printf("nIndex == 6");break;
case 255: printf("nIndex == 255");break;
}
在代码清单5-15中,从case 1开始到case 255结束,共255个case值,会生成一个255字节大小索引表。其中从6到255间隔了249个case值, 这249项保存的是case语句块地址表中switch的结尾地址下标,如代码清单5-16所示。 代码清单5-16 非线性索引表—Debug版 switch(nIndex){ // 源码对比
0040DF80 mov ecx,dword ptr [ebp-4]
0040DF83 mov dword ptr [ebp-8],ecx
; 这三条指令为取出变量nIndex的值并保存到edx的操作
0040DF86 mov edx,dword ptr [ebp-8]
; 索引表以0下标开始,case最小标号值为1,需要进行减1调整
0040DF89 sub edx,1
; 将对齐下标后的值放回到临时变量ebp-8中
0040DF8C mov dword ptr [ebp-8],edx
; 将临时变量与254进行无符号比较,若临时变量大于254则跳转
; 跳转到地址0x0040e002处,那里是switch结构的结尾
0040DF8F cmp dword ptr [ebp-8],0FEh
0040DF96 ja $L566+0Dh (0040e002)
; switch的参数值在case值范围内,取出临时变量中的数据并保存到ecx中
0040DF98 mov ecx,dword ptr [ebp-8]
; 清空eax的值,以ecx为下标在索引表中取出1字节的内容放入al中
; 地址0x0040E02F为索引表的首地址,查看图5-5
0040DF9B xor eax,eax
; 从索引表中取出对应地址表的下标
0040DF9D mov al,byte ptr (0040e02f)[ecx]
; 以eax作下标,0x0040E013为基址进行寻址,跳转到该地址处
; 地址0x0040E013为case语句块地址表的首地址,查看图5-5
0040DFA3 jmp dword ptr [eax*4+40E013h]
case 1: printf("nIndex == 1"); // 源码对比
0040DFAA push offset string "nIndex == 1" (00421024)
0040DFAF call printf (004014b0)
0040DFB4 add esp,4
break; // 源码对比
0040DFB7 jmp $L566+0Dh (0040e002)
case 2: printf("nIndex == 2"); // 源码对比
0040DFB9 push offset string "nIndex == 2" (0042003c)
0040DFBE call printf (004014b0)
0040DFC3 add esp,4
break; // 源码对比
0040DFC6 jmp $L566+0Dh (0040e002)
case 3: printf("nIndex == 3"); // 源码对比
0040DFC8 push offset string "nIndex == 3" (004210d8)
0040DFCD call printf (004014b0)
0040DFD2 add esp,4
break; // 源码对比
0040DFD5 jmp $L566+0Dh (0040e002)
case 5: printf("nIndex == 5"); // 源码对比
0040DFD7 push offset string "i == 3" (00420028)
0040DFDC call printf (004014b0)
0040DFE1 add esp,4
break; // 源码对比
0040DFE4 jmp $L566+0Dh (0040e002)
case 6: printf("nIndex == 6");
0040DFE6 push offset string "nIndex == 6" (004210cc)
0040DFEB call printf (004014b0)
0040DFF0 add esp,4
break; // 源码对比
0040DFF3 jmp $L566+0Dh (0040e002)
case 255: printf("nIndex == 255"); // 源码对比
0040DFF5 push offset string "nIndex == 255" (0042005c)
0040DFFA call printf (004014b0)
0040DFFF add esp,4
break; } // 源码对比
; switch结束地址
0040E002 pop edi
代码清单5-16首先查询索引表,索引表由数组组成,数组的每一项大小为1字节。从索引表中取出地址表的下标,根据下标值,找到跳转地址表中对应的case语句块首地址,跳转到该地址处。这种查询方式会产生两次间接内存访问,在效率上低于线性表方式。 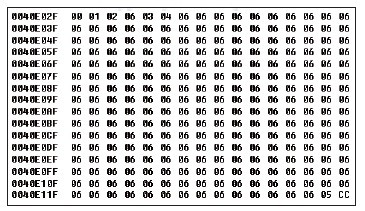 图5-7 非线性索引表—Debug版 图5-7中的第0项为数值0,在图5-8的地址表中查询第0项,取4字节数据作为case语句块首地址—0x0040DFAA,对应代码清单5-16中的“case 1”的首地址(还记得之前的减1调整吗?见代码清单5-16中的0040DF89地址处)。在表中,标号相同的为switch的结束地址标号(有default块则是default块的地址)。然后在地址表中第6项找到switch的结束地址,图5-8中地址表的第6项对应的地址为0x0040E02B。该地址中保存的数据按照地址方式解释为:0x0040E002对应着代码清单5-16中switch的结束地址。 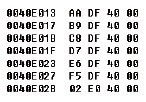 图5-8 非线性地址表—Debug版 已知case语句数及每个case语句块的地址,如何还原每个case的标号值呢?需要将两表相结合,分析出每个case语句的标号值。将索引表看做一个数组,参考反汇编代码中将索引表对齐到0下标的操作,代码清单5-16中对齐到0下标的数值为-1,因此地址表所对应的索引表的下标加1就是case语句的标号值。 例如,索引表中的第0项内容为0(索引表以0为起始下标),在表中是一个独立的数据,说明其不是switch结尾地址下标。它对应于地址表中第0项,地址0x0040DFAA这条case语句的标号值就是(0+1=1)1。地址表中的最后一项0x0040E002是表中的第6项,这个值在索引表中重复出现,可以断定其是switch的结束地址或者是default语句块的首地址。地址表第5项0x0040DFF5对应索引表中的下标值254,将其加1就是地址0x0040DFF5的case语句标号值。 在case语句块中没有任何代码的情况下,索引表中也会出现相同标号。由于case中没有任何代码,当执行到它时,则会顺序向下,直到发现下一个case语句不为空为止。这时所有没有代码的case属于一段多个case值共用的代码。索引表中这些case的对应位置处所保存的都是这段共用代码在地址表中的下标值,因此出现了索引表中标号相同的情况。 总结: mov reg, mem ; 取出switch变量 sub reg,1 ; 调整对齐到索引表的下标0 mov mem, reg ; 影响标记位的指令 jxx xxxx ; 超出范围跳转到switch结尾或default mov reg, [mem] ; 取出switch变量 ; eax不是必须使用的,但之后的数组查询用到的寄存器一定是此处使用到的寄存器 xor eax,eax mov al,byte ptr (xxxx)[reg] ; 查询索引表,得到地址表的下标 jmp dword ptr [eax*4+xxxx] ; 查询地址表,得到对应的case块的首地址 如果遇到以上代码块,可判定其是添加了索引表的switch结构。这里有两次查找地址表的过程,先分析第一次查表代码,byte ptr指明了表中的元素类型为byte;然后分析是否使用在第一次查表中获取的单字节数据作为下标,从而决定是否使用相对比例因子的寻址方式进行第二次查表;最后检查基址是否指向了地址表。有了这些特征后,即可参考索引表中保存的下标值来恢复索引表形式的switch结构中的每一句case原型。 |
|
|
[推荐]《C++反汇编与逆向分析技术揭秘》第5章 流程控制语句的识别
switch是比较常用的多分支结构,使用起来也非常方便,并且效率上也高于if…else if多分支结构。同样是多分支结构,switch是如何进行比较并选择分支的?它和if…else if的处理过程一样吗?下面我们通过简单的switch多分支结构慢慢揭开它的神秘面纱。编写case语句块不超过3条的switch多分支结构,如代码清单5-8所示。 代码清单5-8 switch 转换if else的 C++代码 //略去无关代码
int nIndex = 1;
scanf("%d", &nIndex);
switch(nIndex) {
case 1: printf("nIndex == 1"); break;
case 3: printf("nIndex == 3"); break;
case 100: printf("nIndex == 100") ;break;
}
代码清单5-8中的case语句块只有3条,也就是只有3条分支。if…else if的处理方案是分别进行比较,得到选择的分支,并跳转到分支语句块中。switch也会使用同样的方法进行分支处理吗?下面通过代码清单5-9进行分析和验证。 代码清单5-9 switch 转换if else —Debug版 switch(nIndex) { // 源码对比
0040DF00 mov ecx,dword ptr [ebp-4]
; 取出变量nIndex的值并放到ecx中,再将ecx放入临时变量 ebp - 8中
0040DF03 mov dword ptr [ebp-8],ecx
; 将临时变量和1进行比较
0040DF06 cmp dword ptr [ebp-8],1
; 条件跳转比较,等于1则跳转到地址0x0040DF1A处
0040DF0A je SwitchIf+4Ah (0040df1a)
; 将临时变量和3比较
0040DF0C cmp dword ptr [ebp-8],3
; 条件跳转比较,等于3则跳转到地址0x0040DF29处
0040DF10 je SwitchIf+59h (0040df29)
; 将临时变量和100比较
0040DF12 cmp dword ptr [ebp-8],64h
; 条件跳转比较,等于100则跳转到地址0x0040DF38处
0040DF16 je SwitchIf+68h (0040df38)
0040DF18 jmp SwitchIf+75h (0040df45)
case 1: // 源码对比
printf("nIndex == 1"); // 源码对比
0040DF1A push offset string "nIndex == 1" (00421024)
0040DF1F call printf (004014b0)
0040DF24 add esp,4
break; // 源码对比
0040DF27 jmp SwitchIf+75h (0040df45)
case 3: // 源码对比
printf("nIndex == 3"); // 源码对比
0040DF29 push offset string "nIndex == 3" (004210d8)
0040DF2E call printf (004014b0)
0040DF33 add esp,4
break; // 源码对比
0040DF36 jmp SwitchIf+75h (0040df45)
case 100: // 源码对比
printf("nIndex == 100"); // 源码对比
0040DF38 push offset string "nIndex == 100" (0042004c)
0040DF3D call printf (004014b0)
0040DF42 add esp,4
break; }} // 源码对比
0040DF45 pop edi
从对代码清单5-9的分析中得出,switch语句使用了3次条件跳转指令,分别与1、3、100进行了比较。如果比较条件成立,则跳转到对应的语句块中。这种结构与if…else if多分支结构非常相似,但仔细分析后发现,它们之间有很大的区别。先看看if…else if结构产生的代码,如代码清单5-10所示。 代码清单5-10 if…else if结构—Debug版 if (nIndex == 1) { // 源码对比
; if比较跳转
004011C5 cmp dword ptr [ebp-4],1
004011C9 jne SwitchIf+8Ah (004011da)
printf("nIndex == 1"); // 源码对比
; if语句块
004011CB push offset string "nIndex == 1" (00423080)
004011D0 call printf (00401680)
004011D5 add esp,4
}else if (nIndex == 3) // 源码对比
; else跳转
004011D8 jmp SwitchIf+0B2h (00401202)
; if比较跳转
004011DA cmp dword ptr [ebp-4],3
004011DE jne SwitchIf+9Fh (004011ef)
{printf("nIndex == 3"); // 源码对比
; if语句块
004011E0 push offset string "nIndex == 3" (0042304c)
004011E5 call printf (00401680)
004011EA add esp,4
}else if (nIndex == 3) // 源码对比
; else 跳转
004011ED jmp SwitchIf+0B2h (00401202)
; if比较跳转
004011EF cmp dword ptr [ebp-4],3
004011F3 jne SwitchIf+0B2h (00401202)
{ printf("nIndex == 100"); // 源码对比
; if语句块
004011F5 push offset string "nIndex == 100" (00423090)
004011FA call printf (00401680)
004011FF add esp,4
} // 结尾
将代码清单5-10与代码清单5-9进行对比分析:if…else if结构会在条件跳转后紧跟语句块;而switch结构则将所有的条件跳转都放置在了一起,并没有发现case语句块的踪影。通过条件跳转指令,跳转到相应case语句块中,因此每个case的执行是由switch比较结果引导“跳”过来的。所有case语句块都是连在一起的,这样是为了实现C语法的要求,在case语句块中没有break语句时,可以顺序执行后续case语句块。 总结: mov reg, mem ; 取出switch中考察的变量 ; 影响标志位的指令 jxx xxxx ; 跳转到对应case语句块的首地址处 ; 影响标志位的指令 jxx xxxx ; 影响标志位的指令 jxx xxxx jmp END ; 跳转到switch的结尾地址处 ...... ; case语句块的首地址 jmp END ; case语句块结束,有break则产生这个jmp ...... ; case语句块的首地址 jmp END ; case语句块的结束,有break则产生这个jmp ...... ; case语句块的首地址 jmp END ; case语句块结束,有break则产生这个jmp END: ; switch结尾 ...... 遇到这样的代码块,需要重点考察每个条件跳转指令后是否跟有语句块,以辨别switch分支结构。根据每个条件跳转到的地址来分辨case语句块首地址。如果case语句块内有break,会出现jmp作为结尾。如果没有break,可参考两个条件跳转所跳转到的目标地址,这两个地址之间的代码便是一个case语句块。 在switch分支数小于4的情况下,VC++ 6.0采用模拟if…else if的方法。这样做并没有发挥出switch的优势,在效率上也没有if…else if强。当分支数大于3,并且case的判定值存在明显线性关系组合时,switch的优化特性便可以凸显出来,如代码清单5-11所示。 代码清单5-11 有序线性的C++示例代码 int nIndex = 0;
scanf("%d", & nIndex);
switch(nIndex){
case 1: printf("nIndex == 1");break;
case 2: printf("nIndex == 2");break;
case 3: printf("nIndex == 3");break;
case 5: printf("nIndex == 5");break;
case 6: printf("nIndex == 6");break;
case 7: printf("nIndex == 7");break;
}
在此段代码中,case语句的标号为一个数值为1~7的有序序列。按照if…else if转换规则,会将1~7的数值依次比较一次,从而得到分支选择结果。这么做需要比较的次数太多,如何降低比较次数,提升效率呢?由于是有序线性的数值,可将每个case语句块的地址预先保存在数组中,考察switch语句的参数,并依此查询case语句块地址的数组,从而得到对应case语句块的首地址,通过代码清单5-12,验证这一优化方案。 代码清单5-12 有序线性示例—Debug版 switch(nIndex) { // 源码对比
; 将变量nIndex内容放入ecx中
00401110 mov ecx,dword ptr [ebp-4]
; 取出ecx的值并放入临时变量ebp-8中
00401113 mov dword ptr [ebp-8],ecx
; 取临时变量的值放入edx中,这几句代码的功能看似没有区别
; 只有在Debug版下才会出现
00401116 mov edx,dword ptr [ebp-8]
; 对edx减1,进行下标平衡
00401119 sub edx,1
; 将加1后的临时变量放回
0040111C mov dword ptr [ebp-8],edx
; 判断临时变量是否大于6
0040111F cmp dword ptr [ebp-8],6
; 大于6跳转到0x00401187处
00401123 ja $L556+0Dh (00401187)
; 取出临时变量的值放到eax中
00401125 mov eax,dword ptr [ebp-8]
; 以eax为下标,0x00401198为基址进行寻址,跳转到该地址处
; 注意:地址0x00401198就是case地址数组
00401128 jmp dword ptr [eax*4+401198h]
代码清单5-12的第4条汇编语句为什么要对edx减1呢?因为代码中为case语句制作了一份case地址数组(或者称为“case地址表”),这个数组保存了每个case语句块的首地址,并且数组下标是以0为起始。而case中的最小值是1,与case地址表的起始下标是不对应的,所以需要对edx减1调整,使其可以作为表格的下标进行寻址。 在进入switch后会先进行一次比较,检查输入的数值是否大于case值的最大值,由于case的最小值为1,那么对齐到0下标后,示例中case的最大值为(7-1=6)6。又由于使用了无符号比较(ja指令是无符号比较,大于则跳转),当输入的数值为0或一个负数时,同样会大于6,将直接跳转到switch的末尾。当然,如果有default分支,就直接跳至default语句块的首地址。当case的最小值为0时,不需要调整下标,当然也不会出现类似“sub edx,1”这样的下标调整代码。 保证了switch的参数值在case最大值的范围内,就可以以地址0x00401198作为基地址进行寻址了,查表①后跳转到对应case地址处。地址0x00401198就是case地址表(数组)的首地址,图5-3便是代码清单5-12的case地址表信息。 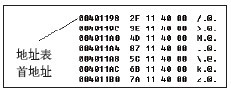 图5-3 有序线性case地址表 图5-3以0x00401198为起始地址,每4个字节数据保存了一个case语句块的首地址。依次排序下来,第一个case语句块所在地址为0x0040112F。表中第0项保存的内容为0x0040112F,即case 1 语句块的首地址。当输入给switch的参数值为1时,编译器减1调整到case地址数组的下标0后,eax*4+401198h就变成了0 * 4 + 0x00401198,查表得到第0项,即得到case 1语句块的首地址。其他case语句块首地址的查询同理,不再赘述。case语句块的首地址可以对照代码清单5-13查询。 代码清单5-13 线性的case语句块—Debug版 case 1: printf("nIndex == 1"); // 源码对比
; 取字符串"nIndex == 1"的首地址0x0004200470作为参数并压栈
0040112F push offset string "nIndex == 1" (00420070)
; 调用printf函数输出字符串,__cdecl调用方式
00401134 call printf (004014b0)
; 平衡printf参数的栈空间
00401139 add esp,4
break; // 源码对比
; 跳转到switch结束处,以下case语句相似,不做注释说明
0040113C jmp $L556+0Dh (00401187)
case 2: printf("nIndex == 2"); // 源码对比
0040113E push offset string "nIndex == 2" (00420064)
00401143 call printf (004014b0)
00401148 add esp,4
break; // 源码对比
0040114B jmp $L556+0Dh (00401187)
case 3: printf("nIndex == 3"); // 源码对比
0040114D push offset string "nIndex == 3" (00420058)
00401152 call printf (004014b0)
00401157 add esp,4
break; // 源码对比
0040115A jmp $L556+0Dh (00401187)
case 5: printf("nIndex == 5"); // 源码对比
0040115C push offset string "nIndex == 5" (00420048)
00401161 call printf (004014b0)
00401166 add esp,4
break; // 源码对比
00401169 jmp $L556+0Dh (00401187)
case 6: printf("nIndex == 6"); // 源码对比
0040116B push offset string "nIndex == 6" (00421024)
00401170 call printf (004014b0)
00401175 add esp,4
break; // 源码对比
00401178 jmp $L556+0Dh (00401187)
case 7: printf("nIndex == 7"); // 源码对比
0040117A push offset string "nIndex == 7" (0042003c)
0040117F call printf (004014b0)
00401184 add esp,4
break; // 源码对比
将图5-3和代码清单5-13对比可知,每个case语句块的首地址都在表中,但有一个地址却不是case语句块的首地址0x00401187。这个地址是每句break跳转的一个地址值,显然这是switch结束的地址。这个地址值出现在图5-3表格的第3项,表格项的下标以0为起始,反推回case应该是(3+1=4)4,而实际中却没有case 4 这个语句块。为了达到线性有序,对于没有case对应的数值,编译器以switch的结束地址或者default语句块的首地址填充对应的表格项。 代码清单5-13中的每一个break语句都对应一个jmp指令,跳转到的地址都是switch的结束地址处,起到了跳出switch的作用。如果没有break语句,则会顺序执行代码,执行到下一句case语句块中,这便是case语句中没有break可以顺序执行的原因。 代码清单5-13中没有使用default语句块。当所有条件都不成立后,才会执行到default语句块,它和switch的末尾实质上是等价的。switch中出现default后,就会填写default语句块的首地址作为switch的结束地址。 如果每两个case值之间的差值小于等于6,并且case语句数大于等于4,编译器中就会形成这种线性结构。在编写代码的过程中无需有序排列case值,编译器会在编译过程中对case线性地址表进行排序,如case的顺序为3、2、1、4、5,在case线性地址表中,会将它们的语句块的首地址进行排序,将case 1语句块的首地址放在case线性地址表的第0项上,case 2语句块首地址放在表中第1项,以此类推,将首地址变为一个有序的表格进行存放。 这种switch的识别有两个关键点,取数值内容进行比较;比较跳转失败后,出现4字节的相对比例因子寻址方式。有了这两个特性,就可以从代码中正确分析出switch结构。switch结构中的case线性地址模拟图如图5-4所示。 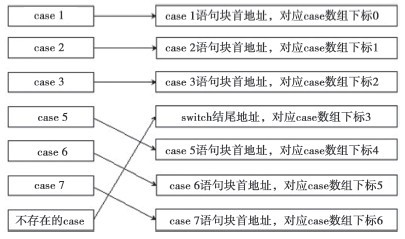 图5-4 case线性地址表模拟图 Release版与Debug版的反汇编代码基本一致,下面将在Release版中对这种结构进行实际分析,如代码清单5-14所示。 代码清单5-14 case语句的有序线性结构—Release版 ; 取出switch语句的参数值并放入ecx中 00401018 mov ecx,dword ptr [esp+8] 0040101C add esp,8 ; 平衡scanf函数的参数 ; 将ecx减1后放入eax中,因为最小的case 1存放在case地址表中下标为0处,需要调整对齐到0下标,便于直接查表 0040101F lea eax,[ecx-1] ; 与6进行比较,有了这两步操作可以初步假设这里的代码是一个switch结构 ; 无符号比较,大于6时跳转到地址0x00401086处 00401022 cmp eax,6 00401025 ja 00401086 ; 下面的指令体现了switch的第二个特性:查表(case地址表) ; 可以确认这是一个switch结构 ; 上一步的跳转地址00401086就是switch结尾或者是default语句块的首地址 ; 下面指令中的地址0x00401088便是case线性地址表的首地址 ; 可参考图5-5 00401027 jmp dword ptr [eax*4+401088h] ; 地址0x0040706C为字符串"nIndex == 1"的首地址 ; 此处为第一个case语句块的地址 0040102E push 40706Ch ; 此处调用printf函数 00401033 call 004012F0 ; 平衡printf函数破坏的栈空间 00401038 add esp,4 ; 还原esp 0040103B pop ecx ; 返回,在Release版中,编译器发现switch后什么也没做就直接返回,所以 ; 将每句break优化为了return ; 到此处,第一个case语句块结束,顺序向下为第二个case语句块 0040103C ret ; 第二个case语句块 ; 以下代码相似,除地址外,不再进行注释,请读者自行分析 ; 地址0x00407060为字符串"nIndex == 2"的首地址 0040103D push 407060h 00401042 call 004012F0 00401047 add esp,4 0040104A pop ecx 0040104B ret ; 第三个case语句块 ; 地址0x00407054为字符串"nIndex == 3"的首地址 0040104C push 407054h 00401051 call 004012F0 00401056 add esp,4 00401059 pop ecx 0040105A ret ; 第四个case语句块 ; 地址0x00407048为字符串"nIndex == 5"的首地址 0040105B push 407048h 00401060 call 004012F0 00401065 add esp,4 00401068 pop ecx 00401069 ret ; 第五个case语句块 ; 地址0x0040703C为字符串"nIndex == 6"的首地址 0040106A push 40703Ch 0040106F call 004012F0 00401074 add esp,4 00401077 pop ecx 00401078 ret ; 第六个case语句块 ; 地址0x00407030为字符串"nIndex == 7"的首地址 00401079 push 407030h 0040107E call 004012F0 00401083 add esp,4 00401086 pop ecx 00401087 ret 所有的case语句块都已找到,接下来将每个case的标号值进行还原。如何得到这个标号值呢?很简单,只要找到case线性地址表即可。此示例的case线性地址表的首地址为0x00401088,如图5-5所示。  图5-5 switch的有序线性case地址表 case线性地址表是一个有序表,在switch语句块中有减1操作,地址表是以0为下标开始,那么表中的第0项对应的case标号值应为(0+1=1)1,地址0x0040102E处为“case 1”。后续case语句块按此方案,请读者进行依次还原。 总结: mov reg, mem ; 取变量 ; 对变量进行运算,对齐case地址表的0下标,非必要 ; 上例中的eax也可用其他寄存器替换,这里也可以是其他类型的运算 lea eax, [reg+xxxx] ; 影响标志位的指令,进行范围检查 jxx DEFAULT_ADDR jmp dword ptr [eax*4+xxxx]; 地址xxxx为case地址表的首地址 当遇到这样的代码块时,可获取某一变量的信息并对其进行范围检查,如果超过case的最大值,则跳转条件成立 ,跳转目标指明了switch语句块的末尾或者是default块的首地址。条件跳转后紧跟jmp指令,并且是相对比例因子寻址方式,且基址为地址表的首地址,说明此处是线性关系的switch分支结构。对变量做运算,使对齐到case地址表0下标的代码不一定存在(当case的最小值为0时)。根据每条case地址在表中的下标位置,即可反推出线性关系的switch分支结构原型。 |
|
|
[推荐]《C++反汇编与逆向分析技术揭秘》第5章 流程控制语句的识别
5.1节和5.2节介绍了由if与if…else…组成的分支结构。本节将介绍它们的组合形式—多分支结构。多分支结构类似于if…else…的组合方式,在if…else…的else之后再添加一个else if进行二次比较,这样就可以进行多次比较,再次选择程序流程,形成了多分支流程。它的C++语法格式为:if…else if…else if…,可重复后缀为else if。当最后为else时,便到了多分支结构的末尾处,不可再分支。通过代码清单5-6可以查看多分支结构的组成。 代码清单5-6 多分支结构—Debug版 // C++源码说明:多分支结构
void IfElseIf(int argc){
if (argc > 0){ // 判断函数参数argc是否大于0
printf("argc > 0"); // 比较成功后执行printf("argc > 0");
}else if (argc == 0){ // 判断函数参数argc是否等于0
printf("argc == 0"); // 比较成功后执行printf("argc == 0");
}else{ // 前两次比较都失败,则此条语句被执行
printf("argc <= 0");
}
}
// C++源码与对应汇编代码讲解
// C++源码对比
if (argc > 0)
; if比较转换
00401108 cmp dword ptr [ebp+8],0
; 使用JLE条件跳转指令,如果判断后的结果小于等于0,则跳转到地址0x0040111D
0040110C jle IfElseIf+2Dh (0040111d)
{
printf("argc > 0");
; printf函数讲解略
0040110E push offset string "argc > 0" (00420f9c)
00401113 call printf (00401150)
00401118 add esp,4
}else if (argc == 0)
; 对应else,当上一条if语句被执行,执行JMP指令,跳转到地址0x0040113F处
; 该地址为多分支结构结束地址,即最后一个else 或 else if的结束地址
0040111B jmp IfElseIf+4Fh (0040113f)
; if比较转换,使用条件跳转指令JNE,不等于0则跳转到地址0x00401132
0040111D cmp dword ptr [ebp+8],0
00401121 jne IfElseIf+42h (00401132)
{
printf("argc == 0");
; printf函数讲解略
00401123 push offset string "argc == 0" (0042003c)
00401128 call printf (00401150)
0040112D add esp,4
}else
; 跳转到多分支结构的结束地址
00401130 jmp IfElseIf+4Fh (0040113f)
{
printf("argc <= 0");
; 注意,此处无判定。当以上各个条件均不成立时,以下代码则无条件执行
; 可将此处定义为最后的else块
00401132 push offset string "argc != 0" (00420030)
00401137 call printf (00401150)
0040113C add esp,4
}
0040113F pop edi
代码清单5-6给出了if…else if…else 的组合。从代码中可以分析出,每条if语句由cmp和jxx组成,而else由一个jmp跳转到分支结构的最后一个语句块结束地址所组成。由此可见,虽然它们组合在了一起,但是每个if和else又都是独立的,if仍然是由CMP/TEST加jxx所组成,我们仍然可以根据上一节介绍的知识,利用jxx和jmp识别出if和else if语句块的边界,jxx指出了下一个else if的起始点,而jmp指出了整个多分支结构的末尾地址以及当前if或者else if语句块的末尾。最后的else块的边界也很容易识别,如果发现多分支块内的某一段代码在执行前没有判定,即可定义为else块,如上述代码中的00401132地址处。 总结: ; 会影响标志位的指令 jxx ELSE_IF_BEGIN ; 跳转到下一条else if语句块的首地址 IF_BEGIN: …… ; if语句块内的执行代码 IF_END: jmp END ; 跳转到多分支结构的结尾地址 ELSE_IF_BEGIN: ; else if 语句块的起始地址 ; 可影响标志位的指令 jxx ELSE_BEGIN ; 跳转到else分支语句块的首地址 …… ; else if语句块内的执行代码 IF_ELSE_ END: ; else if 结尾处 jmp END ; 跳转到多分支结构的结尾地址 ELSE_BEGIN: ; else语句块的起始地址 …… ; else语句块内的执行代码 END: ; 多分支结构的结尾处 …… 如果遇到这样的代码块,需要考察各跳转指令之间的关系。当每个条件跳转指令的跳转地址之前都紧跟JMP指令,并且它们跳转的地址值都一样时,可视为一个多分支结构。JMP指令指明了多分支结构的末尾,配合比较判断指令与条件跳转指令,可还原出各分支语句块的组成。如果某个分支语句块中没有判定类指令,但是存在语句块,且语句块的位置在多分支语句块范围内,可以判定其为else块。 由于编译器可以在编译期间对代码进行优化,当代码中的分支结构形成永远不可抵达的分支语句块时,它永远不会被执行,可以被优化掉而不参与编译处理。向代码清单5-6中插入一句“argc = 0;”,这样argc将被“常量传播”,因此可以在编译期得知,“if(argc < 0)”与“else”这两个分支语句块将永远不可抵达,它们就不会再参与编译。 void IfElseIf(int argc)
{
// 仿造可分支归并代码
argc = 0;
// 其他代码与代码清单5-6相同
}选择O2编译选项,将修改后的代码再次编译。使用IDA查看优化后的不可达分支是否被删除,如图5-2所示。 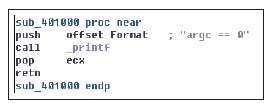 图5-2 优化后的不可达分支结构 优化后,图5-2中的不可达分支被删除了。由于只剩下一个必达的分支语句块,编译器直接提取出必达分支语句块中的代码,将整个分支结构替换,就形成了如图5-2所示的代码。更多分支结构的优化,会遵循第4章中讲述的各种优化方案。以代码清单5-6为例,此多分支结构执行结束后,并没有做任何工作,直接函数返回;且当某一分支判断成立时,其他分支将不会被执行。可以选择在每个语句块内插入return语句,以减少跳转次数。 代码清单5-6中的多分支结构,共有两条比较语句块。如果其中一个分支成立,则其他分支结构语句块便会被跳过。因此可将前两个分支语句块转换为单分支if结构,在各分支语句块中插入return语句,这样既没有破坏程序流程,又可以省略掉else语句。由于没有了else,减少了一次JMP跳转,使程序执行效率得到提高。其C++代码表现为: void IfElseIf(int argc){
if (argc > 0){ // 判断函数参数argc是否大于0
printf("argc > 0"); // 比较成功则执行printf("argc > 0");
return;
}
if (argc == 0){ // 判断函数参数argc是否等于0
printf("argc == 0");// 比较成功则执行printf("argc == 0");
return;
}
printf("argc <= 0"); // 否则执行printf("argc < 0");
return;
}
以上是我们在源码中进行的手工优化,编译器是否会按照我们的意图提升运行效率呢?开启O2编译选项,还原修改过的代码清单5-6,去掉“argc = 0;”再次编译。使用IDA分析反汇编代码,如代码清单5-7所示。 代码清单5-7 优化后的多分支结构—Release版 ; 函数入口处,对应代码清单5-6中if…else if函数 .text:00401000 sub_401000 proc near ; CODE XREF: _main+5p ; arg_0为函数参数 .text:00401000 arg_0 = dword ptr 4 ; 取出参数数据,放入eax,进行第一次if比较 .text:00401000 mov eax, [esp+arg_0] .text:00401004 test eax, eax ; 根据比较结果,使用条件跳转指令JLE,若小于等于则跳转到地址标号short loc_401016处 .text:00401006 jle short loc_401016 ; 跳转失败,执行printf函数参数传递及调用,显示字符串"argc > 0" .text:00401008 push offset Format ; "argc > 0" .text:0040100D call _printf .text:00401012 add esp, 4 ; 使用retn指令返回,结束函数调用 .text:00401015 retn ; 下面指令的注释是由IDA做的标记 ; 表示此处代码被标号sub_401000地址加6的地方引用 .text:00401016 loc_401016: ; CODE XREF: sub_401000+6j ; 第二条if比较,由于之前已经使用过test指令进行比较,这里省去重复操作 ; 直接使用条件跳转指令JNZ,若不等于0则跳转到地址标号short loc_401026处 .text:00401016 jnz short loc_401026 ; 跳转失败,执行printf函数参数传递及调用,显示字符串"argc == 0" .text:00401018 push offset aArgc0_0 ; "argc == 0" .text:0040101D call _printf .text:00401022 add esp, 4 ; 使用retn指令返回,结束函数调用 .text:00401025 retn ; 前两次比较判断都失败,执行此处代码 .text:00401026 loc_401026:; CODE XREF: sub_401000:loc_401016j .text:00401026 push offset aArgc0_1 ; "argc <= 0" .text:0040102B call _printf .text:00401030 pop ecx .text:00401031 retn .text:00401031 sub_401000 endp 由于选择的是O2优化选项,因此在优化方向上更注重效率,而不是节省空间。既然是对效率的优化,就会尽量减少分支中指令的使用。代码清单5-7中就省去了else对应的JMP指令,当第一次比较成功后,则直接在执行分支语句块后返回,省去了一次跳转操作,从而提升效率。 |
|
|
[推荐]《C++反汇编与逆向分析技术揭秘》第5章 流程控制语句的识别
5.1节讲述了if语句的构成,但是,只有if的语句是不完整的分支结构,图5-1对比了两种语句结构的执行流程。 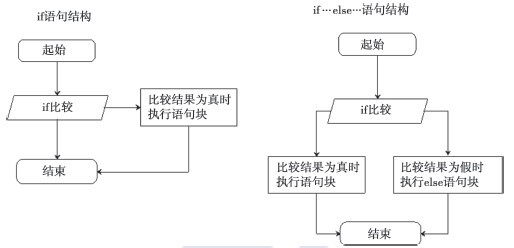 图5-1 if与if…else…结构对比 如图5-1所示,if语句是一个单分支结构,if…else…组合后是一个双分支结构。两者间完成的功能有所不同。从语法上看,if…else…只比if语句多出了一个else。else有两个功能,如果if判断成功,则跳过else分支语句块;如果if判断失败,则进入else分支语句块中。有了else语句的存在,程序在进行流程选择时,必会经过两个分支中的一个。通过代码清单5-3,我们来分析else如何实现这两个功能。 代码清单5-3 if…else…组合—Debug版 // C++源码说明:if…else…组合
if (argc == 0) {
// 执行if语句块
printf("argc == 0");
}else{
// 执行else语句块
printf("argc != 0");
}
// C++源码与对应汇编代码讲解
// C++源码对比,比较参数变量argc == 0
if (argc == 0)
; 使用变量argc减去0
004010B8 cmp dword ptr [ebp+8],0
; 使用条件跳转JNE,检查cmp影响标记位
; 跳转成立,跳转到地址0x004010CD处,即else语句块的首地址
004010BC jne IfElse+2Dh (004010cd)
{
// C++源码对比,进入if语句块,调用printf函数
printf("argc == 0");
; printf函数汇编讲解略
}else
; 直接跳转到地址0x004010DA地址处,当if语句执行后跳转过else语句块
004010CB jmp IfElse+3Ah (004010da)
{
// C++源码对比,进入else语句块,调用printf函数
printf("argc != 0");
; printf函数汇编讲解略
004010CD push offset string "argc != 0" (00420030)
004010D2 call printf (00401150)
004010D7 add esp,4
}
; else语句结束处
004010DA pop edi在代码清单5-3中,if语句转换的条件跳转和代码清单5-1中的if语句相同,都是取相反的条件跳转指令。而在else处(地址004010CB)多了一句jmp指令,这是为了在if语句比较后,如果结果为真,则程序流程执行if语句块并且跳过else语句块,反之执行else语句块。else处的jmp指令跳转的目标地址为else语句块结尾处的地址,这样的设计可以跳过else语句块,实现两个分支语句二选一的功能。 4.2.3节介绍了条件表达式,当条件表达式中的表达式2或表达式3为变量时,没有进行优化处理。条件表达式转换后的汇编代码和if…else…结构非常相似,将代码清单4-17与代码清单5-3进行分析对比可以发现,两者间有很多相似之处,如没有源码比照,想要分辨出是条件表达式还是if…else…结构实在太难。它们都是先比较,然后再执行条件跳转指令,最后进行流程选择的。 通常,VC++ 6.0对条件表达式和if…else…使用同一套处理方式。代码清单5-3对应条件表达式转换方式4。将代码清单5-3稍作改动,改为符合条件表达式转换方式1的形式,如代码清单5-4所示。 代码清单5-4 模拟条件表达式转换方式1 // C++源码说明:if…else…模拟条件表达式转换方式1
if (argc == 0){ // 等价条件表达式中的表达式1
// 修改上例,将上例中的printf函数替换成变量赋值语句
argc = 5; // 等价条件表达式中的表达式2
}else{
// 代码上例,将上例中的printf函数替换成变量赋值语句
argc = 6; // 等价条件表达式中的表达式3
}
// 防止变量被优化处理
printf("%d \r\n", argc);
// Debug调试版,由于注重调试功能,没有进行优化,反汇编讲解如下
22: if (argc == 0){
; 直接与0进行比较,注意后面的jne,如果不相等就跳走,C源码中的逻辑与汇编代码相反
00401098 cmp dword ptr [ebp+8],0
0040109C jne main+27h (004010a7)
23: argc = 5;
; 这里是if语句块的内容,将参数赋值为5
0040109E mov dword ptr [ebp+8],5
24: }else{
; 注意这里的跳转,正好跳出了else块
004010A5 jmp main+2Eh (004010ae)
25: argc = 6;
; 这里是else语句块的内容,将参数赋值为6
004010A7 mov dword ptr [ebp+8],6
26: }
27: printf("%d \r\n", argc);
; printf函数汇编讲解略
004010AE ......按if…else…的逻辑,如果满足if条件,则执行if语句块;否则执行else语句块,两者有且仅有一个会执行。所以,如果编译器生成的代码在0040109C处的跳转条件成立,则必须到达else块的代码开始处。而004010A5处有个无条件跳转jmp,它的作用是绕过else块,因为如果能执行到这个jmp,if条件必然成立,对应的反汇编代码处的跳转条件必然不能成立,且if语句块已经执行完毕。由此,我们可以将这里的两处跳转指令作为“指路明灯”,准确划分if块和else块的边界。 总结: ; 先执行影响标志位的相关指令 jxx ELSE_BEGIN ; 该地址为else语句块的首地址 IF_BEGIN: …… ; if语句块内的执行代码 IF_END: jmp ELSE_END ; 跳转到else语句块的结束地址 ELSE_BEGIN: …… ; else语句块内的执行代码 ELSE_END: 如果遇到以上指令序列,先考察其中的两个跳转指令,当第一个条件跳转指令跳转到地址ELSE_BEGIN处之前有个JMP指令,则可将其视为由if…else…组合而成的双分支结构。根据这两个跳转指令可以得到if和else语句块的代码边界。通过cmp与jxx可还原出if的比较信息,jmp指令之后即为else块的开始。依此分析,即可逆向分析出if…else…组合的原型。 在Debug编译模式下,所使用的编译选项是Od+ZI,于是在这里不能做流水线优化,分支必须存在,以便于开发者设置断点观察程序流程。 使用O2优化选项,重新编译代码清单5-4。通过IDA查看优化后的反汇编代码,如代码清单5-5所示。 代码清单5-5 模拟条件表达式转换方案1—Release版 ; 参数标记定义,arg_表示函数参数1 arg_0= dword ptr 4 ; 将取得的参数数据放到edx中 mov edx, [esp+arg_0] ; 将eax清0 xor eax, eax ; 对edx和edx执行相与操作,结果不影响edx test edx, edx ; 检查ZF标记位,edx不等于0则al=1,反之al=0,这里的操作与代码清单4-14类似 setnz al add eax, 5 ;到此,eax的取值只可能是5或6,如果edx为0,则eax为5,反之则为6 push eax push offset Format ; "%d \r\n" call _printf add esp, 8 retn 代码清单5-5中的这些指令似曾相识,与条件表达式使用了同样的优化手法。其他3种优化方案同样适用于if…else…。通过以上分析,得出VC++ 6.0编译的代码,在很多情况下,会发现条件表达式的反汇编代码和if…else…组合是一样的,这时,可以根据个人习惯还原出等价的高级代码。 有时候会遇到复杂的条件表达式作为分支或者循环结构的判定条件的情况,这时即使直接阅读高级源码也会让人抓狂。在没有高级源码的情况下,分析者需要先定位语句块的边界,然后根据跳转目标和逻辑依赖慢慢反推出高级代码。 |

操作理由
RANk
{{ user_info.golds == '' ? 0 : user_info.golds }}
雪币
{{ experience }}
课程经验
{{ score }}
学习收益
{{study_duration_fmt}}
学习时长
基本信息
荣誉称号:
{{ honorary_title }}
勋章
兑换勋章

证书
证书查询 >
能力值

